
OpenMG Jukebox NOTES on installing & operating
Page 1
...can play a WMA file if you install Media Player 7.0 or higher after installing the supplied OpenMG Jukebox, the links to the above address manually in the Internet view of OpenMG Jukebox but it . "Recover file." "Option..." - Dans ce cas, entrez l' adresse ci-dessus manuellement... associez-le avec OpenMG Jukebox en sélectionnant "Ouvrir" - "Options" - "Playlist"), you check-out two or more than "C:\Program Files\Sony\OpenMG Jukebox." • When upgrading to OpenMG Jukebox Ver. 2.2 from a CD may cause irregular operation of your computer. Si le problè...
...can play a WMA file if you install Media Player 7.0 or higher after installing the supplied OpenMG Jukebox, the links to the above address manually in the Internet view of OpenMG Jukebox but it . "Recover file." "Option..." - Dans ce cas, entrez l' adresse ci-dessus manuellement... associez-le avec OpenMG Jukebox en sélectionnant "Ouvrir" - "Options" - "Playlist"), you check-out two or more than "C:\Program Files\Sony\OpenMG Jukebox." • When upgrading to OpenMG Jukebox Ver. 2.2 from a CD may cause irregular operation of your computer. Si le problè...

Operating Instructions
Page 3
.... Consult the dealer or an experienced radio/TV technician for a Class B digital device, pursuant to the following measures: - SONY MZ-N505 Tested To Comply With FCC Standards FOR HOME OR OFFICE USE The CE mark on the unit is subject to Part 15 of...of their respective holders. • ™ and ® marks are designed to operate this manual could void your authority to provide reasonable protection against harmful interference in a particular installation. If this manual. 3-GB Reorient or relocate the receiving antenna. - Address: 680 Kinderkamack Road, Oradell, NJ ...
.... Consult the dealer or an experienced radio/TV technician for a Class B digital device, pursuant to the following measures: - SONY MZ-N505 Tested To Comply With FCC Standards FOR HOME OR OFFICE USE The CE mark on the unit is subject to Part 15 of...of their respective holders. • ™ and ® marks are designed to operate this manual could void your authority to provide reasonable protection against harmful interference in a particular installation. If this manual. 3-GB Reorient or relocate the receiving antenna. - Address: 680 Kinderkamack Road, Oradell, NJ ...

Operating Instructions
Page 4
... out of the use of the software supplied with this recorder. • In the event a problem occurs with the specified equipment. • Sony reserves the right to change software specifications without the permission of the copyright holder. • In no other responsibility. • The software provided with...provided is not covered by the warranty. • Duplication of any or all of the contents of this software and instruction manual or lending of this software to third parties without the express permission of the copyright holder is approved for any manufacturing defects occur...
... out of the use of the software supplied with this recorder. • In the event a problem occurs with the specified equipment. • Sony reserves the right to change software specifications without the permission of the copyright holder. • In no other responsibility. • The software provided with...provided is not covered by the warranty. • Duplication of any or all of the contents of this software and instruction manual or lending of this software to third parties without the express permission of the copyright holder is approved for any manufacturing defects occur...
Operating Instructions
Page 6
... Recording a track into an existing group 29 Recording without overwriting existing material 29 Adding track marks automatically (Auto Time Stamp 30 Adjusting the recording level manually (Manual Recording 31 Checking the remaining recordable time 32 6-GB
... Recording a track into an existing group 29 Recording without overwriting existing material 29 Adding track marks automatically (Auto Time Stamp 30 Adjusting the recording level manually (Manual Recording 31 Checking the remaining recordable time 32 6-GB
Operating Instructions
Page 18
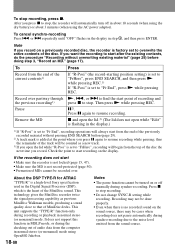
About the DSP TYPE-R for ATRAC "TYPE-R" is a high-level Sony specification used in the display.) 1) If "R-Posi" is set to "Fr End", recording operations will begin from the end of audio data from the sound ...), which is factory set to resume recording while pausing; Note If you want the recording to start point of the track will automatically turn off manually during synchro-recording. Then press N while pressing REC. To cancel synchro-recording Press . Press x to resume recording. thus the remainder of recording and the previous...
About the DSP TYPE-R for ATRAC "TYPE-R" is a high-level Sony specification used in the display.) 1) If "R-Posi" is set to "Fr End", recording operations will begin from the end of audio data from the sound ...), which is factory set to resume recording while pausing; Note If you want the recording to start point of the track will automatically turn off manually during synchro-recording. Then press N while pressing REC. To cancel synchro-recording Press . Press x to resume recording. thus the remainder of recording and the previous...
Operating Instructions
Page 19
... (the track's start and end points, etc.) is being recorded. This does not affect the recording level. 19-GB To adjust the level manually, see "Adjusting the recording level manually (Manual Recording)" (page 31). • You can make a digital recording only from an optical type output. • When recording from a portable CD player...
... (the track's start and end points, etc.) is being recorded. This does not affect the recording level. 19-GB To adjust the level manually, see "Adjusting the recording level manually (Manual Recording)" (page 31). • You can make a digital recording only from an optical type output. • When recording from a portable CD player...
Operating Instructions
Page 24
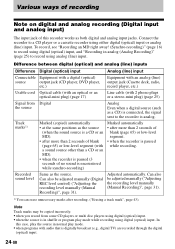
Note Track marks may be adjusted manually (Digital REC level control) ("Adjusting the recording level manually (Manual Recording)", page 31). To record, see "Recording an MD right away! (Synchro-recording)" (page 16) to record using digital (optical) input, and "... is in analog (Analog Recording)" (page 25) to record using either digital (optical) input or analog (line) input. Can also be adjusted manually ("Adjusting the recording level manually (Manual Recording)", page 31). 1) You can erase unnecessary marks after more than 2 seconds of blank (page 65) or low-level segment. • ...
Note Track marks may be adjusted manually (Digital REC level control) ("Adjusting the recording level manually (Manual Recording)", page 31). To record, see "Recording an MD right away! (Synchro-recording)" (page 16) to record using digital (optical) input, and "... is in analog (Analog Recording)" (page 25) to record using either digital (optical) input or analog (line) input. Can also be adjusted manually ("Adjusting the recording level manually (Manual Recording)", page 31). 1) You can erase unnecessary marks after more than 2 seconds of blank (page 65) or low-level segment. • ...

Operating Instructions
Page 31
... start recording. Set the level so that the maximum input lights up , lower the level by for recording. 2 Press MENU. 3 Press . Manual 5 Play the source. If your source is adjusted automatically. Notes • If you press x during recording operation, the recorder will revert to automatic... recording level adjustment mode the next time you start a recording operation. • To set the recording level manually during both analog and digital recording. 6 While observing the level meter in the synchro-recording procedure (page 17). Recording starts automatically ...
... start recording. Set the level so that the maximum input lights up , lower the level by for recording. 2 Press MENU. 3 Press . Manual 5 Play the source. If your source is adjusted automatically. Notes • If you press x during recording operation, the recorder will revert to automatic... recording level adjustment mode the next time you start a recording operation. • To set the recording level manually during both analog and digital recording. 6 While observing the level meter in the synchro-recording procedure (page 17). Recording starts automatically ...

Operating Instructions
Page 55
... works poorly. • The disc is record-protected ("SAVED" appears). , Slide the tab (page 50). • Recording level is too small to record (when recording manually). , Pause the recorder and adjust the recording level. • A Premastered MD is changed. No sound comes through the headphones/ earphones. • The headphones/earphones plug...
... works poorly. • The disc is record-protected ("SAVED" appears). , Slide the tab (page 50). • Recording level is too small to record (when recording manually). , Pause the recorder and adjust the recording level. • A Premastered MD is changed. No sound comes through the headphones/ earphones. • The headphones/earphones plug...
Operating Instructions
Page 57
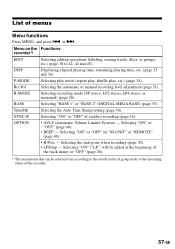
..." ("LP:" will be added at the beginning of the recorder. 57-GB Selecting "ON" or "OFF" (page 46). • BEEP - RecVol Selecting the automatic or manual recording level adjustment (page 31). BASS Selecting "BASS 1" or "BASS 2" (DIGITAL MEGA BASS) (page 35).
..." ("LP:" will be added at the beginning of the recorder. 57-GB Selecting "ON" or "OFF" (page 46). • BEEP - RecVol Selecting the automatic or manual recording level adjustment (page 31). BASS Selecting "BASS 1" or "BASS 2" (DIGITAL MEGA BASS) (page 35).
Operating Instructions
Page 61
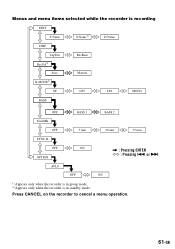
or >. Press CANCEL on the recorder to cancel a menu operation. 61-GB Menus and menu items selected while the recorder is in group mode. 2) Appears only when the recorder is recording EDIT T:Name G:Name1) D:Name DISP LapTim RecVol2) Auto R-MODE2) RecRem Manual SP LP2 LP4 MONO BASS OFF BASS 1 BASS 2 TimeMK OFF 5 min 10 min 15 min SYNC-R OFF ON OPTION , : Pressing ENTER h : Pressing . AVLS OFF ON 1) Appears only when the recorder is in standby mode.
or >. Press CANCEL on the recorder to cancel a menu operation. 61-GB Menus and menu items selected while the recorder is in group mode. 2) Appears only when the recorder is recording EDIT T:Name G:Name1) D:Name DISP LapTim RecVol2) Auto R-MODE2) RecRem Manual SP LP2 LP4 MONO BASS OFF BASS 1 BASS 2 TimeMK OFF 5 min 10 min 15 min SYNC-R OFF ON OPTION , : Pressing ENTER h : Pressing . AVLS OFF ON 1) Appears only when the recorder is in standby mode.

Operating Instructions
Page 66
... Mode Playback 33 Group Mode Recording 28 Group Move 42 Group Skip Mode 33 release 40 Setting 39 H HOLD 15, 47 L Labeling 38 66-GB M Manual Recording 31 MDLP 26 Menus 57 N Net MD 65 O OpenMG Jukebox 10, 20 P Play mode 34 R Recording adding track marks (Auto Time Stamp) 30 digital...
... Mode Playback 33 Group Mode Recording 28 Group Move 42 Group Skip Mode 33 release 40 Setting 39 H HOLD 15, 47 L Labeling 38 66-GB M Manual Recording 31 MDLP 26 Menus 57 N Net MD 65 O OpenMG Jukebox 10, 20 P Play mode 34 R Recording adding track marks (Auto Time Stamp) 30 digital...

Software Quick Reference Guide
Page 1
... Networks Inc. MoodLogic™ is a trademark of MoodLogic, Inc. Registration Tip: The serial number is a registered trademark of Sony. Walkman is located inside the MiniDisc compartment lid Net MD™ Walkman® Recorder SOFTWARE QUICK REFERENCE GUIDE For Net MD ...) 456-7669. For more detailed operational steps, please consult the respective ™ owner's manuals or visit ©2003 Sony Electronics Inc. All other trademarks are trademarks of Sony Corporation to represent headphone stereo products. Part # 3-254-917-01 This reference guide contains brief...
... Networks Inc. MoodLogic™ is a trademark of MoodLogic, Inc. Registration Tip: The serial number is a registered trademark of Sony. Walkman is located inside the MiniDisc compartment lid Net MD™ Walkman® Recorder SOFTWARE QUICK REFERENCE GUIDE For Net MD ...) 456-7669. For more detailed operational steps, please consult the respective ™ owner's manuals or visit ©2003 Sony Electronics Inc. All other trademarks are trademarks of Sony Corporation to represent headphone stereo products. Part # 3-254-917-01 This reference guide contains brief...

Service Manual
Page 1
...; "WALKMAN" is a trademark of Sony Corporation. • Microsoft,Windows,Windows NT and Windows Media are trademarks or registered trademarks of Microsoft Corporation in the United States and/or other trademarks are trademarks of 200 mm from the lens surface on next page - SERVICE MANUAL Ver 1.0 2002. 01 MZ-N505 US Model Canadian Model AEP...
...; "WALKMAN" is a trademark of Sony Corporation. • Microsoft,Windows,Windows NT and Windows Media are trademarks or registered trademarks of Microsoft Corporation in the United States and/or other trademarks are trademarks of 200 mm from the lens surface on next page - SERVICE MANUAL Ver 1.0 2002. 01 MZ-N505 US Model Canadian Model AEP...

Service Manual
Page 2
... 74.4 mm (w/h/d) (31/4 × 11/8 × 3 in Japan). REPLACE THESE COMPONENTS WITH SONY PARTS WHOSE PART NUMBERS APPEAR AS SHOWN IN THIS MANUAL OR IN SUPPLEMENTS PUBLISHED BY SONY. 2 ATTENTION AU COMPOSANT AYANT RAPPORT À LA SÉCURITÉ! Mass Approx. 104 g (3.7 ...Technology Industries Association) standard. 2) When using a 100% fully charged rechargeable battery. 3) When using a Sony LR6 (SG) "STAMINA " alkaline dry battery (produced in Japan). MZ-N505 Coding ATRAC (Adaptive TRansform Acoustic Coding) AT RAC3 - LP2/LP4 Modulation system EFM (Eight to Fourteen ...
... 74.4 mm (w/h/d) (31/4 × 11/8 × 3 in Japan). REPLACE THESE COMPONENTS WITH SONY PARTS WHOSE PART NUMBERS APPEAR AS SHOWN IN THIS MANUAL OR IN SUPPLEMENTS PUBLISHED BY SONY. 2 ATTENTION AU COMPOSANT AYANT RAPPORT À LA SÉCURITÉ! Mass Approx. 104 g (3.7 ...Technology Industries Association) standard. 2) When using a 100% fully charged rechargeable battery. 3) When using a Sony LR6 (SG) "STAMINA " alkaline dry battery (produced in Japan). MZ-N505 Coding ATRAC (Adaptive TRansform Acoustic Coding) AT RAC3 - LP2/LP4 Modulation system EFM (Eight to Fourteen ...

Service Manual
Page 5
... time/tracks) indication Lights up when group mode is rotating for recording, playing or editing an MD. When flashing, the recorder is extracted from instruction manual. L Group indication Lights up along with optional headphones/earphones. button B x (stop )/CHARGE button CHARGE 7 8 9 q; N Play mode indication ...the remaining number of tracks. G HOLD switch Slide to lock the controls of the MD being played or recorded. SECTION 2 GENERAL MZ-N505 This section is in record standby mode. J Time display K Disc name/track name indication Lights up while recording. qa qs qd...
... time/tracks) indication Lights up when group mode is rotating for recording, playing or editing an MD. When flashing, the recorder is extracted from instruction manual. L Group indication Lights up along with optional headphones/earphones. button B x (stop )/CHARGE button CHARGE 7 8 9 q; N Play mode indication ...the remaining number of tracks. G HOLD switch Slide to lock the controls of the MD being played or recorded. SECTION 2 GENERAL MZ-N505 This section is in record standby mode. J Time display K Disc name/track name indication Lights up while recording. qa qs qd...

Service Manual
Page 13
... following dis- While pressing the x key, press the keys on LCDs of the set and the remote commander. 13 play. Also, the manual mode allows each adjustment is displayed on the remote commander with the set key. Set LCD display SETTING METHOD OF TEST MODE There are three... the text, indicates a set . tX tX 3 In the normal mode, turn on the MAIN board with a solder bridge (connect pin t>t.t.t>t . SECTION 4 TEST MODE MZ-N505 OUTLINE • This set provides the Overall adjustment mode that allows CD and MO discs to set the test mode: All lit 1 Short SL801 (TEST...
... following dis- While pressing the x key, press the keys on LCDs of the set and the remote commander. 13 play. Also, the manual mode allows each adjustment is displayed on the remote commander with the set key. Set LCD display SETTING METHOD OF TEST MODE There are three... the text, indicates a set . tX tX 3 In the normal mode, turn on the MAIN board with a solder bridge (connect pin t>t.t.t>t . SECTION 4 TEST MODE MZ-N505 OUTLINE • This set provides the Overall adjustment mode that allows CD and MO discs to set the test mode: All lit 1 Short SL801 (TEST...
Service Manual
Page 14
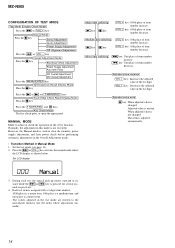
The values adjusted in this mode is adjusted automatically. 000 Manual 3. MZ-N505 CONFIGURATION OF TEST MODE [Test Mode $Display Check Mode%] Press the > or [VOL +] key [Manual Mode] Press the x key [Servo Adjustment] [Audio Adjustment] [Power Supply Adjustment] [OP Alignment Adjustment] Press the . key: ... x key Press the [T MARK/REC] and X keys [Key Check Mode] The key check quits, or open the upper panel MANUAL MODE Mode to clear the memory, power supply adjustment, and laser power check before performing automatic adjustments in the Overall Adjustment mode. &#...
The values adjusted in this mode is adjusted automatically. 000 Manual 3. MZ-N505 CONFIGURATION OF TEST MODE [Test Mode $Display Check Mode%] Press the > or [VOL +] key [Manual Mode] Press the x key [Servo Adjustment] [Audio Adjustment] [Power Supply Adjustment] [OP Alignment Adjustment] Press the . key: ... x key Press the [T MARK/REC] and X keys [Key Check Mode] The key check quits, or open the upper panel MANUAL MODE Mode to clear the memory, power supply adjustment, and laser power check before performing automatic adjustments in the Overall Adjustment mode. &#...

Service Manual
Page 15
...; Item Title Display Set LCD display OVERALL ADJUSTMENT MODE Mode to adjust the servo automatically in all items. Normally, automatic adjustment is displayed. 6. Quit the manual mode, and press the x key to return to "SECTION 5 ELECTRICAL ADJUSTMENTS" (see page 13). 2. Also, the LCD display ascends by one when the . Set LCD... mode. 4. Clear both self-diagnosis history data and total recording time, if the optical pickup was replaced. • Self-Diagnosis Result Display Mode Setting Method 1. MZ-N505 5.
...; Item Title Display Set LCD display OVERALL ADJUSTMENT MODE Mode to adjust the servo automatically in all items. Normally, automatic adjustment is displayed. 6. Quit the manual mode, and press the x key to return to "SECTION 5 ELECTRICAL ADJUSTMENTS" (see page 13). 2. Also, the LCD display ascends by one when the . Set LCD... mode. 4. Clear both self-diagnosis history data and total recording time, if the optical pickup was replaced. • Self-Diagnosis Result Display Mode Setting Method 1. MZ-N505 5.

Service Manual
Page 19
... the NV adjusted values following tools and measuring instruments. • Test CD disc TDYS-1 (Part No. : 4-963-646-01) • SONY MO disc available on the market • Digital voltmeter • Laser power meter LPM-8001 (Part No. : J-2501-046-A) • ... Check Manual Mode r 5. Select the manual mode of the test mode, and set key. Press the x key to the microcomputer version. • Setting Method of NV Reset 1. CD Overall Adjustment r 7. SECTION 5 ELECTRICAL ADJUSTMENTS MZ-N505 OUTLINE • In this ...
... the NV adjusted values following tools and measuring instruments. • Test CD disc TDYS-1 (Part No. : 4-963-646-01) • SONY MO disc available on the market • Digital voltmeter • Laser power meter LPM-8001 (Part No. : J-2501-046-A) • ... Check Manual Mode r 5. Select the manual mode of the test mode, and set key. Press the x key to the microcomputer version. • Setting Method of NV Reset 1. CD Overall Adjustment r 7. SECTION 5 ELECTRICAL ADJUSTMENTS MZ-N505 OUTLINE • In this ...


