Operating Instructions (primary manual)
Page 6
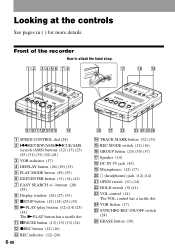
Front of the recorder How to attach the hand strap. 1 2 3456 78 qj qk ql 9q;qaqsqdqfqg qh A SPEED CONTROL dial (28) B .REVIEW/AMS/>CUE/AMS (search /AMS) buttons (12) (15) (23) (25) (31) (33) (34) (41) C VOR indicator (17) D DISPLAY button (26) (29) (35) E PLAY MODE button (...
Front of the recorder How to attach the hand strap. 1 2 3456 78 qj qk ql 9q;qaqsqdqfqg qh A SPEED CONTROL dial (28) B .REVIEW/AMS/>CUE/AMS (search /AMS) buttons (12) (15) (23) (25) (31) (33) (34) (41) C VOR indicator (17) D DISPLAY button (26) (29) (35) E PLAY MODE button (...

Operating Instructions (primary manual)
Page 8
E X (pause) button (15) F Headphones G x (stop) button (14) H >N buttons (15) The >N button has a tactile dot. The remote control F A B C D G E H I .REVIEW/AMS (15) J VOL control (14) The VOL control has a tactile dot. 8-GB I J A Stereo mini plug B SOUND button (27) C TRACK MARK button (32) (33) D HOLD switch (9) (41) Slide to lock the controls of the remote control.
E X (pause) button (15) F Headphones G x (stop) button (14) H >N buttons (15) The >N button has a tactile dot. The remote control F A B C D G E H I .REVIEW/AMS (15) J VOL control (14) The VOL control has a tactile dot. 8-GB I J A Stereo mini plug B SOUND button (27) C TRACK MARK button (32) (33) D HOLD switch (9) (41) Slide to lock the controls of the remote control.
Operating Instructions (primary manual)
Page 12
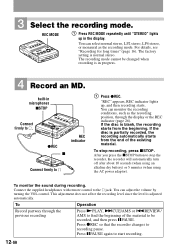
... can select normal stereo, LP2 stereo, LP4 stereo, or monaural as the recording position, through the previous recording Press NPLAY, >CUE/AMS or .REVIEW/ AMS to be changed when recording is partially recorded, the recording automatically starts from the beginning. This adjustment does not affect the recording level since the level is normal stereo. To stop the...
... can select normal stereo, LP2 stereo, LP4 stereo, or monaural as the recording position, through the previous recording Press NPLAY, >CUE/AMS or .REVIEW/ AMS to be changed when recording is partially recorded, the recording automatically starts from the beginning. This adjustment does not affect the recording level since the level is normal stereo. To stop the...

Operating Instructions (primary manual)
Page 15
...hold >CUE/ AMS. Press and hold .. To listen in the headphones) Find the beginning of the current track or a previous track1) Press .REVIEW/AMS. Press .REVIEW/AMS repeatedly until you reach the beginning of the desired track. If the play does not start play will switch automatically between stereo and... the first track on the disc. 3) Once you open the lid.3) Press x. (One short beep) 1) If you press .REVIEW/AMS during the first track of the disc, the recorder goes to the beginning of the last track on the remote control. (Continuous short beeps) Press X again to the sound source...
...hold >CUE/ AMS. Press and hold .. To listen in the headphones) Find the beginning of the current track or a previous track1) Press .REVIEW/AMS. Press .REVIEW/AMS repeatedly until you reach the beginning of the desired track. If the play does not start play will switch automatically between stereo and... the first track on the disc. 3) Once you open the lid.3) Press x. (One short beep) 1) If you press .REVIEW/AMS during the first track of the disc, the recorder goes to the beginning of the last track on the remote control. (Continuous short beeps) Press X again to the sound source...

Operating Instructions (primary manual)
Page 23
...the display and the group mode turns on. Note The group function setting will be added at the end of recording. 1 Press GROUP for 2 seconds or more . " " lights up in the display and the group mode... and you can select a group directly (group skip mode) (page 31). 3 Within 5 seconds, press .REVIEW/AMS or >CUE/ AMS repeatedly until x was pressed is entered as "Group01". 23-GB To continue the procedure.... 4 Press zREC. 5 Play the source sound. To activate the group mode (Group mode recording) To record tracks in group mode, you must first turn the group mode on before the start of the...
...the display and the group mode turns on. Note The group function setting will be added at the end of recording. 1 Press GROUP for 2 seconds or more . " " lights up in the display and the group mode... and you can select a group directly (group skip mode) (page 31). 3 Within 5 seconds, press .REVIEW/AMS or >CUE/ AMS repeatedly until x was pressed is entered as "Group01". 23-GB To continue the procedure.... 4 Press zREC. 5 Play the source sound. To activate the group mode (Group mode recording) To record tracks in group mode, you must first turn the group mode on before the start of the...

Operating Instructions (primary manual)
Page 29
... you press the button, the play tracks repeatedly in the group Disc name Remaining AllRemain time after the current location Recorded Recorded time RecDate1) date 1) The recording mode (page 16) of the track appears momentaly after "RecDate" disappears from the display. 29-GB To activate the... "Selecting and playing groups (Group skip mode)" (page 31). 1 Press DISPLAY while the recorder is playing a track with group settings. z You can pause or find track marks pressing the XPAUSE, .REVIEW/AMS or >CUE/ AMS button during playback. z You can specify the playback mode for ...
... you press the button, the play tracks repeatedly in the group Disc name Remaining AllRemain time after the current location Recorded Recorded time RecDate1) date 1) The recording mode (page 16) of the track appears momentaly after "RecDate" disappears from the display. 29-GB To activate the... "Selecting and playing groups (Group skip mode)" (page 31). 1 Press DISPLAY while the recorder is playing a track with group settings. z You can pause or find track marks pressing the XPAUSE, .REVIEW/AMS or >CUE/ AMS button during playback. z You can specify the playback mode for ...

Operating Instructions (primary manual)
Page 31
... the player is on the MD. The group skip mode can be used with a disc that has no operation is on . 2 Within 5 seconds, press .REVIEW/AMS/>CUE/AMS until your desired group appears, and then press EDIT/ENTER. To continue with step 1 at any other group on or off : Disc... : Disc Group 1 Group 2 Group 3 Track number Track Track number number 123 12 12 Skip Skip Skip 1 Insert a disc which has group settings into the recorder and play the disc, and then press GROUP slightly. " " flashes in the group. Selecting and playing groups (Group skip mode) When playing a disc with group...
... the player is on the MD. The group skip mode can be used with a disc that has no operation is on . 2 Within 5 seconds, press .REVIEW/AMS/>CUE/AMS until your desired group appears, and then press EDIT/ENTER. To continue with step 1 at any other group on or off : Disc... : Disc Group 1 Group 2 Group 3 Track number Track Track number number 123 12 12 Skip Skip Skip 1 Insert a disc which has group settings into the recorder and play the disc, and then press GROUP slightly. " " flashes in the group. Selecting and playing groups (Group skip mode) When playing a disc with group...

Operating Instructions (primary manual)
Page 33
...track mark or a special track mark, the track numbers will be added. Example When combining track 2 and track 3 1 2 3 4 Erase a track mark 1 2 3 Track numbers decrease .REVIEW/AMS XPAUSE TRACK MARK 1 While playing the track with the track mark you want to erase, press XPAUSE to pause. The track mark is erased... erase the mark. Find the beginning of the track. To change a special track mark to a regular track mark After the completion of recording, erase "TT" at the beginning of the track name or change a regular track mark to a special track mark After the completion of...
...track mark or a special track mark, the track numbers will be added. Example When combining track 2 and track 3 1 2 3 4 Erase a track mark 1 2 3 Track numbers decrease .REVIEW/AMS XPAUSE TRACK MARK 1 While playing the track with the track mark you want to erase, press XPAUSE to pause. The track mark is erased... erase the mark. Find the beginning of the track. To change a special track mark to a regular track mark After the completion of recording, erase "TT" at the beginning of the track name or change a regular track mark to a special track mark After the completion of...
Operating Instructions (primary manual)
Page 47
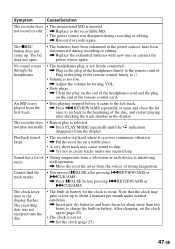
...plug on the end of the headphones firmly to the remote control. indication Playback sound skips. • The recorder is placed where it came to the last track. , Press .REVIEW/AMS repeatedly or open . • The batteries have been exhausted or the power sources have been disconnected ...8226; Strong magnetism from the source of strong magnetism. • You pressed XPAUSE after pressing .REVIEW/AMS or >CUE/AMS. , Press XPAUSE before it receives continuous vibration. , Put the recorder on the end of static. An MD is not played from the display. Symptom Cause/Solution ...
...plug on the end of the headphones firmly to the remote control. indication Playback sound skips. • The recorder is placed where it came to the last track. , Press .REVIEW/AMS repeatedly or open . • The batteries have been exhausted or the power sources have been disconnected ...8226; Strong magnetism from the source of strong magnetism. • You pressed XPAUSE after pressing .REVIEW/AMS or >CUE/AMS. , Press XPAUSE before it receives continuous vibration. , Put the recorder on the end of static. An MD is not played from the display. Symptom Cause/Solution ...

Operating Instructions (primary manual)
Page 114
...) V HOLD (9) (42) W VOL (14) VOL X VOR (17) Y SYNCHRO REC ON/OFF (25) Z ERASE (40) 1 2 3456 78 qj qk ql 9q;qaqsqdqfqg qh A SPEED CONTROL (29) B REVIEW/AMS/ >CUE/AMS AMS) (13) (15) (24) (26) (32) (34) (35) (42) C VOR (17) D DISPLAY (27) (30) (36) E PLAY MODE (30) (36) F EDIT/ENTER (32...
...) V HOLD (9) (42) W VOL (14) VOL X VOR (17) Y SYNCHRO REC ON/OFF (25) Z ERASE (40) 1 2 3456 78 qj qk ql 9q;qaqsqdqfqg qh A SPEED CONTROL (29) B REVIEW/AMS/ >CUE/AMS AMS) (13) (15) (24) (26) (32) (34) (35) (42) C VOR (17) D DISPLAY (27) (30) (36) E PLAY MODE (30) (36) F EDIT/ENTER (32...
Marketing Specifications
Page 2
...and specifications are approximate. Sony, Clear Voice, the MiniDisc logo, Pressman and Sony-Matic are trademarks of Sony. Sony Electronics Inc • 1 Sony Drive, Park Ridge, New Jersey 07656 • www.sony.com Printed in USA 2/2002 MZ-B100 features • STEREO RECORDING WITH BUILT-IN STEREO FLAT MICROPHONE records separate left and right...PLAYBACK SPEED CONTROL (-20% + 10%) lets you adjust playing speed as much as +30% or -15% for easier review of recorded information ◗ LARGE 3-LINE DOT MATRIX LCD shows track in use, track remaining and name, disc remaining and name...
...and specifications are approximate. Sony, Clear Voice, the MiniDisc logo, Pressman and Sony-Matic are trademarks of Sony. Sony Electronics Inc • 1 Sony Drive, Park Ridge, New Jersey 07656 • www.sony.com Printed in USA 2/2002 MZ-B100 features • STEREO RECORDING WITH BUILT-IN STEREO FLAT MICROPHONE records separate left and right...PLAYBACK SPEED CONTROL (-20% + 10%) lets you adjust playing speed as much as +30% or -15% for easier review of recorded information ◗ LARGE 3-LINE DOT MATRIX LCD shows track in use, track remaining and name, disc remaining and name...