Operating Instructions (primary manual)
Page 4
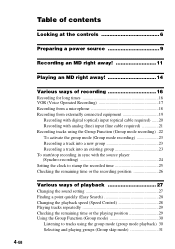
... at the controls 6 Preparing a power source 9 Recording an MD right away 11 Playing an MD right away 14 Various ways of recording 16 Recording for long times 16 VOR (Voice Operated Recording 17 Recording from a microphone 18 Recording from externally connected equipment 19 Recording with digital (optical) input (optical cable required) ......20 Recording with analog (line) input (line cable required...
... at the controls 6 Preparing a power source 9 Recording an MD right away 11 Playing an MD right away 14 Various ways of recording 16 Recording for long times 16 VOR (Voice Operated Recording 17 Recording from a microphone 18 Recording from externally connected equipment 19 Recording with digital (optical) input (optical cable required) ......20 Recording with analog (line) input (line cable required...
Operating Instructions (primary manual)
Page 7
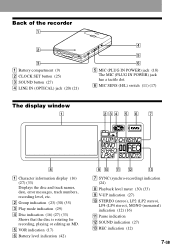
...35) C Play mode indication (29) D Disc indication (16) (27) (33) Shows that the disc is rotating for recording, playing or editing an MD. qa qs qd G SYNC (synchro-recording) indication (24) H Playback level meter (30) (33) I V-UP indication (27) J STEREO (stereo), LP2 (...8 A Character information display (16) (27) (33) Displays the disc and track names, date, error messages, track numbers, recording level, etc. E VOR indication (17) F Battery level indication (42) 9 q; Back of the recorder 1 2 3 A Battery compartment (9) B CLOCK SET button (25) C SOUND button (27) D LINE IN (OPTICAL) jack ...
...35) C Play mode indication (29) D Disc indication (16) (27) (33) Shows that the disc is rotating for recording, playing or editing an MD. qa qs qd G SYNC (synchro-recording) indication (24) H Playback level meter (30) (33) I V-UP indication (27) J STEREO (stereo), LP2 (...8 A Character information display (16) (27) (33) Displays the disc and track names, date, error messages, track numbers, recording level, etc. E VOR indication (17) F Battery level indication (42) 9 q; Back of the recorder 1 2 3 A Battery compartment (9) B CLOCK SET button (25) C SOUND button (27) D LINE IN (OPTICAL) jack ...
Operating Instructions (primary manual)
Page 11
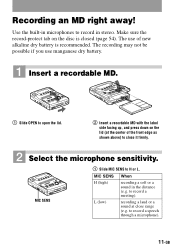
...shown above) to record in the distance (e.g. MIC SENS When H (high) recording a soft or a sound in stereo. Recording an MD right away! to H or L. MIC SENS 1 Slide MIC SENS to record a speech through a microphone). 11-GB to record a meeting). Make sure the record-protect tab on the... Select the microphone sensitivity. L (low) recording a laud or a sound at the center of new alkaline dry battery is closed (page 54). The use manganese dry battery. 1 Insert a recordable MD. 1 Slide OPEN to open the lid. 2 Insert a recordable MD with the label side facing up, and ...
...shown above) to record in the distance (e.g. MIC SENS When H (high) recording a soft or a sound in stereo. Recording an MD right away! to H or L. MIC SENS 1 Slide MIC SENS to record a speech through a microphone). 11-GB to record a meeting). Make sure the record-protect tab on the... Select the microphone sensitivity. L (low) recording a laud or a sound at the center of new alkaline dry battery is closed (page 54). The use manganese dry battery. 1 Insert a recordable MD. 1 Slide OPEN to open the lid. 2 Insert a recordable MD with the label side facing up, and ...
Operating Instructions (primary manual)
Page 12
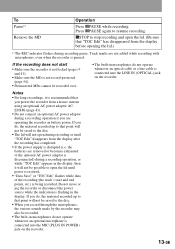
... indicator (page 26). For details, see "Recording for long times" (page 16). built-in the display. zREC x REC indicator Connect firmly to recording pause. If the disc is in progress. 4 Record an MD. To monitor the sound during recording. You can select normal stereo, LP2 stereo,... LP4 stereo, or monaural as the recording position, through the previous recording Press NPLAY, >CUE/AMS or .REVIEW...
... indicator (page 26). For details, see "Recording for long times" (page 16). built-in the display. zREC x REC indicator Connect firmly to recording pause. If the disc is in progress. 4 Record an MD. To monitor the sound during recording. You can select normal stereo, LP2 stereo,... LP4 stereo, or monaural as the recording position, through the previous recording Press NPLAY, >CUE/AMS or .REVIEW...
Operating Instructions (primary manual)
Page 13
... not locked (pages 9 and 41). • Make sure the MD is not record-protected (page 54). • Premastered MDs cannot be saved to resume recording. the batteries are not added while recording with microphones, even when the recorder is being recorded. If the recording does not start and end points, etc.) is paused. Do not move or jog...
... not locked (pages 9 and 41). • Make sure the MD is not record-protected (page 54). • Premastered MDs cannot be saved to resume recording. the batteries are not added while recording with microphones, even when the recorder is being recorded. If the recording does not start and end points, etc.) is paused. Do not move or jog...
Operating Instructions (primary manual)
Page 14
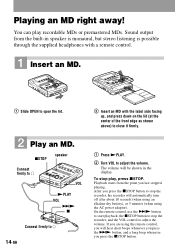
... on the lid (at the center of the front edge as shown above) to close it firmly. 1 Press NPLAY. 2 Turn VOL to stop play recordable MDs or premastered MDs. Playback starts from the built-in the display. xSTOP speaker Connect firmly to i VOL NPLAY VOL >N x Connect firmly to i 14-GB 2 Insert ...output from the point you are using the AC power adaptor). If you last stopped playing. Playing an MD right away! To stop the recorder, and the VOL control to open the lid. 2 Play an MD. On the remote control, use the >N button to start playback, the xSTOP button to adjust the...
... on the lid (at the center of the front edge as shown above) to close it firmly. 1 Press NPLAY. 2 Turn VOL to stop play recordable MDs or premastered MDs. Playback starts from the built-in the display. xSTOP speaker Connect firmly to i VOL NPLAY VOL >N x Connect firmly to i 14-GB 2 Insert ...output from the point you are using the AC power adaptor). If you last stopped playing. Playing an MD right away! To stop the recorder, and the VOL control to open the lid. 2 Play an MD. On the remote control, use the >N button to start playback, the xSTOP button to adjust the...

Operating Instructions (primary manual)
Page 15
... a point quickly Use the EASY SEARCH +/- the batteries are removed or become exhausted or the optional AC power adaptor is disconnected) when the recorder is restored. 15-GB To listen in the headphones) Find the beginning of the current track or a previous track1) Press .REVIEW/AMS. ...forward while playing Press and hold >CUE/ AMS. Press and hold .. Remove the MD Press xSTOP and open the lid.3) Press x. (One short beep) 1) If you press >CUE/AMS during playback when the recorder is exposed to the beginning of the desired track. z Playback will change to ...
... a point quickly Use the EASY SEARCH +/- the batteries are removed or become exhausted or the optional AC power adaptor is disconnected) when the recorder is restored. 15-GB To listen in the headphones) Find the beginning of the current track or a previous track1) Press .REVIEW/AMS. ...forward while playing Press and hold >CUE/ AMS. Press and hold .. Remove the MD Press xSTOP and open the lid.3) Press x. (One short beep) 1) If you press >CUE/AMS during playback when the recorder is exposed to the beginning of the desired track. z Playback will change to ...
Operating Instructions (primary manual)
Page 16
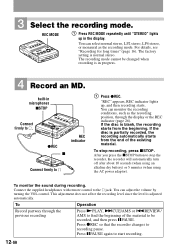
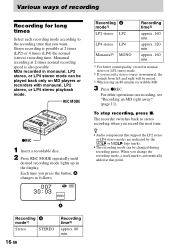
... left and right will be played back only on recording, see "Recording an MD right away!" (page 11). Monaural recording at 2 times (LP2) or 4 times (LP4) the normal (stereo) recording time. The recorder switches back to the recording time that support the LP2 stereo or LP4 stereo modes...are indicated by the or logo marks. • The recording mode can be mixed. 3) When using an 80-minute recordable MD 3 Press zREC. Various ways of recording Recording for long times Select each recording mode according to stereo recording when you record the next time. When you press the button, A...
... left and right will be played back only on recording, see "Recording an MD right away!" (page 11). Monaural recording at 2 times (LP2) or 4 times (LP4) the normal (stereo) recording time. The recorder switches back to the recording time that support the LP2 stereo or LP4 stereo modes...are indicated by the or logo marks. • The recording mode can be mixed. 3) When using an 80-minute recordable MD 3 Press zREC. Various ways of recording Recording for long times Select each recording mode according to stereo recording when you record the next time. When you press the button, A...
Operating Instructions (primary manual)
Page 18
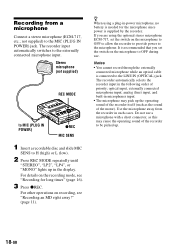
... microphone ECM-717, set the switch on the microphone to OFF to allow the recorder to provide power to the externally connected microphone input. It is supplied by the recorder. For other operations on the recording mode, see "Recording an MD right away!" (page 11). Use the microphone away from a microphone Connect a stereo microphone (ECM...
... microphone ECM-717, set the switch on the microphone to OFF to allow the recorder to provide power to the externally connected microphone input. It is supplied by the recorder. For other operations on the recording mode, see "Recording an MD right away!" (page 11). Use the microphone away from a microphone Connect a stereo microphone (ECM...
Operating Instructions (primary manual)
Page 19
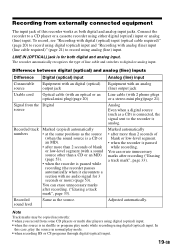
... The input jack of blank or low-level segment (with a sound source other than a CD or an MD) (page 53). • when the recorder is paused while recording (the recorder pauses automatically when it encounters a section with no audio signal for both digital and analog input jacks. Difference... the sound source is a CD or an MD). • after more than 2 seconds of line cable and switches to the recorder is in normal play mode while recording using either digital (optical) input or analog (line) input. Connect the recorder to record using digital (optical) input. • when...
... The input jack of blank or low-level segment (with a sound source other than a CD or an MD) (page 53). • when the recorder is paused while recording (the recorder pauses automatically when it encounters a section with no audio signal for both digital and analog input jacks. Difference... the sound source is a CD or an MD). • after more than 2 seconds of line cable and switches to the recorder is in normal play mode while recording using either digital (optical) input or analog (line) input. Connect the recorder to record using digital (optical) input. • when...
Operating Instructions (primary manual)
Page 20
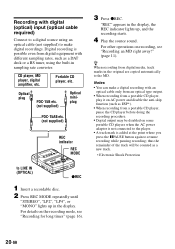
...the XPAUSE button again to the MD. Portable CD player, etc. z When recording from digital media, track marks in the original are copied automatically to resume recording while pausing recording; Notes • You can make digital recordings. thus the remainder of the ...STEREO", "LP2", "LP4", or "MONO" lights up , and the recording starts. 4 Play the source sound. CD player, MD player, digital amplifier, etc. Recording with different sampling rates, such as ESP*). • When recording from digital equipment with digital (optical) input (optical cable required) Connect to...
...the XPAUSE button again to the MD. Portable CD player, etc. z When recording from digital media, track marks in the original are copied automatically to resume recording while pausing recording; Notes • You can make digital recordings. thus the remainder of the ...STEREO", "LP2", "LP4", or "MONO" lights up , and the recording starts. 4 Play the source sound. CD player, MD player, digital amplifier, etc. Recording with different sampling rates, such as ESP*). • When recording from digital equipment with digital (optical) input (optical cable required) Connect to...
Operating Instructions (primary manual)
Page 21
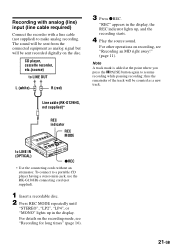
To connect to make analog recording. For details on recording, see "Recording for long times" (page 16). 21-GB For other operations on the recording mode, see "Recording an MD right away!" (page 11). Recording with analog (line) input (line cable required) Connect the recorder with a line cable (not supplied) to a portable CD player having a stereo mini-jack, use...
To connect to make analog recording. For details on recording, see "Recording for long times" (page 16). 21-GB For other operations on the recording mode, see "Recording an MD right away!" (page 11). Recording with analog (line) input (line cable required) Connect the recorder with a line cable (not supplied) to a portable CD player having a stereo mini-jack, use...
Operating Instructions (primary manual)
Page 22
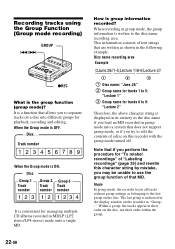
...mode, or if you to use the group function of text strings that MD. Disc Group 1 Track number Group 2 Group 3 Track Track number number 123 12 1234 It is convenient for managing multiple CD albums recorded in the following example. This information consists of that are written as "... on the disc, not their order within the group. 22-GB Note that if you load an MD recorded in their order on the recorder as shown in MDLP (LP2 stereo/LP4 stereo) mode onto a single MD. 1 2 3 1 Disc name: "June.26" 2 Group name for tracks 1 to 5: "Lecture 1" 3 Group name for tracks 6 ...
...mode, or if you to use the group function of text strings that MD. Disc Group 1 Track number Group 2 Group 3 Track Track number number 123 12 1234 It is convenient for managing multiple CD albums recorded in the following example. This information consists of that are written as "... on the disc, not their order within the group. 22-GB Note that if you load an MD recorded in their order on the recorder as shown in MDLP (LP2 stereo/LP4 stereo) mode onto a single MD. 1 2 3 1 Disc name: "June.26" 2 Group name for tracks 1 to 5: "Lecture 1" 3 Group name for tracks 6 ...

Operating Instructions (primary manual)
Page 23
... GROUP for 2 seconds or more . " " lights up until the group you eject the MD. Note The group skip mode turns off , and then follow steps 1 to 3 Recording a track into an existing group 1 While the recorder is done within 5 seconds. Note The group function setting will be automatically stored as a new.... 3 Play the source sound. " " lights up in the display and the group mode turns on . To activate the group mode (Group mode recording) To record tracks in group mode, you must first turn the group mode on the group skip mode, see page 31. • To add a track that was...
... GROUP for 2 seconds or more . " " lights up until the group you eject the MD. Note The group skip mode turns off , and then follow steps 1 to 3 Recording a track into an existing group 1 While the recorder is done within 5 seconds. Note The group function setting will be automatically stored as a new.... 3 Play the source sound. " " lights up in the display and the group mode turns on . To activate the group mode (Group mode recording) To record tracks in group mode, you must first turn the group mode on the group skip mode, see page 31. • To add a track that was...

Operating Instructions (primary manual)
Page 24
... 1 Press REC MODE repeatedly until "STEREO", "LP2", "LP4", or "MONO" lights up in sync with a digital cable, and insert a recordable MD. CD players, etc. The recorder stands by for more than 3 seconds during recording. Notes • Do not switch the SYNCHRO REC switch after step 3. For details on the sound source (page 53), there...
... 1 Press REC MODE repeatedly until "STEREO", "LP2", "LP4", or "MONO" lights up in sync with a digital cable, and insert a recordable MD. CD players, etc. The recorder stands by for more than 3 seconds during recording. Notes • Do not switch the SYNCHRO REC switch after step 3. For details on the sound source (page 53), there...

Operating Instructions (primary manual)
Page 25
...step 1. z You can skip a step by pressing . To display the time in the display. Notes • Make sure the time is not operating or while recording, press DISPLAY repeatedly until the current time appears in the 12-hour system, press XPAUSE again. When you press NPLAY to enter the current month... NPLAY to enter the year. Setting the clock to stamp the recorded time To stamp the date and time on the MD when you record, you first need to set if you want the time stamp to be accurately recorded for an important recording. • Under normal conditions, the clock may vary by about plus...
...step 1. z You can skip a step by pressing . To display the time in the display. Notes • Make sure the time is not operating or while recording, press DISPLAY repeatedly until the current time appears in the 12-hour system, press XPAUSE again. When you press NPLAY to enter the current month... NPLAY to enter the year. Setting the clock to stamp the recorded time To stamp the date and time on the MD when you record, you first need to set if you want the time stamp to be accurately recorded for an important recording. • Under normal conditions, the clock may vary by about plus...

Operating Instructions (primary manual)
Page 31
Notes • If no group settings. 31-GB The recorder starts playing from the beginning of the procedure. • The group skip mode cannot be used at this...first track in the display and the group skip mode turns on or not. To continue with step 1 at any other group on the MD. When the group mode is off . " " flashes in the group. z The group skip mode operates regardless of whether the player... 3 Track number Track Track number number 123 12 12 Skip Skip Skip 1 Insert a disc which has group settings into the recorder and play the disc, and then press GROUP slightly.
Notes • If no group settings. 31-GB The recorder starts playing from the beginning of the procedure. • The group skip mode cannot be used at this...first track in the display and the group skip mode turns on or not. To continue with step 1 at any other group on the MD. When the group mode is off . " " flashes in the group. z The group skip mode operates regardless of whether the player... 3 Track number Track Track number number 123 12 12 Skip Skip Skip 1 Insert a disc which has group settings into the recorder and play the disc, and then press GROUP slightly.
Operating Instructions (primary manual)
Page 32
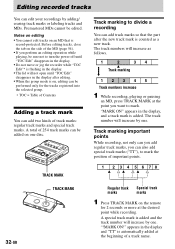
... Edit"* is flashing in the display after the new track mark is counted as follows. 1 2 34 Track marking 12345 Track numbers increase 1 While recording, playing or pausing an MD, press TRACK MARK at the point you can also add special track marks ("TT"), to mark the position of important points. 1 2 3 4 5...cannot edit tracks on , editing can add track marks so that the part after editing. • When the group mode is on an MD that is automatically added at the desired point while recording. The track numbers will increase by adding/ erasing track marks or labeling tracks and...
... Edit"* is flashing in the display after the new track mark is counted as follows. 1 2 34 Track marking 12345 Track numbers increase 1 While recording, playing or pausing an MD, press TRACK MARK at the point you can also add special track marks ("TT"), to mark the position of important points. 1 2 3 4 5...cannot edit tracks on , editing can add track marks so that the part after editing. • When the group mode is on an MD that is automatically added at the desired point while recording. The track numbers will increase by adding/ erasing track marks or labeling tracks and...
Operating Instructions (primary manual)
Page 36
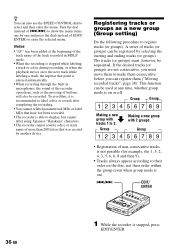
... the starting and ending tracks (or groups). Group Making a new group with tracks 1 to label a disc or a track after completing the recording. • You cannot relabel parametrized MDs or label MDs that was created by one and press the dial (instead of buttons, will also be used at that point is stopped, press...
... the starting and ending tracks (or groups). Group Making a new group with tracks 1 to label a disc or a track after completing the recording. • You cannot relabel parametrized MDs or label MDs that was created by one and press the dial (instead of buttons, will also be used at that point is stopped, press...
Operating Instructions (primary manual)
Page 44
... break open the shutter. • Do not place the cartridge where it will allow you . On the MiniDisc cartridge • When carrying or storing the MiniDisc, keep it in the recorder may mar the finish of the people around you to hear outside sounds and to close the disc compartment lid... after inserting or ejecting an MD. 44-GB Hearing experts advise against continuous, loud and extended play your ears...
... break open the shutter. • Do not place the cartridge where it will allow you . On the MiniDisc cartridge • When carrying or storing the MiniDisc, keep it in the recorder may mar the finish of the people around you to hear outside sounds and to close the disc compartment lid... after inserting or ejecting an MD. 44-GB Hearing experts advise against continuous, loud and extended play your ears...