
Operating Instructions
Page 3
Table of Contents Parts Identification Main unit 4 Remote Control 5 Getting Started Hooking up the optional A/V components 24 Connecting a DVD player 24 Connecting a video game machine ...... 25 Additional Information Precautions 26 Troubleshooting 28 Messages 30 Specifications 30... 21 Adjusting the graphic equalizer and storing 21 Other Features Enhancing video game sound - Daily Timer 23 Optional Components Hooking up the system 6 Inserting two R6 (size AA) batteries into the remote 9 Setting the time 9 Saving the power in standby mode ...... 10 CD Loading a CD 10 Playing ...
Table of Contents Parts Identification Main unit 4 Remote Control 5 Getting Started Hooking up the optional A/V components 24 Connecting a DVD player 24 Connecting a video game machine ...... 25 Additional Information Precautions 26 Troubleshooting 28 Messages 30 Specifications 30... 21 Adjusting the graphic equalizer and storing 21 Other Features Enhancing video game sound - Daily Timer 23 Optional Components Hooking up the system 6 Inserting two R6 (size AA) batteries into the remote 9 Setting the time 9 Saving the power in standby mode ...... 10 CD Loading a CD 10 Playing ...

Operating Instructions
Page 5
...) VOL +/- 9 BUTTON DESCRIPTIONS ?/1 (power) 4 v/V/b/B qg M (fast forward) wd . (go back) wd > (go forward) wd X (pause) wd nN (play) wd m (rewind) wd x (stop) wd 5 Parts Identification Remote Control 12 34 5 wd 6 7 ws 8 9 wa w; 0 qa ql qs qk qd qj qh qf qg CD w; (10 - 12, 17, 18) CLEAR 7 (12) CLOCK/TIMER SELECT...
...) VOL +/- 9 BUTTON DESCRIPTIONS ?/1 (power) 4 v/V/b/B qg M (fast forward) wd . (go back) wd > (go forward) wd X (pause) wd nN (play) wd m (rewind) wd x (stop) wd 5 Parts Identification Remote Control 12 34 5 wd 6 7 ws 8 9 wa w; 0 qa ql qs qk qd qj qh qf qg CD w; (10 - 12, 17, 18) CLEAR 7 (12) CLOCK/TIMER SELECT...
Operating Instructions
Page 8
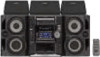
...(front) t CENTER t RIGHT (front) t REAR R (right) t REAR L (left) 3 From your listening position. "PRO LOGIC ON" appears. 2 Press TEST TONE on the remote). Each speaker emits the test tone cyclically in the following order. Adjusting the speaker volume To enjoy Dolby Pro Logic Surround sound, turn on the...the center surround speaker at about 60 to 90 cm above your listening position. 60 to select the volume level. 8 Hooking up the system (continued) Positioning the speakers 1 Place the front speakers at an angle of 45 degrees from your listening position, press REAR/CENTER LEVEL on...
...(front) t CENTER t RIGHT (front) t REAR R (right) t REAR L (left) 3 From your listening position. "PRO LOGIC ON" appears. 2 Press TEST TONE on the remote). Each speaker emits the test tone cyclically in the following order. Adjusting the speaker volume To enjoy Dolby Pro Logic Surround sound, turn on the...the center surround speaker at about 60 to 90 cm above your listening position. 60 to select the volume level. 8 Hooking up the system (continued) Positioning the speakers 1 Place the front speakers at an angle of 45 degrees from your listening position, press REAR/CENTER LEVEL on...

Operating Instructions
Page 9
... Unplug the power cord. Setting the time 1 Turn on the system. 2 Press CLOCK/TIMER SET on the remote) all discs are finished adjusting. on the remote. Inserting two R6 (size AA) batteries into the remote e E E e Tip With normal use the remote for a long period of the center speaker, repeat steps 3... Note The test tone feature works only for about six months. When carrying this system Perform the following procedure to select "SET CLOCK". continued 9 When the remote no longer operates the system, replace both batteries with new ones. The test tone turns off. Proceed to ...
... Unplug the power cord. Setting the time 1 Turn on the system. 2 Press CLOCK/TIMER SET on the remote) all discs are finished adjusting. on the remote. Inserting two R6 (size AA) batteries into the remote e E E e Tip With normal use the remote for a long period of the center speaker, repeat steps 3... Note The test tone feature works only for about six months. When carrying this system Perform the following procedure to select "SET CLOCK". continued 9 When the remote no longer operates the system, replace both batteries with new ones. The test tone turns off. Proceed to ...

Operating Instructions
Page 11
... MODE repeatedly until the mode you want appears in random order. Press X. SHUFFLE 1DISC (Shuffle Play) PROGRAM (Program Play) The tracks on the remote). The tracks on the remote). Other Operations To Stop play Pause Select a track Find a point in a track Select a CD in the order you want to CD function from...
... MODE repeatedly until the mode you want appears in random order. Press X. SHUFFLE 1DISC (Shuffle Play) PROGRAM (Program Play) The tracks on the remote). The tracks on the remote). Other Operations To Stop play Pause Select a track Find a point in a track Select a CD in the order you want to CD function from...

Operating Instructions
Page 12
... track appears in stop mode until "PROGRAM" and "SHUFFLE" disappear. Clear the entire program Press x once in the display. Press DISPLAY (or DSP on the remote). To program Other discs Repeat steps 3 and 5 Other tracks on the same disc 4 and 5 Other tracks on other 3 to 5 discs 7 Press hH ...(or nN on the remote) repeatedly. Tips • The program you select a CD track whose number is 21 or over. Total playing time Disc tray number (including selected track) Track...
... track appears in stop mode until "PROGRAM" and "SHUFFLE" disappear. Clear the entire program Press x once in the display. Press DISPLAY (or DSP on the remote). To program Other discs Repeat steps 3 and 5 Other tracks on the same disc 4 and 5 Other tracks on other 3 to 5 discs 7 Press hH ...(or nN on the remote) repeatedly. Tips • The program you select a CD track whose number is 21 or over. Total playing time Disc tray number (including selected track) Track...

Operating Instructions
Page 13
Scanning stops automatically when the system tunes in a station with a weak signal Press + or - (or TUNING + or - CD/Tuner Tuner Presetting radio stations You can preset a new station in the selected preset number. on the remote) repeatedly in step 2 to select "FM" or "AM". 2 Press and .... To set another station to store the other stations. "COMPLETE" appears. or + on the remote) until the frequency indication starts to store other station. on the remote) repeatedly to select the preset number you want to an existing preset number Start over from preset ...
Scanning stops automatically when the system tunes in a station with a weak signal Press + or - (or TUNING + or - CD/Tuner Tuner Presetting radio stations You can preset a new station in the selected preset number. on the remote) repeatedly in step 2 to select "FM" or "AM". 2 Press and .... To set another station to store the other stations. "COMPLETE" appears. or + on the remote) until the frequency indication starts to store other station. on the remote) repeatedly to select the preset number you want to an existing preset number Start over from preset ...

Operating Instructions
Page 14
... FM stereo program has static noise, press STEREO/MONO repeatedly until a preset number appears in any AM station first, then turn the system back on the remote) repeatedly. or + on the remote). Presetting radio stations (continued) To erase a preset station 1 Press and hold + or - (or TUNING + or - Select "ALL ERASE" when you want...
... FM stereo program has static noise, press STEREO/MONO repeatedly until a preset number appears in any AM station first, then turn the system back on the remote) repeatedly. or + on the remote). Presetting radio stations (continued) To erase a preset station 1 Press and hold + or - (or TUNING + or - Select "ALL ERASE" when you want...
Operating Instructions
Page 16
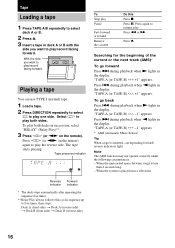
...3 Press hH (or nN on the remote) again to play both sides. Searching for the beginning of the current or the next track (AMS)* To go forward Press > during playback when n lights in the display. Press . When the system is inserted, corresponding forward/ reverse indicators .... "TAPE A (or TAPE B) -1" appears. * AMS (Automatic Music Sensor) Tip When a tape is placed near a television. Press hH (or nN on the remote). Press m or M. The tape starts playing. When the unrecorded space between songs is less than 4 seconds long. - With the side you want to play/record...
...3 Press hH (or nN on the remote) again to play both sides. Searching for the beginning of the current or the next track (AMS)* To go forward Press > during playback when n lights in the display. Press . When the system is inserted, corresponding forward/ reverse indicators .... "TAPE A (or TAPE B) -1" appears. * AMS (Automatic Music Sensor) Tip When a tape is placed near a television. Press hH (or nN on the remote). Press m or M. The tape starts playing. When the unrecorded space between songs is less than 4 seconds long. - With the side you want to play/record...

Operating Instructions
Page 17
... stops at the end of the reverse side, then press x to record. Press CD, TAPE A/B or TUNER/BAND. Select j (or RELAY) to record on the remote) to start playback of the reverse side. • For recording from the radio: If noise is adjusted automatically.
... stops at the end of the reverse side, then press x to record. Press CD, TAPE A/B or TUNER/BAND. Select j (or RELAY) to record on the remote) to start playback of the reverse side. • For recording from the radio: If noise is adjusted automatically.

Operating Instructions
Page 18
... display. 18 Timer-recording radio programs You can record a preset radio station from another disc to program the remaining tracks to be recorded on the remote. or > until "EDIT" flashes after you must first preset the radio station (see "Presetting radio stations" on page 13) and set the clock (see "Setting...
... display. 18 Timer-recording radio programs You can record a preset radio station from another disc to program the remaining tracks to be recorded on the remote. or > until "EDIT" flashes after you must first preset the radio station (see "Presetting radio stations" on page 13) and set the clock (see "Setting...
Operating Instructions
Page 19
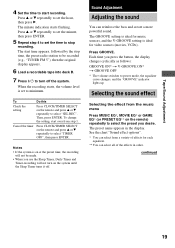
..."TIMER OFF", then press ENTER. Then, press ENTER. Cancel the timer Press CLOCK/TIMER SELECT on the remote and press v or V repeatedly to set the hour, then press B. Notes • If the system is ideal for video sources (movies, VCDs). The GROOVE setting is ideal for each equalizer. ** You can...Selecting the effect from the music menu Press MUSIC EQ*, MOVIE EQ* or GAME EQ* (or PRESET EQ** on the system until the Sleep Timer turns it off the system. Tape/Sound Adjustment 4 Set the time to select the preset you desire. The minute indication starts flashing. Sound Adjustment ...
..."TIMER OFF", then press ENTER. Then, press ENTER. Cancel the timer Press CLOCK/TIMER SELECT on the remote and press v or V repeatedly to set the hour, then press B. Notes • If the system is ideal for video sources (movies, VCDs). The GROOVE setting is ideal for each equalizer. ** You can...Selecting the effect from the music menu Press MUSIC EQ*, MOVIE EQ* or GAME EQ* (or PRESET EQ** on the system until the Sleep Timer turns it off the system. Tape/Sound Adjustment 4 Set the time to select the preset you desire. The minute indication starts flashing. Sound Adjustment ...

Operating Instructions
Page 20
The PRO LOGIC button lights up. Press PRO LOGIC (or PRO LOGIC ON/OFF on the remote) again to turn off Dolby Pro Logic Surround sound. 20 Notes • You cannot use both Dolby Pro Logic Surround sound and the DSP surround ... sound from Dolby Surround-encoded video tapes. To cancel the Dolby Pro Logic Surround sound Press PRO LOGIC (or PRO LOGIC ON/OFF on the remote) while playing a program source. Selecting the sound effect (continued) To cancel the effect Press EFFECT ON/OFF repeatedly until "EFFECT OFF" appears in the display...
The PRO LOGIC button lights up. Press PRO LOGIC (or PRO LOGIC ON/OFF on the remote) again to turn off Dolby Pro Logic Surround sound. 20 Notes • You cannot use both Dolby Pro Logic Surround sound and the DSP surround ... sound from Dolby Surround-encoded video tapes. To cancel the Dolby Pro Logic Surround sound Press PRO LOGIC (or PRO LOGIC ON/OFF on the remote) while playing a program source. Selecting the sound effect (continued) To cancel the effect Press EFFECT ON/OFF repeatedly until "EFFECT OFF" appears in the display...

Operating Instructions
Page 21
.... 4 Press ENTER. DSP OFF: Turns off the DSP mode. Select the audio emphasis you want. Sound Adjustment Selecting the surround effect Press DSP on the remote repeatedly to select the surround effect you want for your basic sound first. 1 Press b or B repeatedly to select a frequency band, then press v or V to adjust...
.... 4 Press ENTER. DSP OFF: Turns off the DSP mode. Select the audio emphasis you want. Sound Adjustment Selecting the surround effect Press DSP on the remote repeatedly to select the surround effect you want for your basic sound first. 1 Press b or B repeatedly to select a frequency band, then press v or V to adjust...

Operating Instructions
Page 22
...the button, the minute display (the turn off Cancel the Sleep Timer function Press SLEEP on the remote. Changing the spectrum analyzer display Press SPECTRUM. Press GAME. Press SLEEP on the remote once. t 10 t OFF * The system turns off time) changes cyclically as follows: PATTERN 1 t PATTERN 2 t PATTERN 3 t ... certain time, so that you can set the system to turn -off when the current CD or tape finishes playback (for up to music - Each time you want. SLEEP on the remote repeatedly to music. SLEEP on the remote repeatedly until "SLEEP OFF" appears. 22 Other ...
...the button, the minute display (the turn off Cancel the Sleep Timer function Press SLEEP on the remote. Changing the spectrum analyzer display Press SPECTRUM. Press GAME. Press SLEEP on the remote once. t 10 t OFF * The system turns off time) changes cyclically as follows: PATTERN 1 t PATTERN 2 t PATTERN 3 t ... certain time, so that you can set the system to turn -off when the current CD or tape finishes playback (for up to music - Each time you want. SLEEP on the remote repeatedly to music. SLEEP on the remote repeatedly until "SLEEP OFF" appears. 22 Other ...

Operating Instructions
Page 23
... Check the setting Change the setting Cancel the timer Do this Press CLOCK/TIMER SELECT on 15 seconds before the preset time. Tip The system turns on the remote and press v or V repeatedly to select the respective mode ("DAILY 1" or "DAILY 2"), then press ENTER. Press v or V repeatedly to set..., then the original display appears. 9 Press ?/1 to start time, stop playing. 7 Press v or V repeatedly until the Sleep Timer turns it off the system. Press CLOCK/TIMER SELECT on page 11). • Tape: Load a tape with the side you want to select "TIMER OFF", then press ENTER. The type...
... Check the setting Change the setting Cancel the timer Do this Press CLOCK/TIMER SELECT on 15 seconds before the preset time. Tip The system turns on the remote and press v or V repeatedly to select the respective mode ("DAILY 1" or "DAILY 2"), then press ENTER. Press v or V repeatedly to set..., then the original display appears. 9 Press ?/1 to start time, stop playing. 7 Press v or V repeatedly until the Sleep Timer turns it off the system. Press CLOCK/TIMER SELECT on page 11). • Tape: Load a tape with the side you want to select "TIMER OFF", then press ENTER. The type...

Operating Instructions
Page 28
...TV or VCR. The demonstration disappears. The remote does not function. • There is an obstacle between the remote and the system. • The remote is acoustic feedback. • Reduce the... of the microphone. Troubleshooting If you have any problem persist, consult your nearest Sony dealer. Should any problem using this system, use the following : - "DAILY 1", "DAILY 2", and "REC" do...is not pointing in the power cord even though you haven't turned on the system (see "Hooking up the optional A/V components" on page 18. First, check that the power cord is no sound....
...TV or VCR. The demonstration disappears. The remote does not function. • There is an obstacle between the remote and the system. • The remote is acoustic feedback. • Reduce the... of the microphone. Troubleshooting If you have any problem persist, consult your nearest Sony dealer. Should any problem using this system, use the following : - "DAILY 1", "DAILY 2", and "REC" do...is not pointing in the power cord even though you haven't turned on the system (see "Hooking up the optional A/V components" on page 18. First, check that the power cord is no sound....

Operating Instructions
Page 32
...antenna External antenna terminal 450 kHz Speaker Front speaker SS-RG70AV/SS-DX60AV Speaker system 3-way, 3-unit, bass-reflex type, magnetically shielded type... kg net per speaker Center surround speaker SS-CT70AV/ SS-CT60AV Speaker system Full range, bass-reflex type, magnetically shielded type Speaker units Full range...kg net per speaker Rear surround speaker SS-RS70AV/ SS-RS60AV Speaker system Full range, bass-reflex type Speaker units Full range: 8 cm, ...AM loop antenna (1) Remote commander (1) Batteries (2) FM lead antenna (1) Front speaker pads (8) Design ...
...antenna External antenna terminal 450 kHz Speaker Front speaker SS-RG70AV/SS-DX60AV Speaker system 3-way, 3-unit, bass-reflex type, magnetically shielded type... kg net per speaker Center surround speaker SS-CT70AV/ SS-CT60AV Speaker system Full range, bass-reflex type, magnetically shielded type Speaker units Full range...kg net per speaker Rear surround speaker SS-RS70AV/ SS-RS60AV Speaker system Full range, bass-reflex type Speaker units Full range: 8 cm, ...AM loop antenna (1) Remote commander (1) Batteries (2) FM lead antenna (1) Front speaker pads (8) Design ...


