Operating Instructions
Page 3
... Sleep Timer 18 Waking up the system 6 Inserting two R6 (size AA) batteries into the remote 8 Setting the time 9 Saving the power in standby mode ........ 9 CD Loading a CD 10 Playing a CD - Normal Play/Shuffle Play/ Repeat Play 10 Programing CD tracks - Game Sync 18 Falling ...asleep to a tape - Program Play 11 Using the CD display 12 Tuner Presetting radio stations 12 Listening to the radio - Daily Timer 18 Optional Components Connecting ...
... Sleep Timer 18 Waking up the system 6 Inserting two R6 (size AA) batteries into the remote 8 Setting the time 9 Saving the power in standby mode ........ 9 CD Loading a CD 10 Playing a CD - Normal Play/Shuffle Play/ Repeat Play 10 Programing CD tracks - Game Sync 18 Falling ...asleep to a tape - Program Play 11 Using the CD display 12 Tuner Presetting radio stations 12 Listening to the radio - Daily Timer 18 Optional Components Connecting ...
Operating Instructions
Page 4
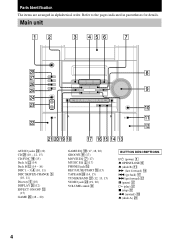
.... Main unit 12 3 456 7 wk 8 wj wh wg 9 wf wd 0 qa ws qs waw;qlqk qj qhqg qf qd AUDIO jacks wd (19) CD wk (10 - 12, 15) CD SYNC qh (15) Deck A ws (14) Deck B qs (14 - 16) DISC 1 - 3 4 (10, 11) DISC SKIP EX-CHANGE 3 (10, 11) Disc tray 5 (10) DISPLAY...
.... Main unit 12 3 456 7 wk 8 wj wh wg 9 wf wd 0 qa ws qs waw;qlqk qj qhqg qf qd AUDIO jacks wd (19) CD wk (10 - 12, 15) CD SYNC qh (15) Deck A ws (14) Deck B qs (14 - 16) DISC 1 - 3 4 (10, 11) DISC SKIP EX-CHANGE 3 (10, 11) Disc tray 5 (10) DISPLAY...
Operating Instructions
Page 5
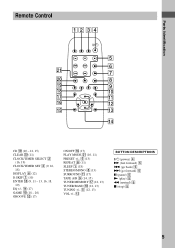
Parts Identification Remote Control 12 34 5 6 wa 7 w; 8 ql 9 qk q; qj qa qh qs qg qd qf CD ql (10 - 12, 15) CLEAR w; (11) CLOCK/TIMER SELECT 2 (16, 19) CLOCK/TIMER SET 3 (9, 16, 18) DISPLAY 6 (12) D.SKIP 7 (10) ENTER qg (9, 11 - 13, 16, ...
Parts Identification Remote Control 12 34 5 6 wa 7 w; 8 ql 9 qk q; qj qa qh qs qg qd qf CD ql (10 - 12, 15) CLEAR w; (11) CLOCK/TIMER SELECT 2 (16, 19) CLOCK/TIMER SET 3 (9, 16, 18) DISPLAY 6 (12) D.SKIP 7 (10) ENTER qg (9, 11 - 13, 16, ...
Operating Instructions
Page 8
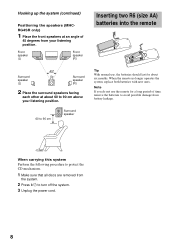
...186; Surround speaker (R) 2 Place the surround speakers facing each other at an angle of time, remove the batteries to avoid possible damage from the system. 2 Press ?/1 to 90 cm Surround speaker Inserting two R6 (size AA) batteries into the remote e E E e Tip With normal use ...the remote for about 60 to 90 cm above your listening position. When the remote no longer operates the system, replace both batteries with new ones. When carrying this system Perform the following procedure to protect the CD mechanism. 1 Make sure that all discs are removed from battery leakage.
...186; Surround speaker (R) 2 Place the surround speakers facing each other at an angle of time, remove the batteries to avoid possible damage from the system. 2 Press ?/1 to 90 cm Surround speaker Inserting two R6 (size AA) batteries into the remote e E E e Tip With normal use ...the remote for about 60 to 90 cm above your listening position. When the remote no longer operates the system, replace both batteries with new ones. When carrying this system Perform the following procedure to protect the CD mechanism. 1 Make sure that all discs are removed from battery leakage.
Operating Instructions
Page 10
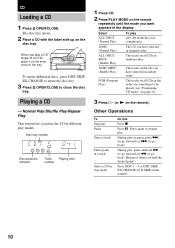
...additional discs, press DISC SKIP EX-CHANGE to rotate the disc tray. 3 Press Z OPEN/CLOSE to go forward) or m (to be played (see "Programing CD tracks" on page 11). 3 Press H (or N on the remote repeatedly until the mode you want appears in stop mode Do this Press x. Normal Play/...Shuffle Play/Repeat Play This system lets you play the CD in different play All CDs in the disc tray continuously. 1DISC (Normal Play) The CD you have selected in random order. 1DISC SHUF (Shuffle Play) The tracks on the inner circle...
...additional discs, press DISC SKIP EX-CHANGE to rotate the disc tray. 3 Press Z OPEN/CLOSE to go forward) or m (to be played (see "Programing CD tracks" on page 11). 3 Press H (or N on the remote repeatedly until the mode you want appears in stop mode Do this Press x. Normal Play/...Shuffle Play/Repeat Play This system lets you play the CD in different play All CDs in the disc tray continuously. 1DISC (Normal Play) The CD you have selected in random order. 1DISC SHUF (Shuffle Play) The tracks on the inner circle...
Operating Instructions
Page 11
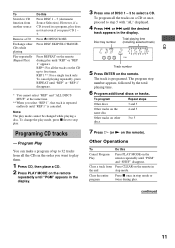
...Track number 5 Press ENTER on the remote. Clear the entire program Press x once in stop mode. Press DISC SKIP EX-CHANGE. To program all the CDs in the display. 3 Press one of up to five times. The program step number appears, followed by the total playing time. 6 Program additional discs or... is used in the display. Clear a track from Press CLEAR on the remote in the end stop mode or twice during play them. 1 Press CD, then place a CD. 2 Press PLAY MODE on the remote repeatedly until "REP" or "REP 1" appears. To change the play mode, press x first to stop play mode...
...Track number 5 Press ENTER on the remote. Clear the entire program Press x once in stop mode. Press DISC SKIP EX-CHANGE. To program all the CDs in the display. 3 Press one of up to five times. The program step number appears, followed by the total playing time. 6 Program additional discs or... is used in the display. Clear a track from Press CLEAR on the remote in the end stop mode or twice during play them. 1 Press CD, then place a CD. 2 Press PLAY MODE on the remote repeatedly until "REP" or "REP 1" appears. To change the play mode, press x first to stop play mode...
Operating Instructions
Page 12
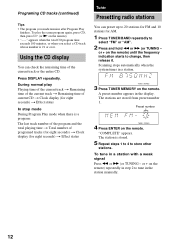
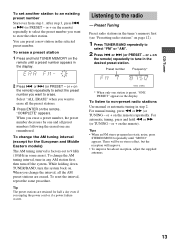
... when there is a program: The last track number of the program and the total playing time t Total number of the current track or the entire CD. The station is stored. 5 Repeat steps 1 to 4 to select "FM" or "AM". 2 Press and hold m or M (or TUNING - During normal play the...of the current track t Remaining time of the current track t Remaining time of current CD t Clock display (for AM. 1 Press TUNER/BAND repeatedly to store other stations. or + on the remote. Scanning stops automatically when the system tunes in a station. 3 Press TUNER MEMORY on the remote) until the frequency ...
... when there is a program: The last track number of the program and the total playing time t Total number of the current track or the entire CD. The station is stored. 5 Repeat steps 1 to 4 to select "FM" or "AM". 2 Press and hold m or M (or TUNING - During normal play the...of the current track t Remaining time of the current track t Remaining time of current CD t Clock display (for AM. 1 Press TUNER/BAND repeatedly to store other stations. or + on the remote. Scanning stops automatically when the system tunes in a station. 3 Press TUNER MEMORY on the remote) until the frequency ...
Operating Instructions
Page 13
... press m or M (or TUNING - Tips • When an FM stereo program has static noise, press STEREO/MONO repeatedly until a preset number appears in the display. CD/Tuner To set to 9 kHz (10 kHz in some areas). You can preset a new station in any AM station first, then turn the...Use manual or automatic tuning in the tuner's memory first (see "Presetting radio stations" on . "COMPLETE" appears. While holding down TUNER/BAND, turn off the system. When you unplug the power cord or if a power failure occurs. * When only one are retained for the European and Middle Eastern models) The AM...
... press m or M (or TUNING - Tips • When an FM stereo program has static noise, press STEREO/MONO repeatedly until a preset number appears in the display. CD/Tuner To set to 9 kHz (10 kHz in some areas). You can preset a new station in any AM station first, then turn the...Use manual or automatic tuning in the tuner's memory first (see "Presetting radio stations" on . "COMPLETE" appears. While holding down TUNER/BAND, turn off the system. When you unplug the power cord or if a power failure occurs. * When only one are retained for the European and Middle Eastern models) The AM...
Operating Instructions
Page 15
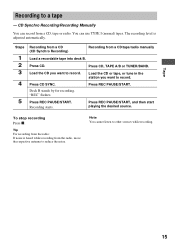
...the noise. You can record from the radio: If noise is adjusted automatically. Press CD, TAPE A/B or TUNER/BAND. Load the CD you want to record. Recording starts. Load the CD or tape, or tune in the station you want to a tape - The ...recording level is heard while recording from a CD/tape/radio manually Load a recordable tape into deck B. CD Synchro Recording/Recording Manually You can use TYPE I (normal) tapes. "REC" flashes. Tape Recording to record. Steps 1 2 3 4 5 Recording from a CD (CD Synchro Recording) Recording from the radio, move ...
...the noise. You can record from the radio: If noise is adjusted automatically. Press CD, TAPE A/B or TUNER/BAND. Load the CD you want to record. Recording starts. Load the CD or tape, or tune in the station you want to a tape - The ...recording level is heard while recording from a CD/tape/radio manually Load a recordable tape into deck B. CD Synchro Recording/Recording Manually You can use TYPE I (normal) tapes. "REC" flashes. Tape Recording to record. Steps 1 2 3 4 5 Recording from a CD (CD Synchro Recording) Recording from the radio, move ...
Operating Instructions
Page 18
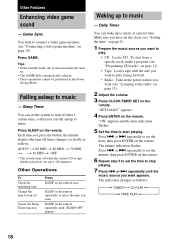
...minute, then press ENTER on the remote. 6 Repeat step 5 to set the system to turn off time) changes cyclically as follows: t TUNER y CD PLAY T t TAPE PLAY T 18 Tips • In the standby mode, the system automatically turns on. • The GAME EQ is automatically selected. • ...Listening to stop playing. 7 Press . or > repeatedly until "SLEEP OFF" appears. Other Features Enhancing video game sound - t 10 MIN t OFF * The system turns off Cancel the Sleep Timer function Press SLEEP on the remote. "ON" appears and the hour indication flashes. 5 Set the time to 100 minutes...
...minute, then press ENTER on the remote. 6 Repeat step 5 to set the system to turn off time) changes cyclically as follows: t TUNER y CD PLAY T t TAPE PLAY T 18 Tips • In the standby mode, the system automatically turns on. • The GAME EQ is automatically selected. • ...Listening to stop playing. 7 Press . or > repeatedly until "SLEEP OFF" appears. Other Features Enhancing video game sound - t 10 MIN t OFF * The system turns off Cancel the Sleep Timer function Press SLEEP on the remote. "ON" appears and the hour indication flashes. 5 Set the time to 100 minutes...
Operating Instructions
Page 21
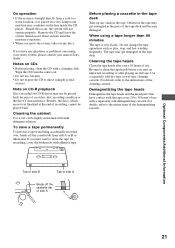
... When using a tape longer than 90 minutes The tape is placed in the parts of recording, cannot be played back because of side A Optional Components/Additional Information 21 Tab of side B Tab of side A Break off the cassette tab from side A or B as play, stop, and fast...the tape heads and the metal parts that have any questions or problems concerning your stereo system, please consult your nearest Sony dealer. Should this occur, the system will not operate properly. Wipe the CD from being accidentally recorded over, break off the cassette tab of scratches, dirt, recording ...
... When using a tape longer than 90 minutes The tape is placed in the parts of recording, cannot be played back because of side A Optional Components/Additional Information 21 Tab of side B Tab of side A Break off the cassette tab from side A or B as play, stop, and fast...the tape heads and the metal parts that have any questions or problems concerning your stereo system, please consult your nearest Sony dealer. Should this occur, the system will not operate properly. Wipe the CD from being accidentally recorded over, break off the cassette tab of scratches, dirt, recording ...
Operating Instructions
Page 23
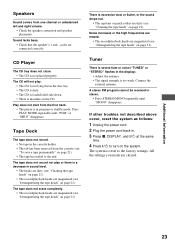
... the speaker's + and - CD Player The CD tray does not close. • The CD is moisture on page 21). The CD will not play or there is excessive wow or flutter, or the sound drops out. • The capstans or pinch rollers are magnetized (see "Cleaning the tape heads" on the system. Noise increases or...
... the speaker's + and - CD Player The CD tray does not close. • The CD is moisture on page 21). The CD will not play or there is excessive wow or flutter, or the sound drops out. • The capstans or pinch rollers are magnetized (see "Cleaning the tape heads" on the system. Noise increases or...
Operating Instructions
Page 24
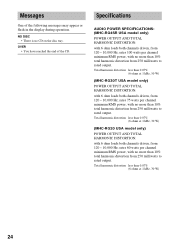
... USA model only) POWER OUTPUT AND TOTAL HARMONIC DISTORTION: with no more than 0.07% (6 ohms at 1 kHz, 30 W) (MHC-RG20 USA model only) POWER OUTPUT AND TOTAL HARMONIC DISTORTION: with no more than 10% total harmonic distortion from 120 - 10,000 Hz; OVER • You ... operation. rates 60 watts per channel minimum RMS power, with 6 ohm loads both channels driven, from 250 milliwatts to rated output. Messages One of the CD. rates 75 watts per channel minimum RMS power, with 6 ohm loads both channels driven, from 250 milliwatts to rated output. NO DISC • There ...
... USA model only) POWER OUTPUT AND TOTAL HARMONIC DISTORTION: with no more than 0.07% (6 ohms at 1 kHz, 30 W) (MHC-RG20 USA model only) POWER OUTPUT AND TOTAL HARMONIC DISTORTION: with no more than 10% total harmonic distortion from 120 - 10,000 Hz; OVER • You ... operation. rates 60 watts per channel minimum RMS power, with 6 ohm loads both channels driven, from 250 milliwatts to rated output. Messages One of the CD. rates 75 watts per channel minimum RMS power, with 6 ohm loads both channels driven, from 250 milliwatts to rated output. NO DISC • There ...
Operating Instructions
Page 25
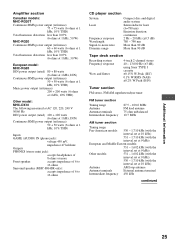
..., 10% THD) Total harmonic distortion less than 0.07% (6 ohms at 1 kHz, 30 W) European model: MHC-RG20 DIN power output (rated) 80 + 80 watts (6 ohms at 1 kHz, DIN) Continuous RMS power output (reference...mini jack): accepts headphones of 8 ohms or more Front speaker: accepts impedance of 6 to 16 ohms Surround speaker (MHC-RG4SR only): accepts impedance of 6 to 16 ohms CD player section System...dB More than 90 dB Tape deck section Recording system Frequency response Wow and flutter 4-track 2-channel stereo 40 - 13,000 Hz (±3 dB), using Sony TYPE I cassette ±0.15% W.Peak (IEC...
..., 10% THD) Total harmonic distortion less than 0.07% (6 ohms at 1 kHz, 30 W) European model: MHC-RG20 DIN power output (rated) 80 + 80 watts (6 ohms at 1 kHz, DIN) Continuous RMS power output (reference...mini jack): accepts headphones of 8 ohms or more Front speaker: accepts impedance of 6 to 16 ohms Surround speaker (MHC-RG4SR only): accepts impedance of 6 to 16 ohms CD player section System...dB More than 90 dB Tape deck section Recording system Frequency response Wow and flutter 4-track 2-channel stereo 40 - 13,000 Hz (±3 dB), using Sony TYPE I cassette ±0.15% W.Peak (IEC...


