Operating Instructions (primary manual)
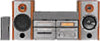
Page 3
...CD by specifying track order 25 Sound Adjustment Adjusting the sound 27 Selecting the audio emphasis 28 Changing the brightness of the display 29 Selecting the surround effects 29 Enjoying the Dolby Pro Logic Surround sound 30 Adjusting the graphic equalizer ......... 31 Making ...a personal audio emphasis file 32 Other Features Using the Radio Data System (RDS)* 33 Falling asleep to music 35 Waking up to music 36 Timer-recording radio programmes .. 37 Optional components Connecting audio components .......... 38 Connecting a VCR 39 Connecting a DVD player 40 Connecting ...
...CD by specifying track order 25 Sound Adjustment Adjusting the sound 27 Selecting the audio emphasis 28 Changing the brightness of the display 29 Selecting the surround effects 29 Enjoying the Dolby Pro Logic Surround sound 30 Adjusting the graphic equalizer ......... 31 Making ...a personal audio emphasis file 32 Other Features Using the Radio Data System (RDS)* 33 Falling asleep to music 35 Waking up to music 36 Timer-recording radio programmes .. 37 Optional components Connecting audio components .......... 38 Connecting a VCR 39 Connecting a DVD player 40 Connecting ...
Operating Instructions (primary manual)
Page 6
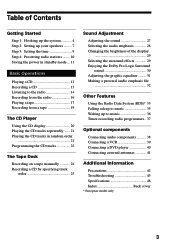
... does not fit your local power line voltage. To connect optional components See page 38. To activate/deactivate the demonstration again, press DISPLAY (U.S.A., Canadian and European models) or DEMO (STANDBY) (other models) while the system is deactivated. Tip You can reinforce the bass sound by connecting ...an optional super woofer to protect the CD mechanism. 1 Press CD (or FUNCTION on the remote repeatedly) until "CD" appears in the display. 2 Hold down ENTER and press 1/u so...
... does not fit your local power line voltage. To connect optional components See page 38. To activate/deactivate the demonstration again, press DISPLAY (U.S.A., Canadian and European models) or DEMO (STANDBY) (other models) while the system is deactivated. Tip You can reinforce the bass sound by connecting ...an optional super woofer to protect the CD mechanism. 1 Press CD (or FUNCTION on the remote repeatedly) until "CD" appears in the display. 2 Hold down ENTER and press 1/u so...
Operating Instructions (primary manual)
Page 9
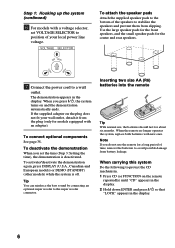
...are cancelled when you 've made a mistake, start over from step 1. • Setting the time deactivates the demo mode. The 24-hour system model is off . The clock starts working. To change the time while the power is off . Step 3: Setting the time You must set ...time The previous explanation shows you want to set the time before using the timer functions. The hour indication flashes. 2 Press V or v to display the demo mode, press DISPLAY (U.S.A., Canadian and European models) or DEMO (STANDBY) (other models. If you how to select the SET CLOCK. 3 Press ENTER. 4 Perform steps...
...are cancelled when you 've made a mistake, start over from step 1. • Setting the time deactivates the demo mode. The 24-hour system model is off . The clock starts working. To change the time while the power is off . Step 3: Setting the time You must set ...time The previous explanation shows you want to set the time before using the timer functions. The hour indication flashes. 2 Press V or v to display the demo mode, press DISPLAY (U.S.A., Canadian and European models) or DEMO (STANDBY) (other models. If you how to select the SET CLOCK. 3 Press ENTER. 4 Perform steps...
Operating Instructions (primary manual)
Page 10
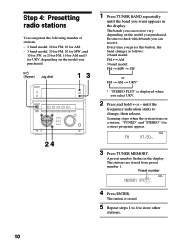
...n SW or FM n AM n UKV* * "STEREO PLUS" is stored. 5 Repeat steps 1 to 4 to store other stations. 10 The station is displayed when you purchased. A preset number flashes in a station. until the band you can receive. TUNED STEREO MHz 3 Press TUNER MEMORY. Scanning stops when the... system tunes in the display. The bands you want appears in the display. The stations are stored from preset number 1. Step 4: Presetting radio stations You can preset the following number of...
...n SW or FM n AM n UKV* * "STEREO PLUS" is stored. 5 Repeat steps 1 to 4 to store other stations. 10 The station is displayed when you purchased. A preset number flashes in a station. until the band you can receive. TUNED STEREO MHz 3 Press TUNER MEMORY. Scanning stops when the... system tunes in the display. The bands you want appears in the display. The stations are stored from preset number 1. Step 4: Presetting radio stations You can preset the following number of...

Operating Instructions (primary manual)
Page 11
... "COMPLETE!!" appears. To change the AM tuning interval (Except for half a day even if you want to the Power Saving Mode and the clock display disappears. The system is set the time in the Power Saving Mode. • One Touch Play function does not work in a station with a weak signal Press +...the Power Saving Mode. Notes • You cannot set ) light up even in the Power Saving Mode. • The timer works in the display. The clock display appears. 11 TUNED STEREO Saving the power in some areas). Select "ALL ERASE" when you press POWER SAVE/DEMO (STANDBY) in the Power ...
... "COMPLETE!!" appears. To change the AM tuning interval (Except for half a day even if you want to the Power Saving Mode and the clock display disappears. The system is set the time in the Power Saving Mode. • One Touch Play function does not work in a station with a weak signal Press +...the Power Saving Mode. Notes • You cannot set ) light up even in the Power Saving Mode. • The timer works in the display. The clock display appears. 11 TUNED STEREO Saving the power in some areas). Select "ALL ERASE" when you press POWER SAVE/DEMO (STANDBY) in the Power ...
Operating Instructions (primary manual)
Page 13
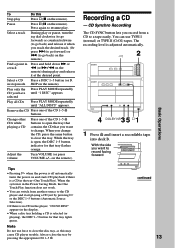
... by pressing · or the DISC 1~5 buttons (Automatic Source Selection). • If there is no CD in the player, "CD NO DISC" appears in the display. • When a disc tray holding a CD is in the tray (One Touch Play). Recording a CD - With the side you change . When you want to... change the CD, press the same button to close the tray. When the system is selected (or playing), the DISC 1~5 button for that tray lights green. CD Synchro Recording The CD SYNC button lets you have selected Press PLAY...
... by pressing · or the DISC 1~5 buttons (Automatic Source Selection). • If there is no CD in the player, "CD NO DISC" appears in the display. • When a disc tray holding a CD is in the tray (One Touch Play). Recording a CD - With the side you change . When you want to... change the CD, press the same button to close the tray. When the system is selected (or playing), the DISC 1~5 button for that tray lights green. CD Synchro Recording The CD SYNC button lets you have selected Press PLAY...
Operating Instructions (primary manual)
Page 15
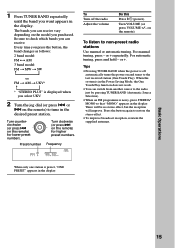
... the stereo effect. • To improve broadcast reception, reorient the supplied antennas. or +. When only one station is in the display. Basic Operations 15 on the remote) for higher preset numbers. For manual tuning, press - Tips • Pressing TUNER BAND when...the radio just by pressing TUNER BAND (Automatic Source Selection). • When an FM programme is displayed when you purchased. or + repeatedly. When the system is preset, "ONE PRESET" appears in the display. The bands you want appears in the display. For automatic tuning, press and hold -
... the stereo effect. • To improve broadcast reception, reorient the supplied antennas. or +. When only one station is in the display. Basic Operations 15 on the remote) for higher preset numbers. For manual tuning, press - Tips • Pressing TUNER BAND when...the radio just by pressing TUNER BAND (Automatic Source Selection). • When an FM programme is displayed when you purchased. or + repeatedly. When the system is preset, "ONE PRESET" appears in the display. The bands you want appears in the display. For automatic tuning, press and hold -
Operating Instructions (primary manual)
Page 18
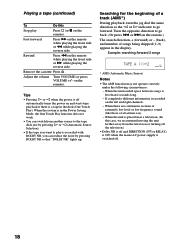
... remote.) The search direction, + (forward) or - (back), and number of songs being skipped (1~9) appear in the display. Searching for the beginning of a baritone sax). - Adjust the volume Turn VOLUME (or press VOLUME +/- When the system is recorded with DOLBY NR, you want to go forward. Example: searching forward 2 songs DOLBY NR * AMS...
... remote.) The search direction, + (forward) or - (back), and number of songs being skipped (1~9) appear in the display. Searching for the beginning of a baritone sax). - Adjust the volume Turn VOLUME (or press VOLUME +/- When the system is recorded with DOLBY NR, you want to go forward. Example: searching forward 2 songs DOLBY NR * AMS...
Operating Instructions (primary manual)
Page 20
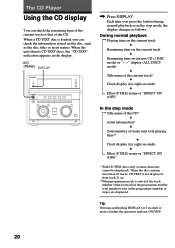
...number of the CD. When a CD TEXT disc is loaded, you press the button during normal playback or in the display. 1/u (Power) DISPLAY - + 0 ) ≠ + - + g / Press DISPLAY. Tip Pressing and holding DISPLAY for eight seconds) µ Effect (P FILE) name or "EFFECT ON (OFF)" * With CD TEXT discs only ...µ Artist information* µ Total number of the current track* µ Clock display (for eight seconds) µ Effect (P FILE) name or "EFFECT ON (OFF)" In the stop mode, the display changes as the disc titles or artist names. When the disc contains more switches the ...
...number of the CD. When a CD TEXT disc is loaded, you press the button during normal playback or in the display. 1/u (Power) DISPLAY - + 0 ) ≠ + - + g / Press DISPLAY. Tip Pressing and holding DISPLAY for eight seconds) µ Effect (P FILE) name or "EFFECT ON (OFF)" * With CD TEXT discs only ...µ Artist information* µ Total number of the current track* µ Clock display (for eight seconds) µ Effect (P FILE) name or "EFFECT ON (OFF)" In the stop mode, the display changes as the disc titles or artist names. When the disc contains more switches the ...

Operating Instructions (primary manual)
Page 21
... lets you want to five until "1 DISC SHUFFLE" or "ALL DISCS SHUFFLE" appears in the player. Do the following procedure to five times display. To repeat Press All the tracks on PLAY MODE repeatedly the current CD up to repeat. To cancel Repeat Play Press REPEAT so that "REPEAT..." or "REPEAT 1" disappears from the display. All the tracks play . 1/u (power) REPEAT PLAY MODE Playing the CD tracks in random order. Playing the CD tracks repeatedly -- continued 21 Repeat ...
... lets you want to five until "1 DISC SHUFFLE" or "ALL DISCS SHUFFLE" appears in the player. Do the following procedure to five times display. To repeat Press All the tracks on PLAY MODE repeatedly the current CD up to repeat. To cancel Repeat Play Press REPEAT so that "REPEAT..." or "REPEAT 1" disappears from the display. All the tracks play . 1/u (power) REPEAT PLAY MODE Playing the CD tracks in random order. Playing the CD tracks repeatedly -- continued 21 Repeat ...

Operating Instructions (primary manual)
Page 22
...; π § 5 § 7π 3 22 Programme Play You can start Shuffle Play during normal play by pressing PLAY MODE repeatedly to 32 tracks from the display. To select a desired CD Press DISC 1~5. Programming the CD tracks -- Tips • You can make a programme of up to select "SHUFFLE". • To skip a track...
...; π § 5 § 7π 3 22 Programme Play You can start Shuffle Play during normal play by pressing PLAY MODE repeatedly to 32 tracks from the display. To select a desired CD Press DISC 1~5. Programming the CD tracks -- Tips • You can make a programme of up to select "SHUFFLE". • To skip a track...
Operating Instructions (primary manual)
Page 23
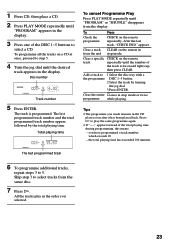
... on the remote repeatedly until the desired track appears in the CD player even after it has been played back. you made remains in the display. Disc number 3 PROGRAM Track number 5 Press ENTER. Clear a track CLEAR on a CD at once, proceed to select a CD. Add a track to 5. Clear the entire π.... • If "--.--" appears instead of the DISC 1~5 buttons to step 5. 4 Turn the jog dial until the number of the track to select tracks from the display. After the last track, "CHECK END" appears. To programme all the tracks on the remote in stop mode.
... on the remote repeatedly until the desired track appears in the CD player even after it has been played back. you made remains in the display. Disc number 3 PROGRAM Track number 5 Press ENTER. Clear a track CLEAR on a CD at once, proceed to select a CD. Add a track to 5. Clear the entire π.... • If "--.--" appears instead of the DISC 1~5 buttons to step 5. 4 Turn the jog dial until the number of the track to select tracks from the display. After the last track, "CHECK END" appears. To programme all the tracks on the remote in stop mode.

Operating Instructions (primary manual)
Page 25
Programme Edit You can record tracks from the same disc. The track is programmed. Skip step 4 to select tracks from all the CDs in the display. Recording a CD by the total playing time. The last programmed track number and the total programmed track number appear, followed by specifying track order - continued ... of the tape. 1/u (power) EDIT 5 32 6 1 Place a CD and insert a recordable tape into deck B. 2 Press CD. 3 Press PLAY MODE repeatedly until "PROGRAM" appears in the display. 4 Press one of the DISC 1~5 buttons to 6.
Programme Edit You can record tracks from the same disc. The track is programmed. Skip step 4 to select tracks from all the CDs in the display. Recording a CD by the total playing time. The last programmed track number and the total programmed track number appear, followed by specifying track order - continued ... of the tape. 1/u (power) EDIT 5 32 6 1 Place a CD and insert a recordable tape into deck B. 2 Press CD. 3 Press PLAY MODE repeatedly until "PROGRAM" appears in the display. 4 Press one of the DISC 1~5 buttons to 6.
Operating Instructions (primary manual)
Page 26
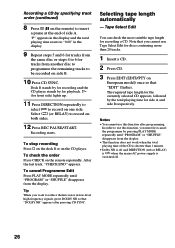
...that "DOLBY NR" appears after programming. To check the order Press CHECK on the CD player. Selecting tape length automatically - "P" appears in the display and the total playing time resets to "0.00" in low-level high-frequency signals, press DOLBY NR so that "EDIT" flashes. In order to... reduce the hiss noise in the display. 9 Repeat steps 5 and 6 for tracks from the same disc or steps 4 to 6 for side A and side B respectively. Recording a CD by ...
...that "DOLBY NR" appears after programming. To check the order Press CHECK on the CD player. Selecting tape length automatically - "P" appears in the display and the total playing time resets to "0.00" in low-level high-frequency signals, press DOLBY NR so that "EDIT" flashes. In order to... reduce the hiss noise in the display. 9 Repeat steps 5 and 6 for tracks from the same disc or steps 4 to 6 for side A and side B respectively. Recording a CD by ...

Operating Instructions (primary manual)
Page 27
.... Notes • With some songs, the music will come from the super woofer even when the headphones are connected. Note If you use the DBFB system with headphones. 1/u (power) DBFB - + 0 ) ≠ + - + g PHONES GROOVE To reinforce bass (DBFB) Press DBFB*. No sound will sound distorted ... the previous volume. Turn off ) * DBFB = Dynamic Bass Feedback For a powerful sound (GROOVE) Press GROOVE. Every time you press the button, the display changes as follows: n DBFB NORMAL ( DBFB ) µ DBFB HIGH ( DBFB ) µ DBFB OFF (off the power of the super woofer when...
.... Notes • With some songs, the music will come from the super woofer even when the headphones are connected. Note If you use the DBFB system with headphones. 1/u (power) DBFB - + 0 ) ≠ + - + g PHONES GROOVE To reinforce bass (DBFB) Press DBFB*. No sound will sound distorted ... the previous volume. Turn off ) * DBFB = Dynamic Bass Feedback For a powerful sound (GROOVE) Press GROOVE. Every time you press the button, the display changes as follows: n DBFB NORMAL ( DBFB ) µ DBFB HIGH ( DBFB ) µ DBFB OFF (off the power of the super woofer when...
Operating Instructions (primary manual)
Page 28
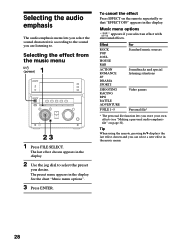
See the chart "Music menu options". 3 Press ENTER. The last effect chosen appears in the display. To cancel the effect Press EFFECT on page 32). Effect ROCK POP SOUL HOUSE R&B ACTION ROMANCE SF DRAMA SPORTS SHOOTING RACING RPG BATTLE ADVENTURE P... audio emphasis file" on the remote repeatedly so that "EFFECT OFF" appears in the display. 2 Use the jog dial to . Tip When using the remote, pressing V/v displays the last effect chosen and you can select a new effect in the display. Selecting the effect from the music menu 1 1/u (power) - + 0 ) ≠ + - + g 23 1 ...
See the chart "Music menu options". 3 Press ENTER. The last effect chosen appears in the display. To cancel the effect Press EFFECT on page 32). Effect ROCK POP SOUL HOUSE R&B ACTION ROMANCE SF DRAMA SPORTS SHOOTING RACING RPG BATTLE ADVENTURE P... audio emphasis file" on the remote repeatedly so that "EFFECT OFF" appears in the display. 2 Use the jog dial to . Tip When using the remote, pressing V/v displays the last effect chosen and you can select a new effect in the display. Selecting the effect from the music menu 1 1/u (power) - + 0 ) ≠ + - + g 23 1 ...
Operating Instructions (primary manual)
Page 29
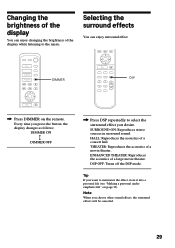
THEATER: Reproduces the acoustics of a concert hall. Every time you press the button, the display changes as follows: DIMMER ON DIMMER OFF ˜ / Press DSP repeatedly to select the surround effect you want to the music. · ª· ª&#.... 29 DSP OFF: Turns off the DSP mode. ENHANCED THEATER: Reproduces the acoustics of a large movie theater. Changing the brightness of the display You can enjoy changing the brightness of the display while listening to memorize the effect, store it into a personal file (see "Making a personal audio emphasis file" on the remote.
THEATER: Reproduces the acoustics of a concert hall. Every time you press the button, the display changes as follows: DIMMER ON DIMMER OFF ˜ / Press DSP repeatedly to select the surround effect you want to the music. · ª· ª&#.... 29 DSP OFF: Turns off the DSP mode. ENHANCED THEATER: Reproduces the acoustics of a large movie theater. Changing the brightness of the display You can enjoy changing the brightness of the display while listening to memorize the effect, store it into a personal file (see "Making a personal audio emphasis file" on the remote.
Operating Instructions (primary manual)
Page 32
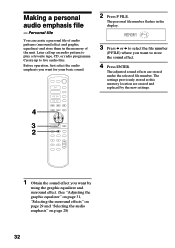
... file of the unit. The personal file number flashes in the memory of audio patterns (surround effect and graphic equalizer) and store them in the display. 3 Press B or b to store the sound effect. 4 Press ENTER. Before operation, first select the audio emphasis you want by the new settings. 1 Obtain the sound...
... file of the unit. The personal file number flashes in the memory of audio patterns (surround effect and graphic equalizer) and store them in the display. 3 Press B or b to store the sound effect. 4 Press ENTER. Before operation, first select the audio emphasis you want by the new settings. 1 Obtain the sound...
Operating Instructions (primary manual)
Page 33
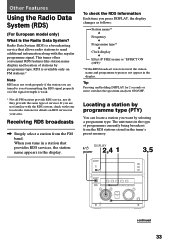
... the same type of services. The unit tunes in the type of stations by selecting a programme type. Radio Data System (RDS) is the Radio Data System? This tuner offers convenient RDS features like station name display and location of programmes currently being broadcast from the FM band. Other Features Using the Radio Data...
... the same type of services. The unit tunes in the type of stations by selecting a programme type. Radio Data System (RDS) is the Radio Data System? This tuner offers convenient RDS features like station name display and location of programmes currently being broadcast from the FM band. Other Features Using the Radio Data...
Operating Instructions (primary manual)
Page 34
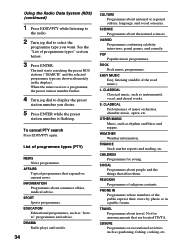
...about consumer affairs, medical advice. EASY MUSIC Easy listening (middle of the public express their views by phone or in the display). S. AFFAIRS Topical programmes that expand on recreational activities such as rhythm and blues and reggae. EDUCATION Educational programmes, such as... News programmes. FINANCE Stock market reports and trading, etc. Using the Radio Data System (RDS) (continued) 1 Press EDIT/PTY while listening to the radio. 2 Turn jog dial to display the preset station number you want. VARIED Programmes containing celebrity interviews, panel games, and...
...about consumer affairs, medical advice. EASY MUSIC Easy listening (middle of the public express their views by phone or in the display). S. AFFAIRS Topical programmes that expand on recreational activities such as rhythm and blues and reggae. EDUCATION Educational programmes, such as... News programmes. FINANCE Stock market reports and trading, etc. Using the Radio Data System (RDS) (continued) 1 Press EDIT/PTY while listening to the radio. 2 Turn jog dial to display the preset station number you want. VARIED Programmes containing celebrity interviews, panel games, and...


