Operating Instructions (primary manual)
Page 1
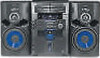
Record the serial number in the space provided below. 4-233-902-12(3) Mini Hi-Fi Component System Operating Instructions Owner's Record The model and serial numbers are located on the rear panel. Model No Serial No MHC-MG510AV MHC-MG310AV MHC-MG110 © 2001 Sony Corporation 1 Refer to them whenever you call upon your Sony dealer regarding this product.
Record the serial number in the space provided below. 4-233-902-12(3) Mini Hi-Fi Component System Operating Instructions Owner's Record The model and serial numbers are located on the rear panel. Model No Serial No MHC-MG510AV MHC-MG310AV MHC-MG110 © 2001 Sony Corporation 1 Refer to them whenever you call upon your Sony dealer regarding this product.

Operating Instructions (primary manual)
Page 2
... to alert the user to Subpart B of Part 15 of FCC Rules. This symbol is located on the rear exterior. These limits are trademarks of important operating and maintenance (servicing) instructions in a confined space, such as the injurious wastes. CAUTION • The use with The limits for a digital device pursuant to the presence of Dolby Laboratories. "Dolby", "Pro Logic", and the...
... to alert the user to Subpart B of Part 15 of FCC Rules. This symbol is located on the rear exterior. These limits are trademarks of important operating and maintenance (servicing) instructions in a confined space, such as the injurious wastes. CAUTION • The use with The limits for a digital device pursuant to the presence of Dolby Laboratories. "Dolby", "Pro Logic", and the...
Operating Instructions (primary manual)
Page 3
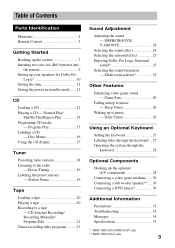
Station Name 19 Tape Loading a tape 20 Playing a tape 20 Recording to music - Multi room selector 25 Other Features Enhancing video game sound - Table of Contents Parts Identification Main unit 4 Remote Control 5 Getting Started Hooking up the system 7 Inserting two size AA (R6) batteries into the remote 9 Setting up the optional A/V components 28 Connecting a video game machine ...... 29 Connecting a sub woofer speaker** .... 30 Connecting a DVD player 30 Additional Information Precautions 31 Troubleshooting 32 Messages 34 Specifications 35 * MHC-MG510AV/MG310AV...
Station Name 19 Tape Loading a tape 20 Playing a tape 20 Recording to music - Multi room selector 25 Other Features Enhancing video game sound - Table of Contents Parts Identification Main unit 4 Remote Control 5 Getting Started Hooking up the system 7 Inserting two size AA (R6) batteries into the remote 9 Setting up the optional A/V components 28 Connecting a video game machine ...... 29 Connecting a sub woofer speaker** .... 30 Connecting a DVD player 30 Additional Information Precautions 31 Troubleshooting 32 Messages 34 Specifications 35 * MHC-MG510AV/MG310AV...
Operating Instructions (primary manual)
Page 4
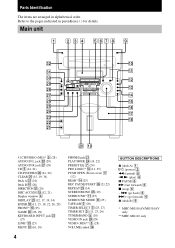
...) qj (12) REAR* qf (25) REC PAUSE/START wh (21,22) REPEAT wg (14) STEREO/MONO wg (19) SURROUND* qa (25) SURROUND MODE 8 (25) TAPE A/B 5 (20) TIMER SELECT 3 (23, 27) TIMER SET 3 (11, 23, 26) TUNER/BAND 5 (18) VIDEO IN jack wl (29) VIDEO (MD)** 5 (28) VOLUME control qh BUTTON DESCRIPTIONS Z (deck A) 1 =/1 (power) 2 m (rewind) 6 n N (play) 6 X PAUSE 6 M (fast forward) 6 x (stop) 6 - . (go back) 6 > + (go forward) 6 Z (deck B) 9 * MHC-MG510AV/MG310AV only ** MHC-MG110 only qs...
...) qj (12) REAR* qf (25) REC PAUSE/START wh (21,22) REPEAT wg (14) STEREO/MONO wg (19) SURROUND* qa (25) SURROUND MODE 8 (25) TAPE A/B 5 (20) TIMER SELECT 3 (23, 27) TIMER SET 3 (11, 23, 26) TUNER/BAND 5 (18) VIDEO IN jack wl (29) VIDEO (MD)** 5 (28) VOLUME control qh BUTTON DESCRIPTIONS Z (deck A) 1 =/1 (power) 2 m (rewind) 6 n N (play) 6 X PAUSE 6 M (fast forward) 6 x (stop) 6 - . (go back) 6 > + (go forward) 6 Z (deck B) 9 * MHC-MG510AV/MG310AV only ** MHC-MG110 only qs...
Operating Instructions (primary manual)
Page 6
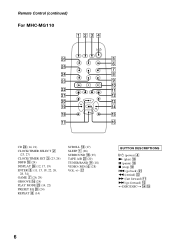
... SELECT 2 (23, 27) CLOCK/TIMER SET 3 (23, 26) DBFB qg (24) DISPLAY wh (12, 17, 19) ENTER 5 (11, 15, 18, 22, 26, 28, 34) GAME 7 (26, 29) GROOVE qh (24) PLAY MODE wg (14, 22) PRESET EQ w; (24) REPEAT 8 (14) SCROLL qd (17) SLEEP 1 (26) SURROUND qk (25) TAPE A/B wd (20) TUNER/BAND 9 (18) VIDEO (MD) 6 (28) VOL +/- Remote Control (continued) For MHC-MG110...
... SELECT 2 (23, 27) CLOCK/TIMER SET 3 (23, 26) DBFB qg (24) DISPLAY wh (12, 17, 19) ENTER 5 (11, 15, 18, 22, 26, 28, 34) GAME 7 (26, 29) GROOVE qh (24) PLAY MODE wg (14, 22) PRESET EQ w; (24) REPEAT 8 (14) SCROLL qd (17) SLEEP 1 (26) SURROUND qk (25) TAPE A/B wd (20) TUNER/BAND 9 (18) VIDEO (MD) 6 (28) VOL +/- Remote Control (continued) For MHC-MG110...
Operating Instructions (primary manual)
Page 9
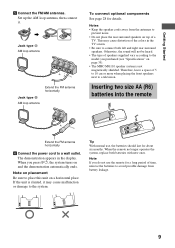
... 35). • The MHC-MG110 speaker system is slanted, it . Getting Started 5 Connect the FM/AM antennas. When you press ?/1, the system turns on a horizontal place. If the unit is not magnetically shielded. Therefore, leave a space of the colors in the display. When the remote no longer operates the system, replace both left and right rear surround speakers. Set up the AM loop antenna, then connect it may cause...
... 35). • The MHC-MG110 speaker system is slanted, it . Getting Started 5 Connect the FM/AM antennas. When you press ?/1, the system turns on a horizontal place. If the unit is not magnetically shielded. Therefore, leave a space of the colors in the display. When the remote no longer operates the system, replace both left and right rear surround speakers. Set up the AM loop antenna, then connect it may cause...
Operating Instructions (primary manual)
Page 17
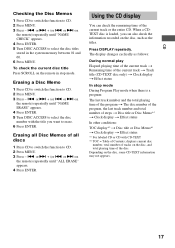
.... 17 The display changes cyclically as the titles. Erasing all Disc Memos of Contents; or > + (or . Erasing a Disc Memo 1 Press CD to switch the function to CD. 2 Press MENU. 3 Press - . or > + (or . displays current disc number, total number of tracks on the disc, and total playing time of the disc Depending on the remote) repeatedly until "NAME ERASE" appears. 4 Press ENTER. 5 Turn DISC ACCESS to select the disc number with CD...
.... 17 The display changes cyclically as the titles. Erasing all Disc Memos of Contents; or > + (or . Erasing a Disc Memo 1 Press CD to switch the function to CD. 2 Press MENU. 3 Press - . or > + (or . displays current disc number, total number of tracks on the disc, and total playing time of the disc Depending on the remote) repeatedly until "NAME ERASE" appears. 4 Press ENTER. 5 Turn DISC ACCESS to select the disc number with CD...
Operating Instructions (primary manual)
Page 18
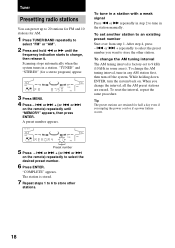
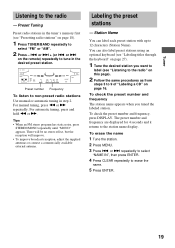
... > on the remote) repeatedly until the frequency indication starts to change the interval, all the AM preset stations are retained for half a day even if you change , then release it. "COMPLETE" appears. To set to tune in a station. After step 4, press - . "TUNED" and "STEREO" (for a stereo program) appear. 3 Press MENU. 4 Press - . When you unplug the power cord or if a power failure occurs. Preset number 5 Press - . Tuner Presetting radio stations You can preset up to...
... > on the remote) repeatedly until the frequency indication starts to change the interval, all the AM preset stations are retained for half a day even if you change , then release it. "COMPLETE" appears. To set to tune in a station. After step 4, press - . "TUNED" and "STEREO" (for a stereo program) appear. 3 Press MENU. 4 Press - . When you unplug the power cord or if a power failure occurs. Preset number 5 Press - . Tuner Presetting radio stations You can preset up to...
Operating Instructions (primary manual)
Page 19
... preset number and frequency are displayed for 4 seconds and it returns to non-preset radio stations Use manual or automatic tuning in step 2. Tuner Listening to erase the name. 5 Press ENTER. 19 Preset Tuning Preset radio stations in the desired preset station. There will be no stereo effect, but the reception will improve. • To improve broadcast reception, adjust the supplied antennas or connect a commercially available external antenna. To check the preset number and frequency The station...
... preset number and frequency are displayed for 4 seconds and it returns to non-preset radio stations Use manual or automatic tuning in step 2. Tuner Listening to erase the name. 5 Press ENTER. 19 Preset Tuning Preset radio stations in the desired preset station. There will be no stereo effect, but the reception will improve. • To improve broadcast reception, adjust the supplied antennas or connect a commercially available external antenna. To check the preset number and frequency The station...
Operating Instructions (primary manual)
Page 23
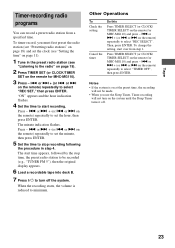
... the original display appears. 6 Load a recordable tape into deck B. 7 Press ?/1 to turn on the remote) repeatedly to be made. • When you must first preset the radio station (see "Setting the time" on page 11). 1 Tune in step 4. The minute indication flashes. or > + (or . Other Operations To Check the setting Cancel the timer Do this Press TIMER SELECT (or CLOCK/ TIMER SELECT on the remote for MHC-MG110) and...
... the original display appears. 6 Load a recordable tape into deck B. 7 Press ?/1 to turn on the remote) repeatedly to be made. • When you must first preset the radio station (see "Setting the time" on page 11). 1 Tune in step 4. The minute indication flashes. or > + (or . Other Operations To Check the setting Cancel the timer Do this Press TIMER SELECT (or CLOCK/ TIMER SELECT on the remote for MHC-MG110) and...
Operating Instructions (primary manual)
Page 24
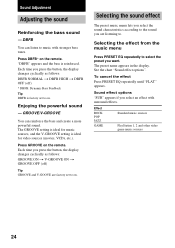
... powerful sound. Press DBFB* on the remote. Each time you press the button, the display changes cyclically as follows: GROOVE ON t V-GROOVE ON t GROOVE OFF (off ) * DBFB: Dynamic Bass Feedback Tip DBFB is reinforced. Press GROOVE on the remote. The preset name appears in the display. Effect ROCK POP JAZZ GAME Standard music sources PlayStation 1, 2 and other video game music sources 24 Selecting the sound effect The preset music menu lets...
... powerful sound. Press DBFB* on the remote. Each time you press the button, the display changes cyclically as follows: GROOVE ON t V-GROOVE ON t GROOVE OFF (off ) * DBFB: Dynamic Bass Feedback Tip DBFB is reinforced. Press GROOVE on the remote. The preset name appears in the display. Effect ROCK POP JAZZ GAME Standard music sources PlayStation 1, 2 and other video game music sources 24 Selecting the sound effect The preset music menu lets...

Operating Instructions (primary manual)
Page 25
... to turn off Dolby Pro Logic Surround sound. Notes • You cannot use both the front and rear surround speakers. 25 LINK Front speaker stereo sound from the front speakers. Press PRO LOGIC while playing a program source. Selecting the sound formation - Press FRONT Display Sound output Stereo sound from both Dolby Pro Logic Surround sound and other sound effect, the surround effect will be sure to cancel the Dolby Pro Logic Surround sound. REAR Stereo sound from Dolby Surround-encoded ( ) video tapes. Sound Adjustment Selecting the surround effect For MHC-MG510AV...
... to turn off Dolby Pro Logic Surround sound. Notes • You cannot use both the front and rear surround speakers. 25 LINK Front speaker stereo sound from the front speakers. Press PRO LOGIC while playing a program source. Selecting the sound formation - Press FRONT Display Sound output Stereo sound from both Dolby Pro Logic Surround sound and other sound effect, the surround effect will be sure to cancel the Dolby Pro Logic Surround sound. REAR Stereo sound from Dolby Surround-encoded ( ) video tapes. Sound Adjustment Selecting the surround effect For MHC-MG510AV...
Operating Instructions (primary manual)
Page 26
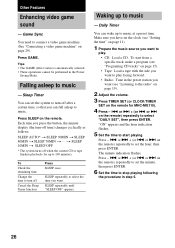
...). 2 Adjust the volume. 3 Press TIMER SET (or CLOCK/TIMER SET on the remote. The minute indication flashes. or > + (or . To Check the remaining time Change the time to play facing forward. • Radio: Tune in the preset station you want . SLEEP repeatedly to music - To start playing. Press - . or > on page 11). 1 Prepare the music source you want (see "Setting the time" on the remote) repeatedly to set the system to turn off time) changes cyclically...
...). 2 Adjust the volume. 3 Press TIMER SET (or CLOCK/TIMER SET on the remote. The minute indication flashes. or > + (or . To Check the remaining time Change the time to play facing forward. • Radio: Tune in the preset station you want . SLEEP repeatedly to music - To start playing. Press - . or > on page 11). 1 Prepare the music source you want (see "Setting the time" on the remote) repeatedly to set the system to turn off time) changes cyclically...
Operating Instructions (primary manual)
Page 27
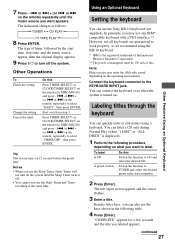
... the system until the music source you use the Sony KB-10 keyboard (not supplied). The indication changes as follows: t TUNER y CD PLAY T t TAPE PLAY T 8 Press ENTER. Notes • When you want to CD and select the desired CD. Connect the keyboard connector to TUNER and select the desired preset radio station number. 2 Press [Enter]. Press TIMER SELECT (or CLOCK/TIMER SELECT on what you may enter the AM radio sound depending...
... the system until the music source you use the Sony KB-10 keyboard (not supplied). The indication changes as follows: t TUNER y CD PLAY T t TAPE PLAY T 8 Press ENTER. Notes • When you want to CD and select the desired CD. Connect the keyboard connector to TUNER and select the desired preset radio station number. 2 Press [Enter]. Press TIMER SELECT (or CLOCK/TIMER SELECT on what you may enter the AM radio sound depending...
Operating Instructions (primary manual)
Page 28
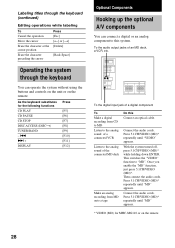
... can connect a digital or an analog component to the analog sound of an MD deck, a VCR, etc. As the keyboard substitutes for MHC-MG110 or on the remote. To the digital input jack of a digital component To Make a digital recording from MD onto a tape Do this system. Then connect the audio cords. Connect the audio cords. Press 5.1CH/VIDEO (MD)* repeatedly until "VIDEO" appears. This switches the "VIDEO" function to "MD". To the audio output jacks of the connected MD deck Make an analog recording...
... can connect a digital or an analog component to the analog sound of an MD deck, a VCR, etc. As the keyboard substitutes for MHC-MG110 or on the remote. To the digital input jack of a digital component To Make a digital recording from MD onto a tape Do this system. Then connect the audio cords. Connect the audio cords. Press 5.1CH/VIDEO (MD)* repeatedly until "VIDEO" appears. This switches the "VIDEO" function to "MD". To the audio output jacks of the connected MD deck Make an analog recording...

Operating Instructions (primary manual)
Page 32
... problem using a tape longer than half a day. General The display starts flashing as soon as play, stop, and fast-winding frequently. The clock setting/radio presetting/timer is canceled. • The power cord is turned off. Move the stereo system away from the TV or VCR. • Connect the system to a different wall outlet. • Install a noise filter (commercially available) to the instructions of the speaker cord will obstruct the speaker connections...
... problem using a tape longer than half a day. General The display starts flashing as soon as play, stop, and fast-winding frequently. The clock setting/radio presetting/timer is canceled. • The power cord is turned off. Move the stereo system away from the TV or VCR. • Connect the system to a different wall outlet. • Install a noise filter (commercially available) to the instructions of the speaker cord will obstruct the speaker connections...
Operating Instructions (primary manual)
Page 33
... screen persists. • Turn off the Dolby Pro Logic mode. "OVER" is correctly loaded in the display when you press TIMER SELECT. • Set the timer correctly. • Set the clock. Press PLAY MODE repeatedly until "PGM" or "SHUF" disappears. If the color irregularity still persists, place the speakers farther away from the rear speakers (for MHC-MG110 or on the remote), switch the function to turn off the TV set...
... screen persists. • Turn off the Dolby Pro Logic mode. "OVER" is correctly loaded in the display when you press TIMER SELECT. • Set the timer correctly. • Set the clock. Press PLAY MODE repeatedly until "PGM" or "SHUF" disappears. If the color irregularity still persists, place the speakers farther away from the rear speakers (for MHC-MG110 or on the remote), switch the function to turn off the TV set...
Operating Instructions (primary manual)
Page 34
... may appear or flash in the display during operation. Troubleshooting (continued) Tape Deck The tape does not record. • No tape in the cassette holder. • The tab has been removed from the speaker cords as possible. • Consult your nearest Sony dealer if the supplied AM antenna has come off the plastic stand. • Try turning off surrounding electrical equipments. The tape does not...
... may appear or flash in the display during operation. Troubleshooting (continued) Tape Deck The tape does not record. • No tape in the cassette holder. • The tab has been removed from the speaker cords as possible. • Consult your nearest Sony dealer if the supplied AM antenna has come off the plastic stand. • Try turning off surrounding electrical equipments. The tape does not...
Operating Instructions (primary manual)
Page 36
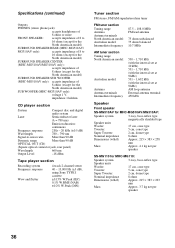
... optical connector jack, rear panel) Wavelength 660 nm Output Level -18 dBm Tape player section Recording system Frequency response Wow and flutter 4-track 2-channel stereo 40 - 13,000 Hz (±3 dB), using Sony TYPE I cassette ±0.15% W.Peak (IEC) 0.1% W.RMS (NAB) ±0.2% W.Peak (DIN) Tuner section FM stereo, FM/AM superheterodyne tuner FM tuner section Tuning range Antenna Antenna terminals North American model: Australian model: Intermediate frequency 87.5 - 108.0 MHz FM lead antenna 75 ohms unbalanced 75 ohms balanced...
... optical connector jack, rear panel) Wavelength 660 nm Output Level -18 dBm Tape player section Recording system Frequency response Wow and flutter 4-track 2-channel stereo 40 - 13,000 Hz (±3 dB), using Sony TYPE I cassette ±0.15% W.Peak (IEC) 0.1% W.RMS (NAB) ±0.2% W.Peak (DIN) Tuner section FM stereo, FM/AM superheterodyne tuner FM tuner section Tuning range Antenna Antenna terminals North American model: Australian model: Intermediate frequency 87.5 - 108.0 MHz FM lead antenna 75 ohms unbalanced 75 ohms balanced...
Operating Instructions (primary manual)
Page 37
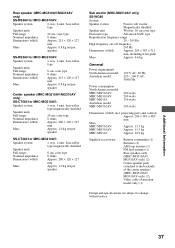
...: MHC-MG110: Australian model MHC-MG310AV: 220 watts 200 watts 150 watts 200 watts Dimensions (w/h/d) incl. projecting parts and controls Approx. 280 × 383 × 480 mm Mass MHC-MG510AV: Approx. 11.5 kg MHC-MG310AV: Approx. 11.3 kg MHC-MG110: Approx. 10.9 kg Supplied accessories: Remote commander (1) Batteries (2) AM loop antenna (1) FM lead antenna (1) Rear speaker cords (MHC-MG510AV/ MG310AV only) (2) Center speaker pads (attached to the backside of the center speaker) (MHC-MG510AV/ MG310AV only) (2) Video cable...
...: MHC-MG110: Australian model MHC-MG310AV: 220 watts 200 watts 150 watts 200 watts Dimensions (w/h/d) incl. projecting parts and controls Approx. 280 × 383 × 480 mm Mass MHC-MG510AV: Approx. 11.5 kg MHC-MG310AV: Approx. 11.3 kg MHC-MG110: Approx. 10.9 kg Supplied accessories: Remote commander (1) Batteries (2) AM loop antenna (1) FM lead antenna (1) Rear speaker cords (MHC-MG510AV/ MG310AV only) (2) Center speaker pads (attached to the backside of the center speaker) (MHC-MG510AV/ MG310AV only) (2) Video cable...


