Operating Instructions
Page 2
... or modifications not expressly approved in the U.S.A This symbol is classified as a CLASS 1 LASER product. Except for the customers in this manual could void your authority to persons. This equipment generates, uses, and can be of sufficient magnitude to constitute a risk of electric shock to...
... or modifications not expressly approved in the U.S.A This symbol is classified as a CLASS 1 LASER product. Except for the customers in this manual could void your authority to persons. This equipment generates, uses, and can be of sufficient magnitude to constitute a risk of electric shock to...
Operating Instructions
Page 4
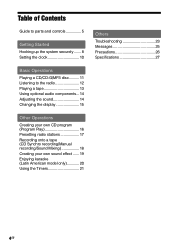
Table of Contents Guide to parts and controls 5 Getting Started Hooking up the system securely ....... 8 Setting the clock 10 Basic Operations Playing a CD/CD-G/MP3 disc.......... 11 Listening to the radio 12 Playing a tape 13 Using optional audio ... Changing the display 15 Other Operations Creating your own CD program (Program Play 16 Presetting radio stations 17 Recording onto a tape (CD Synchro recording/Manual recording/Sound Mixing 18 Creating your own sound effect ...... 19 Enjoying karaoke (Latin American model only 20 Using the Timers 21 Others Troubleshooting 23 Messages...
Table of Contents Guide to parts and controls 5 Getting Started Hooking up the system securely ....... 8 Setting the clock 10 Basic Operations Playing a CD/CD-G/MP3 disc.......... 11 Listening to the radio 12 Playing a tape 13 Using optional audio ... Changing the display 15 Other Operations Creating your own CD program (Program Play 16 Presetting radio stations 17 Recording onto a tape (CD Synchro recording/Manual recording/Sound Mixing 18 Creating your own sound effect ...... 19 Enjoying karaoke (Latin American model only 20 Using the Timers 21 Others Troubleshooting 23 Messages...
Operating Instructions
Page 5
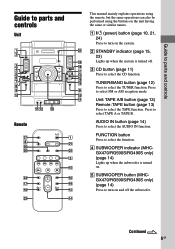
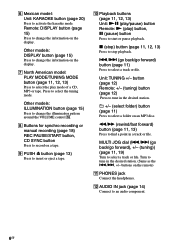
... to select the AUDIO IN function. Press to select the TAPE function. Guide to parts and controls Guide to parts and controls Unit Remote This manual mainly explains operations using the remote, but the same operations can also be performed using the buttons on and off . CD button (page ... 10, 21, 24) Press to turn on the unit having the same or similar names. TUNER/BAND button (page 12) Press to turn on the system. STANDBY indicator (page 15, 23) Lights up when the subwoofer is turned off the subwoofer. Continued 5GB FUNCTION button Press to select...
... to select the AUDIO IN function. Press to select the TAPE function. Guide to parts and controls Guide to parts and controls Unit Remote This manual mainly explains operations using the remote, but the same operations can also be performed using the buttons on and off . CD button (page ... 10, 21, 24) Press to turn on the unit having the same or similar names. TUNER/BAND button (page 12) Press to turn on the system. STANDBY indicator (page 15, 23) Lights up when the subwoofer is turned off the subwoofer. Continued 5GB FUNCTION button Press to select...
Operating Instructions
Page 6
... or tape. Other models: DISPLAY button (page 15) Press to change the illumination pattern around the VOLUME control . Buttons for synchro recording or manual recording (page 18) REC PAUSE/START button, CD SYNC button Press to record on the display. North American model: PLAY MODE/TUNING MODE button...
... or tape. Other models: DISPLAY button (page 15) Press to change the illumination pattern around the VOLUME control . Buttons for synchro recording or manual recording (page 18) REC PAUSE/START button, CD SYNC button Press to record on the display. North American model: PLAY MODE/TUNING MODE button...

Operating Instructions
Page 18
... and do not start playing any other source in step 4. 3 Set deck B to select the CD function. Recording onto a tape (CD Synchro recording/Manual recording/Sound Mixing) You can record on a TYPE I (normal) tape in your desired order, perform steps 2 to 6 of the components and singing or...with the side you want to record facing forward, and then press TAPE A/B repeatedly to record or mix. Manual Recording: You can be recorded onto a tape. For Manual Recording and Sound Mixing: Select the desired source to select TAPE B. 2 Prepare the recording source. The recording level is...
... and do not start playing any other source in step 4. 3 Set deck B to select the CD function. Recording onto a tape (CD Synchro recording/Manual recording/Sound Mixing) You can record on a TYPE I (normal) tape in your desired order, perform steps 2 to 6 of the components and singing or...with the side you want to record facing forward, and then press TAPE A/B repeatedly to record or mix. Manual Recording: You can be recorded onto a tape. For Manual Recording and Sound Mixing: Select the desired source to select TAPE B. 2 Prepare the recording source. The recording level is...
Operating Instructions
Page 19
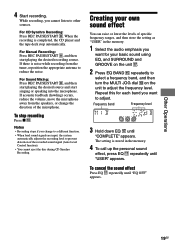
For Manual Recording: Press REC PAUSE/START , and then start singing or speaking into the microphone. To stop automatically. Creating your own sound effect You can ... want to adjust. The setting is noise while recording from the speakers, or change to a different function. • When loud sound signals are input, the system automatically adjusts the recording level to adjust the frequency level. For Sound Mixing: Press REC PAUSE/START , and then start playing the desired source...
For Manual Recording: Press REC PAUSE/START , and then start singing or speaking into the microphone. To stop automatically. Creating your own sound effect You can ... want to adjust. The setting is noise while recording from the speakers, or change to a different function. • When loud sound signals are input, the system automatically adjusts the recording level to adjust the frequency level. For Sound Mixing: Press REC PAUSE/START , and then start playing the desired source...

Operating Instructions
Page 22
To activate or check the timer again Press CLOCK/TIMER SELECT , press repeatedly until "TIMER OFF" appears, and then press ENTER . To change the setting Start over from step 1. To cancel the timer Repeat the same procedure as the setting is not canceled manually. • The volume is reduced to minimum during the Rec Timer. • The Rec Timer is canceled automatically after the Rec Timer has been activated. 22GB Tips • The Play Timer setting remains as long as above until "PLAY SELECT" or "REC SELECT" appears, and then press ENTER .
To activate or check the timer again Press CLOCK/TIMER SELECT , press repeatedly until "TIMER OFF" appears, and then press ENTER . To change the setting Start over from step 1. To cancel the timer Repeat the same procedure as the setting is not canceled manually. • The volume is reduced to minimum during the Rec Timer. • The Rec Timer is canceled automatically after the Rec Timer has been activated. 22GB Tips • The Play Timer setting remains as long as above until "PLAY SELECT" or "REC SELECT" appears, and then press ENTER .

