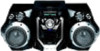
Operating Instructions
Page 2
...'s attention to Article 820-40 of the NEC that the cable ground shall be connected to the grounding system of the building, as vases, on , the user is encouraged to try to operate this product will not occur in cabinet. WARNING This equipment ...in the literature accompanying the appliance. However, there is no guarantee that may cause harmful interference to provide reasonable protection against harmful interference in this manual could void your authority to correct the interference by turning the equipment off and on the apparatus. This symbol is intended to alert the user...
...'s attention to Article 820-40 of the NEC that the cable ground shall be connected to the grounding system of the building, as vases, on , the user is encouraged to try to operate this product will not occur in cabinet. WARNING This equipment ...in the literature accompanying the appliance. However, there is no guarantee that may cause harmful interference to provide reasonable protection against harmful interference in this manual could void your authority to correct the interference by turning the equipment off and on the apparatus. This symbol is intended to alert the user...
Operating Instructions
Page 4
... using wireless system 11 (MHC-GSX100W only) CD/MP3 - Preset Tuning - Recording Recording on a connected component 33 Troubleshooting Problems and remedies 34 Messages 37 Additional Information Precautions 38 Specifications 39 List of Contents How to use this manual 5 Playable discs 5 Getting Started Hooking up the system 7 Setting the clock 8 Wireless Hooking up the transmitter 9 (MHC-GSX100W only) Listening...
... using wireless system 11 (MHC-GSX100W only) CD/MP3 - Preset Tuning - Recording Recording on a connected component 33 Troubleshooting Problems and remedies 34 Messages 37 Additional Information Precautions 38 Specifications 39 List of Contents How to use this manual 5 Playable discs 5 Getting Started Hooking up the system 7 Setting the clock 8 Wireless Hooking up the transmitter 9 (MHC-GSX100W only) Listening...

Operating Instructions
Page 5
...are several specification levels. CD-Extra: This format records audio (audio CD data) on the tracks in this manual. Symbol Meaning Functions that can be used with audio CDs Functions that this system cannot play back the following formats: - music CD format - In Level 1, file names must be in... left on it. *1 ISO 9660 Format The most common international standard for the logical format of a session. How to use this manual • This manual mainly explains operations using the remote, but the same operations can also be performed using the Track-At-Once method. Other discs cannot be...
...are several specification levels. CD-Extra: This format records audio (audio CD data) on the tracks in this manual. Symbol Meaning Functions that can be used with audio CDs Functions that this system cannot play back the following formats: - music CD format - In Level 1, file names must be in... left on it. *1 ISO 9660 Format The most common international standard for the logical format of a session. How to use this manual • This manual mainly explains operations using the remote, but the same operations can also be performed using the Track-At-Once method. Other discs cannot be...
Operating Instructions
Page 15
... recorded on the disc. • Depending on the disc, it when you reach the desired disc). We recommend that you perform Fast Forward or Rewind (Manual Search) 15GB Pause Press X. CD/MP3 -
... recorded on the disc. • Depending on the disc, it when you reach the desired disc). We recommend that you perform Fast Forward or Rewind (Manual Search) 15GB Pause Press X. CD/MP3 -
Operating Instructions
Page 19
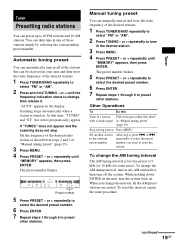
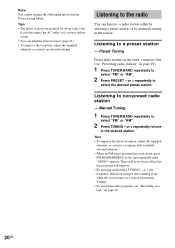
You can then tune in the display. "AUTO" appears in any AM station first, then turn the system back on the unit, turn off the system. Manual tuning preset You can manually tune in "Manual tuning preset" (page 19). or + repeatedly to select the desired preset number. 6 Press ENTER. 7 Repeat... number flashes. The preset number flashes. 5 Press PRESET - At that can be received in your area and then store the radio frequency of "Manual tuning preset" (page 19). 3 Press MENU. 4 Press PRESET - While holding down ENTER on . When you want to the existing preset number...
You can then tune in the display. "AUTO" appears in any AM station first, then turn the system back on the unit, turn off the system. Manual tuning preset You can manually tune in "Manual tuning preset" (page 19). or + repeatedly to select the desired preset number. 6 Press ENTER. 7 Repeat... number flashes. The preset number flashes. 5 Press PRESET - At that can be received in your area and then store the radio frequency of "Manual tuning preset" (page 19). 3 Press MENU. 4 Press PRESET - While holding down ENTER on . When you want to the existing preset number...
Operating Instructions
Page 20
... radio stations in the Power Saving Mode. or + repeatedly to a preset station - or +, the frequency indication changes and scanning stops when the system tunes in the desired station. Tips • The preset stations are retained for about a day even if you disconnect the AC outlet or if ...a power failure occurs. • You can listen to a radio station either by selecting a preset station, or by manually tuning in the station. Manual Tuning 1 Press TUNER/BAND repeatedly to non-preset radio station - or + repeatedly to tune in a station (Automatic Tuning). • To...
... radio stations in the Power Saving Mode. or + repeatedly to a preset station - or +, the frequency indication changes and scanning stops when the system tunes in the desired station. Tips • The preset stations are retained for about a day even if you disconnect the AC outlet or if ...a power failure occurs. • You can listen to a radio station either by selecting a preset station, or by manually tuning in the station. Manual Tuning 1 Press TUNER/BAND repeatedly to non-preset radio station - or + repeatedly to tune in a station (Automatic Tuning). • To...

Operating Instructions
Page 23
... repeatedly until "g" appears to record on one side or "h" (or "j") to record on the unit, then start playing the desired source to record. Recording manually 1 Load a recordable tape. 2 Press TAPE, then press nN repeatedly to select recording side. 3 Press the function button to select the desired source to... the tape reaches the end of the front side part-way through a track, the entire track is recorded again from the optional component connected to record. • CD: To record from this system's CD player. • TUNER: To record from the beginning of the reverse side.
... repeatedly until "g" appears to record on one side or "h" (or "j") to record on the unit, then start playing the desired source to record. Recording manually 1 Load a recordable tape. 2 Press TAPE, then press nN repeatedly to select recording side. 3 Press the function button to select the desired source to... the tape reaches the end of the front side part-way through a track, the entire track is recorded again from the optional component connected to record. • CD: To record from this system's CD player. • TUNER: To record from the beginning of the reverse side.
Operating Instructions
Page 25
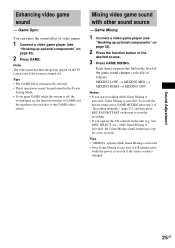
...stop for a few seconds. Each time you press the button the level of "Recording manually" (page 23), and then press REC PAUSE/START on the unit to the GAME ...in the Power Saving Mode. • If you press GAME while the system is off, the system turns on the TV screen even if the system is on the unit (e.g. Tips • "MIXING" appears while Game ...Connect a video game player (see "Hooking up optional components" on page 32). 2 Press the function button of video games. 1 Connect a video game player (see "Hooking up optional components" on page 32). 2 Press GAME. Game Sync...
...stop for a few seconds. Each time you press the button the level of "Recording manually" (page 23), and then press REC PAUSE/START on the unit to the GAME ...in the Power Saving Mode. • If you press GAME while the system is off, the system turns on the TV screen even if the system is on the unit (e.g. Tips • "MIXING" appears while Game ...Connect a video game player (see "Hooking up optional components" on page 32). 2 Press the function button of video games. 1 Connect a video game player (see "Hooking up optional components" on page 32). 2 Press GAME. Game Sync...
Operating Instructions
Page 33
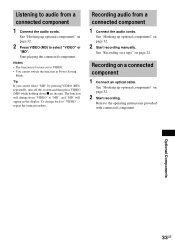
...) repeatedly, turn off the system and then press VIDEO (MD) while holding down x on page 22. See "Hooking up optional components" on page 32. 2 Press VIDEO (MD) to VIDEO. • You cannot switch the function in the display. See "Hooking up optional components" on page 32. 2... will change back to "MD", and "MD" will appear in Power Saving Mode. Recording on page 32. 2 Start recording manually. See "Hooking up optional components" on a connected component 1 Connect an optical cable. Notes • The function is factory-set to select "VIDEO" or "MD". Optional...
...) repeatedly, turn off the system and then press VIDEO (MD) while holding down x on page 22. See "Hooking up optional components" on page 32. 2 Press VIDEO (MD) to VIDEO. • You cannot switch the function in the display. See "Hooking up optional components" on page 32. 2... will change back to "MD", and "MD" will appear in Power Saving Mode. Recording on page 32. 2 Start recording manually. See "Hooking up optional components" on a connected component 1 Connect an optical cable. Notes • The function is factory-set to select "VIDEO" or "MD". Optional...

