Operating Instructions
Page 1
4-233-926-13(1) MiniDisc Deck Operating Instructions Owner's Record The model and serial numbers are located on the rear of the unit. Record the serial number in the space provided below. Model No Serial No MDS-JE770 MDS-JE470 ©2001 Sony Corporation Refer to them whenever you call upon your Sony dealer regarding this product.
4-233-926-13(1) MiniDisc Deck Operating Instructions Owner's Record The model and serial numbers are located on the rear of the unit. Record the serial number in the space provided below. Model No Serial No MDS-JE770 MDS-JE470 ©2001 Sony Corporation Refer to them whenever you call upon your Sony dealer regarding this product.

Operating Instructions
Page 3
...OUTLET UNLESS THE BLADES CAN BE FULLY INSERTED TO PREVENT BLADE EXPOSURE. Conventions Controls in operation is the model used for illustration purposes. The MDS-JE770 is clearly indicated in this manual are similarly named, or, when different, appear in Canada This Class B digital apparatus complies with... Canadian ICES-003. About this manual The instructions in the text, for models MDSJE770 and MDS-JE470. For customers in the instructions within parentheses. 3 these instructions are those on the supplied remote that are for example...
...OUTLET UNLESS THE BLADES CAN BE FULLY INSERTED TO PREVENT BLADE EXPOSURE. Conventions Controls in operation is the model used for illustration purposes. The MDS-JE770 is clearly indicated in this manual are similarly named, or, when different, appear in Canada This Class B digital apparatus complies with... Canadian ICES-003. About this manual The instructions in the text, for models MDSJE770 and MDS-JE470. For customers in the instructions within parentheses. 3 these instructions are those on the supplied remote that are for example...

Operating Instructions
Page 4
... times/Marking track numbers/Smart Space/Adjusting the recording level/Checking the remaining recordable time/Input monitor Starting recording with a Sony CD player - Name Function 31 Registering recorded tracks into a new group (MDS-JE770 only) - Group Function 12 Notes on recording 13 Recording tips 14 - Release Function 32 Changing the recorded level after...
... times/Marking track numbers/Smart Space/Adjusting the recording level/Checking the remaining recordable time/Input monitor Starting recording with a Sony CD player - Name Function 31 Registering recorded tracks into a new group (MDS-JE770 only) - Group Function 12 Notes on recording 13 Recording tips 14 - Release Function 32 Changing the recorded level after...

Operating Instructions
Page 5
... only) ......... 37 Using the CONTROL A1ΙΙ control system (MDS-JE770 only 38 Operating the MD Deck Using a Keyboard (MDS-JE770 only) Setting the keyboard 39 Naming a track or MD using the keyboard 40 Operating the deck using the keyboard 40 Assigning characters to music - Pitch... Control Function 35 Fading in and fading out 36 Falling asleep to keyboard keys 41 Additional Information Precautions 42 Note on MDs 42 System limitations 42 Troubleshooting 44 Self-diagnosis function 44 Display messages 45 Setup menu table 46 Specifications 47 5 Other Functions Changing...
... only) ......... 37 Using the CONTROL A1ΙΙ control system (MDS-JE770 only 38 Operating the MD Deck Using a Keyboard (MDS-JE770 only) Setting the keyboard 39 Naming a track or MD using the keyboard 40 Operating the deck using the keyboard 40 Assigning characters to music - Pitch... Control Function 35 Fading in and fading out 36 Falling asleep to keyboard keys 41 Additional Information Precautions 42 Note on MDs 42 System limitations 42 Troubleshooting 44 Self-diagnosis function 44 Display messages 45 Setup menu table 46 Specifications 47 5 Other Functions Changing...

Operating Instructions
Page 6
...A 8 (11) (20) (25) GROUP ON/OFF1) 3 (13) (22) (31) GROUP SKIP1) 4 (13) (22) (31) INPUT ws (11) LEVEL/DISPLAY/CHAR w; (11) (21) (29) MD insertion slot 6 MDLP indicator 7 (14) (21) MENU/NO qs (15) (22) (25) (35) (39) PC LINK (KEYBOARD)1) qj (39) PHONE LEVEL1) qh (21) PHONES jack1... ?/1 1 (11) (20) (25) H 9 (11) (20) (37) (40) X 0 (11) (20) (39) (40) x qa (11) (20) (25) (37) (40) m/M wd (20) (26) (40) 1) MDS-JE770 only. 2) MDS-JE770 only. JE470, the remote sensor is located on the display window. 6 Refer to the pages indicated in alphabetical order. Main unit 1 2 345 6 7 8 9 0 qa qs qd...
...A 8 (11) (20) (25) GROUP ON/OFF1) 3 (13) (22) (31) GROUP SKIP1) 4 (13) (22) (31) INPUT ws (11) LEVEL/DISPLAY/CHAR w; (11) (21) (29) MD insertion slot 6 MDLP indicator 7 (14) (21) MENU/NO qs (15) (22) (25) (35) (39) PC LINK (KEYBOARD)1) qj (39) PHONE LEVEL1) qh (21) PHONES jack1... ?/1 1 (11) (20) (25) H 9 (11) (20) (37) (40) X 0 (11) (20) (39) (40) x qa (11) (20) (25) (37) (40) m/M wd (20) (26) (40) 1) MDS-JE770 only. 2) MDS-JE770 only. JE470, the remote sensor is located on the display window. 6 Refer to the pages indicated in alphabetical order. Main unit 1 2 345 6 7 8 9 0 qa qs qd...

Operating Instructions
Page 7
... m/M qf (20) (26) (40) ./> qg (15) (20) (25) (35) (39) z qh (11) H qk (11) (20) (37) (40) A wf (11) (20) (25) 1) MDS-JE470 only 2) MDS-JE770 only 7 Parts Identification Remote control wf A wd ws wa w; ` / 1 1 2 3 4 5 6 7 ql 8 qk H X 9 qj z qh x 0 qg .> qf mM qa qd qs AyB qs ...(20) CD PLAYER ./>1) ql CD-SYNCHRO STANDBY 7 (19) CD-SYNCHRO START 7 (19) CD-SYNCHRO STOP 7 (19) CLEAR 6 (23) (30) (40) DISPLAY...
... m/M qf (20) (26) (40) ./> qg (15) (20) (25) (35) (39) z qh (11) H qk (11) (20) (37) (40) A wf (11) (20) (25) 1) MDS-JE470 only 2) MDS-JE770 only 7 Parts Identification Remote control wf A wd ws wa w; ` / 1 1 2 3 4 5 6 7 ql 8 qk H X 9 qj z qh x 0 qg .> qf mM qa qd qs AyB qs ...(20) CD PLAYER ./>1) ql CD-SYNCHRO STANDBY 7 (19) CD-SYNCHRO START 7 (19) CD-SYNCHRO STOP 7 (19) CLEAR 6 (23) (30) (40) DISPLAY...

Operating Instructions
Page 8
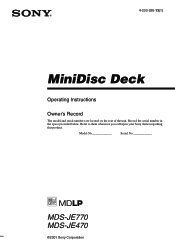
MDS-JE470 CD player, DBS tuner CD player, DBS tuner, etc.2), Digital amplifier, DAT deck, MD deck, etc.3) PC LINK E AC power cord A B Amplifier, etc. Getting Started Hooking up the audio components MDS-JE770 CONTROL A1ΙΙ D AC power cord A C 1) B to a wall outlet CD player, DBS tuner 1) European model only 2) Digital equipment with a DIGITAL OUT connector only 3) Digital equipment with both DIGITAL IN and OUT connectors 8 to a wall outlet Amplifier, etc.
MDS-JE470 CD player, DBS tuner CD player, DBS tuner, etc.2), Digital amplifier, DAT deck, MD deck, etc.3) PC LINK E AC power cord A B Amplifier, etc. Getting Started Hooking up the audio components MDS-JE770 CONTROL A1ΙΙ D AC power cord A C 1) B to a wall outlet CD player, DBS tuner 1) European model only 2) Digital equipment with a DIGITAL OUT connector only 3) Digital equipment with both DIGITAL IN and OUT connectors 8 to a wall outlet Amplifier, etc.
Operating Instructions
Page 9
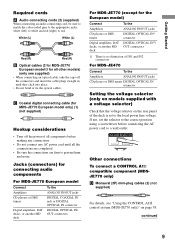
...COAXIAL IN jack or DIGITAL OPTICAL IN connector DIGITAL OPTICAL IN/ OUT connectors For MDS-JE770 (except for the European model) Connect Amplifiers CD players or DBS tuners Digital amplifiers, DAT decks, or another MD deck To the ANALOG IN/OUT jacks DIGITAL OPTICAL IN1) connector DIGITAL OPTICAL IN1... AC power cord until they click into place. • Do not bend or tie the optical cables. For MDS-JE470 Connect To the Amplifiers ANALOG IN/OUT jacks CD players or DBS tuners DIGITAL OPTICAL IN connector Setting the voltage selector (only on models supplied with a voltage selector) ...
...COAXIAL IN jack or DIGITAL OPTICAL IN connector DIGITAL OPTICAL IN/ OUT connectors For MDS-JE770 (except for the European model) Connect Amplifiers CD players or DBS tuners Digital amplifiers, DAT decks, or another MD deck To the ANALOG IN/OUT jacks DIGITAL OPTICAL IN1) connector DIGITAL OPTICAL IN1... AC power cord until they click into place. • Do not bend or tie the optical cables. For MDS-JE470 Connect To the Amplifiers ANALOG IN/OUT jacks CD players or DBS tuners DIGITAL OPTICAL IN connector Setting the voltage selector (only on models supplied with a voltage selector) ...

Operating Instructions
Page 10
... x and CLEAR simultaneously when there is activated automatically after about ten minutes. "Demo Off" appears in the display. Tip When the remote no MD in the deck, demonstration mode is no longer operates the deck, replace both batteries with the PC connecting kit. For details, refer to the ...into the remote casing, particularly when replacing the batteries. • Do not use a timer, connect the AC power cord to select and play MD tracks and do various editing operations on the front panel of the timer. Notes • Do not leave the remote in an extremely hot or...
... x and CLEAR simultaneously when there is activated automatically after about ten minutes. "Demo Off" appears in the display. Tip When the remote no MD in the deck, demonstration mode is no longer operates the deck, replace both batteries with the PC connecting kit. For details, refer to the ...into the remote casing, particularly when replacing the batteries. • Do not use a timer, connect the AC power cord to select and play MD tracks and do various editing operations on the front panel of the timer. Notes • Do not leave the remote in an extremely hot or...

Operating Instructions
Page 11
...CHAR (or DISPLAY) repeatedly to turn on the deck. The deck changes to the program source. MDS-JE470 Track number and recorded time of the current track t Remaining recordable time4) on the MD t Level of the input signal t Track name5) 4) Time shown in the display differs depending on... OPT or D-IN DIGITAL COAXIAL IN jack1) COAX ANALOG IN jacks ANALOG or A-IN 1) MDS-JE770 European model only 5 Press REC z. Recording to MDs Recording to MDs Recording to an MD If the MD has been partially recorded, recording starts after stopping recording 2) The track number increases by one....
...CHAR (or DISPLAY) repeatedly to turn on the deck. The deck changes to the program source. MDS-JE470 Track number and recorded time of the current track t Remaining recordable time4) on the MD t Level of the input signal t Track name5) 4) Time shown in the display differs depending on... OPT or D-IN DIGITAL COAXIAL IN jack1) COAX ANALOG IN jacks ANALOG or A-IN 1) MDS-JE770 European model only 5 Press REC z. Recording to MDs Recording to MDs Recording to an MD If the MD has been partially recorded, recording starts after stopping recording 2) The track number increases by one....

Operating Instructions
Page 12
... group (page 31) • Registering recorded tracks into a new group (page 32) • Releasing track group registrations (page 32) Note MDs recorded using the Group function, the group management information is the Group function? To use the Group function. 12 This is convenient for "Releasing... the registrations of all tracks on an MD" on page 33 and release the registrations of all tracks on page 30 and rewrite this deck. Group Function: Off Disc Track 1 2 3 ...
... group (page 31) • Registering recorded tracks into a new group (page 32) • Releasing track group registrations (page 32) Note MDs recorded using the Group function, the group management information is the Group function? To use the Group function. 12 This is convenient for "Releasing... the registrations of all tracks on an MD" on page 33 and release the registrations of all tracks on page 30 and rewrite this deck. Group Function: Off Disc Track 1 2 3 ...

Operating Instructions
Page 13
... 31). or 48-kHz DAT tape or satellite broadcasts, as well as 32- Recording into a new group You can be registered on a single MD. • If "Group Full!" Delete unnecessary characters (disc name or track names) until group recording is turned off the deck. appears while recording...space for group management. This allows you press REC z to record in sampling rate converter automatically converts the sampling frequency of "Recording to an MD" on page 11. 2 Press GROUP ON/OFF. To continue and record into another new group, press x repeatedly after any existing groups with...
... 31). or 48-kHz DAT tape or satellite broadcasts, as well as 32- Recording into a new group You can be registered on a single MD. • If "Group Full!" Delete unnecessary characters (disc name or track names) until group recording is turned off the deck. appears while recording...space for group management. This allows you press REC z to record in sampling rate converter automatically converts the sampling frequency of "Recording to an MD" on page 11. 2 Press GROUP ON/OFF. To continue and record into another new group, press x repeatedly after any existing groups with...
Operating Instructions
Page 14
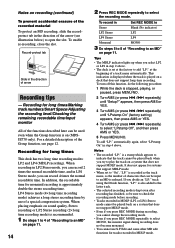
...select LP2 or LP4 in step 2 above . Notes on recording (continued) To prevent accidental erasure of the recorded material To protect an MD recording, slide the recordprotect tab in the direction of the arrow (see page 12. When placing emphasis on sound quality, Stereo recording or... recordable time. LP4 Stereo mode (4× long time recording mode) achieves a long stereo recording time by use S.F Edit and some other MD edit functions for long times/Marking track numbers/Smart Space/Adjusting the recording level/Checking the remaining recordable time/Input monitor All of a track ...
...select LP2 or LP4 in step 2 above . Notes on recording (continued) To prevent accidental erasure of the recorded material To protect an MD recording, slide the recordprotect tab in the direction of the arrow (see page 12. When placing emphasis on sound quality, Stereo recording or... recordable time. LP4 Stereo mode (4× long time recording mode) achieves a long stereo recording time by use S.F Edit and some other MD edit functions for long times/Marking track numbers/Smart Space/Adjusting the recording level/Checking the remaining recordable time/Input monitor All of a track ...
Operating Instructions
Page 15
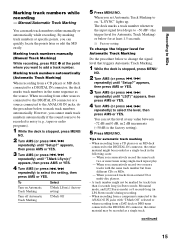
...Marking to -50 dB1) (the trigger level for Automatic Track Marking) or below for automatic track marking • When recording from a CD player or MD deck connected to the ANALOG IN jacks with the same track number but from a DAT deck or DBS tuner connected to the DIGITAL IN ... the same track two or more tracks with "T.Mark Off" selected or when recording from different CDs or MDs. - Marking track numbers automatically (Automatic Track Marking) When recording from a CD player or an MD deck connected to select the level, then press AMS or YES. appears, then press AMS or YES....
...Marking to -50 dB1) (the trigger level for Automatic Track Marking) or below for automatic track marking • When recording from a CD player or MD deck connected to the ANALOG IN jacks with the same track number but from a DAT deck or DBS tuner connected to the DIGITAL IN ... the same track two or more tracks with "T.Mark Off" selected or when recording from different CDs or MDs. - Marking track numbers automatically (Automatic Track Marking) When recording from a CD player or an MD deck connected to select the level, then press AMS or YES. appears, then press AMS or YES....

Operating Instructions
Page 16
...if there is automatically turned on Smart Space S.Space On (factory and Auto Cut setting) Turn off in the middle of the input signal appears. 4 MDS-JE770 While monitoring the sound, turn AMS (or press LEVEL +/- No sound input for 30 seconds or more, the deck replaces this silence with a ... 3 seconds long automatically. Tip You can adjust the recording level for both analog and digital recordings. 1 Do steps 1 to 5 of "Recording to an MD" on the peak level meters. S.Space Off Notes • Smart Space does not affect the order of the track numbers being recorded, even if the...
...if there is automatically turned on Smart Space S.Space On (factory and Auto Cut setting) Turn off in the middle of the input signal appears. 4 MDS-JE770 While monitoring the sound, turn AMS (or press LEVEL +/- No sound input for 30 seconds or more, the deck replaces this silence with a ... 3 seconds long automatically. Tip You can adjust the recording level for both analog and digital recordings. 1 Do steps 1 to 5 of "Recording to an MD" on the peak level meters. S.Space Off Notes • Smart Space does not affect the order of the track numbers being recorded, even if the...
Operating Instructions
Page 17
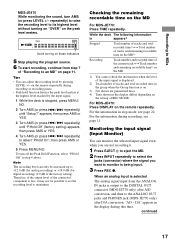
Recording to MDs MDS-JE470 While monitoring the sound, turn off the Peak Hold Function, select "P.Hold Off.... To turn AMS (or press LEVEL +/- For MDS-JE470: Press DISPLAY on the peak level meters. repeatedly) to raise the recording level to the ANALOG OUT jacks and PHONES jack (MDS-JE770 only) after D/A conversion. Note The recording ... (or press ./> repeatedly) until "Setup?" DA" appears in the group when the Group function is on the MD For MDS-JE770: Press TIME repeatedly. While the deck The following information is appears1) Stopped Total number of tracks and total recorded...
Recording to MDs MDS-JE470 While monitoring the sound, turn off the Peak Hold Function, select "P.Hold Off.... To turn AMS (or press LEVEL +/- For MDS-JE470: Press DISPLAY on the peak level meters. repeatedly) to raise the recording level to the ANALOG OUT jacks and PHONES jack (MDS-JE770 only) after D/A conversion. Note The recording ... (or press ./> repeatedly) until "Setup?" DA" appears in the group when the Group function is on the MD For MDS-JE770: Press TIME repeatedly. While the deck The following information is appears1) Stopped Total number of tracks and total recorded...
Operating Instructions
Page 18
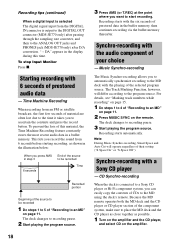
... OUT jacks and PHONES jack (MDS-JE770 only) after D/A conversion. Synchro-recording with a Sony CD player - Because the MD remote operates both the MD deck and the CD player or CD player section of the component system, make sure to place the MD deck and the CD player as close together as shown in...digital input is selected The digital signal input from the DIGITAL IN connector is connected to a Sony CD player or Hi-Fi component system, you can easily copy the contents of CDs to the MD using the deck's remote. DA" appears in the buffer memory, then continues recording via the...
... OUT jacks and PHONES jack (MDS-JE770 only) after D/A conversion. Synchro-recording with a Sony CD player - Because the MD remote operates both the MD deck and the CD player or CD player section of the component system, make sure to place the MD deck and the CD player as close together as shown in...digital input is selected The digital signal input from the DIGITAL IN connector is connected to a Sony CD player or Hi-Fi component system, you can easily copy the contents of CDs to the MD using the deck's remote. DA" appears in the buffer memory, then continues recording via the...

Operating Instructions
Page 19
... STANDBY on the remote Locate the next track to CD PLAYER ./> on the deck. When the CD player is to the MD (Disc Memo Copy Function) (MDS-JE770 only). Press number button 2 on the remote while pressing down ?/1 on the remote MD (MDS-JE470) (page 17) Tips • You can use the... of the track marking parameter setting ("T.Mark LSyn(c)" or "T.Mark Off"). • By reprograming the MD's remote, you record tracks from a Sony CD player connected with a Sony CD player" on page 18. 2 Set the CD player to playing pause mode. 3 Press REC z on be sure to set the selector to the ANALOG...
... STANDBY on the remote Locate the next track to CD PLAYER ./> on the deck. When the CD player is to the MD (Disc Memo Copy Function) (MDS-JE770 only). Press number button 2 on the remote while pressing down ?/1 on the remote MD (MDS-JE470) (page 17) Tips • You can use the... of the track marking parameter setting ("T.Mark LSyn(c)" or "T.Mark Off"). • By reprograming the MD's remote, you record tracks from a Sony CD player connected with a Sony CD player" on page 18. 2 Set the CD player to playing pause mode. 3 Press REC z on be sure to set the selector to the ANALOG...

Operating Instructions
Page 20
...the mode you want (see "Creating your own program" on the amplifier. "REP A-B" lights up With the arrow pointing toward the deck Playing an MD - during play Turn AMS counterclockwise (or press . Release it when you want appears in the display. With the labeled side up and Repeat A-B ... : Repeat only one track Press REPEAT repeatedly until the track number you reach the desired point. Select To play Blank (no PLAY The MD in the original order MODE indication) SHUF The tracks in random order PGM The tracks in the display, then press AMS or H. Repeat ...
...the mode you want (see "Creating your own program" on the amplifier. "REP A-B" lights up With the arrow pointing toward the deck Playing an MD - during play Turn AMS counterclockwise (or press . Release it when you want appears in the display. With the labeled side up and Repeat A-B ... : Repeat only one track Press REPEAT repeatedly until the track number you reach the desired point. Select To play Blank (no PLAY The MD in the original order MODE indication) SHUF The tracks in random order PGM The tracks in the display, then press AMS or H. Repeat ...

Operating Instructions
Page 21
...press .) or press m to go back. • You can use headphones, connect them to the PHONES jack. repeatedly) to adjust the headphones level (MDS-JE770 only). • When "- The track name appears and scrolls. 1) Automatic Music Sensor 2) When you locate a point while monitoring the sound. 3)...over 10 1 Press >10. Tips • The MDLP indicator lights up ) t Track name1) Turning off indications in the display (MDS-JE770 only)" below.) MDS-JE470 Track number and elapsed time of the current track t Track number and remaining time of the current track t Remaining time of all tracks ...
...press .) or press m to go back. • You can use headphones, connect them to the PHONES jack. repeatedly) to adjust the headphones level (MDS-JE770 only). • When "- The track name appears and scrolls. 1) Automatic Music Sensor 2) When you locate a point while monitoring the sound. 3)...over 10 1 Press >10. Tips • The MDLP indicator lights up ) t Track name1) Turning off indications in the display (MDS-JE770 only)" below.) MDS-JE470 Track number and elapsed time of the current track t Track number and remaining time of the current track t Remaining time of all tracks ...


