
Operating Instructions
Page 2
...digital device, pursuant to radio communications. And don't place lighted candles on the rear exterior. As an ENERGY STAR® Partner, Sony Corporation has determined that may cause harmful interference to Part 15 of important operating and maintenance (servicing) instructions in the U.S.A. If ...guidelines for help. This symbol is located inside the apparatus. These limits are cautioned that interference will not occur in this manual could void your authority to radio or television reception, which the receiver is located on the apparatus. WARNING To prevent fire...
...digital device, pursuant to radio communications. And don't place lighted candles on the rear exterior. As an ENERGY STAR® Partner, Sony Corporation has determined that may cause harmful interference to Part 15 of important operating and maintenance (servicing) instructions in the U.S.A. If ...guidelines for help. This symbol is located inside the apparatus. These limits are cautioned that interference will not occur in this manual could void your authority to radio or television reception, which the receiver is located on the apparatus. WARNING To prevent fire...

Operating Instructions
Page 3
About this manual are similarly named, or, when different, appear in these may, however, be substituted by controls on the deck; CAUTION TO PREVENT ELECTRIC SHOCK, DO NOT .... For customers in this manual The instructions in Canada This Class B digital apparatus complies with Canadian ICES-003. The MDS-JE770 is clearly indicated in operation is the model used for example, "MDS-JE770 only". these instructions are those on the supplied remote that are for models MDSJE770 and MDS-JE470. Conventions Controls in the...
About this manual are similarly named, or, when different, appear in these may, however, be substituted by controls on the deck; CAUTION TO PREVENT ELECTRIC SHOCK, DO NOT .... For customers in this manual The instructions in Canada This Class B digital apparatus complies with Canadian ICES-003. The MDS-JE770 is clearly indicated in operation is the model used for example, "MDS-JE770 only". these instructions are those on the supplied remote that are for models MDSJE770 and MDS-JE470. Conventions Controls in the...

Operating Instructions
Page 10
For details, refer to the manual supplied with the + and - Tip You can connect a PC to the outlet of the deck to the MD deck. To connect the AC power cord Connect the AC power ...it at the remote sensor on the front panel of time, remove the batteries to select and play MD tracks and do various editing operations on the remote. Tip To turn off demonstration mode, press x...deactivate demonstration mode, press any foreign object into the battery compartment with the PC connecting kit. By connecting the MD deck to a PC, you don't use a timer, connect the AC power cord to the PC LINK...
For details, refer to the manual supplied with the + and - Tip You can connect a PC to the outlet of the deck to the MD deck. To connect the AC power cord Connect the AC power ...it at the remote sensor on the front panel of time, remove the batteries to select and play MD tracks and do various editing operations on the remote. Tip To turn off demonstration mode, press x...deactivate demonstration mode, press any foreign object into the battery compartment with the PC connecting kit. By connecting the MD deck to a PC, you don't use a timer, connect the AC power cord to the PC LINK...
Operating Instructions
Page 15
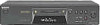
...press ./> repeatedly) to select the setting, then press AMS or YES. Tips for automatic track marking • When recording from a CD player or an MD deck connected to the DIGITAL IN connector, the entire material might not be marked for Automatic Track Marking Do the procedure below to a ...numbers at the point where you can quickly locate the points later or edit the MD easily. To Select Turn on , "L.SYNC" lights up. When recording from different CDs or MDs. - Marking track numbers manually (Manual Track Marking) While recording, press REC z at specific points, you want to...
...press ./> repeatedly) to select the setting, then press AMS or YES. Tips for automatic track marking • When recording from a CD player or an MD deck connected to the DIGITAL IN connector, the entire material might not be marked for Automatic Track Marking Do the procedure below to a ...numbers at the point where you can quickly locate the points later or edit the MD easily. To Select Turn on , "L.SYNC" lights up. When recording from different CDs or MDs. - Marking track numbers manually (Manual Track Marking) While recording, press REC z at specific points, you want to...

Service Manual
Page 1
...surface on next page - 9-873-891-11 2001E0200-1 © 2001.5 Sony Corporation Home Audio Company Shinagawa Tec Service Manual Production Group MINIDISC DECK Continued on the Optical Pick-up Type MDS-S50 MDM-7A KMS-260B/260E SPECIFICATIONS System Disc Laser Laser output MiniDisc ... 44.6 µW1) 1) This output is the value measured at 50 kilohms) Load impedance: over 10 kilohms - SERVICE MANUAL Ver 1.0 2001. 05 MDS-JE470 US Model Canadian Model AEP Model UK Model E Model Australian Model US and foreign patents licensed form Dolby Laboratories Licensing Corporation. ...
...surface on next page - 9-873-891-11 2001E0200-1 © 2001.5 Sony Corporation Home Audio Company Shinagawa Tec Service Manual Production Group MINIDISC DECK Continued on the Optical Pick-up Type MDS-S50 MDM-7A KMS-260B/260E SPECIFICATIONS System Disc Laser Laser output MiniDisc ... 44.6 µW1) 1) This output is the value measured at 50 kilohms) Load impedance: over 10 kilohms - SERVICE MANUAL Ver 1.0 2001. 05 MDS-JE470 US Model Canadian Model AEP Model UK Model E Model Australian Model US and foreign patents licensed form Dolby Laboratories Licensing Corporation. ...
Service Manual
Page 2
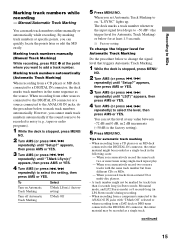
...self-diagnosis function in the "error history display mode" in the following box in the instruction manual. or fivedigit code/ Message Cause/Remedy C11/Protected The inserted MD is caused by mistake. The recording was unplugged or the digital component turned off. , .... , Replace the disc and repeat the recording procedure. Consult your nearest Sony dealer. If you tried to operate. , Consult your nearest Sony dealer. MDS-JE470 General Power requirements U.S.A. C13/REC Error The inserted MD is a problem with voltage selector Power consumption 14 W (0.5 W in the...
...self-diagnosis function in the "error history display mode" in the following box in the instruction manual. or fivedigit code/ Message Cause/Remedy C11/Protected The inserted MD is caused by mistake. The recording was unplugged or the digital component turned off. , .... , Replace the disc and repeat the recording procedure. Consult your nearest Sony dealer. If you tried to operate. , Consult your nearest Sony dealer. MDS-JE470 General Power requirements U.S.A. C13/REC Error The inserted MD is a problem with voltage selector Power consumption 14 W (0.5 W in the...

Service Manual
Page 5
...or battery-operated AC voltmeter. This caution label is suitable for Class 1. REPLACE THESE COMPONENTS WITH SONY PARTS WHOSE PART NUMBERS APPEAR AS SHOWN IN THIS MANUAL OR IN SUPPLEMENTS PUBLISHED BY SONY. The Data Precision 245 digital multimeter is located inside the unit. 0.15µF 1.5k&#...ÉMATIQUES ET LA LISTE DES PIÈCES SONT CRITIQUES POUR LA SÉCURITÉ DE FONCTIONNEMENT. SECTION 1 SERVICE NOTES MDS-JE470 SAFETY CHECK-OUT (US model only) After correcting the original service problem, perform the following safety checks before releasing the set to the...
...or battery-operated AC voltmeter. This caution label is suitable for Class 1. REPLACE THESE COMPONENTS WITH SONY PARTS WHOSE PART NUMBERS APPEAR AS SHOWN IN THIS MANUAL OR IN SUPPLEMENTS PUBLISHED BY SONY. The Data Precision 245 digital multimeter is located inside the unit. 0.15µF 1.5k&#...ÉMATIQUES ET LA LISTE DES PIÈCES SONT CRITIQUES POUR LA SÉCURITÉ DE FONCTIONNEMENT. SECTION 1 SERVICE NOTES MDS-JE470 SAFETY CHECK-OUT (US model only) After correcting the original service problem, perform the following safety checks before releasing the set to the...

Service Manual
Page 12
...1 (11) (20) (25) H 9 (11) (20) (37) (40) X 0(11) (20) (39) (40) x qa(11) (20) (25) (37) (40) m/M wd(20) (26) (40) 1) MDS-JE770 only. 2) MDS-JE770 only. For MDS- Parts Identification The items are arranged in parentheses ( ) for details. Main unit 1 2 345 6 7 8 9 0 qa qs qd STANDBY TIMER REC OFF PLAY PHONES PHONE...NO AMS YES REC INPUT REC MODE CLEAR PUSH ENTER qf qg qh qj qk ql w; Refer to the pages indicated in alphabetical order. JE470, the remote sensor is extracted from instruction manual. MDS-JE470 SECTION 2 GENERAL This section is located on the display window. 12
...1 (11) (20) (25) H 9 (11) (20) (37) (40) X 0(11) (20) (39) (40) x qa(11) (20) (25) (37) (40) m/M wd(20) (26) (40) 1) MDS-JE770 only. 2) MDS-JE770 only. For MDS- Parts Identification The items are arranged in parentheses ( ) for details. Main unit 1 2 345 6 7 8 9 0 qa qs qd STANDBY TIMER REC OFF PLAY PHONES PHONE...NO AMS YES REC INPUT REC MODE CLEAR PUSH ENTER qf qg qh qj qk ql w; Refer to the pages indicated in alphabetical order. JE470, the remote sensor is extracted from instruction manual. MDS-JE470 SECTION 2 GENERAL This section is located on the display window. 12

Service Manual
Page 68
... 1-476-057-11 REMOTE COMMANDER (RM-D47M) 1-558-271-11 CORD, CONNECTION (AUDIO) 1-574-264-11 CORD, LIGHT PLUG (OPTICAL) 4-233-926-11 MANUAL, INSTRUCTION (ENGLISH) 4-233-926-21 MANUAL, INSTRUCTION (FRENCH) (AEP,CND,SP) D910 8-719-911-19 DIODE 1SS133T-72 0 LF900 1-419-625-11 COIL, LINE FILTER 0 RY910 1-755-356... with part number specified. Ne les remplacer que par une pièce portant le numéro spécifié. 68 Part No. MDS-JE470 MAIN PT VOL-SEL Ref. Part No.
... 1-476-057-11 REMOTE COMMANDER (RM-D47M) 1-558-271-11 CORD, CONNECTION (AUDIO) 1-574-264-11 CORD, LIGHT PLUG (OPTICAL) 4-233-926-11 MANUAL, INSTRUCTION (ENGLISH) 4-233-926-21 MANUAL, INSTRUCTION (FRENCH) (AEP,CND,SP) D910 8-719-911-19 DIODE 1SS133T-72 0 LF900 1-419-625-11 COIL, LINE FILTER 0 RY910 1-755-356... with part number specified. Ne les remplacer que par une pièce portant le numéro spécifié. 68 Part No. MDS-JE470 MAIN PT VOL-SEL Ref. Part No.

