Operating Instructions
Page 3
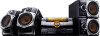
...manual The LBT-ZUX9 consists of the building, as close to operate this product will not occur in a residential installation. About this equipment does cause harmful interference to radio or television reception, which the receiver is connected. - MICROVAULT is no guarantee that any changes or modification not expressly approved in this manual... could void your authority to the point of the following measures: - This equipment generates, uses, and can be connected to the grounding system of : - However, there is a trademark of Sony Corporation. Connect...
...manual The LBT-ZUX9 consists of the building, as close to operate this product will not occur in a residential installation. About this equipment does cause harmful interference to radio or television reception, which the receiver is connected. - MICROVAULT is no guarantee that any changes or modification not expressly approved in this manual... could void your authority to the point of the following measures: - This equipment generates, uses, and can be connected to the grounding system of : - However, there is a trademark of Sony Corporation. Connect...
Operating Instructions
Page 4
... 27 Using play mode 29 Tuner Listening to parts and controls.......... 7 Getting Started Hooking up the optional components 47 Additional Information Troubleshooting 49 Precautions 57 Specifications 59 Index 61 4US Table of Contents About this manual 3 Playable discs 5 Playable/Recordable USB devices 6 Guide to the radio 31 Tape Playing a tape 33 Recording...
... 27 Using play mode 29 Tuner Listening to parts and controls.......... 7 Getting Started Hooking up the optional components 47 Additional Information Troubleshooting 49 Precautions 57 Specifications 59 Index 61 4US Table of Contents About this manual 3 Playable discs 5 Playable/Recordable USB devices 6 Guide to the radio 31 Tape Playing a tape 33 Recording...
Operating Instructions
Page 7
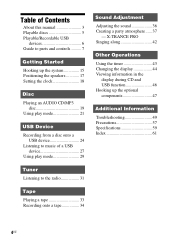
Front view 12 3 4 5 67 wh wg wf wd ws wa w; ql qk - qa qs qd qf qg qh qj wk wj wl ef e; Top view 8 9 q; Unit - ea ed es Continued l 7US Guide to parts and controls This manual mainly explains operations using the buttons on the unit, but the same operations can also be performed using the buttons on the remote having the same or similar names.
Front view 12 3 4 5 67 wh wg wf wd ws wa w; ql qk - qa qs qd qf qg qh qj wk wj wl ef e; Top view 8 9 q; Unit - ea ed es Continued l 7US Guide to parts and controls This manual mainly explains operations using the buttons on the unit, but the same operations can also be performed using the buttons on the remote having the same or similar names.
Operating Instructions
Page 31
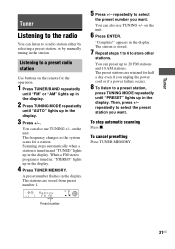
... +/- To cancel presetting Press TUNER MEMORY. Tuner Tuner Listening to the radio You can listen to a radio station either by selecting a preset station, or by manually tuning in the display. 3 Press +/-. The frequency changes as the system scans for the operation. 1 Press TUNER/BAND repeatedly until "FM" or "AM" lights up...
... +/- To cancel presetting Press TUNER MEMORY. Tuner Tuner Listening to the radio You can listen to a radio station either by selecting a preset station, or by manually tuning in the display. 3 Press +/-. The frequency changes as the system scans for the operation. 1 Press TUNER/BAND repeatedly until "FM" or "AM" lights up...
Operating Instructions
Page 32
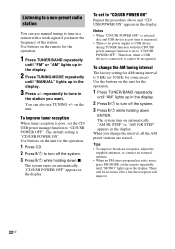
... for AM tuning interval is 9 kHz (or 10 kHz for the operation. 1 Press TUNER/BAND repeatedly until "MANUAL" lights up in the display. 3 Press +/- Listening to a non-preset radio station You can also use manual tuning to tune in the display. 2 Press "/1 to turn off the system. 3 Press "/1 while holding down x. Use...
... for AM tuning interval is 9 kHz (or 10 kHz for the operation. 1 Press TUNER/BAND repeatedly until "MANUAL" lights up in the display. 3 Press +/- Listening to a non-preset radio station You can also use manual tuning to tune in the display. 2 Press "/1 to turn off the system. 3 Press "/1 while holding down x. Use...

Operating Instructions
Page 34
...4 Press TAPE REC PAUSE/ START. Recording starts. You cannot listen to record on the remote repeatedly to 6 of the tape. 34US For Manual Recording and Sound Mixing: Press the function button to select the source you want to record facing upward. 2 Prepare the recording source. Recording...to load the tape with the side you can "mix" sound from any tape. • When recording from an audio source, including connected audio components. Perform steps 2 to select the selected disc 1 DISC. Then, press +/- CD-TAPE Synchro Recording: You can record tracks on the remote ...
...4 Press TAPE REC PAUSE/ START. Recording starts. You cannot listen to record on the remote repeatedly to 6 of the tape. 34US For Manual Recording and Sound Mixing: Press the function button to select the source you want to record facing upward. 2 Prepare the recording source. Recording...to load the tape with the side you can "mix" sound from any tape. • When recording from an audio source, including connected audio components. Perform steps 2 to select the selected disc 1 DISC. Then, press +/- CD-TAPE Synchro Recording: You can record tracks on the remote ...

Operating Instructions
Page 35
5 For Manual Recording and Sound Mixing, start singing along with the music and adjust the microphone volume by turning MIC LEVEL. Notes • You cannot eject the ...
5 For Manual Recording and Sound Mixing, start singing along with the music and adjust the microphone volume by turning MIC LEVEL. Notes • You cannot eject the ...

Operating Instructions
Page 38
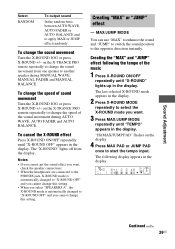
... bubbling effect - AQUA OFF cancel the AQUA sound effect. The display changes cyclically as follows: MANUAL WAVE t MANUAL FADER t MANUAL BALANCE t AUTO WAVE t AUTO FADER t AUTO BALANCE t RANDOM POSITION t TWISTER t RANDOM Select MANUAL WAVE, AUTO WAVE MANUAL FADER, AUTO FADER MANUAL BALANCE, AUTO BALANCE RANDOM POSITION TWISTER To output sound In circular motion around the room...
... bubbling effect - AQUA OFF cancel the AQUA sound effect. The display changes cyclically as follows: MANUAL WAVE t MANUAL FADER t MANUAL BALANCE t AUTO WAVE t AUTO FADER t AUTO BALANCE t RANDOM POSITION t TWISTER t RANDOM Select MANUAL WAVE, AUTO WAVE MANUAL FADER, AUTO FADER MANUAL BALANCE, AUTO BALANCE RANDOM POSITION TWISTER To output sound In circular motion around the room...
Operating Instructions
Page 39
... FADER and AUTO BALANCE. on the X-TRANCE PRO remote repeatedly to "X-ROUND OFF" and you cannot change the speed of the sound movement during MANUAL WAVE, MANUAL FADER and MANUAL BALANCE. "Hit MAX/JUMP PAD" flashes on the X-TRANCE PRO remote repeatedly to change this setting. on the display. 4 Press MAX PAD or...
... FADER and AUTO BALANCE. on the X-TRANCE PRO remote repeatedly to "X-ROUND OFF" and you cannot change the speed of the sound movement during MANUAL WAVE, MANUAL FADER and MANUAL BALANCE. "Hit MAX/JUMP PAD" flashes on the X-TRANCE PRO remote repeatedly to change this setting. on the display. 4 Press MAX PAD or...
Operating Instructions
Page 40
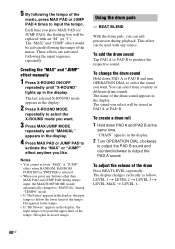
Creating the "MAX" and "JUMP" effect manually 1 Press X-ROUND ON/OFF repeatedly until "MANUAL" appears in the display, the input tempo is selected. • When you press any source. Hit again in the display. These effects are activated following ... can be activated following the input sequence repeatedly. "CHAIN" appears in the display. 2 Turn OPERATION DIAL clockwise to output the PAD B sound and counterclockwise to "MANUAL" during playback. Notes • You cannot activate "MAX" or "JUMP" effect when RANDOM, RANDOM POSITION or TWISTER is below the lower limit of the tempo...
Creating the "MAX" and "JUMP" effect manually 1 Press X-ROUND ON/OFF repeatedly until "MANUAL" appears in the display, the input tempo is selected. • When you press any source. Hit again in the display. These effects are activated following ... can be activated following the input sequence repeatedly. "CHAIN" appears in the display. 2 Turn OPERATION DIAL clockwise to output the PAD B sound and counterclockwise to "MANUAL" during playback. Notes • You cannot activate "MAX" or "JUMP" effect when RANDOM, RANDOM POSITION or TWISTER is below the lower limit of the tempo...

Operating Instructions
Page 41
... DIAL (or press BEAT PATTERN + or BEAT PATTERN - To change the beat pattern Hold down ENTER and then press BEAT SPEED. To change the speed manually after you input the tempo. on the X-TRANCE PRO remote repeatedly) to input the tempo. Hit again with slower tempo. • If the tempo of...
... DIAL (or press BEAT PATTERN + or BEAT PATTERN - To change the beat pattern Hold down ENTER and then press BEAT SPEED. To change the speed manually after you input the tempo. on the X-TRANCE PRO remote repeatedly) to input the tempo. Hit again with slower tempo. • If the tempo of...
Operating Instructions
Page 52
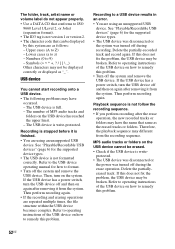
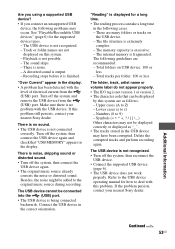
Upper cases (A to 9) - Numbers (0 to Z) - Refer to the USB device operating manual for how to format. • Turn off the system and remove the USB device. Recording to a USB device results in an error. • You are ...
Upper cases (A to 9) - Numbers (0 to Z) - Refer to the USB device operating manual for how to format. • Turn off the system and remove the USB device. Recording to a USB device results in an error. • You are ...
Operating Instructions
Page 53
... is fragmented. Lower cases (a to Z) - Delete the corrupted tracks and perform recording again. If the problem persists, contact your nearest Sony dealer. Make sure there is no sound. • The USB device is being connected backwards. There is displayed for a long time....original music source already consists the noise or distorted sound. Recording stops before it is not recognized. - Refer to the USB device operating manual for the supported device types. - "Over Current" appear in the correct orientation. Total folders on the USB device. - See "Playable...
... is fragmented. Lower cases (a to Z) - Delete the corrupted tracks and perform recording again. If the problem persists, contact your nearest Sony dealer. Make sure there is no sound. • The USB device is being connected backwards. There is displayed for a long time....original music source already consists the noise or distorted sound. Recording stops before it is not recognized. - Refer to the USB device operating manual for the supported device types. - "Over Current" appear in the correct orientation. Total folders on the USB device. - See "Playable...
Operating Instructions
Page 61
... 37 Demonstration 16, 45 Display 11 E EFFECTOR 37 F FLANGER 37 FM MODE 32 G GROOVE 36 H Handling discs 57 Hooking up the optional components 47 system 15 J JUMP PAD 39 M Manual Recording 34 MAX PAD 39 Multi Session 6 N Non-playable disc 5 Normal Play 21, 29 P Playable disc 5 Playable/Recordable USB devices 6 Power Saving...
... 37 Demonstration 16, 45 Display 11 E EFFECTOR 37 F FLANGER 37 FM MODE 32 G GROOVE 36 H Handling discs 57 Hooking up the optional components 47 system 15 J JUMP PAD 39 M Manual Recording 34 MAX PAD 39 Multi Session 6 N Non-playable disc 5 Normal Play 21, 29 P Playable disc 5 Playable/Recordable USB devices 6 Power Saving...

