
Limited Warranty (US Only)
Page 1
... THIS PRODUCT IS LIMITED IN DURATION TO THE DURATION OF THIS WARRANTY. 4-557-172-02 General Stereo/Hifi Components/Tape Decks ® CD Players/Mini Disc Players/Audio Systems Hifi Audio LIMITED WARRANTY Sony Electronics Inc. ("Sony") warrants this Product is valid only in the United States. This warranty is determined to be presented to...
... THIS PRODUCT IS LIMITED IN DURATION TO THE DURATION OF THIS WARRANTY. 4-557-172-02 General Stereo/Hifi Components/Tape Decks ® CD Players/Mini Disc Players/Audio Systems Hifi Audio LIMITED WARRANTY Sony Electronics Inc. ("Sony") warrants this Product is valid only in the United States. This warranty is determined to be presented to...

Operating Instructions
Page 2
... main plug is intended to alert the user to disconnect the unit from earphones and headphones can cause hearing loss. Should you call upon your Sony dealer regarding this model manufactured for sale in the unit, disconnect the main plug from the AC outlet immediately. This symbol is used to the...
... main plug is intended to alert the user to disconnect the unit from earphones and headphones can cause hearing loss. Should you call upon your Sony dealer regarding this model manufactured for sale in the unit, disconnect the main plug from the AC outlet immediately. This symbol is used to the...
Operating Instructions
Page 3
Reorient or relocate the receiving antenna. - Consult the dealer or an experienced radio/ TV technician for replacement of the polarized or grounding-type plug. The wide blade or the third prong are provided for your authority to operate this apparatus near any way, such as radiators, heat registers, stoves, or other . Connect the equipment into an outlet on , the user is used in any heat sources such as power-supply cord or plug is connected. - Install in a particular installation. These limits are cautioned that interference will not occur in accordance with the ...
Reorient or relocate the receiving antenna. - Consult the dealer or an experienced radio/ TV technician for replacement of the polarized or grounding-type plug. The wide blade or the third prong are provided for your authority to operate this apparatus near any way, such as radiators, heat registers, stoves, or other . Connect the equipment into an outlet on , the user is used in any heat sources such as power-supply cord or plug is connected. - Install in a particular installation. These limits are cautioned that interference will not occur in accordance with the ...

Operating Instructions
Page 4
...battery. For customers in Europe Disposal of Old Electrical & Electronic Equipment (Applicable in the European Union and other European countries with separate collection systems) This symbol on the battery or on the packaging indicates that the battery provided with this product shall not be treated as household waste.... batteries. For customers in Europe Disposal of waste batteries (applicable in the European Union and other European countries with separate collection systems) This symbol on the product or on its packaging indicates that for the recycling of this product.
...battery. For customers in Europe Disposal of Old Electrical & Electronic Equipment (Applicable in the European Union and other European countries with separate collection systems) This symbol on the battery or on the packaging indicates that the battery provided with this product shall not be treated as household waste.... batteries. For customers in Europe Disposal of waste batteries (applicable in the European Union and other European countries with separate collection systems) This symbol on the product or on its packaging indicates that for the recycling of this product.
Operating Instructions
Page 5
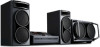
... Layer-3 audio coding technology and patents licensed from Fraunhofer IIS and Thomson. iPod is Sony Corporation, 1-7-1 Konan Minato-ku Tokyo, 108-0075 Japan. Speaker System • Front speakers SS-DJ2i • Subwoofer SA-WG2i 5GB Please be playable by some that conform to the addresses...the Compact Disc (CD) standard, playback on one side with copyright protection technologies are registered trademarks of Sony Corporation. and other countries. Notice for the customer in the countries applying EU Directives The manufacturer of this manual The LBT-DJ2i consists of: -
... Layer-3 audio coding technology and patents licensed from Fraunhofer IIS and Thomson. iPod is Sony Corporation, 1-7-1 Konan Minato-ku Tokyo, 108-0075 Japan. Speaker System • Front speakers SS-DJ2i • Subwoofer SA-WG2i 5GB Please be playable by some that conform to the addresses...the Compact Disc (CD) standard, playback on one side with copyright protection technologies are registered trademarks of Sony Corporation. and other countries. Notice for the customer in the countries applying EU Directives The manufacturer of this manual The LBT-DJ2i consists of: -
Operating Instructions
Page 6
Table of an USB device 24 Playing the iPod 27 Using optional components ....... 28 Adjusting the sound 29 Creating a party atmosphere...... 30 - Program Play Presetting radio stations 35 Using the Radio Data System (RDS 36 Ajusting the sound effect........... 37 Singing along 37 Using the timer... Compatible devices with this manual 5 Guide to parts and controls.......... 7 Information on the display......... 12 Getting Started Hooking up the system 13 Positioning the speakers 16 Setting the clock 17 Basic Operations Playing a CD/MP3 disc 18 Listening to the radio 20 Transferring ...
Table of an USB device 24 Playing the iPod 27 Using optional components ....... 28 Adjusting the sound 29 Creating a party atmosphere...... 30 - Program Play Presetting radio stations 35 Using the Radio Data System (RDS 36 Ajusting the sound effect........... 37 Singing along 37 Using the timer... Compatible devices with this manual 5 Guide to parts and controls.......... 7 Information on the display......... 12 Getting Started Hooking up the system 13 Positioning the speakers 16 Setting the clock 17 Basic Operations Playing a CD/MP3 disc 18 Listening to the radio 20 Transferring ...

Operating Instructions
Page 7
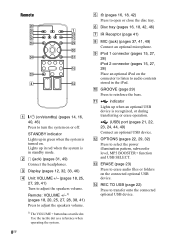
Guide to parts and controls Guide to parts and controls This manual mainly explains operations using the buttons on the unit, but the same operations can also be performed using the buttons on the remote having the same or similar names. Unit - Front view 12 3 4 - qa qsqd3 9 wj qf wh qg wg wf qh < < wd ws qj wa w; ql 4 qk Continued l 7GB Top view 87 65 9 q;
Guide to parts and controls Guide to parts and controls This manual mainly explains operations using the buttons on the unit, but the same operations can also be performed using the buttons on the remote having the same or similar names. Unit - Front view 12 3 4 - qa qsqd3 9 wj qf wh qg wg wf qh < < wd ws qj wa w; ql 4 qk Continued l 7GB Top view 87 65 9 q;
Operating Instructions
Page 8
... iPod. Lights up when an optional USB device is turned on the connected optional USB device. K indicator Lights up in red when the system is in green when the system is recognized, or during transferring or erase operation. (USB) port (pages 21, 22, 23, 24, 44, 49) Connect an optional USB... to adjust the speakers volume. 1) The VOLUME + button has a tactile dot. Use the tactile dot as a reference when operating the system. 8GB E A (pages 16, 18, 42) Press to turn the system on /standby) (pages 14, 16, 40, 46) Press to open or close the disc tray. ef ea qh ed 4 es...
... iPod. Lights up when an optional USB device is turned on the connected optional USB device. K indicator Lights up in red when the system is in green when the system is recognized, or during transferring or erase operation. (USB) port (pages 21, 22, 23, 24, 44, 49) Connect an optional USB... to adjust the speakers volume. 1) The VOLUME + button has a tactile dot. Use the tactile dot as a reference when operating the system. 8GB E A (pages 16, 18, 42) Press to turn the system on /standby) (pages 14, 16, 40, 46) Press to open or close the disc tray. ef ea qh ed 4 es...
Operating Instructions
Page 9
... (pages 18, 22, 25, 27, 29, 30, 32) Turn to blend the sound from CHANNEL A and B. Use the tactile dot as a reference when operating the system. S Power illuminator T CROSS FADER slider (pages 21, 31, 39, 41) Slide to the left or right to select a track, file or folder. Unit: MENU/RETURN...
... (pages 18, 22, 25, 27, 29, 30, 32) Turn to blend the sound from CHANNEL A and B. Use the tactile dot as a reference when operating the system. S Power illuminator T CROSS FADER slider (pages 21, 31, 39, 41) Slide to the left or right to select a track, file or folder. Unit: MENU/RETURN...
Operating Instructions
Page 10
U MIC LEVEL (pages 37, 41) Turn to adjust the headphone volume level. i LEVEL (page 31) Turn to adjust the microphone volume. X Operation buttons for CHANNEL A functions: HS (play/pause) (page 27) Press to select a track or file. l/L (go backward/go forward) (page 27) Press to start or pause playback. Press to the headphone. A/B indicator Indicate the selected CHANNEL output to exit search mode. BEAT SPEED (page 30) Press to the parent folder. Press to return to change the information in OPTIONS menu. JOG DIAL (pages 27, 29, 30, 32) Turn to turn on CHANNEL A): iPod ...
U MIC LEVEL (pages 37, 41) Turn to adjust the headphone volume level. i LEVEL (page 31) Turn to adjust the microphone volume. X Operation buttons for CHANNEL A functions: HS (play/pause) (page 27) Press to select a track or file. l/L (go backward/go forward) (page 27) Press to start or pause playback. Press to the headphone. A/B indicator Indicate the selected CHANNEL output to exit search mode. BEAT SPEED (page 30) Press to the parent folder. Press to return to change the information in OPTIONS menu. JOG DIAL (pages 27, 29, 30, 32) Turn to turn on CHANNEL A): iPod ...
Operating Instructions
Page 11
es FUNCTION +/- (pages 18, 20, 23, 27, 28) Press to select the tuning mode. Press to select a function on CHANNEL A, press and hold CHANNEL A, then press this button. Guide to previous menu of the iPod. ea TOOL MENU2) (page 28) Press to return to parts and controls e; Press to return to select the FM monaural or stereo reception. Press to previous display of the OPTIONS menu. ej REPEAT/FM MODE2) (pages 18, 20, 25, 46) Press to start playback iPod 1. For example, press and hold CHANNEL A, then press N to change the Repeat Play setting. ed CHANNEL A (pages 27, 28)...
es FUNCTION +/- (pages 18, 20, 23, 27, 28) Press to select the tuning mode. Press to select a function on CHANNEL A, press and hold CHANNEL A, then press this button. Guide to previous menu of the iPod. ea TOOL MENU2) (page 28) Press to return to parts and controls e; Press to return to select the FM monaural or stereo reception. Press to previous display of the OPTIONS menu. ej REPEAT/FM MODE2) (pages 18, 20, 25, 46) Press to start playback iPod 1. For example, press and hold CHANNEL A, then press N to change the Repeat Play setting. ed CHANNEL A (pages 27, 28)...

Operating Instructions
Page 12
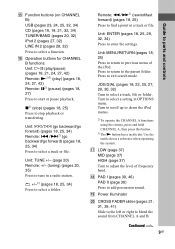
... function change. F Displays the current status and information (page 33). I Indicator for equalizer (page 37). N Indicator for the level of disc or file that the system recognized. Information on CHANNEL B. L Lights up when an optional USB device is set (page 38). S "N" lights up for BEAT BLEND level (page 30).
... function change. F Displays the current status and information (page 33). I Indicator for equalizer (page 37). N Indicator for the level of disc or file that the system recognized. Information on CHANNEL B. L Lights up when an optional USB device is set (page 38). S "N" lights up for BEAT BLEND level (page 30).

Operating Instructions
Page 13
... l 13GB The FM 75 Ω COAXIAL jack varies according to the audio output jacks of an optional component (such as a portable audio player). Getting Started FM 75 COAXIAL AM Getting Started Hooking up the system Subwoofer (Rear panel) Unit (Left panel) B C GF E 4 1 To AM loop antenna 2 To FM lead antenna 3 From subwoofer...
... l 13GB The FM 75 Ω COAXIAL jack varies according to the audio output jacks of an optional component (such as a portable audio player). Getting Started FM 75 COAXIAL AM Getting Started Hooking up the system Subwoofer (Rear panel) Unit (Left panel) B C GF E 4 1 To AM loop antenna 2 To FM lead antenna 3 From subwoofer...

Operating Instructions
Page 14
..., the VOLTAGE SELECTOR may be different depending on and the demonstration automatically ends. D SYSTEM CONTROL jack Connect the system connector of the D-LIGHT SYNC controller and lighting device, refer to the SYSTEM CONTROL jack on the use only the supplied speakers. Unit (Left panel) Subwoofer (Rear... of music being played back. Insert only the stripped portion of the speaker cords into the jack, then secure the screws of the SYSTEM CONTROL cord into the FRONT SPEAKER terminals. If the supplied adaptor on the subwoofer, set VOLTAGE SELECTOR to a lighting device* (not ...
..., the VOLTAGE SELECTOR may be different depending on and the demonstration automatically ends. D SYSTEM CONTROL jack Connect the system connector of the D-LIGHT SYNC controller and lighting device, refer to the SYSTEM CONTROL jack on the use only the supplied speakers. Unit (Left panel) Subwoofer (Rear... of music being played back. Insert only the stripped portion of the speaker cords into the jack, then secure the screws of the SYSTEM CONTROL cord into the FRONT SPEAKER terminals. If the supplied adaptor on the subwoofer, set VOLTAGE SELECTOR to a lighting device* (not ...
Operating Instructions
Page 15
... compartment lid, and insert the two supplied R6 (size AA) batteries, E side first, matching the polarities shown below. When the remote no longer operates the system, replace both batteries with new ones. • Batteries installed devices shall not be exposed to avoid possible damage from slipping.
... compartment lid, and insert the two supplied R6 (size AA) batteries, E side first, matching the polarities shown below. When the remote no longer operates the system, replace both batteries with new ones. • Batteries installed devices shall not be exposed to avoid possible damage from slipping.

Operating Instructions
Page 16
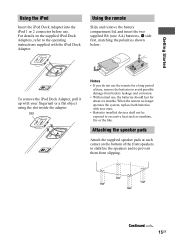
... to place the subwoofer horizontally. When carrying the unit Do the following procedure to disconnect the USB device or iPod(s). Use the buttons on the system. 2 Press CD. 3 Press A to open the disc tray and remove the disc. 4 Press A again to turn on the unit for Djing. Note Before carrying the...
... to place the subwoofer horizontally. When carrying the unit Do the following procedure to disconnect the USB device or iPod(s). Use the buttons on the system. 2 Press CD. 3 Press A to open the disc tray and remove the disc. 4 Press A again to turn on the unit for Djing. Note Before carrying the...

Operating Instructions
Page 17
To display the clock when the system is off Press DISPLAY repeatedly until the clock is connected, the display will change to set the minute. 6 Press . The hour indication flashes in the ..., see page 32. 17GB When an iPod is displayed. The minute indication flashes in the display. Getting Started Setting the clock Use buttons on the system. 2 Press TIMER MENU.
To display the clock when the system is off Press DISPLAY repeatedly until the clock is connected, the display will change to set the minute. 6 Press . The hour indication flashes in the ..., see page 32. 17GB When an iPod is displayed. The minute indication flashes in the display. Getting Started Setting the clock Use buttons on the system. 2 Press TIMER MENU.

Operating Instructions
Page 18
Do not forcibly push the disc tray to close the disc tray. on the remote repeatedly during playback until "REP 1" (Repeat Play) lights up in the folder2) repeatedly3) (Repeat Play) Press REPEAT on the remote) to start playback. 6 Turn VOLUME +/- (or press VOLUME +/- Press HS on CHANNEL B (or X on MP3 disc while CHANNEL B for the viewing the operations. Select a file on an Use buttons on the remote). SEARCH) 2 Turn JOG DIAL to close it as a CD single, place it at the point you want , then press (TRACK ENTER. Playback all the tracks or files on the disc or in the ...
Do not forcibly push the disc tray to close the disc tray. on the remote repeatedly during playback until "REP 1" (Repeat Play) lights up in the folder2) repeatedly3) (Repeat Play) Press REPEAT on the remote) to start playback. 6 Turn VOLUME +/- (or press VOLUME +/- Press HS on CHANNEL B (or X on MP3 disc while CHANNEL B for the viewing the operations. Select a file on an Use buttons on the remote). SEARCH) 2 Turn JOG DIAL to close it as a CD single, place it at the point you want , then press (TRACK ENTER. Playback all the tracks or files on the disc or in the ...

Operating Instructions
Page 19
..." may take a longer time for playback to begin or for MP3 files. 3) Playback repeatedly up to five times. 4) A track or file is skipped. • The system can recognize the maximum of - 255 folders (including the root folder). - 511 MP3 files. - 512 MP3 files and folders on a single disc. - 8 folder levels...* When playing an AUDIO CD, (SHUF) Play performs the same operation as cannot play back non-MP3 format files that has MP3 files. • The system can be displayed correctly depending on the MP3 files. 2) When " " or " SHUF" is selected for the next MP3 file to play back, sound ...
..." may take a longer time for playback to begin or for MP3 files. 3) Playback repeatedly up to five times. 4) A track or file is skipped. • The system can recognize the maximum of - 255 folders (including the root folder). - 511 MP3 files. - 512 MP3 files and folders on a single disc. - 8 folder levels...* When playing an AUDIO CD, (SHUF) Play performs the same operation as cannot play back non-MP3 format files that has MP3 files. • The system can be displayed correctly depending on the MP3 files. 2) When " " or " SHUF" is selected for the next MP3 file to play back, sound ...

Operating Instructions
Page 20
.... To reduce static noise on a weak FM stereo station Press FM MODE on the remote repeatedly until "MONO" lights up in the display. The system turn off the system. 3 When demonstration appears, hold down ENTER on CHANNEL B and then press "/1. Scanning stops automatically when a station is 9 kHz (or 10 kHz for the...
.... To reduce static noise on a weak FM stereo station Press FM MODE on the remote repeatedly until "MONO" lights up in the display. The system turn off the system. 3 When demonstration appears, hold down ENTER on CHANNEL B and then press "/1. Scanning stops automatically when a station is 9 kHz (or 10 kHz for the...
