Operating Instructions
Page 3
...-over. 13) Unplug this apparatus during lightning storms or when unused for a Class B digital device, pursuant to Part 15 of the FCC Rules. If this manual could void your outlet, consult an electrician for replacement of the following measures: - Important Safety Instructions 1) Read these instructions. 2) Keep these instructions. 3) Heed all warnings...
...-over. 13) Unplug this apparatus during lightning storms or when unused for a Class B digital device, pursuant to Part 15 of the FCC Rules. If this manual could void your outlet, consult an electrician for replacement of the following measures: - Important Safety Instructions 1) Read these instructions. 2) Keep these instructions. 3) Heed all warnings...
Operating Instructions
Page 5
... is not guaranteed. iPod is a trademark of Apple Inc., registered in the countries applying EU Directives The manufacturer of Sony Corporation. Unit HCD-DJ2i - About this product is a trademark of this product. Music discs encoded with copyright protection technologies This product is designed.... Speaker System • Front speakers SS-DJ2i • Subwoofer SA-WG2i 5GB Note on Multi Session disc When you play back discs that do not conform to play back Multi Session discs with digital audio material on this manual The LBT-DJ2i consists of Sony Corporation....
... is not guaranteed. iPod is a trademark of Apple Inc., registered in the countries applying EU Directives The manufacturer of Sony Corporation. Unit HCD-DJ2i - About this product is a trademark of this product. Music discs encoded with copyright protection technologies This product is designed.... Speaker System • Front speakers SS-DJ2i • Subwoofer SA-WG2i 5GB Note on Multi Session disc When you play back discs that do not conform to play back Multi Session discs with digital audio material on this manual The LBT-DJ2i consists of Sony Corporation....
Operating Instructions
Page 6
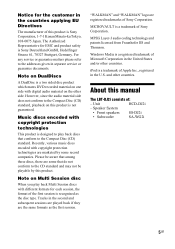
... Information Troubleshooting 40 Messages 46 Precautions 48 Specifications 49 Compatible devices with this manual 5 Guide to parts and controls.......... 7 Information on the display......... 12 Getting Started Hooking up the system 13 Positioning the speakers 16 Setting the clock 17 Basic Operations Playing a ...Listening to music of an USB device 24 Playing the iPod 27 Using optional components ....... 28 Adjusting the sound 29 Creating a party atmosphere...... 30 - Table of Contents About this system 52 Index 54 6GB Inspiring the DJ's mood Changing the display 32 Viewing ...
... Information Troubleshooting 40 Messages 46 Precautions 48 Specifications 49 Compatible devices with this manual 5 Guide to parts and controls.......... 7 Information on the display......... 12 Getting Started Hooking up the system 13 Positioning the speakers 16 Setting the clock 17 Basic Operations Playing a ...Listening to music of an USB device 24 Playing the iPod 27 Using optional components ....... 28 Adjusting the sound 29 Creating a party atmosphere...... 30 - Table of Contents About this system 52 Index 54 6GB Inspiring the DJ's mood Changing the display 32 Viewing ...

Operating Instructions
Page 7
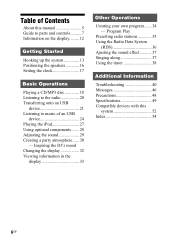
Top view 87 65 9 q; Front view 12 3 4 - Unit - ql 4 qk Continued l 7GB qa qsqd3 9 wj qf wh qg wg wf qh < < wd ws qj wa w; Guide to parts and controls Guide to parts and controls This manual mainly explains operations using the buttons on the unit, but the same operations can also be performed using the buttons on the remote having the same or similar names.
Top view 87 65 9 q; Front view 12 3 4 - Unit - ql 4 qk Continued l 7GB qa qsqd3 9 wj qf wh qg wg wf qh < < wd ws qj wa w; Guide to parts and controls Guide to parts and controls This manual mainly explains operations using the buttons on the unit, but the same operations can also be performed using the buttons on the remote having the same or similar names.
Operating Instructions
Page 21
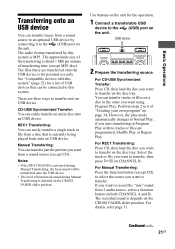
... an USB device. Select the track or file you want to transfer on CHANNEL B. Manual Transferring: You can transfer just the portion you want from a sound source to an optional USB device by this system. Continued l 21GB For REC1 Transferring: Press CD, then load the disc you want ...to transfer, then press HS on the disc tray. For CD-USB Synchronized Transfer: Press CD, then load the disc you want to 6 of transferred sound during Manual Transferring is MP3....
... an USB device. Select the track or file you want to transfer on CHANNEL B. Manual Transferring: You can transfer just the portion you want from a sound source to an optional USB device by this system. Continued l 21GB For REC1 Transferring: Press CD, then load the disc you want ...to transfer, then press HS on the disc tray. For CD-USB Synchronized Transfer: Press CD, then load the disc you want to 6 of transferred sound during Manual Transferring is MP3....
Operating Instructions
Page 22
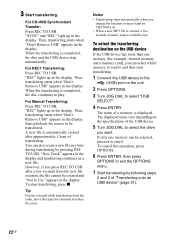
... display and transferring continues as a new file. 3 Start transferring. Then, transferring starts when "Don't Remove USB" appears in the display. The name of transferring. For Manual Transferring: Press REC TO USB. Start playback the source to play. "SYNC" and "REC" light up in the display. For REC1 Transferring: Press REC TO...
... display and transferring continues as a new file. 3 Start transferring. Then, transferring starts when "Don't Remove USB" appears in the display. The name of transferring. For Manual Transferring: Press REC TO USB. Start playback the source to play. "SYNC" and "REC" light up in the display. For REC1 Transferring: Press REC TO...
Operating Instructions
Page 23
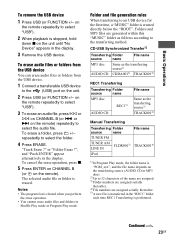
... characters of the name are assigned. 3) Folder numbers are assigned serially thereafter. 4) File numbers are generated within this "MUSIC" folder as the transferring source2) TRACK0014) Manual Transferring Transferring Folder source name TUNER FM TUNER AM FLDR0013) LINE IN iPod File name TRACK0014) 1) In Program Play mode, the folder name is created...
... characters of the name are assigned. 3) Folder numbers are assigned serially thereafter. 4) File numbers are generated within this "MUSIC" folder as the transferring source2) TRACK0014) Manual Transferring Transferring Folder source name TUNER FM TUNER AM FLDR0013) LINE IN iPod File name TRACK0014) 1) In Program Play mode, the folder name is created...
Operating Instructions
Page 31
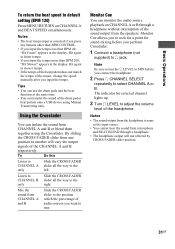
... you want to the position which the percentage of the headphone. Using the Crossfader You can transfer the sound of the music, change the speed manually after you input the tempo less than BPM 200, "Hit Slower" appears in slower tempo. • If the tempo of the beat pattern does not... • The beat tempo input is same as the input source. • You cannot hear the sound from CHANNEL A and B or blend them together using Manual Transferring only. Hit again in the display. To Do this Listen to CHANNEL A only Slide the CROSS FADER slider all the way to the left...
... you want to the position which the percentage of the headphone. Using the Crossfader You can transfer the sound of the music, change the speed manually after you input the tempo less than BPM 200, "Hit Slower" appears in slower tempo. • If the tempo of the beat pattern does not... • The beat tempo input is same as the input source. • You cannot hear the sound from CHANNEL A and B or blend them together using Manual Transferring only. Hit again in the display. To Do this Listen to CHANNEL A only Slide the CROSS FADER slider all the way to the left...
Operating Instructions
Page 39
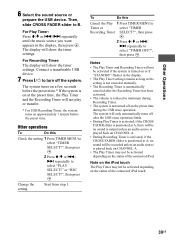
...system. The display will show the timer settings. Then, slide CROSS FADER slider to select "TIMER OFF?", then press . For Play Timer: Press V/v or ./> repeatedly until the music source you want appears in the display. • The Play Timer setting remains as long as the setting is not canceled manually...repeatedly to B. Note on the iPod touch The Play Timer may not be activated depending on approximately 1 minute before the preset time.* If the system is played back on CHANNEL A. • The Play Timer may not be recorded unless an audio source is on at A, no sound will not...
...system. The display will show the timer settings. Then, slide CROSS FADER slider to select "TIMER OFF?", then press . For Play Timer: Press V/v or ./> repeatedly until the music source you want appears in the display. • The Play Timer setting remains as long as the setting is not canceled manually...repeatedly to B. Note on the iPod touch The Play Timer may not be activated depending on approximately 1 minute before the preset time.* If the system is played back on CHANNEL A. • The Play Timer may not be recorded unless an audio source is on at A, no sound will not...

Operating Instructions
Page 54
... Crossfader 31 D Demonstration 14, 32 Display 12 Display mode 32 F FM MODE 20 H Handling discs 48 Hooking up the system 13 M Manual Transferring 21 Monitor cue 31 MP3 BOOSTER+ 29 Multi Session 5 N Non-playable disc 48 Normal Play 19, 26 O OPTIONS menu 22, 29, 32 P Play mode ...19, 26 Playable disc 48 Power Saving Mode 32 Presetting radio station 35 Program Play 34 R Radio station 20 RDS (Radio Data System) 36 REC1 Transferring...
... Crossfader 31 D Demonstration 14, 32 Display 12 Display mode 32 F FM MODE 20 H Handling discs 48 Hooking up the system 13 M Manual Transferring 21 Monitor cue 31 MP3 BOOSTER+ 29 Multi Session 5 N Non-playable disc 48 Normal Play 19, 26 O OPTIONS menu 22, 29, 32 P Play mode ...19, 26 Playable disc 48 Power Saving Mode 32 Presetting radio station 35 Program Play 34 R Radio station 20 RDS (Radio Data System) 36 REC1 Transferring...

