Operating Instructions
Page 2
... provides guidelines for energy efficiency. BBE and BBE Symbol are trademarks of BBE Sound, Inc. ClearEdge VM and HD Detailer are trademarks of Sony Corporation. 1 REFER SERVICING TO QUALIFIED SERVICE PERSONNEL. This symbol is intended to alert the user to the presence of...might damage the finish of the cabinet. TruSurround technology is incorporated under U.S. Wega, FD Trinitron, Steady Sound, Digital Reality Creation, Caption Vision, CineMotion, Memory Stick, and Twin View are the result of Sony Corporation. CAUTION TO PREVENT ELECTRIC SHOCK, MATCH WIDE BLADE OF PLUG TO ...
... provides guidelines for energy efficiency. BBE and BBE Symbol are trademarks of BBE Sound, Inc. ClearEdge VM and HD Detailer are trademarks of Sony Corporation. 1 REFER SERVICING TO QUALIFIED SERVICE PERSONNEL. This symbol is intended to alert the user to the presence of...might damage the finish of the cabinet. TruSurround technology is incorporated under U.S. Wega, FD Trinitron, Steady Sound, Digital Reality Creation, Caption Vision, CineMotion, Memory Stick, and Twin View are the result of Sony Corporation. CAUTION TO PREVENT ELECTRIC SHOCK, MATCH WIDE BLADE OF PLUG TO ...
Operating Instructions
Page 8
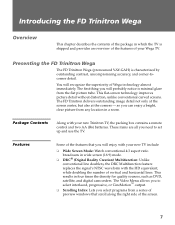
... up and use the TV. The FD Trinitron delivers outstanding image detail not only at the screen center, but also at the corners - Features Some of the features that scroll along the right side of the screen. 7 These items are all you will recognize the superiority of Wega technology almost immediately. This results in...
... up and use the TV. The FD Trinitron delivers outstanding image detail not only at the screen center, but also at the corners - Features Some of the features that scroll along the right side of the screen. 7 These items are all you will recognize the superiority of Wega technology almost immediately. This results in...
Operating Instructions
Page 9
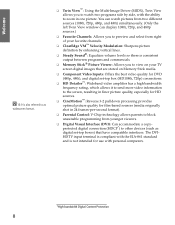
...: Sharpens picture definition by side, with personal computers. Welcome SETUP z 16:9 is also referred to as digital set -top box (HD1080i, 720p) connections. ❑ HD Detailer™: Wideband video amplifier has a high bandwidth frequency rating, which allows it to send more video information to the screen, resulting in finer picture quality...
...: Sharpens picture definition by side, with personal computers. Welcome SETUP z 16:9 is also referred to as digital set -top box (HD1080i, 720p) connections. ❑ HD Detailer™: Wideband video amplifier has a high bandwidth frequency rating, which allows it to send more video information to the screen, resulting in finer picture quality...
Operating Instructions
Page 12
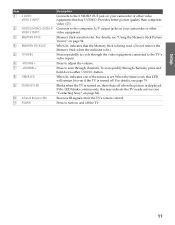
... scan quickly through the video equipment connected to the TV's video inputs. Press to turn on page 54. SETUP SETUP SETUP SETUP 11 For details, see "Using the Memory Stick Picture Viewer" on and off the TV. When lit, indicates that has S VIDEO. When the timer is....) Press repeatedly to cycle through channels, press and hold down either CHANNEL button. Provides better picture quality than composite video (2). For details, see "Contacting Sony" on your camcorder or other video equipment. When lit, indicates one of the timers is set , this may indicate the TV needs...
... scan quickly through the video equipment connected to the TV's video inputs. Press to turn on page 54. SETUP SETUP SETUP SETUP 11 For details, see "Using the Memory Stick Picture Viewer" on and off the TV. When lit, indicates that has S VIDEO. When the timer is....) Press repeatedly to cycle through channels, press and hold down either CHANNEL button. Provides better picture quality than composite video (2). For details, see "Contacting Sony" on your camcorder or other video equipment. When lit, indicates one of the timers is set , this may indicate the TV needs...
Operating Instructions
Page 14
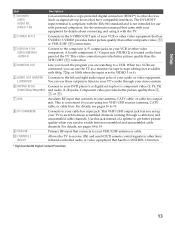
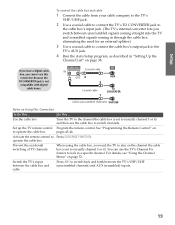
... are watching to a VCR. This video connection provides better picture quality than 2, 3, or 9). 7 AUX Auxiliary RF input that has S VIDEO. For details, see pages 18 to 19. 9 VHF/UHF Primary RF input that connects to your VHF/UHF antenna or cable. 0 CONTROL S IN/OUT Allows the... TV to receive (IN) and send (OUT) remote control signals to other Sony infrared-controlled audio or video equipment that have compatible interfaces. See the instruction manual that came with your equipment for details about connecting and using two VHF/UHF sources (antenna, CATV cable, or cable ...
... are watching to a VCR. This video connection provides better picture quality than 2, 3, or 9). 7 AUX Auxiliary RF input that has S VIDEO. For details, see pages 18 to 19. 9 VHF/UHF Primary RF input that connects to your VHF/UHF antenna or cable. 0 CONTROL S IN/OUT Allows the... TV to receive (IN) and send (OUT) remote control signals to other Sony infrared-controlled audio or video equipment that have compatible interfaces. See the instruction manual that came with your equipment for details about connecting and using two VHF/UHF sources (antenna, CATV cable, or cable ...
Operating Instructions
Page 18
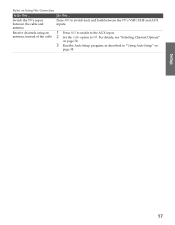
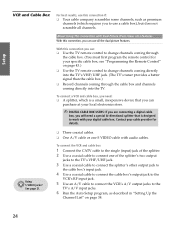
Switch the TV's input between the cable and antenna Receive channels using an antenna, instead of the cable Press ANT to switch back and forth between the TV's VHF/UHF and AUX inputs. 1 Press ANT to switch to the AUX input. 2 Set the Cable option to Off. For details, see "Selecting Channel Options" on page 72. 3 Run the Auto Setup program, as described in "Using Auto Setup" on Using This Connection To Do This ... Setup SETUP SETUP SETUP SETUP 17 Do This ... SETUP Notes on page 38.
Switch the TV's input between the cable and antenna Receive channels using an antenna, instead of the cable Press ANT to switch back and forth between the TV's VHF/UHF and AUX inputs. 1 Press ANT to switch to the AUX input. 2 Set the Cable option to Off. For details, see "Selecting Channel Options" on page 72. 3 Run the Auto Setup program, as described in "Using Auto Setup" on Using This Connection To Do This ... Setup SETUP SETUP SETUP SETUP 17 Do This ... SETUP Notes on page 38.
Operating Instructions
Page 20
Activate the remote control to switch back and forth between the TV's VHF/UHF (unscrambled channels) and AUX (scrambled) inputs. For details, see "Using the Channel Menu" on Using This Connection To Do This ... Switch the TV's input between the cable box and cable Press ANT to ...
Activate the remote control to switch back and forth between the TV's VHF/UHF (unscrambled channels) and AUX (scrambled) inputs. For details, see "Using the Channel Menu" on Using This Connection To Do This ... Switch the TV's input between the cable box and cable Press ANT to ...
Operating Instructions
Page 21
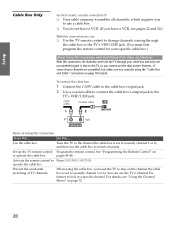
... not, consider using the cable box, you need the TV to stay on to the TV, so you can use the dual picture features.. For details, see pages 22 and 24.) With this connection, all channels, which requires you to use a cable box. ❑ You do not have a VCR. (If you...
... not, consider using the cable box, you need the TV to stay on to the TV, so you can use the dual picture features.. For details, see pages 22 and 24.) With this connection, all channels, which requires you to use a cable box. ❑ You do not have a VCR. (If you...
Operating Instructions
Page 25
... cable box.) ❑ Record channels coming through the cable box and channels coming through the cable box. (You must first program the remote control for details. SETUP Setup SETUP VCR and Cable Box For best results, use this connection if: ❑ Your cable company scrambles some channels, such as described in...
... cable box.) ❑ Record channels coming through the cable box and channels coming through the cable box. (You must first program the remote control for details. SETUP Setup SETUP VCR and Cable Box For best results, use this connection if: ❑ Your cable company scrambles some channels, such as described in...
Operating Instructions
Page 37
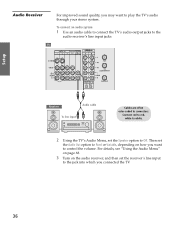
... Audio cable To line input Cables are often color-coded to the jack into which you want to the audio receiver's line input jacks. For details, see "Using the Audio Menu" on page 68. 3 Turn on how you connected the TV. 36 SETUP
... Audio cable To line input Cables are often color-coded to the jack into which you want to the audio receiver's line input jacks. For details, see "Using the Audio Menu" on page 68. 3 Turn on how you connected the TV. 36 SETUP
Operating Instructions
Page 41
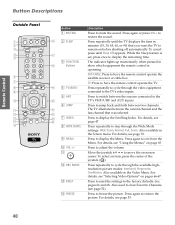
... repeatedly until Sleep Off appears. Also available in the Video Menu. Press again to restore the picture. w; Press to freeze the picture. For details, see "Using the Menus" on -screen cursor. Press to jump back and forth between the sources connected to the TV's video inputs. SETUP...ENTER 6 7 WIDE MODE INDEX TWIN VIEW 8 ql 9 MENU VOL CH q; To cancel press until the TV displays the time in minutes (15, 30, 45, 60, or 90) that was selected. While the Sleep feature is operating: SAT/CABLE: Press to remain on pages 66-67. Press repeatedly...
... repeatedly until Sleep Off appears. Also available in the Video Menu. Press again to restore the picture. w; Press to freeze the picture. For details, see "Using the Menus" on -screen cursor. Press to jump back and forth between the sources connected to the TV's video inputs. SETUP...ENTER 6 7 WIDE MODE INDEX TWIN VIEW 8 ql 9 MENU VOL CH q; To cancel press until the TV displays the time in minutes (15, 30, 45, 60, or 90) that was selected. While the Sleep feature is operating: SAT/CABLE: Press to remain on pages 66-67. Press repeatedly...
Operating Instructions
Page 42
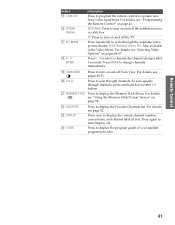
... 9 ENTER Description Press to program the remote control to display the program guide of your satellite program provider. Press to operate nonSony video equipment. For details, see "Selecting Video Options" on page 43. Press 0 - 9 to scan through channels. Press to select a channel; Remote Control SETUP SETUP... ENTER to cycle through channels, press and hold down either CH button. Press again to turn on and off Twin View. For details, see page 52. Press repeatedly to change channels immediately. ql TWIN VIEW Press to turn on and off the satellite receiver or...
... 9 ENTER Description Press to program the remote control to display the program guide of your satellite program provider. Press to operate nonSony video equipment. For details, see "Selecting Video Options" on page 43. Press 0 - 9 to scan through channels. Press to select a channel; Remote Control SETUP SETUP... ENTER to cycle through channels, press and hold down either CH button. Press again to turn on and off Twin View. For details, see page 52. Press repeatedly to change channels immediately. ql TWIN VIEW Press to turn on and off the satellite receiver or...

Operating Instructions
Page 43
... with older Sony equipment.) m Rewind N Play z Record (press together with N) x Stop M Fast forward X Pause Press repeatedly to cycle through the Audio Effect options. Press to control connected video equipment. Also available in the VCR or DVD player's menu. SETUP SETUP SETUP 42 Also available in the Audio Menu. For details, see "...Programming the Remote Control" on page 68. Press to change to the VHF/UHF output of the A/V slide switch. For details, see page 43. Press to move the VCR or DVD player's onscreen cursor. Press Vv B b to display the DVD player setup menu. Press to ...
... with older Sony equipment.) m Rewind N Play z Record (press together with N) x Stop M Fast forward X Pause Press repeatedly to cycle through the Audio Effect options. Press to control connected video equipment. Also available in the VCR or DVD player's menu. SETUP SETUP SETUP 42 Also available in the Audio Menu. For details, see "...Programming the Remote Control" on page 68. Press to change to the VHF/UHF output of the A/V slide switch. For details, see page 43. Press to move the VCR or DVD player's onscreen cursor. Press Vv B b to display the DVD player setup menu. Press to ...

Operating Instructions
Page 47
... Press TV/VIDEO repeatedly to cycle through the video equipment connected to the TV's VHF/UHF and VHF/UHF and AUX inputs AUX inputs. For details, see pages 39-44. Do This ... SETUP Features SETUP SETUP 46 Mute the sound Press MUTING (press again to unmute) Alternate back and forth between...
... Press TV/VIDEO repeatedly to cycle through the video equipment connected to the TV's VHF/UHF and VHF/UHF and AUX inputs AUX inputs. For details, see pages 39-44. Do This ... SETUP Features SETUP SETUP 46 Mute the sound Press MUTING (press again to unmute) Alternate back and forth between...

Operating Instructions
Page 49
..., as much as channels and inputs are changed, set 4:3 Default to Off. Black bars are stretched to fill the 16:9 screen. For details, see page 70. ✍ When viewing high-definition programs broadcast in several Wide Screen modes (16:9 aspect ratio). Normal returns the 4:3 ... m Full Mode stretches the entire 4:3 picture horizontally only, to its original size. To retain the current Wide Mode setting as possible. For details, see page 71. Useful for watching Letterbox movies. Zoom Mode enlarges the entire 4:3 picture proportionately to fill the 16:9 screen. SETUP SETUP...
..., as much as channels and inputs are changed, set 4:3 Default to Off. Black bars are stretched to fill the 16:9 screen. For details, see page 70. ✍ When viewing high-definition programs broadcast in several Wide Screen modes (16:9 aspect ratio). Normal returns the 4:3 ... m Full Mode stretches the entire 4:3 picture horizontally only, to its original size. To retain the current Wide Mode setting as possible. For details, see page 71. Useful for watching Letterbox movies. Zoom Mode enlarges the entire 4:3 picture proportionately to fill the 16:9 screen. SETUP SETUP...

Operating Instructions
Page 50
... also change the relative size of each of the sources at the same time. Displaying Twin Pictures 1 Tune the TV to a working channel. 2 Press . For details, see two pictures from an antenna, VCR, DVD, etc. -
... also change the relative size of each of the sources at the same time. Displaying Twin Pictures 1 Tune the TV to a working channel. 2 Press . For details, see two pictures from an antenna, VCR, DVD, etc. -

Operating Instructions
Page 51
... to unmute) Switch the TV's input between Press TV/VIDEO sources connected to the TV's A/V inputs Change the picture size Move the joystick V or v. (For details, see "Changing the Picture Size" on page 51.) SETUP Features SETUP SETUP 50 Adjust the volume Press VOL +/-
... to unmute) Switch the TV's input between Press TV/VIDEO sources connected to the TV's A/V inputs Change the picture size Move the joystick V or v. (For details, see "Changing the Picture Size" on page 51.) SETUP Features SETUP SETUP 50 Adjust the volume Press VOL +/-

Operating Instructions
Page 53
... watch . Features SETUP SETUP 52 SETUP SETUP SETUP Using Favorite Channels The Favorite Channels feature lets you select programs from a list of Favorite Channels z For details on using the Channel Menu, see page 73). 1 Press FAVORITES. The Favorite Channels list appears. A preview of the screen. Creating a List of up to your...
... watch . Features SETUP SETUP 52 SETUP SETUP SETUP Using Favorite Channels The Favorite Channels feature lets you select programs from a list of Favorite Channels z For details on using the Channel Menu, see page 73). 1 Press FAVORITES. The Favorite Channels list appears. A preview of the screen. Creating a List of up to your...

Operating Instructions
Page 59
... + 3 To select an option, move the joystick V or v to view. For details, see page 57. 2 Press the MEMORY STICK button on page 59. For details, see "Using the Memory Stick Index" on the remote control. For details, see "Using the Memory Stick Slideshow" on page 60. 4 To exit the Memory ...press CH +/-, TV/VIDEO, ANT, or use the 0-9 buttons and ENTER (or wait 3 seconds) to change slideshow options and rotate images. For details, see "Changing the Memory Stick Setup Options" on page 60. Setup Allows you want to highlight the option and press . SETUP Features SETUP SETUP ...
... + 3 To select an option, move the joystick V or v to view. For details, see page 57. 2 Press the MEMORY STICK button on page 59. For details, see "Using the Memory Stick Index" on the remote control. For details, see "Using the Memory Stick Slideshow" on page 60. 4 To exit the Memory ...press CH +/-, TV/VIDEO, ANT, or use the 0-9 buttons and ENTER (or wait 3 seconds) to change slideshow options and rotate images. For details, see "Changing the Memory Stick Setup Options" on page 60. Setup Allows you want to highlight the option and press . SETUP Features SETUP SETUP ...

Operating Instructions
Page 60
For details, see page 57. 2 Press the MEMORY STICK button on the screen. The Memory Stick Index appears. If you view images that the image does not ...
For details, see page 57. 2 Press the MEMORY STICK button on the screen. The Memory Stick Index appears. If you view images that the image does not ...


