
Child Safety: It Makes A Difference Where Your TV Stands
Page 1
As a result, TV sets may fall over . 7 Share our safety message on top of TVs such as VCRs and remotes that may cause unnecessary injury. The Consumer Electronics Association formed the Home Entertainment Support Safety Committee comprised of television and consumer electronics furniture manufacturers to ...
As a result, TV sets may fall over . 7 Share our safety message on top of TVs such as VCRs and remotes that may cause unnecessary injury. The Consumer Electronics Association formed the Home Entertainment Support Safety Committee comprised of television and consumer electronics furniture manufacturers to ...

Dimensions Diagrams
Page 1
KV-27FS210 FRONT VIEW 30 7/8" MDDDEIEOMSSDECCENRRLSII:PPIOTTNIIOOSNN::Mo2n7ito" rW/Reegcae®iver POWER REQUIREMENTS:120VAC (W(WWEHHIGDDH))::T3:0 7/8 "x 23 3/4" x 20 1/2" WEIGHT: 105 lbs 13 oz POWER CONSUMPTION: 60Hz 185w 1w(stby) SIDE VIEW 20 1/2" 10 3/4" S 21 7/8" S P P E E A 16 1/2" A 23 3/4" K K E E 18 " R R S S IR RECEIVER 9 3/4" TOP VIEW 27 1/4" 19 3/8" 4 1/2" 1 1/2" JACK PACK 20 1/2" AUX CONV OUT VHF/UHF VIDEO IN...
KV-27FS210 FRONT VIEW 30 7/8" MDDDEIEOMSSDECCENRRLSII:PPIOTTNIIOOSNN::Mo2n7ito" rW/Reegcae®iver POWER REQUIREMENTS:120VAC (W(WWEHHIGDDH))::T3:0 7/8 "x 23 3/4" x 20 1/2" WEIGHT: 105 lbs 13 oz POWER CONSUMPTION: 60Hz 185w 1w(stby) SIDE VIEW 20 1/2" 10 3/4" S 21 7/8" S P P E E A 16 1/2" A 23 3/4" K K E E 18 " R R S S IR RECEIVER 9 3/4" TOP VIEW 27 1/4" 19 3/8" 4 1/2" 1 1/2" JACK PACK 20 1/2" AUX CONV OUT VHF/UHF VIDEO IN...
Operating Instructions
Page 7
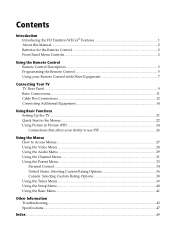
Contents Introduction Introducing the FD Trinitron WEGA® Features 1 About this Manual...2 Batteries for the Remote Control 2 Front Panel Menu Controls ...2 Using the Remote Control Remote Control Description...3 Programming the Remote Control 5 Using your Remote Control with Other Equipment 7 Connecting Your TV TV Rear Panel ...9 Basic Connections ...11 Cable ... in Picture (PIP) ...24 Connections that affect your ability to use PIP 26 Using the Menus How to Access Menus...27 Using the Video Menu ...28 Using the Audio Menu ...29 Using the Channel Menu ...31 Using the Parent Menu ...33...
Contents Introduction Introducing the FD Trinitron WEGA® Features 1 About this Manual...2 Batteries for the Remote Control 2 Front Panel Menu Controls ...2 Using the Remote Control Remote Control Description...3 Programming the Remote Control 5 Using your Remote Control with Other Equipment 7 Connecting Your TV TV Rear Panel ...9 Basic Connections ...11 Cable ... in Picture (PIP) ...24 Connections that affect your ability to use PIP 26 Using the Menus How to Access Menus...27 Using the Video Menu ...28 Using the Audio Menu ...29 Using the Channel Menu ...31 Using the Parent Menu ...33...
Operating Instructions
Page 9
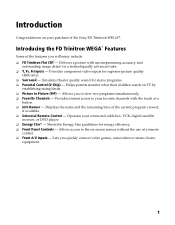
...10063; Info Banner - Helps parents monitor what their children watch on -screen menus without the use of the Sony FD Trinitron WEGA®. Operates your purchase of a remote control. ❏ Front A/V Inputs - Allows you quickly connect video games, camcorders or stereo/mono equipment.... the remaining time of the features you will enjoy include: ❏ FD Trinitron Flat CRT - Introducing the FD Trinitron WEGA® Features Some of the current program viewed, if available. ❏ Universal Remote Control - Provides component video inputs for superior picture quality (480i only)....
...10063; Info Banner - Helps parents monitor what their children watch on -screen menus without the use of the Sony FD Trinitron WEGA®. Operates your purchase of a remote control. ❏ Front A/V Inputs - Allows you quickly connect video games, camcorders or stereo/mono equipment.... the remaining time of the features you will enjoy include: ❏ FD Trinitron Flat CRT - Introducing the FD Trinitron WEGA® Features Some of the current program viewed, if available. ❏ Universal Remote Control - Provides component video inputs for superior picture quality (480i only)....

Operating Instructions
Page 10
... instructions to six months. If the remote control does not operate properly, the... for the Remote Control Insert two AA (R6) batteries (supplied) into the remote control using the remote control for an extended period of your remote control. &#...your TV is connected, follow the instructions and use the remote control to change your channels (CH+/-), adjust the volume ...Menu Controls The front Audio/Video panel controls allow you enjoy your remote control, see "Using the Menus" on the front Audio/Video...the menu without the remote control. ❏ Press to display the on-screen menu. ❏...
... instructions to six months. If the remote control does not operate properly, the... for the Remote Control Insert two AA (R6) batteries (supplied) into the remote control using the remote control for an extended period of your remote control. &#...your TV is connected, follow the instructions and use the remote control to change your channels (CH+/-), adjust the volume ...Menu Controls The front Audio/Video panel controls allow you enjoy your remote control, see "Using the Menus" on the front Audio/Video...the menu without the remote control. ❏ Press to display the on-screen menu. ❏...
Operating Instructions
Page 11
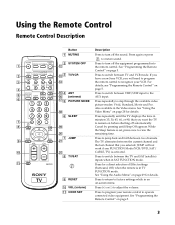
...Button 1 MUTING 2 SYSTEM OFF L M3 TV/VCR N O4 ANT P (antenna) Q5 PICTURE MODE R 6 SLEEP S T 7 JUMP U V 8 TV/SAT 9 RESET q; See "Programming the Remote Control" on page 5. see "Programming the Remote Control" on page 5. Press to recognize your remote control to restore sound. While the Sleep feature is activated. JUMP will need to program the...page 29 for details. VOL (volume) qa CODE SET Description Press to view the remaining time. If you have a non-Sony VCR, you selected. Press to program your VCR. Press again or press to operate connected video equipment. See "Using the...
...Button 1 MUTING 2 SYSTEM OFF L M3 TV/VCR N O4 ANT P (antenna) Q5 PICTURE MODE R 6 SLEEP S T 7 JUMP U V 8 TV/SAT 9 RESET q; See "Programming the Remote Control" on page 5. see "Programming the Remote Control" on page 5. Press to recognize your remote control to restore sound. While the Sleep feature is activated. JUMP will need to program the...page 29 for details. VOL (volume) qa CODE SET Description Press to view the remaining time. If you have a non-Sony VCR, you selected. Press to program your VCR. Press again or press to operate connected video equipment. See "Using the...

Operating Instructions
Page 12
... seconds. Operating Instructions Button Description qs POWER buttons Press to turn off the TV and other audio/ video equipment you want to operate with your remote control, see page 44. 4 VCR (operating) Press to operate your satellite antenna. M Fast-forward. qj MTS/SAP qk 0 9 and ENTER Press to...Play. X Pause. Press again to cycle through the channels, press and hold down the CH+ or CH- Press to record programs with the remote control. wa MENU ws CH (channel) Press the arrow buttons to select an option. Press the center button to move the cursor in the ...
... seconds. Operating Instructions Button Description qs POWER buttons Press to turn off the TV and other audio/ video equipment you want to operate with your remote control, see page 44. 4 VCR (operating) Press to operate your satellite antenna. M Fast-forward. qj MTS/SAP qk 0 9 and ENTER Press to...Play. X Pause. Press again to cycle through the channels, press and hold down the CH+ or CH- Press to record programs with the remote control. wa MENU ws CH (channel) Press the arrow buttons to select an option. Press the center button to move the cursor in the ...

Operating Instructions
Page 13
... 2 and 3. 4 Use the 0 9 buttons to enter the three-digit manufacturer's code number. 5 Press . 6 To check if the code number works, aim the TV's remote control at the component and press on the green POWER button (VCR/DVD, SAT/CABLE, TV) that corresponds with other equipment, you need to program... the remote control. 1 Check the list of "Manufacturer's Codes" on page 6 and find the three-digit code number for that component. Use the following procedure ...
... 2 and 3. 4 Use the 0 9 buttons to enter the three-digit manufacturer's code number. 5 Press . 6 To check if the code number works, aim the TV's remote control at the component and press on the green POWER button (VCR/DVD, SAT/CABLE, TV) that corresponds with other equipment, you need to program... the remote control. 1 Check the list of "Manufacturer's Codes" on page 6 and find the three-digit code number for that component. Use the following procedure ...
Operating Instructions
Page 15
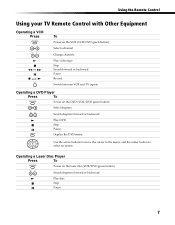
Using the Remote Control Using your TV Remote Control with Other Equipment Operating a VCR Press 09 or and To Power on the VCR (VCR/DVD green button) Select a channel Change channels Play video ...
Using the Remote Control Using your TV Remote Control with Other Equipment Operating a VCR Press 09 or and To Power on the VCR (VCR/DVD green button) Select a channel Change channels Play video ...

Operating Instructions
Page 17
... cable. 9 Devices connected to the AUX input cannot be viewed in PIP. ✍ AUX jack is only active when the TV is turned on the remote control. You can switch between scrambled channels (through a cable box) and normal cable channels (CATV). This input connects to your TV for the first time...
... cable. 9 Devices connected to the AUX input cannot be viewed in PIP. ✍ AUX jack is only active when the TV is turned on the remote control. You can switch between scrambled channels (through a cable box) and normal cable channels (CATV). This input connects to your TV for the first time...

Operating Instructions
Page 20
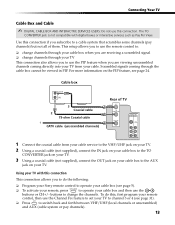
... supplied) from the OUT jack on your cable box to the VHF/UHF jack on your TV. If you to do this, first program your remote control, then use the Channel Fix feature to set your cable box and then use this connection This connection allows you subscribe to that require... coming in to change the channels. Using your channels are scrambled, consider using the cable box and cable connection (see page 5). ❏ To activate your remote press to view all , of your TV with this connection. To do the following: ❏ Program your...
... supplied) from the OUT jack on your cable box to the VHF/UHF jack on your TV. If you to do this, first program your remote control, then use the Channel Fix feature to set your cable box and then use this connection This connection allows you subscribe to that require... coming in to change the channels. Using your channels are scrambled, consider using the cable box and cable connection (see page 5). ❏ To activate your remote press to view all , of your TV with this connection. To do the following: ❏ Program your...
Operating Instructions
Page 21
...your cable. buttons to the AUX jack on your cable box and then use the 0 9 buttons or CH+/- To do the following: ❏ Program your Sony remote control to switch back and forth between VHF/UHF (local channels or unscrambled) and AUX (cable system or pay channels) but not all of TV... allows you subscribe to a cable system that scrambles some channels (pay channels). 13 Use this connection if you to do this, first program your remote control, then use the Channel Fix feature to operate your TV. For more information on your cable box to change channels through your TV This...
...your cable. buttons to the AUX jack on your cable box and then use the 0 9 buttons or CH+/- To do the following: ❏ Program your Sony remote control to switch back and forth between VHF/UHF (local channels or unscrambled) and AUX (cable system or pay channels) but not all of TV... allows you subscribe to a cable system that scrambles some channels (pay channels). 13 Use this connection if you to do this, first program your remote control, then use the Channel Fix feature to operate your TV. For more information on your cable box to change channels through your TV This...

Operating Instructions
Page 22
...TV and VCR Rear of the yellow video cable. To do this connection This connection allows you to do the following: ❏ Program your Sony remote control to operate your VCR (see page 31). ❏ Press repeatedly to the VHF/UHF jack on the TV. Using your VCR to ...switch between VCR input (VIDEO input) and VHF/UHF (local channels). 14 Optional connection ❏ If your VCR is equipped with this , first program your remote control, then use S VIDEO instead of TV 1 From cable/antenna 2 VCR 1 34 5 Y S VIDEO PB PR AUDIO OUT (VAR/FIX) VIDEO L (MONO) R L (MONO) R...
...TV and VCR Rear of the yellow video cable. To do this connection This connection allows you to do the following: ❏ Program your Sony remote control to operate your VCR (see page 31). ❏ Press repeatedly to the VHF/UHF jack on the TV. Using your VCR to ...switch between VCR input (VIDEO input) and VHF/UHF (local channels). 14 Optional connection ❏ If your VCR is equipped with this , first program your remote control, then use S VIDEO instead of TV 1 From cable/antenna 2 VCR 1 34 5 Y S VIDEO PB PR AUDIO OUT (VAR/FIX) VIDEO L (MONO) R L (MONO) R...

Operating Instructions
Page 23
Use this connection if you subscribe to a cable system that is equipped with your cable. This setup allows you to use the remote control to: ❏ change channels through your cable box or VCR when you are connecting a digital cable box, you will need a special bi- Scrambled signals ...
Use this connection if you subscribe to a cable system that is equipped with your cable. This setup allows you to use the remote control to: ❏ change channels through your cable box or VCR when you are connecting a digital cable box, you will need a special bi- Scrambled signals ...

Operating Instructions
Page 24
... cable. Optional connection ❏ For better picture quality, use this connection. The TO CONVERTER jack is not compatible with this , first program your remote control, then use the Channel Fix feature to set your TV to channel 3 or 4 (see page 5). ❏ To activate your... or scrambled channels). 16 S VIDEO does not provide sound, so you still must connect the audio cables. To do this connection ❏ Program your Sony remote control to operate your VCR or cable box (see page 31). ❏ Press repeatedly to operate your TV with digital boxes. Using your cable box....
... cable. Optional connection ❏ For better picture quality, use this connection. The TO CONVERTER jack is not compatible with this , first program your remote control, then use the Channel Fix feature to set your TV to channel 3 or 4 (see page 5). ❏ To activate your... or scrambled channels). 16 S VIDEO does not provide sound, so you still must connect the audio cables. To do this connection ❏ Program your Sony remote control to operate your VCR or cable box (see page 31). ❏ Press repeatedly to operate your TV with digital boxes. Using your cable box....

Operating Instructions
Page 25
... repeatedly to switch to operate your satellite receiver. Using your TV with this connection This connection allows you to do the following: ❏ Program your Sony remote control to operate your satellite receiver (see page 5). ❏ To activate your TV. to satellite receiver input (VIDEO input). 17 See page 7 on your...
... repeatedly to switch to operate your satellite receiver. Using your TV with this connection This connection allows you to do the following: ❏ Program your Sony remote control to operate your satellite receiver (see page 5). ❏ To activate your TV. to satellite receiver input (VIDEO input). 17 See page 7 on your...

Operating Instructions
Page 26
Using your TV with this connection This connection allows you to do the following: ❏ Program your Sony remote control to operate your VCR or satellite receiver (see page 5). ❏ Turn on your VCR to enable your satellite receiver to work with this ... AUDIO/VIDEO IN on your VCR. 5 Using audio/video cables (not supplied), connect AUDIO/VIDEO OUT on your VCR to AUDIO/VIDEO IN on the remote control. Operating Instructions Connecting a TV, VCR, and Satellite Receiver 4 From 1 cable/ antenna 2 VCR Satellite receiver 3 5 Rear of TV 1 3 4 5 Y S VIDEO PB PR AUDIO OUT ...
Using your TV with this connection This connection allows you to do the following: ❏ Program your Sony remote control to operate your VCR or satellite receiver (see page 5). ❏ Turn on your VCR to enable your satellite receiver to work with this ... AUDIO/VIDEO IN on your VCR. 5 Using audio/video cables (not supplied), connect AUDIO/VIDEO OUT on your VCR to AUDIO/VIDEO IN on the remote control. Operating Instructions Connecting a TV, VCR, and Satellite Receiver 4 From 1 cable/ antenna 2 VCR Satellite receiver 3 5 Rear of TV 1 3 4 5 Y S VIDEO PB PR AUDIO OUT ...
Operating Instructions
Page 27
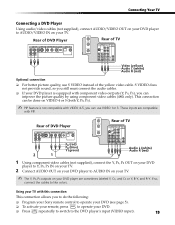
... or Y, B-Y, and R-Y. Using your TV with this connection This connection allows you to do the following: ❏ Program your Sony remote control to operate your DVD (see page 5). ❏ To activate your remote, press to operate your DVD player is not compatible with VIDEO 4-5, you can improve the picture quality by using component...
... or Y, B-Y, and R-Y. Using your TV with this connection This connection allows you to do the following: ❏ Program your Sony remote control to operate your DVD (see page 5). ❏ To activate your remote, press to operate your DVD player is not compatible with VIDEO 4-5, you can improve the picture quality by using component...

Operating Instructions
Page 29
The Initial Setup screen appears. To reset the TV to factory settings 1 Turn the TV on. 2 Hold down on the remote control. 3 Press and release the POWER button on . 4 Release . 21 Press to search for available channels and program receivable channels. ✍ When you can use ... Setup screen appears each time you turn on the TV. Initial Setup Auto Program: [CH+] Exit: [CH-] First please connect cable/antenna 2 Press on the remote control or on the TV front panel to how you perform Auto Program. Press to select. 4 Press F or f to highlight On or Off according to...
The Initial Setup screen appears. To reset the TV to factory settings 1 Turn the TV on. 2 Hold down on the remote control. 3 Press and release the POWER button on . 4 Release . 21 Press to search for available channels and program receivable channels. ✍ When you can use ... Setup screen appears each time you turn on the TV. Initial Setup Auto Program: [CH+] Exit: [CH-] First please connect cable/antenna 2 Press on the remote control or on the TV front panel to how you perform Auto Program. Press to select. 4 Press F or f to highlight On or Off according to...
Operating Instructions
Page 32
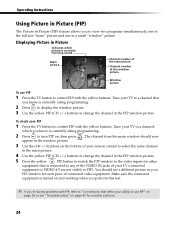
... TV (connected equipment to VIDEO 4-5 are not visible in PIP). You should now 3 Use the (CH +/-) buttons on page 43 for each piece of your remote control to select the same channel in the main picture. 4 Use the yellow PIP (CH +/-) buttons to view two programs simultaneously, one in the full...
... TV (connected equipment to VIDEO 4-5 are not visible in PIP). You should now 3 Use the (CH +/-) buttons on page 43 for each piece of your remote control to select the same channel in the main picture. 4 Use the yellow PIP (CH +/-) buttons to view two programs simultaneously, one in the full...


