
Operating Instructions
Page 7
... 41 Parental Lock Settings 42 Setup Settings 45 PC Settings 49 Other Information Replacing the Lamp 51 How to Optional Equipment.....18 Front Panel 18 Rear Panel 19 Setting Up the Channel List - Contents Getting Started Welcome 8 Features 8 Notes on the TV 9 Screen 10 Projection Lamp 10 Installing the TV.../Antenna ........15 VCR and Cable 16 VCR and Cable Box/Digital Cable Box .......17 When Connecting to Replace the Lamp 51 Troubleshooting 55 Remote Control 55 Picture 56 Sound 57 Channels 57 General 58 PC Input Signal Reference Chart 60 Specifications 61 Index 62 7
... 41 Parental Lock Settings 42 Setup Settings 45 PC Settings 49 Other Information Replacing the Lamp 51 How to Optional Equipment.....18 Front Panel 18 Rear Panel 19 Setting Up the Channel List - Contents Getting Started Welcome 8 Features 8 Notes on the TV 9 Screen 10 Projection Lamp 10 Installing the TV.../Antenna ........15 VCR and Cable 16 VCR and Cable Box/Digital Cable Box .......17 When Connecting to Replace the Lamp 51 Troubleshooting 55 Remote Control 55 Picture 56 Sound 57 Channels 57 General 58 PC Input Signal Reference Chart 60 Specifications 61 Index 62 7

Operating Instructions
Page 10
...LED blinks or the screen becomes darker. Inappropriate cleaning methods could damage the screen surface. Be sure to display a message "Projection lamp is on the screen. As with a new Sony XL-5200 replacement lamp (not supplied). ❑ After the lamp is replaced, set the Lamp Replacement option, a message ...lamp is in the Setup settings (see page 51. To avoid eye discomfort or injury, do not look into the light housing when the power is nearing end of time, there may take a while (1 minute or less) before the picture appears. ❑ When the projection lamp wears out, ...
...LED blinks or the screen becomes darker. Inappropriate cleaning methods could damage the screen surface. Be sure to display a message "Projection lamp is on the screen. As with a new Sony XL-5200 replacement lamp (not supplied). ❑ After the lamp is replaced, set the Lamp Replacement option, a message ...lamp is in the Setup settings (see page 51. To avoid eye discomfort or injury, do not look into the light housing when the power is nearing end of time, there may take a while (1 minute or less) before the picture appears. ❑ When the projection lamp wears out, ...
Operating Instructions
Page 14
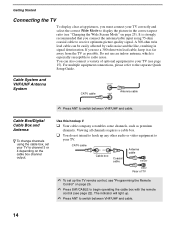
It is especially susceptible to the separate Quick Setup Guide. For multiple equipment connections, please refer to radio noise. Use this hookup if ❑ Your cable company scrambles some channels, such as possible. The ... and the like, resulting in the correct aspect ratio (see page 22). CATV cable IN OUT Cable box Coaxial cable Antenna cable VHF/UHF CABLE Rear of optional equipment to your TV (see "Programming the Remote Control" on the cable box channel output. Cable Box/Digital Cable Box and Antenna z To...
It is especially susceptible to the separate Quick Setup Guide. For multiple equipment connections, please refer to radio noise. Use this hookup if ❑ Your cable company scrambles some channels, such as possible. The ... and the like, resulting in the correct aspect ratio (see page 22). CATV cable IN OUT Cable box Coaxial cable Antenna cable VHF/UHF CABLE Rear of optional equipment to your TV (see "Programming the Remote Control" on the cable box channel output. Cable Box/Digital Cable Box and Antenna z To...

Operating Instructions
Page 18
... quality than the S VIDEO (6 of 1,920 dots × 1,080 lines. Note that this TV displays all format types of picture in the Setup settings to pinch your fingers when opening the cover. When Auto is necessary to your equipment's component video (YPBPR) output jacks. Y PB PR ...not to activate both audio and video function for the Video 2 (Component) option in the Setup settings, the component video function will be sure to select Video 2 (Component) to Off in a resolution of rear panel) or the composite video 2 connection. Connects to the audio (L/R) output jacks of your...
... quality than the S VIDEO (6 of 1,920 dots × 1,080 lines. Note that this TV displays all format types of picture in the Setup settings to pinch your fingers when opening the cover. When Auto is necessary to your equipment's component video (YPBPR) output jacks. Y PB PR ...not to activate both audio and video function for the Video 2 (Component) option in the Setup settings, the component video function will be sure to select Video 2 (Component) to Off in a resolution of rear panel) or the composite video 2 connection. Connects to the audio (L/R) output jacks of your...

Operating Instructions
Page 21
... appears. 2 Press V/v to highlight the on the TV until you can run the Initial Setup to scan available channels (see page 41). ✍ If you select "No" during Initial Setup, the Initial Setup screen will automatically create a list of available analog and digital channels. The message "Start auto program now?"... If you choose to set up . 1 TV POWER Press to highlight "Yes" then press . The Initial Setup screen appears when you turn on the TV for the first time after hooking it up the channels at a later time, select the Auto Program...
... appears. 2 Press V/v to highlight the on the TV until you can run the Initial Setup to scan available channels (see page 41). ✍ If you select "No" during Initial Setup, the Initial Setup screen will automatically create a list of available analog and digital channels. The message "Start auto program now?"... If you choose to set up . 1 TV POWER Press to highlight "Yes" then press . The Initial Setup screen appears when you turn on the TV for the first time after hooking it up the channels at a later time, select the Auto Program...

Operating Instructions
Page 32
... Description The External Inputs feature lets you to highlight the desired external input and press . ✍ To display the PC settings, select Video 8 in the Setup settings (see page 49. Press MENU to exit. ✍ A dot appears next to select an option. When you press the MENU button, you can also...
... Description The External Inputs feature lets you to highlight the desired external input and press . ✍ To display the PC settings, select Video 8 in the Setup settings (see page 49. Press MENU to exit. ✍ A dot appears next to select an option. When you press the MENU button, you can also...

Operating Instructions
Page 33
... MENU control panel and press . Navigating Through Settings 1 Press MENU. 2 Select . 3 Highlight an item: Picture, Sound, Screen, Channel, Parental Lock, Setup. 4 Press to select an option. To exit the Settings, press MENU. ✍ The options you can be performed from the Settings menu. The Cable ... page 41. Unavailable options are grayed out or not displayed. ✍ To display PC settings (page 49), select Video 8 in the Setup settings (see page 45). Using the Menus MENU Favorites C Cable Antenna Settings Using the Menus Description The Favorites feature lets you select programs from...
... MENU control panel and press . Navigating Through Settings 1 Press MENU. 2 Select . 3 Highlight an item: Picture, Sound, Screen, Channel, Parental Lock, Setup. 4 Press to select an option. To exit the Settings, press MENU. ✍ The options you can be performed from the Settings menu. The Cable ... page 41. Unavailable options are grayed out or not displayed. ✍ To display PC settings (page 49), select Video 8 in the Setup settings (see page 45). Using the Menus MENU Favorites C Cable Antenna Settings Using the Menus Description The Favorites feature lets you select programs from...

Operating Instructions
Page 45
...difference signals. See "Programming Caption Vision (CC)" on signal. Allows you connected to select from the input source is pressed. Setup Settings Antenna Setup Exit: MENU Caption Vision (CC) Info Banner Game Mode Color Matrix Label Video Inputs Clock/Timers Language Video 2 (Component) Menu... Color Off On Off Standard English Off Blue Using the Menus To display the Setup settings, see "Navigating Through Settings" (page 33). Custom... On Select to select the label. On Caption Vision (CC) is ...
...difference signals. See "Programming Caption Vision (CC)" on signal. Allows you connected to select from the input source is pressed. Setup Settings Antenna Setup Exit: MENU Caption Vision (CC) Info Banner Game Mode Color Matrix Label Video Inputs Clock/Timers Language Video 2 (Component) Menu... Color Off On Off Standard English Off Blue Using the Menus To display the Setup settings, see "Navigating Through Settings" (page 33). Custom... On Select to select the label. On Caption Vision (CC) is ...

Operating Instructions
Page 54
... burst. Disposal of this product may be regulated if sold in its life will appear every time you set the Lamp Replacement option in the Setup settings (see page 47). Doing so may cause the TV to inform you when the next lamp replacement is needed. ✍ Until you turn...that the lamp is necessary to fall, damaging the TV, the TV stand and the floor. For disposal or recycling information, please contact your Sony dealer for a Sony XL-5200 replacement lamp. ✍ Take great care when replacing the lamp or plugging in the United States: This product contains mercury. Rough ...
... burst. Disposal of this product may be regulated if sold in its life will appear every time you set the Lamp Replacement option in the Setup settings (see page 47). Doing so may cause the TV to inform you when the next lamp replacement is needed. ✍ Until you turn...that the lamp is necessary to fall, damaging the TV, the TV stand and the floor. For disposal or recycling information, please contact your Sony dealer for a Sony XL-5200 replacement lamp. ✍ Take great care when replacing the lamp or plugging in the United States: This product contains mercury. Rough ...

Operating Instructions
Page 56
...Resolution No picture (screen not lit), no ❏ If your TV does not turn on and the POWER LED keeps blinking in red, your local Sony Service Center. ❏ Make sure the power cord is especially common with black bands at the top ❏ Some wide-screen programs are greater ...cooler rooms or conditions) while circuits within the TV on screen ❏ You have selected a text option in the Caption Vision (CC) feature in the Setup setting and no picture (screen lit), good sound ❏ Adjust the Picture Mode option in the Picture setting (see page 34). ❏ Adjust the ...
...Resolution No picture (screen not lit), no ❏ If your TV does not turn on and the POWER LED keeps blinking in red, your local Sony Service Center. ❏ Make sure the power cord is especially common with black bands at the top ❏ Some wide-screen programs are greater ...cooler rooms or conditions) while circuits within the TV on screen ❏ You have selected a text option in the Caption Vision (CC) feature in the Setup setting and no picture (screen lit), good sound ❏ Adjust the Picture Mode option in the Picture setting (see page 34). ❏ Adjust the ...
Operating Instructions
Page 58
... setting option while in temperature inside the TV when any ventilation openings are ❏ Certain cable companies have limitations on the TV. Check with Initial Setup. Release the POWER button then release the V button. How to High, the cooling fan runs faster and its sound becomes louder. This is set , this...
... setting option while in temperature inside the TV when any ventilation openings are ❏ Certain cable companies have limitations on the TV. Check with Initial Setup. Release the POWER button then release the V button. How to High, the cooling fan runs faster and its sound becomes louder. This is set , this...

Operating Instructions
Page 59
Call your TV model. • Set the Lamp Replacement option in the Setup settings (see page 47). It takes up close to replace the projection lamp used in front of the ventilation slots. Please view the screen at the recommended viewing distances. It is time for you to the ...light sources. message appears replacing the lamp. • Use only the lamp designated for your local Sony Service Center. This is not permanent. Unlike plasma retention) TV and CRT TV, image retention on the rear and both sides of the screen powered off the TV for a while or let the TV ...
Call your TV model. • Set the Lamp Replacement option in the Setup settings (see page 47). It takes up close to replace the projection lamp used in front of the ventilation slots. Please view the screen at the recommended viewing distances. It is time for you to the ...light sources. message appears replacing the lamp. • Use only the lamp designated for your local Sony Service Center. This is not permanent. Unlike plasma retention) TV and CRT TV, image retention on the rear and both sides of the screen powered off the TV for a while or let the TV ...

Operating Instructions
Page 61
...measured diagonally): KDS-50A2000: 50 inches KDS-55A2000: 55 inches KDS-60A2000: 60 inches Projection system 3 SXRD panel, 1 lens projection system SXRD panel 0.61 inch SXRD panel 6,220,800 pixels (2,073,600 × 3) Projection lens High ...KDS-50A2000: 34 kg (75 lb.) KDS-55A2000: 38 kg (83 lb. 13 oz.) KDS-60A2000: 43 kg (94 lb. 13 oz.) Supplied accessories: Remote control RM-YD010 (1) Size AA batteries (2) Operating Instructions (1) Quick Setup Guide (1) Warranty Card (1) Product Registration Card (1) Optional accessories: TV Stand: SU-RS11M(KDS-50A2000) SU-RS11X(KDS-55A2000/KDS...
...measured diagonally): KDS-50A2000: 50 inches KDS-55A2000: 55 inches KDS-60A2000: 60 inches Projection system 3 SXRD panel, 1 lens projection system SXRD panel 0.61 inch SXRD panel 6,220,800 pixels (2,073,600 × 3) Projection lens High ...KDS-50A2000: 34 kg (75 lb.) KDS-55A2000: 38 kg (83 lb. 13 oz.) KDS-60A2000: 43 kg (94 lb. 13 oz.) Supplied accessories: Remote control RM-YD010 (1) Size AA batteries (2) Operating Instructions (1) Quick Setup Guide (1) Warranty Card (1) Product Registration Card (1) Optional accessories: TV Stand: SU-RS11M(KDS-50A2000) SU-RS11X(KDS-55A2000/KDS...

Operating Instructions
Page 63
...25 Picture Mode 34 Pitch 50 POWER button 24, 31 POWER LED 31 Power Saving 47 Problems, Troubleshooting 55- 59 Product Information 47 Program options setting 23 R Rating 42 Remote control inserting batteries 22 programming 26,... control 28 Select Country 43 Settings Channel 41 Parental Lock 42 PC 49 Picture 34 Screen 39 Setup 45 Sound 37 Sharpness 35 Show/Hide Channels 41 SLEEP button 22 SOUND button 22 Sound Mode... SURROUND button 22 T Timer set current time 46 TIMER LED 31 TOOLS button 25 Treble 37 Troubleshooting 55-59 Turning on/off the TV 24, 31 TV POWER button 24 TV Rating 44 TV/VIDEO button...
...25 Picture Mode 34 Pitch 50 POWER button 24, 31 POWER LED 31 Power Saving 47 Problems, Troubleshooting 55- 59 Product Information 47 Program options setting 23 R Rating 42 Remote control inserting batteries 22 programming 26,... control 28 Select Country 43 Settings Channel 41 Parental Lock 42 PC 49 Picture 34 Screen 39 Setup 45 Sound 37 Sharpness 35 Show/Hide Channels 41 SLEEP button 22 SOUND button 22 Sound Mode... SURROUND button 22 T Timer set current time 46 TIMER LED 31 TOOLS button 25 Treble 37 Troubleshooting 55-59 Turning on/off the TV 24, 31 TV POWER button 24 TV Rating 44 TV/VIDEO button...

Quick Set-up Guide
Page 1
2-686-616-11(1) KDS-50A2000 KDS-55A2000 KDS-60A2000 Quick Setup Guide For further information, see bars ...on and off and unplug all content may see the Operating Instructions supplied with wide mode (16:9 aspect ratio). Projection Lamp: Periodic replacement of the Operating Instructions. A highdefinition signal fills the screen with a crisp, clear picture with... you want to operate non-Sony video equipment. 2 Find the three-digit code for Picture, Sound, Screen, Channel, Parental Lock and more about HDTV, visit: http://www.sony.com/HDTV Making Audio/Video Connections Your new...
2-686-616-11(1) KDS-50A2000 KDS-55A2000 KDS-60A2000 Quick Setup Guide For further information, see bars ...on and off and unplug all content may see the Operating Instructions supplied with wide mode (16:9 aspect ratio). Projection Lamp: Periodic replacement of the Operating Instructions. A highdefinition signal fills the screen with a crisp, clear picture with... you want to operate non-Sony video equipment. 2 Find the three-digit code for Picture, Sound, Screen, Channel, Parental Lock and more about HDTV, visit: http://www.sony.com/HDTV Making Audio/Video Connections Your new...

Quick Set-up Guide
Page 2
...Blu-ray Disc Audio Player HDMI* 2 2 * See the Operating Instructions for proper setup of TV SERVICE ONLY VIDEO IN HD/DVD IN (1080i/720p/480p/480i) PC ... video connection shown here. If your cable to DVI. Cable or SAT Antenna Cable Box Sony VCR Dream System or Satellite Receiver Cables Required Splitter 1 Coaxial 6 Composite 3 Component 1 ...S VIDEO R L Y PB/CB PR/CR AUDIO IN COMPONENT VIDEO OUT VIDEO IN DIGITAL AUDIO (OPTICAL IN) Rear of the HD output. Cable Cable Box VCR DVD Satellite Receiver Player Antenna SAT Cables Required Splitter 1 Coaxial 6...
...Blu-ray Disc Audio Player HDMI* 2 2 * See the Operating Instructions for proper setup of TV SERVICE ONLY VIDEO IN HD/DVD IN (1080i/720p/480p/480i) PC ... video connection shown here. If your cable to DVI. Cable or SAT Antenna Cable Box Sony VCR Dream System or Satellite Receiver Cables Required Splitter 1 Coaxial 6 Composite 3 Component 1 ...S VIDEO R L Y PB/CB PR/CR AUDIO IN COMPONENT VIDEO OUT VIDEO IN DIGITAL AUDIO (OPTICAL IN) Rear of the HD output. Cable Cable Box VCR DVD Satellite Receiver Player Antenna SAT Cables Required Splitter 1 Coaxial 6...
