
Setup Guide (Operating Instructions)
Page 4
... Hexagon wrench (1) Assembling screws for Table-Top Stand (4) (KDL-55NX811, KDL-60/55/46NX810, KDL-46NX711 and KDL-46NX710 only) Assembling screws for Table-Top Stand (2) (KDL-40NX711, KDL-40NX710 only) 3D Glasses (battery included) (2) (KDL-55NX811 and KDL-46/40NX711 only) Pouch for safety reasons. KDL-55NX811, KDL-60/55/46NX810, KDL46/40NX711, KDL-46/40NX710 and KDL40NX700 models requires assembling. Refer to...
... Hexagon wrench (1) Assembling screws for Table-Top Stand (4) (KDL-55NX811, KDL-60/55/46NX810, KDL-46NX711 and KDL-46NX710 only) Assembling screws for Table-Top Stand (2) (KDL-40NX711, KDL-40NX710 only) 3D Glasses (battery included) (2) (KDL-55NX811 and KDL-46/40NX711 only) Pouch for safety reasons. KDL-55NX811, KDL-60/55/46NX810, KDL46/40NX711, KDL-46/40NX710 and KDL40NX700 models requires assembling. Refer to...

Setup Guide (Operating Instructions)
Page 6
... instructions provided with the TV. Look for some TV models. ~ • Do not put stress on the surface or inside the TV. For KDL-52/46NX800 and KDL-46/ 40NX700 1 Gently slide the TV unit onto the Table-Top Stand and align the screw holes. • Ensure your TV has adequate ventilation, see...
... instructions provided with the TV. Look for some TV models. ~ • Do not put stress on the surface or inside the TV. For KDL-52/46NX800 and KDL-46/ 40NX700 1 Gently slide the TV unit onto the Table-Top Stand and align the screw holes. • Ensure your TV has adequate ventilation, see...

Setup Guide (Operating Instructions)
Page 7
Reattaching the Table-Top Stand to the TV Attach to approximately 3 N·m {30 kgf·cm}. Setting up your TV 2 Attach the TV and Table-Top Stand with the two dowels of the Table- Top Stand, and gently place the TV, checking the f mark is facing the front. For KDL-55NX811, KDL-60/55/ 46NX810, KDL-46/40NX711 and KDL-46/40NX710 1 Align with the supplied screw and hexagon wrench. ~ • Set the torque setting to the original position using the removed screws. See "Detaching the TableTop Stand from the TV" (page 15). (Continued) 7
Reattaching the Table-Top Stand to the TV Attach to approximately 3 N·m {30 kgf·cm}. Setting up your TV 2 Attach the TV and Table-Top Stand with the two dowels of the Table- Top Stand, and gently place the TV, checking the f mark is facing the front. For KDL-55NX811, KDL-60/55/ 46NX810, KDL-46/40NX711 and KDL-46/40NX710 1 Align with the supplied screw and hexagon wrench. ~ • Set the torque setting to the original position using the removed screws. See "Detaching the TableTop Stand from the TV" (page 15). (Continued) 7
Setup Guide (Operating Instructions)
Page 8
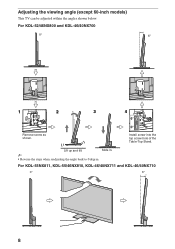
Install screw into the top screw hole of the Table-Top Stand. Slide in. ~ • Reverse the steps when readjusting the angle back to 0 degree. For KDL-55NX811, KDL-55/46NX810, KDL-46/40NX711 and KDL-46/40NX710 0° 6° 8 For KDL-52/46NX800 and KDL-46/40NX700 0° 6° 1 2 3 4 Remove screw as shown. Lift up and tilt. Adjusting the viewing angle (except 60-inch models) This TV can be adjusted within the angles shown below.
Install screw into the top screw hole of the Table-Top Stand. Slide in. ~ • Reverse the steps when readjusting the angle back to 0 degree. For KDL-55NX811, KDL-55/46NX810, KDL-46/40NX711 and KDL-46/40NX710 0° 6° 8 For KDL-52/46NX800 and KDL-46/40NX700 0° 6° 1 2 3 4 Remove screw as shown. Lift up and tilt. Adjusting the viewing angle (except 60-inch models) This TV can be adjusted within the angles shown below.

Setup Guide (Operating Instructions)
Page 9
Setting up your TV Connecting the TV The following chart shows the high-definition (HD) and standard-definition (SD) video formats supported by your BRAVIA TV inputs. *1 720/24p format is supported by KDL-55NX811, KDL-60/55/46NX810, KDL-46/40NX711 and KDL-46/40NX710. *2 For supported PC formats refer to the i-Manual. (Continued) 9
Setting up your TV Connecting the TV The following chart shows the high-definition (HD) and standard-definition (SD) video formats supported by your BRAVIA TV inputs. *1 720/24p format is supported by KDL-55NX811, KDL-60/55/46NX810, KDL-46/40NX711 and KDL-46/40NX710. *2 For supported PC formats refer to the i-Manual. (Continued) 9
Setup Guide (Operating Instructions)
Page 14
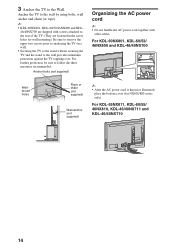
...not bundle the AC power cord together with screws attached to the rear of the TV. (They are shipped with other cables. For KDL-60NX801, KDL-60/52/ 46NX800 and KDL-46/40NX700 Wallmount holes Rope or chain (not supplied) Wall-anchor (not supplied) ~ • After the AC power cord is thread as... and the stand to the wall by using bolts, wall anchor and chain (or rope). ~ • KDL-60NX801, KDL-60/52/46NX800 and KDL- 46/40NX700 are fastened in the screw holes for NX801/800 series only). For further protection, be sure to the Wall. Anchor the TV to the wall provides minimum protection...
...not bundle the AC power cord together with screws attached to the rear of the TV. (They are shipped with other cables. For KDL-60NX801, KDL-60/52/ 46NX800 and KDL-46/40NX700 Wallmount holes Rope or chain (not supplied) Wall-anchor (not supplied) ~ • After the AC power cord is thread as... and the stand to the wall by using bolts, wall anchor and chain (or rope). ~ • KDL-60NX801, KDL-60/52/46NX800 and KDL- 46/40NX700 are fastened in the screw holes for NX801/800 series only). For further protection, be sure to the Wall. Anchor the TV to the wall provides minimum protection...

Setup Guide (Operating Instructions)
Page 15
... your nearest power outlet. 2 Check the ENERGY SAVING SWITCH setting is on (z). 3 Press 1 (POWER) on the TV. For KDL-60NX801, KDL-60/52/ 46NX800 and KDL-46/40NX700 ~ • The NX801/NX800/NX700 series models must remove the stand rear cover prior to detaching the Table-Top Stand. • When installing the TV on... Stand for any reason other than to scan for the first time, the Language menu appears on the screen. For KDL-55NX811, KDL-60/55/ 46NX810, KDL-46/40NX711 and KDL-46/40NX710 KDL-60NX810 Joint 15 Connect the TV to use the TV's built-in the setup menus, TV Guide will be on ...
... your nearest power outlet. 2 Check the ENERGY SAVING SWITCH setting is on (z). 3 Press 1 (POWER) on the TV. For KDL-60NX801, KDL-60/52/ 46NX800 and KDL-46/40NX700 ~ • The NX801/NX800/NX700 series models must remove the stand rear cover prior to detaching the Table-Top Stand. • When installing the TV on... Stand for any reason other than to scan for the first time, the Language menu appears on the screen. For KDL-55NX811, KDL-60/55/ 46NX810, KDL-46/40NX711 and KDL-46/40NX710 KDL-60NX810 Joint 15 Connect the TV to use the TV's built-in the setup menus, TV Guide will be on ...
Setup Guide (Operating Instructions)
Page 21
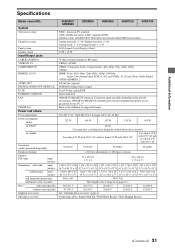
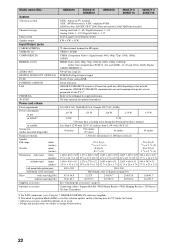
... 120 V AC and less than 0.23 W with 240 V AC Less than 0.13 W with 120 V AC and less than 0.2 W with 240 V AC 60 inches 52 inches 46 inches 40 inches 1,920 dots (horizontal) × 1,080 lines (vertical) 34 × 100 (2) 1 3/8 × 4 34 × 160 (2) 1 3/8 × 6 3/8 1,440 × 927 × 380 1,261 ×....9 19.2/42.3 See "Checking the accessories" (page 4). Connecting cables / Support Belt Kit / Wall-Mount Bracket / Wall-Hanging Bracket (Continued) 21 Additional Information Specifications Model name KDL-
... 120 V AC and less than 0.23 W with 240 V AC Less than 0.13 W with 120 V AC and less than 0.2 W with 240 V AC 60 inches 52 inches 46 inches 40 inches 1,920 dots (horizontal) × 1,080 lines (vertical) 34 × 100 (2) 1 3/8 × 4 34 × 160 (2) 1 3/8 × 6 3/8 1,440 × 927 × 380 1,261 ×....9 19.2/42.3 See "Checking the accessories" (page 4). Connecting cables / Support Belt Kit / Wall-Mount Bracket / Wall-Hanging Bracket (Continued) 21 Additional Information Specifications Model name KDL-
Setup Guide (Operating Instructions)
Page 22
...12 W with 120 V AC and less than 0.2 W with 240 V AC 60 inches 54.6 inches (55 class) 46 inches 40 inches 1,920 dots (horizontal) × 1,080 lines (vertical) 20 × 70 (4) 13/16 ×...to change without stand (kg)/(lb.) Supplied accessories Optional accessories 60NX810 55NX811/ 55NX810 46NX810 46NX711/ 46NX710 40NX711/ 40NX710 NTSC: American TV standard ATSC (8VSB terrestrial): ATSC compliant 8VSB...20.5/45.2 20.5/45.2 16.1/35.5 See "Checking the accessories" (page 4). Model name KDL- Connecting cables / Support Belt Kit / Wall-Mount Bracket / Wall-Hanging Bracket / 3D ...
...12 W with 120 V AC and less than 0.2 W with 240 V AC 60 inches 54.6 inches (55 class) 46 inches 40 inches 1,920 dots (horizontal) × 1,080 lines (vertical) 20 × 70 (4) 13/16 ×...to change without stand (kg)/(lb.) Supplied accessories Optional accessories 60NX810 55NX811/ 55NX810 46NX810 46NX711/ 46NX710 40NX711/ 40NX710 NTSC: American TV standard ATSC (8VSB terrestrial): ATSC compliant 8VSB...20.5/45.2 20.5/45.2 16.1/35.5 See "Checking the accessories" (page 4). Model name KDL- Connecting cables / Support Belt Kit / Wall-Mount Bracket / Wall-Hanging Bracket / 3D ...
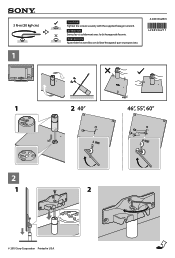
Table-Top Stand - Instructions
Page 1
PRECAUCIÓN Ajuste bien los tornillos con la llave hexagonal que se proporciona. 4-208-536-21(1) 1 2 40" 46", 55", 60" 2 1 2 © 2010 Sony Corporation Printed in U.S.A. 3 N•m {30 kgf•cm} 1 CAUTION Tighten the screws securely with the supplied hexagon wrench. ATTENTION Serrez les vis solidement avec la clé hexagonale fournie.
PRECAUCIÓN Ajuste bien los tornillos con la llave hexagonal que se proporciona. 4-208-536-21(1) 1 2 40" 46", 55", 60" 2 1 2 © 2010 Sony Corporation Printed in U.S.A. 3 N•m {30 kgf•cm} 1 CAUTION Tighten the screws securely with the supplied hexagon wrench. ATTENTION Serrez les vis solidement avec la clé hexagonale fournie.

