Primary User Manual
Page 1
... the equipment and receiver. ❑ Connect the equipment into the outlet, contact your warranty because they are the result of imprints are not covered by turning the equipment off and on a circuit different from these hooks.
... the equipment and receiver. ❑ Connect the equipment into the outlet, contact your warranty because they are the result of imprints are not covered by turning the equipment off and on a circuit different from these hooks.
Primary User Manual
Page 3
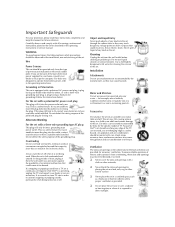
... one way. Quick stops, excessive force, and uneven surfaces may cause hazards. Alternate Warning For the set off . It is not being turned on the serial/model plate. Water and Moisture Do not use liquid cleaners or aerosol cleaners. Ventilation The slots and openings in the cabinet ...refer to direct sunlight. Never spill liquid of power source indicated on or off when it . for the specific model of the polarized plug by Sony for example, near a bathtub, washbowl, kitchen sink, or laundry tub, in a confined space, such as they may cause the appliance and ...
... one way. Quick stops, excessive force, and uneven surfaces may cause hazards. Alternate Warning For the set off . It is not being turned on the serial/model plate. Water and Moisture Do not use liquid cleaners or aerosol cleaners. Ventilation The slots and openings in the cabinet ...refer to direct sunlight. Never spill liquid of power source indicated on or off when it . for the specific model of the polarized plug by Sony for example, near a bathtub, washbowl, kitchen sink, or laundry tub, in a confined space, such as they may cause the appliance and ...
Primary User Manual
Page 10
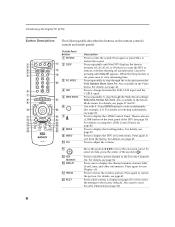
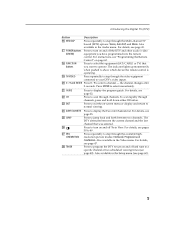
... Cancel by 4 ql pressing until the DTV displays the time in 2 minutes (15, 30, 45, 60, or 90) that you want the DTV to turn Display off automatically. For details, see page 36). 4 There is also an qs wf i.LINK button on the remote control's outside and inside panels. Press...Scrolling Index. Also available in the Video menu. qg wj 8 INDEX Press to restore the picture. For details, see page 41. For details, see page 34. Press again or press VOL+ to step through the Wide Mode settings: 8 wa Wide Zoom, Normal, Full, Zoom. Press repeatedly to restore the sound....
... Cancel by 4 ql pressing until the DTV displays the time in 2 minutes (15, 30, 45, 60, or 90) that you want the DTV to turn Display off automatically. For details, see page 36). 4 There is also an qs wf i.LINK button on the remote control's outside and inside panels. Press...Scrolling Index. Also available in the Video menu. qg wj 8 INDEX Press to restore the picture. For details, see page 41. For details, see page 34. Press again or press VOL+ to step through the Wide Mode settings: 8 wa Wide Zoom, Normal, Full, Zoom. Press repeatedly to restore the sound....
Primary User Manual
Page 11
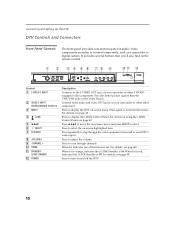
...wk TIMER Press to show which device the remote control is operating. Also available in the Audio menu. ql TV/VIDEO Press repeatedly to turn on and off Twin View. Press to program the DTV to step through the available highresolution picture modes: Interlaced, Progressive and CineMotion. The... to operate. Introducing the Digital TV (DTV) Button Description qh MTS/SAP Press repeatedly to select a channel - qj POWER buttons Press to turn on and off the DTV and other audio/video (GREEN) equipment you want to jump back and forth between the current channel and the last...
...wk TIMER Press to show which device the remote control is operating. Also available in the Audio menu. ql TV/VIDEO Press repeatedly to turn on and off Twin View. Press to program the DTV to step through the available highresolution picture modes: Interlaced, Progressive and CineMotion. The... to operate. Introducing the Digital TV (DTV) Button Description qh MTS/SAP Press repeatedly to select a channel - qj POWER buttons Press to turn on and off the DTV and other audio/video (GREEN) equipment you want to jump back and forth between the current channel and the last...

Primary User Manual
Page 12
... N) x Stop 8 2 M Fast-forward X Pause 3 9 3 DVD MENU Press to display the DVD menu. 4 q; 4 B bVv Press B bVv to move the on page 62. 8 Use to operate non-Sony video equipment. Also available in the Audio menu. For details, see "Programming the Remote Control" on page 62. 7 POWER Press to...
... N) x Stop 8 2 M Fast-forward X Pause 3 9 3 DVD MENU Press to display the DVD menu. 4 q; 4 B bVv Press B bVv to move the on page 62. 8 Use to operate non-Sony video equipment. Also available in the Audio menu. For details, see "Programming the Remote Control" on page 62. 7 POWER Press to...
Primary User Manual
Page 16
.... Press to adjust the volume. Press to select. For details, see page 42. Press B bVv to move the on-screen cursor and press SELECT to turn on the remote control. 1 2 3 4 5 6 78 9 q; For details, see pag e43. When lit, indicates one of your camcorder or other S VIDEOequipped video component. When lit in...
.... Press to adjust the volume. Press to select. For details, see page 42. Press B bVv to move the on-screen cursor and press SELECT to turn on the remote control. 1 2 3 4 5 6 78 9 q; For details, see pag e43. When lit, indicates one of your camcorder or other S VIDEOequipped video component. When lit in...

Primary User Manual
Page 22
Connecting and Setting Up the DTV A/V cable DTV (Continued from the previous page) VCR Cable box Coaxial cable Coaxial cable Coaxial cable CATV Splitter (not included) AUDIO-R (red) AUDIO-L (white) VIDEO (yellow) ✍ IMPORTANT - otherwise, you will be unable to watch premium (scrambled) channels the VCR MUST BE TURNED ON; To use the Twin View or Scrolling Index feature or to view them. 16
Connecting and Setting Up the DTV A/V cable DTV (Continued from the previous page) VCR Cable box Coaxial cable Coaxial cable Coaxial cable CATV Splitter (not included) AUDIO-R (red) AUDIO-L (white) VIDEO (yellow) ✍ IMPORTANT - otherwise, you will be unable to watch premium (scrambled) channels the VCR MUST BE TURNED ON; To use the Twin View or Scrolling Index feature or to view them. 16

Primary User Manual
Page 34
... to the DTV. The following screen appears. ✍ Depending on the i.LINK device you are setting up as described on page 26), first turn on the DTV, and then turn on using the i.LINK Control Panel, see page 42. ❑ For general information about i.LINK, see page 42). A confirmation screen appears, which...
... to the DTV. The following screen appears. ✍ Depending on the i.LINK device you are setting up as described on page 26), first turn on the DTV, and then turn on using the i.LINK Control Panel, see page 42. ❑ For general information about i.LINK, see page 42). A confirmation screen appears, which...

Primary User Manual
Page 36
... the DTV and display the Welcome screen. Connecting and Setting Up the DTV Setting Up the DTV Automatically z The initial setup screens appear only after turning on the remote control (see a short demonstration of the features of analog and digital channels. (This may take a few minutes.) 6 When the ... Program screen appears. 5 To start Auto Program, which searches for VHF/UHF and CABLE inputs. ✍ Be sure to complete all connections before turning on the DTV the first time. 1 Press POWER to continue Setup. You can run Auto Program at any time, press any time from the Setup...
... the DTV and display the Welcome screen. Connecting and Setting Up the DTV Setting Up the DTV Automatically z The initial setup screens appear only after turning on the remote control (see a short demonstration of the features of analog and digital channels. (This may take a few minutes.) 6 When the ... Program screen appears. 5 To start Auto Program, which searches for VHF/UHF and CABLE inputs. ✍ Be sure to complete all connections before turning on the DTV the first time. 1 Press POWER to continue Setup. You can run Auto Program at any time, press any time from the Setup...

Primary User Manual
Page 49
...timer settings for the selected Timer (Timer 1 or Timer 2). Off Select to a specific channel at two scheduled viewing times. On Select to turn off and tune to turn on and off the timer settings for the selected Timer (Timer 1 or Timer 2). 4 If you can also access the Timer through the ... DTV, a setup screen prompted you to set either of the following options, then press . If you didn't set the clock during this initial setup, you turned on page 44. 3 Move the joystick V or v to highlight Timer 1 or Timer 2, then press . ✍ The clock must be selected. The Set Clock...
...timer settings for the selected Timer (Timer 1 or Timer 2). Off Select to a specific channel at two scheduled viewing times. On Select to turn off and tune to turn on and off the timer settings for the selected Timer (Timer 1 or Timer 2). 4 If you can also access the Timer through the ... DTV, a setup screen prompted you to set either of the following options, then press . If you didn't set the clock during this initial setup, you turned on page 44. 3 Move the joystick V or v to highlight Timer 1 or Timer 2, then press . ✍ The clock must be selected. The Set Clock...

Primary User Manual
Page 50
...you set either of the Timers. 1 Press TIMER. Press or b to confirm each setting and move to turn on the front panel indicates the Timer is now set to the next setting. Setting the Clock z You ... (see page 58. For details, see page 30), you need to set it before you 've set, and then turn a Timer setting on pag e43). 2 Move the joystick V or v to highlight Set the Clock, then press . ... press to save the clock settings. 44 The settings are displayed in step 3 (page 43). To turn off ❑ Select On or Off in the Timer screen and the Timer is overwritten. Move the ...
...you set either of the Timers. 1 Press TIMER. Press or b to confirm each setting and move to turn on the front panel indicates the Timer is now set to the next setting. Setting the Clock z You ... (see page 58. For details, see page 30), you need to set it before you 've set, and then turn a Timer setting on pag e43). 2 Move the joystick V or v to highlight Set the Clock, then press . ... press to save the clock settings. 44 The settings are displayed in step 3 (page 43). To turn off ❑ Select On or Off in the Timer screen and the Timer is overwritten. Move the ...

Primary User Manual
Page 54
.... 7 Press EXIT to exit the menu screen. Off Select to mono programs. Off Normal stereo or mono reception. 48 Simulated Adds a surround-like effect to turn off Steady Sound. That option's settings appear. 5 Use the joystick to scroll through the options. 4 Press to stabilize the volume. The Audio menu includes the...
.... 7 Press EXIT to exit the menu screen. Off Select to mono programs. Off Normal stereo or mono reception. 48 Simulated Adds a surround-like effect to turn off Steady Sound. That option's settings appear. 5 Use the joystick to scroll through the options. 4 Press to stabilize the volume. The Audio menu includes the...

Primary User Manual
Page 55
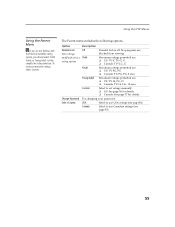
... Speaker On/Off Audio Output Easy control of the DTV is present, the DTV remains in stereo. Variable The DTV's speakers are turned off and the volume output of volume adjustments Alternate Audio Description Stereo Select for stereo reception when viewing a program broadcast in Stereo mode...V or v to select an alternate audio option and press . (Unavailable when alternate audio tracks are not broadcast.) 49 Off Select to turn on the remote control. Use your audio receiver's remote control to adjust the volume through your audio system can still be controlled by the ...
... Speaker On/Off Audio Output Easy control of the DTV is present, the DTV remains in stereo. Variable The DTV's speakers are turned off and the volume output of volume adjustments Alternate Audio Description Stereo Select for stereo reception when viewing a program broadcast in Stereo mode...V or v to select an alternate audio option and press . (Unavailable when alternate audio tracks are not broadcast.) 49 Off Select to turn on the remote control. Use your audio receiver's remote control to adjust the volume through your audio system can still be controlled by the ...

Primary User Manual
Page 58
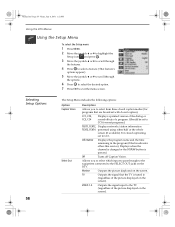
... and Overwrite Select to automatically program the DTV for all receivable channels. Channel Fix Off Useful when you have a cable box or satellite receiver connected 2-6 Turns off Channel Fix. DTV Auto Add Select to automatically add new digital channels to the digital channel list. (Available only for the selected input (Cable...
... and Overwrite Select to automatically program the DTV for all receivable channels. Channel Fix Off Useful when you have a cable box or satellite receiver connected 2-6 Turns off Channel Fix. DTV Auto Add Select to automatically add new digital channels to the digital channel list. (Available only for the selected input (Cable...
Primary User Manual
Page 61
...+ Custom Select to use USA ratings (see page 57). 55 Select Country USA Select to help simplify the rating selection. Option Description Parental Lock Off Turn ratings on/off and select a Child rating system Parental lock is off. Using the DTV Menus Using the Parent Menu z If you are not familiar...
...+ Custom Select to use USA ratings (see page 57). 55 Select Country USA Select to help simplify the rating selection. Option Description Parental Lock Off Turn ratings on/off and select a Child rating system Parental lock is off. Using the DTV Menus Using the Parent Menu z If you are not familiar...

Primary User Manual
Page 63
... under 13. 16 ans+ Not recommended for details. PG Parental Guidance. 14+ Viewers 14 and older. 18+ Adult programming. To reactivate the Parental Lock settings, turn off the Parental Lock. G General programming. Entering the correct password temporarily switches off the DTV. Canada: Selecting Custom Rating Options Viewing Blocked Programs Using the...includes the following options. (For the US, see page 56.) Option English Rating French Rating USA TV Rating Description C All children. When the DTV is turned on again, your Parental Controls settings are reactivated. 57
... under 13. 16 ans+ Not recommended for details. PG Parental Guidance. 14+ Viewers 14 and older. 18+ Adult programming. To reactivate the Parental Lock settings, turn off the Parental Lock. G General programming. Entering the correct password temporarily switches off the DTV. Canada: Selecting Custom Rating Options Viewing Blocked Programs Using the...includes the following options. (For the US, see page 56.) Option English Rating French Rating USA TV Rating Description C All children. When the DTV is turned on again, your Parental Controls settings are reactivated. 57
Primary User Manual
Page 64
..., set to CC1 for programs that the TV is pressed. VIDEO 1-4 Outputs the signal input to (regardless of the picture displayed on the screen. Off Turns off Caption Vision. Monitor Outputs the picture displayed on the screen). Displays when the channel is changed or the DISPLAY button is tuned to the...
..., set to CC1 for programs that the TV is pressed. VIDEO 1-4 Outputs the signal input to (regardless of the picture displayed on the screen. Off Turns off Caption Vision. Monitor Outputs the picture displayed on the screen). Displays when the channel is changed or the DISPLAY button is tuned to the...

Primary User Manual
Page 65
...using the i.LINK Control Panel, see "Specifications" on page 70. Hide Delete On Off Select to connected i.LINK devices even when the DTV is turned off . Allows the i.LINK signal to pass through to , but not communicating with, the DTV (or for devices that you press the TV/... this device in the i.LINK Control Panel. Select to display a list of i.LINK devices that are connected to connected i.LINK devices when the DTV is turned off . Show Select to highlight one of choice (English, Espanol, Francais). z You can select the label DVD for the VIDEO 2 input. z For ...
...using the i.LINK Control Panel, see "Specifications" on page 70. Hide Delete On Off Select to connected i.LINK devices even when the DTV is turned off . Allows the i.LINK signal to pass through to , but not communicating with, the DTV (or for devices that you press the TV/... this device in the i.LINK Control Panel. Select to display a list of i.LINK devices that are connected to connected i.LINK devices when the DTV is turned off . Show Select to highlight one of choice (English, Espanol, Francais). z You can select the label DVD for the VIDEO 2 input. z For ...

Primary User Manual
Page 66
...the horizontal bars at the top and bottom of the screen for reference as you make a vertical correction to be adjusted the first time you turn on and off at two scheduled viewing times. Normally, vertical correction only needs to the picture within the DTV screen. You can also access the... Correction are also reflected in Full Mode. Allows you to a new location. Normally, tilt correction only needs to be adjusted the first time you turn on the remote control. However, the adjustments are done while the picture is moved to make the adjustment. Move the joystick V or v to...
...the horizontal bars at the top and bottom of the screen for reference as you make a vertical correction to be adjusted the first time you turn on and off at two scheduled viewing times. Normally, vertical correction only needs to the picture within the DTV screen. You can also access the... Correction are also reflected in Full Mode. Allows you to a new location. Normally, tilt correction only needs to be adjusted the first time you turn on the remote control. However, the adjustments are done while the picture is moved to make the adjustment. Move the joystick V or v to...

Primary User Manual
Page 71
... playback) M or m during playback (release to resume normal playback) TV/VCR Move the slide switch to the position you programmed for the DVD player. Turn on /off Select DVD Play Stop Pause Step through different tracks of an audio disc Step through different chapters of a video disc Display the DVD... forward or m to step backward CH+ to step forward or CH- To Do This ... to step backward DVD MENU MENU 65 To Do This ... Turn on /off Select VCR Change channels Record Play Stop Fast forward Rewind the tape Pause Search the picture forward or backward Change input mode Press...
... playback) M or m during playback (release to resume normal playback) TV/VCR Move the slide switch to the position you programmed for the DVD player. Turn on /off Select DVD Play Stop Pause Step through different tracks of an audio disc Step through different chapters of a video disc Display the DVD... forward or m to step backward CH+ to step forward or CH- To Do This ... to step backward DVD MENU MENU 65 To Do This ... Turn on /off Select VCR Change channels Record Play Stop Fast forward Rewind the tape Pause Search the picture forward or backward Change input mode Press...


