Operating Instructions
Page 1
3-227-586-13 (1) FM Stereo/SW/MW/LW PLL Synthesized Receiver Operating instructions GB Mode d'emploi FR Bedienungsanleitung DE Manual de instrucciones ES Gebruiksaanwijzing NL Manual de Instruções PT ICF-SW7600GR Sony Corporation 2001 Printed in Japan
3-227-586-13 (1) FM Stereo/SW/MW/LW PLL Synthesized Receiver Operating instructions GB Mode d'emploi FR Bedienungsanleitung DE Manual de instrucciones ES Gebruiksaanwijzing NL Manual de Instruções PT ICF-SW7600GR Sony Corporation 2001 Printed in Japan
Operating Instructions
Page 2
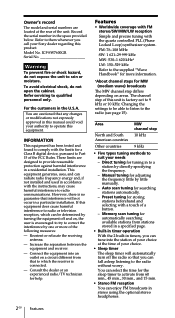
ICF-SW7600GR Serial No Warning To prevent fire or shock hazard, do not open the cabinet....countries MW channel step 10 kHz 9 kHz • Five types tuning methods to suit your Sony dealer regarding this equipment does cause harmful interference to radio or television reception, which the receiver is connected. - You can select the time for ... stations stored in a specified page. • Built-in timer operation With the 2 built-in timers, you can enjoy FM broadcasts in this manual could void your authority to operate this unit is factory-set to 9 kHz or 10 kHz. This...
ICF-SW7600GR Serial No Warning To prevent fire or shock hazard, do not open the cabinet....countries MW channel step 10 kHz 9 kHz • Five types tuning methods to suit your Sony dealer regarding this equipment does cause harmful interference to radio or television reception, which the receiver is connected. - You can select the time for ... stations stored in a specified page. • Built-in timer operation With the 2 built-in timers, you can enjoy FM broadcasts in this manual could void your authority to operate this unit is factory-set to 9 kHz or 10 kHz. This...
Operating Instructions
Page 4
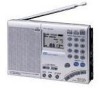
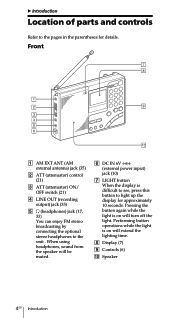
...) jack (35) 2 ATT (attenuator) control (21) 3 ATT (attenuator) ON/ OFF switch (21) 4 LINE OUT (recording output) jack (33) 5 2 (headphones) jack (17, 33) You can enjoy FM stereo broadcasting by connecting the optional stereo headphones to the unit . B Introduction Location of parts and controls Refer to the pages in the parentheses for...
...) jack (35) 2 ATT (attenuator) control (21) 3 ATT (attenuator) ON/ OFF switch (21) 4 LINE OUT (recording output) jack (33) 5 2 (headphones) jack (17, 33) You can enjoy FM stereo broadcasting by connecting the optional stereo headphones to the unit . B Introduction Location of parts and controls Refer to the pages in the parentheses for...
Operating Instructions
Page 6
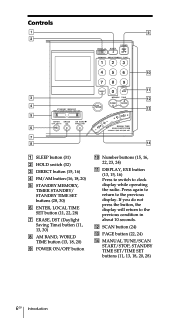
... you do not press the button, the display will return to the previous display. Controls 1 SLEEP button (31) 2 HOLD switch (32) 3 DIRECT button (15, 16) 4 FM/AM button (16, 18, 20) 5 STANDBY MEMORY, TIMER STANDBY/ STANDBY TIME SET buttons (28, 30) 6 ENTER, LOCAL TIME SET button (11, 22, 28) 7 ERASE, DST.../OFF button 0 Number buttons (15, 16, 22, 23, 24) qa DISPLAY, EXE button (13, 15, 16) Press to switch to clock display while operating the radio.
... you do not press the button, the display will return to the previous display. Controls 1 SLEEP button (31) 2 HOLD switch (32) 3 DIRECT button (15, 16) 4 FM/AM button (16, 18, 20) 5 STANDBY MEMORY, TIMER STANDBY/ STANDBY TIME SET buttons (28, 30) 6 ENTER, LOCAL TIME SET button (11, 22, 28) 7 ERASE, DST.../OFF button 0 Number buttons (15, 16, 22, 23, 24) qa DISPLAY, EXE button (13, 15, 16) Press to switch to clock display while operating the radio.
Operating Instructions
Page 9
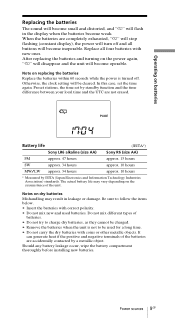
... time. • Do not carry the dry batteries with new ones. Otherwise, the clock setting will turn off . Battery life (JEITA*) Sony LR6 alkaline (size AA) Sony R6 (size AA) FM approx. 47 hours approx. 15 hours SW approx. 34 hours approx. 10 hours MW/LW approx. 34 hours approx. 10 hours * Measured...
... time. • Do not carry the dry batteries with new ones. Otherwise, the clock setting will turn off . Battery life (JEITA*) Sony LR6 alkaline (size AA) Sony R6 (size AA) FM approx. 47 hours approx. 15 hours SW approx. 34 hours approx. 10 hours MW/LW approx. 34 hours approx. 10 hours * Measured...
Operating Instructions
Page 16
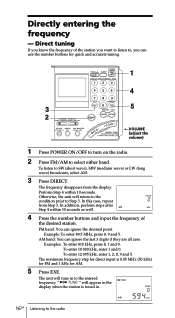
...will tune in . 16GB Listening to the radio AM band: You can ignore the decimal point. " TUNE " will appear in the display when the station is 0.05 MHz (50 kHz) for FM and 1 kHz for AM. 5 Press EXE. The frequency disappears from Step 3. FM band: You can ignore the last 3 digits... frequency - The minimum frequency step for quick and accurate tuning. 1 4 3 5 2 TVOLUME (adjust the volume) 1 Press POWER ON/OFF to turn on the radio. 2 Press FM/AM to SW (short wave), MW (medium wave) or LW (long wave) broadcasts, select AM. 3 Press DIRECT. The unit will return to the condition prior...
...will tune in . 16GB Listening to the radio AM band: You can ignore the decimal point. " TUNE " will appear in the display when the station is 0.05 MHz (50 kHz) for FM and 1 kHz for AM. 5 Press EXE. The frequency disappears from Step 3. FM band: You can ignore the last 3 digits... frequency - The minimum frequency step for quick and accurate tuning. 1 4 3 5 2 TVOLUME (adjust the volume) 1 Press POWER ON/OFF to turn on the radio. 2 Press FM/AM to SW (short wave), MW (medium wave) or LW (long wave) broadcasts, select AM. 3 Press DIRECT. The unit will return to the condition prior...
Operating Instructions
Page 17
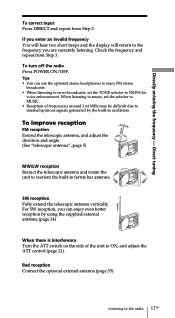
...ATT switch on the side of frequencies around 3.64 MHz may be difficult due to NEWS for voice enhancement. To turn off the radio Press POWER ON/OFF. SW reception Fully extend the telescopic antenna vertically. Bad reception Connect the optional external antenna (page 35). When... listening to music, set the TONE selector to internal spurious signals generated by the built-in ferrite bar antenna. To improve reception FM reception Extend the telescopic antenna, and adjust the direction and angle. (See "telescopic antenna", page 5) MW/LW reception Retract the telescopic ...
...ATT switch on the side of frequencies around 3.64 MHz may be difficult due to NEWS for voice enhancement. To turn off the radio Press POWER ON/OFF. SW reception Fully extend the telescopic antenna vertically. Bad reception Connect the optional external antenna (page 35). When... listening to music, set the TONE selector to internal spurious signals generated by the built-in ferrite bar antenna. To improve reception FM reception Extend the telescopic antenna, and adjust the direction and angle. (See "telescopic antenna", page 5) MW/LW reception Retract the telescopic ...
Operating Instructions
Page 18
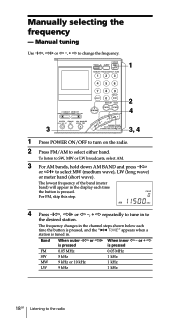
... step. 4 Press -?K, k?+ or K -, + k repeatedly to tune in . Manual tuning Use -?K, k?+ or K -, + k to change the frequency. 1 2 4 3 3, 4 1 Press POWER ON/OFF to turn on the radio. 2 Press FM/AM to the radio or + k is pressed is tuned in to select MW (medium wave), LW (long wave) or meter band (short wave). Manually selecting the frequency...
... step. 4 Press -?K, k?+ or K -, + k repeatedly to tune in . Manual tuning Use -?K, k?+ or K -, + k to change the frequency. 1 2 4 3 3, 4 1 Press POWER ON/OFF to turn on the radio. 2 Press FM/AM to the radio or + k is pressed is tuned in to select MW (medium wave), LW (long wave) or meter band (short wave). Manually selecting the frequency...
Operating Instructions
Page 19
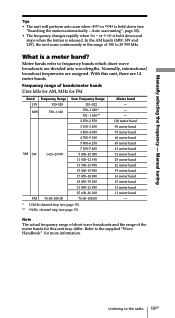
... are assigned. or + k is a meter band? In the AM bands (MW, SW and LW), the unit scans continuously in the range of 150 to the radio 19GB Frequency range of the meter bands for FM Band Frequency Range Scan Frequency Range LW 150-529 MW 530-1 620 AM SW 1 621-29 999... FM 76.00-108.00 153-522 530-1 620 * 531-1 620 ** 2 250-2 550 3 150-3 450 3 850-4 050 4 700-5 100 5 900-6 250 7 100-7 400 9 400-10 000 ...
... are assigned. or + k is a meter band? In the AM bands (MW, SW and LW), the unit scans continuously in the range of 150 to the radio 19GB Frequency range of the meter bands for FM Band Frequency Range Scan Frequency Range LW 150-529 MW 530-1 620 AM SW 1 621-29 999... FM 76.00-108.00 153-522 530-1 620 * 531-1 620 ** 2 250-2 550 3 150-3 450 3 850-4 050 4 700-5 100 5 900-6 250 7 100-7 400 9 400-10 000 ...
Operating Instructions
Page 20
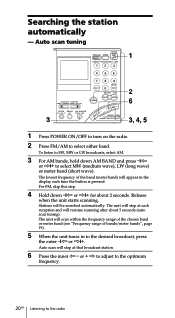
... bands/meter bands", page 19). 5 When the unit tunes in the display each reception and will stop at that broadcast station. 6 Press the inner K - For FM, skip this step. 4 Hold down AM BAND and press -?K or k?+ to SW, MW or LW broadcasts, select AM. 3 For AM bands, hold down -?K or k?+ for... the band (meter band) will be searched automatically. Release when the unit starts scanning. Auto scan tuning 1 2 6 3 3, 4, 5 1 Press POWER ON/OFF to turn on the radio. 2 Press FM/AM to the...
... bands/meter bands", page 19). 5 When the unit tunes in the display each reception and will stop at that broadcast station. 6 Press the inner K - For FM, skip this step. 4 Hold down AM BAND and press -?K or k?+ to SW, MW or LW broadcasts, select AM. 3 For AM bands, hold down -?K or k?+ for... the band (meter band) will be searched automatically. Release when the unit starts scanning. Auto scan tuning 1 2 6 3 3, 4, 5 1 Press POWER ON/OFF to turn on the radio. 2 Press FM/AM to the...

Operating Instructions
Page 26
During this unit. 1 6 4 3 2 1 Press POWER ON/OFF to turn on radio waves", page 41. 26GB Listening to the radio Receiving SSB and CW transmissions You can fine tune the received frequency in to either LSB or USB. To receive CW transmission, select LSB. 5 Adjust ... FINE TUNE control to fine tune in a range of about ±1.5 kHz. Tip For more information on SSB and CW, refer to "Tips on the radio. 2 Press FM/AM to select AM. 3 Set the AM MODE selector to SSB. 4 Set the LSB/USB selector to a frequency where you have the best reception.
During this unit. 1 6 4 3 2 1 Press POWER ON/OFF to turn on radio waves", page 41. 26GB Listening to the radio Receiving SSB and CW transmissions You can fine tune the received frequency in to either LSB or USB. To receive CW transmission, select LSB. 5 Adjust ... FINE TUNE control to fine tune in a range of about ±1.5 kHz. Tip For more information on SSB and CW, refer to "Tips on the radio. 2 Press FM/AM to select AM. 3 Set the AM MODE selector to SSB. 4 Set the LSB/USB selector to a frequency where you have the best reception.
Operating Instructions
Page 27
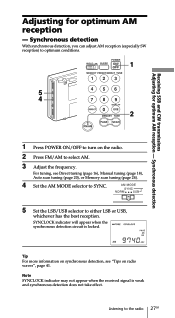
...not take effect. Listening to either LSB or USB, whichever has the best reception. For tuning, see "Tips on the radio. 2 Press FM/AM to turn on radio waves", page 41. Synchronous detection Adjusting for optimum AM reception - Note SYNCLOCK indicator may not appear when the received signal ... scan tuning (page 20), or Memory scan tuning (page 24). 4 Set the AM MODE selector to SYNC. 5 Set the LSB/USB selector to the radio 27GB Synchronous detection With synchronous detection, you can adjust AM reception (especially SW reception) to optimum conditions. 1 5 4 2 1 Press POWER ON/OFF to...
...not take effect. Listening to either LSB or USB, whichever has the best reception. For tuning, see "Tips on the radio. 2 Press FM/AM to turn on radio waves", page 41. Synchronous detection Adjusting for optimum AM reception - Note SYNCLOCK indicator may not appear when the received signal ... scan tuning (page 20), or Memory scan tuning (page 24). 4 Set the AM MODE selector to SYNC. 5 Set the LSB/USB selector to the radio 27GB Synchronous detection With synchronous detection, you can adjust AM reception (especially SW reception) to optimum conditions. 1 5 4 2 1 Press POWER ON/OFF to...

Operating Instructions
Page 33
To record FM broadcasts in to the station you want to insert headphones into the i jack. Use the appropriate cable for the type of cassette recorder. Tip Adjusting the VOLUME control on the radio has no effect on the cassette recorder. Preventing operation errors - Cassette recorder Type Jack ... Both channels will be recorded in monaural. to MIC IN or LINE IN Cassette recorder to LINE OUT 1 Connect the radio to a cassette recorder with the optional connecting cable. Other convenient uses 33GB Hold function Recording broadcasts Recording broadcasts You can record...
To record FM broadcasts in to the station you want to insert headphones into the i jack. Use the appropriate cable for the type of cassette recorder. Tip Adjusting the VOLUME control on the radio has no effect on the cassette recorder. Preventing operation errors - Cassette recorder Type Jack ... Both channels will be recorded in monaural. to MIC IN or LINE IN Cassette recorder to LINE OUT 1 Connect the radio to a cassette recorder with the optional connecting cable. Other convenient uses 33GB Hold function Recording broadcasts Recording broadcasts You can record...
Operating Instructions
Page 40
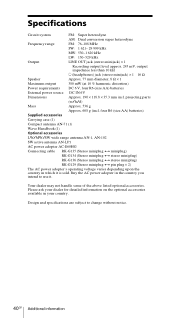
... intend to change without notice. 40GB Additional information Design and specifications are subject to use it is sold. Specifications Circuit system FM: Super heterodyne AM: Dual conversion super heterodyne Frequency range FM: 76-108 MHz SW: 1 621- 29 999 kHz MW: 530-1 620 kHz LW: 150-529 kHz Output LINE OUT jack...
... intend to change without notice. 40GB Additional information Design and specifications are subject to use it is sold. Specifications Circuit system FM: Super heterodyne AM: Dual conversion super heterodyne Frequency range FM: 76-108 MHz SW: 1 621- 29 999 kHz MW: 530-1 620 kHz LW: 150-529 kHz Output LINE OUT jack...
Service Manual
Page 1
... Design and specifications are subject to change without notice. 9-873-099-11 2001C1600-1 © 2001.3 Sony Corporation Audio Entertainment Group General Engineering Dept. ICF-SW7600GR SERVICE MANUAL Ver 1.0 2001. 03 US Model Canadian Model AEP Model Chinese Model E Model Tourist Model ...SPECIFICATIONS Circuit system FM: Super heterodyne AM: Dual conversion super heterodyne Frequency range FM: 76-108 MHz SW: 1...
... Design and specifications are subject to change without notice. 9-873-099-11 2001C1600-1 © 2001.3 Sony Corporation Audio Entertainment Group General Engineering Dept. ICF-SW7600GR SERVICE MANUAL Ver 1.0 2001. 03 US Model Canadian Model AEP Model Chinese Model E Model Tourist Model ...SPECIFICATIONS Circuit system FM: Super heterodyne AM: Dual conversion super heterodyne Frequency range FM: 76-108 MHz SW: 1...
Service Manual
Page 3
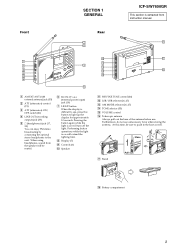
...attenuator) control (21) 3 ATT (attenuator) ON/ OFF switch (21) 4 LINE OUT (recording output) jack (33) 5 2 (headphones) jack (17, 33) You can enjoy FM stereo broadcasting by connecting the optional stereo headphones to the unit . Pressing the button again while the light is on will extend the lighting time... the antenna. Furthermore, do not use . Performing button operations while the light is on will turn off the light. Front SECTION 1 GENERAL Rear ICF-SW7600GR This section is difficult to see, press this time, be muted. 6 DC IN 6V ! (external power input) jack (10) 7 LIGHT ...
...attenuator) control (21) 3 ATT (attenuator) ON/ OFF switch (21) 4 LINE OUT (recording output) jack (33) 5 2 (headphones) jack (17, 33) You can enjoy FM stereo broadcasting by connecting the optional stereo headphones to the unit . Pressing the button again while the light is on will extend the lighting time... the antenna. Furthermore, do not use . Performing button operations while the light is on will turn off the light. Front SECTION 1 GENERAL Rear ICF-SW7600GR This section is difficult to see, press this time, be muted. 6 DC IN 6V ! (external power input) jack (10) 7 LIGHT ...
Service Manual
Page 4
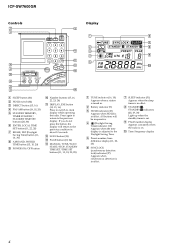
... buttons (11, 13, 18, 20, 28) 1 TUNE indicator (16, 18) Appears when a station is tuned in about 10 seconds. ICF-SW7600GR Controls Display 1 SLEEP button (31) 2 HOLD switch (32) 3 DIRECT button (15, 16) 4 FM/AM button (16, 18, 20) 5 STANDBY MEMORY, TIMER STANDBY/ STANDBY TIME SET buttons (28, 30) 6 ENTER, LOCAL TIME SET... timer is in effect. 8 STANDBY , STANDBY indicators (28, 29, 30) Light up when the standby timer is set. 9 PAGE number display Appears constantly when the radio is in effect. Press again to return to clock display while operating the...
... buttons (11, 13, 18, 20, 28) 1 TUNE indicator (16, 18) Appears when a station is tuned in about 10 seconds. ICF-SW7600GR Controls Display 1 SLEEP button (31) 2 HOLD switch (32) 3 DIRECT button (15, 16) 4 FM/AM button (16, 18, 20) 5 STANDBY MEMORY, TIMER STANDBY/ STANDBY TIME SET buttons (28, 30) 6 ENTER, LOCAL TIME SET... timer is in effect. 8 STANDBY , STANDBY indicators (28, 29, 30) Light up when the standby timer is set. 9 PAGE number display Appears constantly when the radio is in effect. Press again to return to clock display while operating the...
Service Manual
Page 6
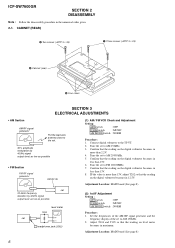
... signal generator Put the lead-wire antenna close to the set. 30% amplitude modulation by 400Hz signal output level: as low as possible • FM Section FM RF signal generator FM RF IN set 22.5kHz frequency deviation by 400Hz signal output level: as low as possible 16 Ω level meter set to... TP VT. 2. IF the value is more than 13V. 8. Adjust T104 and T105 so that the reading on level meter becomes in less than 2.2V. 4. ICF-SW7600GR SECTION 2 DISASSEMBLY Note : Follow the disassembly procedure in 12.5V.
... signal generator Put the lead-wire antenna close to the set. 30% amplitude modulation by 400Hz signal output level: as low as possible • FM Section FM RF signal generator FM RF IN set 22.5kHz frequency deviation by 400Hz signal output level: as low as possible 16 Ω level meter set to... TP VT. 2. IF the value is more than 13V. 8. Adjust T104 and T105 so that the reading on level meter becomes in less than 2.2V. 4. ICF-SW7600GR SECTION 2 DISASSEMBLY Note : Follow the disassembly procedure in 12.5V.
Service Manual
Page 7
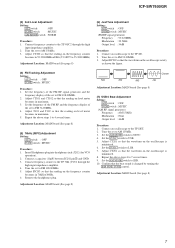
... waveform on the frequency counter becomes in maximum. 5. Insert Headphones plug into headphones jack (J202) (for VCO operation). 2. ICF-SW7600GR (3) 2nd Local Adjustment Setting: ATT switch : OFF TONE switch : MUSIC AM MODE switch : NORM Procedure: 1. Connect frequency counter to FM 76.00MHz. 4. Set the SYNC switch to SYNC. 4. Set the frequency of the...
... waveform on the frequency counter becomes in maximum. 5. Insert Headphones plug into headphones jack (J202) (for VCO operation). 2. ICF-SW7600GR (3) 2nd Local Adjustment Setting: ATT switch : OFF TONE switch : MUSIC AM MODE switch : NORM Procedure: 1. Connect frequency counter to FM 76.00MHz. 4. Set the SYNC switch to SYNC. 4. Set the frequency of the...
Service Manual
Page 9
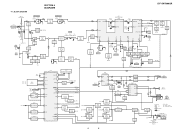
... BEEP 52 SD 53 METER 54 EO 19 23 VDD 51 VDET 50 CE VCOL 20 VCOH 21 AM/FM 16 BAR/ROD 17 POWER 15 LCD1 LIQUID CRYSTAL DISPLAY Q301 LED DRIVE D301(BACK LIGHT) MUTING BEEP SD...IN 6V DRY BATTERY SIZE"AA" (IEC DESIGNATION R6) 4PCS,6V 9 9 BLOCK DIAGRAM SECTION 4 DIAGRAMS ICF-SW7600GR ANT101 (TELESCOPIC) FM TRACKING T101 CT101 FM ANT J101 AM EXT ANT (EXCEPT CH) Q120 ATT VT Q101 MUTING CONTROL MUTING ROD B BAR B...SW RF AMP Q116 LW/MW RF AMP Q112,113 Q114,115 ATT AGC AGC Q104 FM RF AMP FM TRACKING T102 CT102 FM RF VT 1ST IF T104 XF101 T105 AM MIX2 55.845MHz AM IFT1 + Q109,110...
... BEEP 52 SD 53 METER 54 EO 19 23 VDD 51 VDET 50 CE VCOL 20 VCOH 21 AM/FM 16 BAR/ROD 17 POWER 15 LCD1 LIQUID CRYSTAL DISPLAY Q301 LED DRIVE D301(BACK LIGHT) MUTING BEEP SD...IN 6V DRY BATTERY SIZE"AA" (IEC DESIGNATION R6) 4PCS,6V 9 9 BLOCK DIAGRAM SECTION 4 DIAGRAMS ICF-SW7600GR ANT101 (TELESCOPIC) FM TRACKING T101 CT101 FM ANT J101 AM EXT ANT (EXCEPT CH) Q120 ATT VT Q101 MUTING CONTROL MUTING ROD B BAR B...SW RF AMP Q116 LW/MW RF AMP Q112,113 Q114,115 ATT AGC AGC Q104 FM RF AMP FM TRACKING T102 CT102 FM RF VT 1ST IF T104 XF101 T105 AM MIX2 55.845MHz AM IFT1 + Q109,110...


