Operating Instructions
Page 2
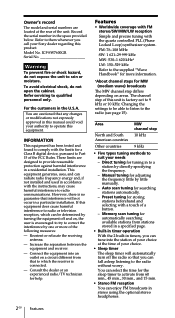
...., 30 min., and 15 min. • Stereo FM reception You can be able to listen to the radio (see page 15). Record the serial number in the U.S.A. ICF-SW7600GR Serial No Warning To prevent fire or shock hazard, do not open the cabinet. However, there is factory-...can select the time for automatically searching available stations from that any changes or modifications not expressly approved in this manual could void your Sony dealer regarding this equipment. Preset tuning for searching stations automatically. - To avoid electrical shock, do not expose the unit to suit...
...., 30 min., and 15 min. • Stereo FM reception You can be able to listen to the radio (see page 15). Record the serial number in the U.S.A. ICF-SW7600GR Serial No Warning To prevent fire or shock hazard, do not open the cabinet. However, there is factory-...can select the time for automatically searching available stations from that any changes or modifications not expressly approved in this manual could void your Sony dealer regarding this equipment. Preset tuning for searching stations automatically. - To avoid electrical shock, do not expose the unit to suit...
Operating Instructions
Page 3
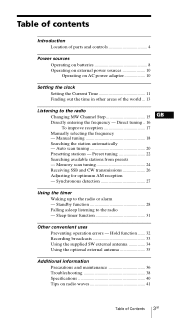
... Setting the Current Time 11 Finding out the time in other areas of Contents 3GB Standby function 28 Falling asleep listening to the radio or alarm - Preset tuning 22 Searching available stations from presets - Memory scan tuning 24 Receiving SSB and CW transmissions 26 Adjusting ...of parts and controls 4 Power sources Operating on batteries 8 Operating on external power sources 10 Operating on radio waves 41 Table of the world ... 13 Listening to the radio Changing MW Channel Step 15 GB Directly entering the frequency - Synchronous detection 27 Using the timer Waking up...
... Setting the Current Time 11 Finding out the time in other areas of Contents 3GB Standby function 28 Falling asleep listening to the radio or alarm - Preset tuning 22 Searching available stations from presets - Memory scan tuning 24 Receiving SSB and CW transmissions 26 Adjusting ...of parts and controls 4 Power sources Operating on batteries 8 Operating on external power sources 10 Operating on radio waves 41 Table of the world ... 13 Listening to the radio Changing MW Channel Step 15 GB Directly entering the frequency - Synchronous detection 27 Using the timer Waking up...
Operating Instructions
Page 6
... to the previous condition in about 10 seconds. If you do not press the button, the display will return to clock display while operating the radio. Press again to return to the previous display.
... to the previous condition in about 10 seconds. If you do not press the button, the display will return to clock display while operating the radio. Press again to return to the previous display.
Operating Instructions
Page 7
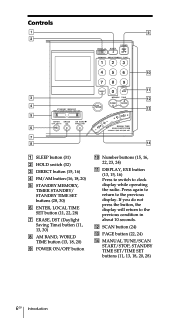
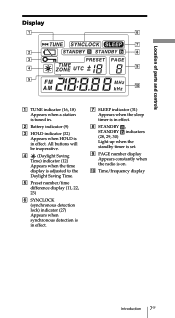
... timer is in effect. 8 STANDBY , STANDBY indicators (28, 29, 30) Light up when the standby timer is set. 9 PAGE number display Appears constantly when the radio is in . 2 Battery indicator (9) 3 HOLD indicator (32) Appears when HOLD is on. 0 Time/frequency display Introduction 7GB
... timer is in effect. 8 STANDBY , STANDBY indicators (28, 29, 30) Light up when the standby timer is set. 9 PAGE number display Appears constantly when the radio is in . 2 Battery indicator (9) 3 HOLD indicator (32) Appears when HOLD is on. 0 Time/frequency display Introduction 7GB
Operating Instructions
Page 10
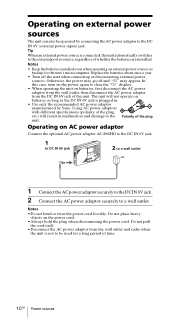
... the unit on batteries, first disconnect the AC power adaptor from the wall outlet, then disconnect the AC power adaptor from the wall outlet and radio when the unit is connected, the unit automatically switches to the external power source, regardless of whether the batteries are installed. Do not place heavy... cord. The unit will result in . • Use only the recommended AC power adaptor manufactured by connecting the AC power adaptor to be operated by Sony.
... the unit on batteries, first disconnect the AC power adaptor from the wall outlet, then disconnect the AC power adaptor from the wall outlet and radio when the unit is connected, the unit automatically switches to the external power source, regardless of whether the batteries are installed. Do not place heavy... cord. The unit will result in . • Use only the recommended AC power adaptor manufactured by connecting the AC power adaptor to be operated by Sony.
Operating Instructions
Page 11
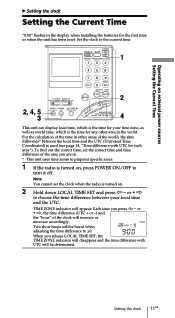
... has been reset. Two short beeps will appear. To find out the correct time, set the clock when the radio is turned on, press POWER ON/OFF to pinpoint specific areas. 1 If the radio is turned on. 2 Hold down LOCAL TIME SET and press K - TIME ZONE indicator will be determined. For the...
... has been reset. Two short beeps will appear. To find out the correct time, set the clock when the radio is turned on, press POWER ON/OFF to pinpoint specific areas. 1 If the radio is turned on. 2 Hold down LOCAL TIME SET and press K - TIME ZONE indicator will be determined. For the...
Operating Instructions
Page 12
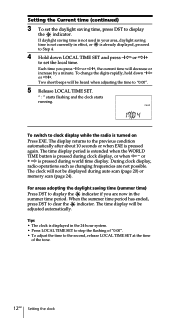
... the clock starts running. Tips • The clock is already displayed, proceed to clock display while the radio is pressed during auto scan (page 20) or memory scan (page 24). During clock display, radio operations such as changing frequencies are now in the 24 hour system. • Press LOCAL TIME SET to...
... the clock starts running. Tips • The clock is already displayed, proceed to clock display while the radio is pressed during auto scan (page 20) or memory scan (page 24). During clock display, radio operations such as changing frequencies are now in the 24 hour system. • Press LOCAL TIME SET to...
Operating Instructions
Page 13
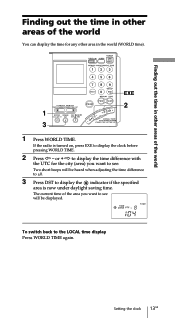
... can display the time for the city (area) you want to display the clock before pressing WORLD TIME. 2 Press K - Setting the clock 13GB If the radio is now under daylight saving time. Two short beeps will be heard when adjusting the time difference to ±0. 3 Press DST to display the indicator...
... can display the time for the city (area) you want to display the clock before pressing WORLD TIME. 2 Press K - Setting the clock 13GB If the radio is now under daylight saving time. Two short beeps will be heard when adjusting the time difference to ±0. 3 Press DST to display the indicator...
Operating Instructions
Page 15
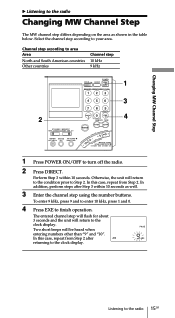
... repeat from Step 2 after Step 3 within 10 seconds. To enter 9 kHz, press 9 and to enter 10 kHz, press 1 and 0. 4 Press EXE to the radio 15GB Channel step according to area Area North and South American countries Other countries Channel step 10 kHz 9 kHz 1 3 2 4 1 Press POWER ON/OFF to your...the clock display. Two short beeps will be heard when entering numbers other than "9" and "10". Changing MW Channel Step B Listening to the radio Changing MW Channel Step The MW channel step differs depending on the area as well. 3 Enter the channel step using the number buttons. Select ...
... repeat from Step 2 after Step 3 within 10 seconds. To enter 9 kHz, press 9 and to enter 10 kHz, press 1 and 0. 4 Press EXE to the radio 15GB Channel step according to area Area North and South American countries Other countries Channel step 10 kHz 9 kHz 1 3 2 4 1 Press POWER ON/OFF to your...the clock display. Two short beeps will be heard when entering numbers other than "9" and "10". Changing MW Channel Step B Listening to the radio Changing MW Channel Step The MW channel step differs depending on the area as well. 3 Enter the channel step using the number buttons. Select ...
Operating Instructions
Page 16
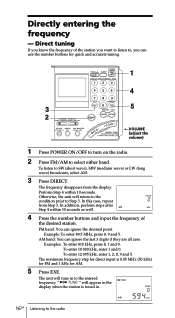
... to SW (short wave), MW (medium wave) or LW (long wave) broadcasts, select AM. 3 Press DIRECT. Direct tuning If you want to listen to the radio To enter 10 000 kHz, enter 1 and 0. The frequency disappears from Step 3. " TUNE " will return to the condition prior to select either band. Directly entering... 0.05 MHz (50 kHz) for FM and 1 kHz for quick and accurate tuning. 1 4 3 5 2 TVOLUME (adjust the volume) 1 Press POWER ON/OFF to turn on the radio. 2 Press FM/AM to Step 3.
... to SW (short wave), MW (medium wave) or LW (long wave) broadcasts, select AM. 3 Press DIRECT. Direct tuning If you want to listen to the radio To enter 10 000 kHz, enter 1 and 0. The frequency disappears from Step 3. " TUNE " will return to the condition prior to select either band. Directly entering... 0.05 MHz (50 kHz) for FM and 1 kHz for quick and accurate tuning. 1 4 3 5 2 TVOLUME (adjust the volume) 1 Press POWER ON/OFF to turn on the radio. 2 Press FM/AM to Step 3.
Operating Instructions
Page 17
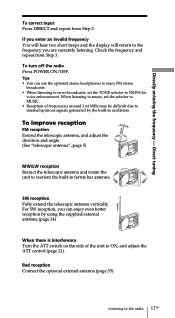
... enjoy even better reception by the built-in ferrite bar antenna. Listening to ON, and adjust the ATT control (page 21). To turn off the radio Press POWER ON/OFF. When listening to music, set the TONE selector to internal spurious signals generated by using the supplied external antenna (page 34... stereo headphones to enjoy FM stereo broadcasts. • When listening to news broadcasts, set the selector to MUSIC. • Reception of the unit to the radio 17GB SW reception Fully extend the telescopic antenna vertically.
... enjoy even better reception by the built-in ferrite bar antenna. Listening to ON, and adjust the ATT control (page 21). To turn off the radio Press POWER ON/OFF. When listening to music, set the TONE selector to internal spurious signals generated by using the supplied external antenna (page 34... stereo headphones to enjoy FM stereo broadcasts. • When listening to news broadcasts, set the selector to MUSIC. • Reception of the unit to the radio 17GB SW reception Fully extend the telescopic antenna vertically.
Operating Instructions
Page 18
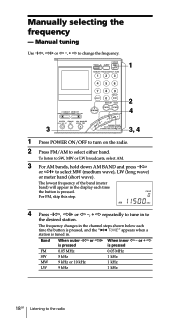
... step. 4 Press -?K, k?+ or K -, + k repeatedly to tune in . Manual tuning Use -?K, k?+ or K -, + k to change the frequency. 1 2 4 3 3, 4 1 Press POWER ON/OFF to turn on the radio. 2 Press FM/AM to select MW (medium wave), LW (long wave) or meter band (short wave). The frequency changes in the channel steps shown below...meter band) will appear in the display each time the button is pressed, and the " TUNE " appears when a station is tuned in to the radio To listen to SW, MW or LW broadcasts, select AM. 3 For AM bands, hold down AM BAND and press -?K or k?+ to select either band...
... step. 4 Press -?K, k?+ or K -, + k repeatedly to tune in . Manual tuning Use -?K, k?+ or K -, + k to change the frequency. 1 2 4 3 3, 4 1 Press POWER ON/OFF to turn on the radio. 2 Press FM/AM to select MW (medium wave), LW (long wave) or meter band (short wave). The frequency changes in the channel steps shown below...meter band) will appear in the display each time the button is pressed, and the " TUNE " appears when a station is tuned in to the radio To listen to SW, MW or LW broadcasts, select AM. 3 For AM bands, hold down AM BAND and press -?K or k?+ to select either band...
Operating Instructions
Page 19
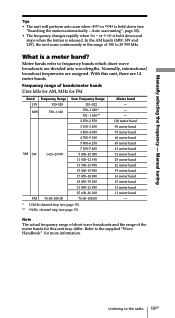
... bands Unit: kHz for AM, MHz for this unit, there are assigned. Normally, international broadcast frequencies are 14 meter bands. Meter bands refer to the radio 19GB Manual tuning Tips • The unit will perform auto scan when -?K or k?+ is held down (see page 15). Frequency range of the meter bands...
... bands Unit: kHz for AM, MHz for this unit, there are assigned. Normally, international broadcast frequencies are 14 meter bands. Meter bands refer to the radio 19GB Manual tuning Tips • The unit will perform auto scan when -?K or k?+ is held down (see page 15). Frequency range of the meter bands...
Operating Instructions
Page 20
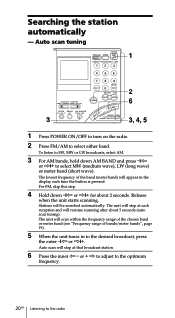
... adjust to the optimum frequency. 20GB Listening to select either band. Auto scan tuning 1 2 6 3 3, 4, 5 1 Press POWER ON/OFF to turn on the radio. 2 Press FM/AM to the radio The lowest frequency of bands/meter bands", page 19). 5 When the unit tunes in the display each reception and will be searched automatically.
... adjust to the optimum frequency. 20GB Listening to select either band. Auto scan tuning 1 2 6 3 3, 4, 5 1 Press POWER ON/OFF to turn on the radio. 2 Press FM/AM to the radio The lowest frequency of bands/meter bands", page 19). 5 When the unit tunes in the display each reception and will be searched automatically.

Operating Instructions
Page 21
... descending order when holding down -?K, and in ascending order when holding down k?+. • To change the scanning direction, hold down either -?K or k?+ opposite to the radio 21GB Listening to the current direction for scanning -
... descending order when holding down -?K, and in ascending order when holding down k?+. • To change the scanning direction, hold down either -?K or k?+ opposite to the radio 21GB Listening to the current direction for scanning -
Operating Instructions
Page 22
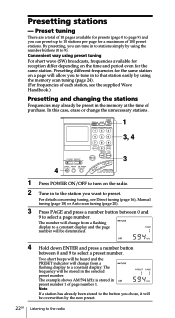
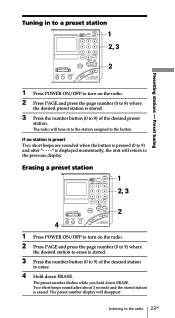
...change from a flashing display to 9). The example shows AM 594 kHz is stored in to 10 stations per page for reception differ depending on the radio. 2 Tune in the selected preset number. Preset tuning There are a total of 10 pages available for the same station. Note If a station ... tuning (page 16), Manual tuning (page 18) or Auto scan tuning (page 20). 3 Press PAGE and press a number button between 0 and 9 to the radio Presetting stations - The number will allow you chose, it will be overwritten by using the memory scan tuning (page 24). (For frequencies of page number...
...change from a flashing display to 9). The example shows AM 594 kHz is stored in to 10 stations per page for reception differ depending on the radio. 2 Tune in the selected preset number. Preset tuning There are a total of 10 pages available for the same station. Note If a station ... tuning (page 16), Manual tuning (page 18) or Auto scan tuning (page 20). 3 Press PAGE and press a number button between 0 and 9 to the radio Presetting stations - The number will allow you chose, it will be overwritten by using the memory scan tuning (page 24). (For frequencies of page number...
Operating Instructions
Page 23
... The preset number flashes while you hold down ERASE. Erasing a preset station 1 2, 3 2 4 1 Press POWER ON/OFF to turn on the radio. 2 Press PAGE and press the page number (0 to 9) where the desired station to erase is displayed momentarily, the unit will return to the button....station assigned to the previous display. The preset number display will tune in to a preset station 1 2, 3 2 1 Press POWER ON/OFF to turn on the radio. 2 Press PAGE and press the page number (0 to erase. 4 Hold down ERASE. Listening to 9) of the desired preset station. Two short beeps sound after...
... The preset number flashes while you hold down ERASE. Erasing a preset station 1 2, 3 2 4 1 Press POWER ON/OFF to turn on the radio. 2 Press PAGE and press the page number (0 to 9) where the desired station to erase is displayed momentarily, the unit will return to the button....station assigned to the previous display. The preset number display will tune in to a preset station 1 2, 3 2 1 Press POWER ON/OFF to turn on the radio. 2 Press PAGE and press the page number (0 to erase. 4 Hold down ERASE. Listening to 9) of the desired preset station. Two short beeps sound after...
Operating Instructions
Page 24
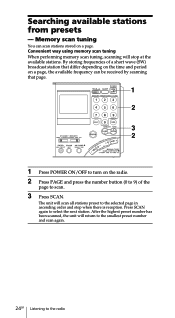
Memory scan tuning You can be received by scanning that page. 1 2 3 2 1 Press POWER ON/OFF to turn on the radio. 2 Press PAGE and press the number button (0 to 9) of a short wave (SW) broadcast station that differ depending on the time and period on a page, the ... tuning, scanning will stop when there is reception. After the highest preset number has been scanned, the unit will scan all stations preset to the radio The unit will return to the smallest preset number and scan again. 24GB Listening to the selected page in ascending order and stop at the...
Memory scan tuning You can be received by scanning that page. 1 2 3 2 1 Press POWER ON/OFF to turn on the radio. 2 Press PAGE and press the number button (0 to 9) of a short wave (SW) broadcast station that differ depending on the time and period on a page, the ... tuning, scanning will stop when there is reception. After the highest preset number has been scanned, the unit will scan all stations preset to the radio The unit will return to the smallest preset number and scan again. 24GB Listening to the selected page in ascending order and stop at the...
Operating Instructions
Page 25
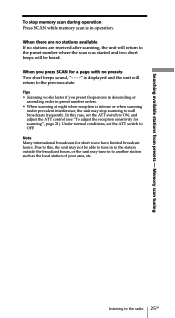
... no stations available If no presets Two short beeps sound, "- - - -" is intense or when scanning under prevalent interference, the unit may tune in to the radio 25GB Searching available stations from presets - Listening to another station such as the local station of your area, etc.
... no stations available If no presets Two short beeps sound, "- - - -" is intense or when scanning under prevalent interference, the unit may tune in to the radio 25GB Searching available stations from presets - Listening to another station such as the local station of your area, etc.

Operating Instructions
Page 26
... Wave) transmissions with this time, the frequency display will not change. During this unit. 1 6 4 3 2 1 Press POWER ON/OFF to turn on radio waves", page 41. 26GB Listening to the radio For tuning, see Direct tuning (page 16), Manual tuning (page 18), or Auto scan tuning (page 20). 6 Use SSB FINE TUNE control... can fine tune the received frequency in to either LSB or USB. Tip For more information on SSB and CW, refer to "Tips on the radio. 2 Press FM/AM to select AM. 3 Set the AM MODE selector to SSB. 4 Set the LSB/USB selector to a frequency where you have the best...
... Wave) transmissions with this time, the frequency display will not change. During this unit. 1 6 4 3 2 1 Press POWER ON/OFF to turn on radio waves", page 41. 26GB Listening to the radio For tuning, see Direct tuning (page 16), Manual tuning (page 18), or Auto scan tuning (page 20). 6 Use SSB FINE TUNE control... can fine tune the received frequency in to either LSB or USB. Tip For more information on SSB and CW, refer to "Tips on the radio. 2 Press FM/AM to select AM. 3 Set the AM MODE selector to SSB. 4 Set the LSB/USB selector to a frequency where you have the best...


