
Operating Guide
Page 1
http://www.sony.net/ Printed on 70% or more recycled paper using VOC (Volatile Organic Compound) -free vegetable oil based ink. Printed in Japan US Digital HD Video Camera Recorder 3-280-847-11(1) Digital HD Video Camera Recorder Operating Guide Before operating the unit, please read this manual thoroughly, and retain it for future reference HVR-Z7U/Z7N © 2008 Sony Corporation
http://www.sony.net/ Printed on 70% or more recycled paper using VOC (Volatile Organic Compound) -free vegetable oil based ink. Printed in Japan US Digital HD Video Camera Recorder 3-280-847-11(1) Digital HD Video Camera Recorder Operating Guide Before operating the unit, please read this manual thoroughly, and retain it for future reference HVR-Z7U/Z7N © 2008 Sony Corporation

Operating Guide
Page 4
... on other accessories are used for illustrating the operating procedures. Change the screen language before using a digital still camera, and therefore may be copyrighted. Also, the lens for video cameras and offers a quality typical of light from a subject coming into the lens. 4 Features available ...the contents of the camcorder, storage media, etc. • TV color systems differ depending on the icons used in Germany, and Sony Corporation, and produces superior images. Notes on the countries/regions. About this first (Continued) • Compensation for the contents of ...
... on other accessories are used for illustrating the operating procedures. Change the screen language before using a digital still camera, and therefore may be copyrighted. Also, the lens for video cameras and offers a quality typical of light from a subject coming into the lens. 4 Features available ...the contents of the camcorder, storage media, etc. • TV color systems differ depending on the icons used in Germany, and Sony Corporation, and produces superior images. Notes on the countries/regions. About this first (Continued) • Compensation for the contents of ...

Operating Guide
Page 71
... bird away at a low level. The default setting is [OFF]. The image quality decreases because the image is [OFF]. The default setting is digitally processed. The default setting is [OFF]. b Notes • This function is effective only when the focus ring is canceled when you set this ...for panorama tilt recordings. D.EXTENDER When you set this function to [OFF] when you will lose focus on a subject within 80 cm. HARD Reduces camera shakes at a standard level. The default setting is [ON]. Select [OFF] ( ) when you use the spotlight function if at least two of...
... bird away at a low level. The default setting is [OFF]. The image quality decreases because the image is [OFF]. The default setting is digitally processed. The default setting is [OFF]. b Notes • This function is effective only when the focus ring is canceled when you set this ...for panorama tilt recordings. D.EXTENDER When you set this function to [OFF] when you will lose focus on a subject within 80 cm. HARD Reduces camera shakes at a standard level. The default setting is [ON]. Select [OFF] ( ) when you use the spotlight function if at least two of...

Operating Guide
Page 85
... setting is [OFF]. Refer also to DV format signals. x DOWN CONVERT You can connect your camcorder to an HDV/DVCAM/DV compatible device (digital HD video camera recorder, digital video camera recorder, hard disc recorder, etc.) with an i.LINK cable, and record movies on a standard 4:3 TV, images of the movie may not be able...
... setting is [OFF]. Refer also to DV format signals. x DOWN CONVERT You can connect your camcorder to an HDV/DVCAM/DV compatible device (digital HD video camera recorder, digital video camera recorder, hard disc recorder, etc.) with an i.LINK cable, and record movies on a standard 4:3 TV, images of the movie may not be able...

Operating Guide
Page 87
...Disconnect the i.LINK cable Continued , 87 Using the Menu 2 Select [PRESET] with the SEL/PUSH EXEC dial. 3 Select the first 2 digits with the SEL/PUSH EXEC dial. 4 Set other digits by multiple camcorders. 1 Insert a tape to the main camcorder from which you want to generate the time code. 2 Set the POWER... switches of the main and sub camcorders to CAMERA. 3 Connect the sub camcorder to the main camcorder with an i.LINK cable. ...
...Disconnect the i.LINK cable Continued , 87 Using the Menu 2 Select [PRESET] with the SEL/PUSH EXEC dial. 3 Select the first 2 digits with the SEL/PUSH EXEC dial. 4 Set other digits by multiple camcorders. 1 Insert a tape to the main camcorder from which you want to generate the time code. 2 Set the POWER... switches of the main and sub camcorders to CAMERA. 3 Connect the sub camcorder to the main camcorder with an i.LINK cable. ...

Operating Guide
Page 96
...device for playback. When dubbing to VCR. Slide the POWER switch to the VCR, insert a cassette for recording. Data codes (date/time/camera settings data) may not operate your camcorder on other than normal playback. • Note the following cannot be displayed or recorded depending on... the VCR/DVD device. Indicators - Titles that are transmitted digitally, producing high quality pictures. • When an i.LINK cable is paused on the screen. • When you can set it to a...
...device for playback. When dubbing to VCR. Slide the POWER switch to the VCR, insert a cassette for recording. Data codes (date/time/camera settings data) may not operate your camcorder on other than normal playback. • Note the following cannot be displayed or recorded depending on... the VCR/DVD device. Indicators - Titles that are transmitted digitally, producing high quality pictures. • When an i.LINK cable is paused on the screen. • When you can set it to a...

Operating Guide
Page 115
...you select [MIX], the sounds of channel 1/2 and channel 3/ 4 are compressed in MPEG2 format, which is adopted in BS (broadcast satellite) digital, terrestrial digital HDTV broadcastings, in HDV/DVCAM/DV formats. Audio mode The DVCAM format has 2 audio modes. • You cannot dub sound onto a recorded.... x FS32K (12-bit) mode The original sound is recorded in channels 1 and 2, and the new sound in another video camera connected to your camcorder that contains copyright control signals for copyright protection of the recorded section using your camcorder for recording is the HDV...
...you select [MIX], the sounds of channel 1/2 and channel 3/ 4 are compressed in MPEG2 format, which is adopted in BS (broadcast satellite) digital, terrestrial digital HDTV broadcastings, in HDV/DVCAM/DV formats. Audio mode The DVCAM format has 2 audio modes. • You cannot dub sound onto a recorded.... x FS32K (12-bit) mode The original sound is recorded in channels 1 and 2, and the new sound in another video camera connected to your camcorder that contains copyright control signals for copyright protection of the recorded section using your camcorder for recording is the HDV...

Operating Guide
Page 125
... Effective (still, 4:3): 778 000 pixels Lens Carl Zeiss Vario-Sonnar T 12 × (Optical), Approx. 18 × (Digital, when [D.EXTENDER] is set to [ON]) Focal length f=4.4 - 52.8 mm (3/16 - 2 1/8 in.) When converted to a 35 mm still camera 32.0 - 384 mm (1 5/16 - 15 1/8 in.) (16:9), 39.5 - 474 mm (1 9/16 - 18 3/4 in.) (4:3) F1.6 - 2.0 Filter diameter...
... Effective (still, 4:3): 778 000 pixels Lens Carl Zeiss Vario-Sonnar T 12 × (Optical), Approx. 18 × (Digital, when [D.EXTENDER] is set to [ON]) Focal length f=4.4 - 52.8 mm (3/16 - 2 1/8 in.) When converted to a 35 mm still camera 32.0 - 384 mm (1 5/16 - 15 1/8 in.) (16:9), 39.5 - 474 mm (1 9/16 - 18 3/4 in.) (4:3) F1.6 - 2.0 Filter diameter...

Operating Guide
Page 134
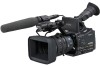
... (50) O DISPLAY/BATT INFO button (53) P RESET button If you press the RESET button, all settings including the clock setting (except the Picture profile and Camera profile settings) return to the rear of the rear lens cap as illustrated and remove the cap from the lens mount. 134 To attach the... qh qg qf qd qs 12 3 4 MANUAL ZOOM SERVO 5 6 A Lens cover lever (13) B Focus ring (28) C Zoom ring (27) D Iris ring (30) E ZOOM switch (27) F DIGITAL EXTENDER/L1 button (43) G LCD screen (18) H TC/U-BIT button Switches between time code and user bit to display on the back of the cap...
... (50) O DISPLAY/BATT INFO button (53) P RESET button If you press the RESET button, all settings including the clock setting (except the Picture profile and Camera profile settings) return to the rear of the rear lens cap as illustrated and remove the cap from the lens mount. 134 To attach the... qh qg qf qd qs 12 3 4 MANUAL ZOOM SERVO 5 6 A Lens cover lever (13) B Focus ring (28) C Zoom ring (27) D Iris ring (30) E ZOOM switch (27) F DIGITAL EXTENDER/L1 button (43) G LCD screen (18) H TC/U-BIT button Switches between time code and user bit to display on the back of the cap...

Operating Guide
Page 139
...BLACK LEVEL 35 BLK BALANCE 33 Button-type lithium battery 135 C Cable holder 10, 12 CAM DATA DSP (Camera data display 80, 105 CAM LEVELING 79 CAMERA PROF. (Camera profile 90, 105 CAMERA SET menu........... 68 Carl Zeiss lens 8 Cassette Insert/Eject 22 Tape 115 Cassette compartment .......... 22 CH1 12 ...DATA CODE button 53 Date and time 21, 136 DATE REC 92, 105 Date search 55 DEGREE 80 Deleting camera profile settings 90 Deleting still images 51 DETAIL 39 DF 87 DIGITAL EXTENDER button 43 DISP OUTPUT 82 DISPLAY SET menu ...........78 DISPLAY/BATT INFO button 18, 53, 54 DOWN...
...BLACK LEVEL 35 BLK BALANCE 33 Button-type lithium battery 135 C Cable holder 10, 12 CAM DATA DSP (Camera data display 80, 105 CAM LEVELING 79 CAMERA PROF. (Camera profile 90, 105 CAMERA SET menu........... 68 Carl Zeiss lens 8 Cassette Insert/Eject 22 Tape 115 Cassette compartment .......... 22 CH1 12 ...DATA CODE button 53 Date and time 21, 136 DATE REC 92, 105 Date search 55 DEGREE 80 Deleting camera profile settings 90 Deleting still images 51 DETAIL 39 DF 87 DIGITAL EXTENDER button 43 DISP OUTPUT 82 DISPLAY SET menu ...........78 DISPLAY/BATT INFO button 18, 53, 54 DOWN...


