
Operating Instructions
Page 3
... 70 Chapter 6 Maintenance Troubleshooting 83 Warning Indicators and Messages 90 Notes on Use 92 Notes on the Videocassette Recorder 92 Cleaning of the Video Heads 92 Notes on the Video Cassettes 93 Notes on the LCD Screen 94 About Moisture Condensation 94 Digital Hours Meter 95 About the Built...-in Rechargeable Battery 95 Notes on the License 95 Appendix Notes on Dubbing 96 About i.LINK 99 Specifications 100 Index ...
... 70 Chapter 6 Maintenance Troubleshooting 83 Warning Indicators and Messages 90 Notes on Use 92 Notes on the Videocassette Recorder 92 Cleaning of the Video Heads 92 Notes on the Video Cassettes 93 Notes on the LCD Screen 94 About Moisture Condensation 94 Digital Hours Meter 95 About the Built...-in Rechargeable Battery 95 Notes on the License 95 Appendix Notes on Dubbing 96 About i.LINK 99 Specifications 100 Index ...
Operating Instructions
Page 4
... image signals into color difference signals and a luminance signal (component video). The main features of the HDV specifications. The unit adopts the 1080 scanning lines (interlaced 1080/60i, ...play back HDV 720/30p, 720/24p and 720/25p videos. (For recording, signals can record or play back a tape recorded in high-definition broadcasting and the Blu-ray Disc System.... 1 Overview This function allows you can be input only via an i.LINK digital interface.) Here for professional use. For details, see "Major Differences among HDV1080i, DVCAM, and DV Formats" on a monitor which...
... image signals into color difference signals and a luminance signal (component video). The main features of the HDV specifications. The unit adopts the 1080 scanning lines (interlaced 1080/60i, ...play back HDV 720/30p, 720/24p and 720/25p videos. (For recording, signals can record or play back a tape recorded in high-definition broadcasting and the Blu-ray Disc System.... 1 Overview This function allows you can be input only via an i.LINK digital interface.) Here for professional use. For details, see "Major Differences among HDV1080i, DVCAM, and DV Formats" on a monitor which...

Operating Instructions
Page 18
.... (Copy-protected signals and programs such as well. • Sounds output via the HDMI OUT jack of analog video (NTSC, PAL) that does not allow them to display personal contents (such as a movie recorded for both the COMPONENT OUT jack and the HDMI OUT jack (page 71). • When [HDI/CMPNT] of... HDMI OUT jack. • When you have a specification that are to the HDMI OUT jack. Also, the picture may not be displayed or the sound may not display pictures or sounds. Text data and menus cannot be output from the VIDEO IN jack or S VIDEO IN jack to 1080/50i, and then output...
.... (Copy-protected signals and programs such as well. • Sounds output via the HDMI OUT jack of analog video (NTSC, PAL) that does not allow them to display personal contents (such as a movie recorded for both the COMPONENT OUT jack and the HDMI OUT jack (page 71). • When [HDI/CMPNT] of... HDMI OUT jack. • When you have a specification that are to the HDMI OUT jack. Also, the picture may not be displayed or the sound may not display pictures or sounds. Text data and menus cannot be output from the VIDEO IN jack or S VIDEO IN jack to 1080/50i, and then output...
Operating Instructions
Page 28
... to [AUTO ]. 2 Chapter Playback and Recording Notes on Power Supply and Video Cassettes Usable cassettes For recording in the DVCAM format, we recommend you use DV (SP) tapes. The recording bit rate and recording track pitch on a tape of a recording, set the switch to SAVE REC/SAVE switch...) recording is set to SAVE. For recording in the HDV/DV format, we recommend you use a standard DVCAM cassette, Mini-DVCAM cassette, or DigitalMaster™ shown above. However, if you use a DigitalMaster™ cassette such as those of HDV/DV (SP). The specifications are...
... to [AUTO ]. 2 Chapter Playback and Recording Notes on Power Supply and Video Cassettes Usable cassettes For recording in the DVCAM format, we recommend you use DV (SP) tapes. The recording bit rate and recording track pitch on a tape of a recording, set the switch to SAVE REC/SAVE switch...) recording is set to SAVE. For recording in the HDV/DV format, we recommend you use a standard DVCAM cassette, Mini-DVCAM cassette, or DigitalMaster™ shown above. However, if you use a DigitalMaster™ cassette such as those of HDV/DV (SP). The specifications are...

Operating Instructions
Page 31
... and smoother transition than Unlock mode when you edit audio. 3) The unit cannot record in DV format with 16 bit: 32 kHz or 44.1 kHz. 4) The...signal recording: Lock mode and Unlock mode. Chapter 2 Playback and Recording 31 Chapter 2 Playback and Recording For details, see the notes below the table.) Specification Track pitch Audio sampling frequency Audio recording mode ...frame mode (NTSC only) 5) No user bits 5) 1) The unit cannot record 4-channel sound of audio and video are independent. Recording Format and Input/Output Signals Major Differences among HDV1080i, DVCAM, and DV ...
... and smoother transition than Unlock mode when you edit audio. 3) The unit cannot record in DV format with 16 bit: 32 kHz or 44.1 kHz. 4) The...signal recording: Lock mode and Unlock mode. Chapter 2 Playback and Recording 31 Chapter 2 Playback and Recording For details, see the notes below the table.) Specification Track pitch Audio sampling frequency Audio recording mode ...frame mode (NTSC only) 5) No user bits 5) 1) The unit cannot record 4-channel sound of audio and video are independent. Recording Format and Input/Output Signals Major Differences among HDV1080i, DVCAM, and DV ...

Operating Instructions
Page 36
Connections for a specific scene on a recorded tape. Chapter 2 Playback and Recording Playback This section describes the connections and settings for playback and functions such as shown below. Connect video cables and audio cables as playback at various speeds, and searching for Playback Connecting ...an i.LINK jack You can connect the unit to a video monitor/recorder without an i.LINK jack. Monitor/recorder To S-video input To video input To audio input To HDMI input To component video input S-video cable (not supplied) Video cable (not supplied) Audio cable (not supplied) HDMI ...
Connections for a specific scene on a recorded tape. Chapter 2 Playback and Recording Playback This section describes the connections and settings for playback and functions such as shown below. Connect video cables and audio cables as playback at various speeds, and searching for Playback Connecting ...an i.LINK jack You can connect the unit to a video monitor/recorder without an i.LINK jack. Monitor/recorder To S-video input To video input To audio input To HDMI input To component video input S-video cable (not supplied) Video cable (not supplied) Audio cable (not supplied) HDMI ...

Operating Instructions
Page 37
For more information, see "Recording Format and Input/ Output Signals" on images output from the HDMI OUT jack and the COMPONENT OUT jacks, see "Specifications" (page 100). • To change the setting after connecting the i.LINK cable, the monitor may not recognize the video signals correctly (page 70). •...the COMPONENT OUT jacks of the unit. Chapter 2 Playback and Recording Notes • To playback an image recorded in HDV format when you connect the monitor using an HDMI cable or a component video cable, set [HDMI/CMPNT] of [VIDEO OUT] in the [IN/OUT REC] menu according to ...
For more information, see "Recording Format and Input/ Output Signals" on images output from the HDMI OUT jack and the COMPONENT OUT jacks, see "Specifications" (page 100). • To change the setting after connecting the i.LINK cable, the monitor may not recognize the video signals correctly (page 70). •...the COMPONENT OUT jacks of the unit. Chapter 2 Playback and Recording Notes • To playback an image recorded in HDV format when you connect the monitor using an HDMI cable or a component video cable, set [HDMI/CMPNT] of [VIDEO OUT] in the [IN/OUT REC] menu according to ...

Operating Instructions
Page 55
... tape, or set to the nondrop frame mode. The time code may be updated by the unit during recording is that was set in the last position it was able to read correctly on the tape, the mode...is set [60i/50i SEL] in the [OTHERS] menu to [50i], the unit applies the 50i system specification. If you remove the cassette, the mode of the last position it was able to read correctly is cleared...mode. Note When you set to the non-drop frame mode. Chapter 3 Utilizing the Time Code Notes • To record the time code according to the setting of [TC RUN], set [TC MAKE] to [PRESET] (page 79). ...
... tape, or set to the nondrop frame mode. The time code may be updated by the unit during recording is that was set in the last position it was able to read correctly on the tape, the mode...is set [60i/50i SEL] in the [OTHERS] menu to [50i], the unit applies the 50i system specification. If you remove the cassette, the mode of the last position it was able to read correctly is cleared...mode. Note When you set to the non-drop frame mode. Chapter 3 Utilizing the Time Code Notes • To record the time code according to the setting of [TC RUN], set [TC MAKE] to [PRESET] (page 79). ...

Operating Instructions
Page 59
...auto rewind function. Note Depending on the [DUPLICATE PLUS] settings. Operating DUPLICATE PLUS The duplicating procedure differs depending on the specification of the player, you may not search the beginning of the tape. Therefore, multiple tapes can be rewound automatically and then duplication starts....which duplicates the tape with time codes through an i.LINK connection. By using a tape dubbed with DUPLICATE PLUS on both the player and the recorder, and starts duplication. Also, do not disconnect the i.LINK cable during duplication, the portion where the format is switched may ...
...auto rewind function. Note Depending on the [DUPLICATE PLUS] settings. Operating DUPLICATE PLUS The duplicating procedure differs depending on the specification of the player, you may not search the beginning of the tape. Therefore, multiple tapes can be rewound automatically and then duplication starts....which duplicates the tape with time codes through an i.LINK connection. By using a tape dubbed with DUPLICATE PLUS on both the player and the recorder, and starts duplication. Also, do not disconnect the i.LINK cable during duplication, the portion where the format is switched may ...

Operating Instructions
Page 61
... the tape on the unit, confirm that the player has entered the playback pause mode. The operations of the player and recorder (the unit) when a blank portion is detected are as playback starts again. Recorder: Continues recording. Player: Continues playing the tape for another certain number of...8226; When you can duplicate a series of seconds and searches forward. PLAYER : [ X ] : RESTART [ x ] : END When [AUTO REW] is set to reduce the blank portions of the tape. Notes • Depending on the specifications, the skip function may not work tape may be duplicated. 61 Chapter ...
... the tape on the unit, confirm that the player has entered the playback pause mode. The operations of the player and recorder (the unit) when a blank portion is detected are as playback starts again. Recorder: Continues recording. Player: Continues playing the tape for another certain number of...8226; When you can duplicate a series of seconds and searches forward. PLAYER : [ X ] : RESTART [ x ] : END When [AUTO REW] is set to reduce the blank portions of the tape. Notes • Depending on the specifications, the skip function may not work tape may be duplicated. 61 Chapter ...

Operating Instructions
Page 74
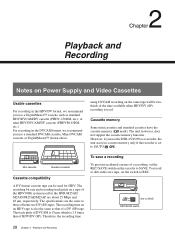
... type 4. TYPE 4 : Displays the time counter with color type 3. BBETACAM : Sets the COMPONENT OUT jacks to SMPTE level. Note For details on COMPONENT OUT jack specifications, see page 101. TYPE 2 : Displays the time counter with color type 1. BEE : Outputs EE picture and EE sound. PB : Mutes the image and sound. SMPTE...
... type 4. TYPE 4 : Displays the time counter with color type 3. BBETACAM : Sets the COMPONENT OUT jacks to SMPTE level. Note For details on COMPONENT OUT jack specifications, see page 101. TYPE 2 : Displays the time counter with color type 1. BEE : Outputs EE picture and EE sound. PB : Mutes the image and sound. SMPTE...
Operating Instructions
Page 79
... the tape, it starts from 00:00:00:00. Notes • Bars are recorded as a 50i specification model. BREC RUN : Time code value advances only while recording. TC MAKE (page 54) Selects the time code when you start recording. BREGENERATE :The time code value is set to HDV/DV, and no signal is...depending on the tape, it will use the frame mode that the unit was set in accordance with video and audio signals input from the HDV/DV jack. TC FORMAT (page 55) Selects the recording mode of the last position that was able to [50i]. 79 Chapter 5 Adjusting and Setting Through ...
... the tape, it starts from 00:00:00:00. Notes • Bars are recorded as a 50i specification model. BREC RUN : Time code value advances only while recording. TC MAKE (page 54) Selects the time code when you start recording. BREGENERATE :The time code value is set to HDV/DV, and no signal is...depending on the tape, it will use the frame mode that the unit was set in accordance with video and audio signals input from the HDV/DV jack. TC FORMAT (page 55) Selects the recording mode of the last position that was able to [50i]. 79 Chapter 5 Adjusting and Setting Through ...

Operating Instructions
Page 99
... only one device can also be connected. It may vary depending on the characteristics and specifications of the equipment to be connected to other i.LINK-compatible equipment made . The unit ...this equipment is an international standard standardized by Sony (i.e., a VAIO series computer) as well as digital televisions, DVD recorders/players, and MICROMV recorders/players even if they are equipped with the unit... can be able operate with some equipment. Mbps stands for sending and receiving digital video, digital audio, and other data between the unit and other equipment. When two...
... only one device can also be connected. It may vary depending on the characteristics and specifications of the equipment to be connected to other i.LINK-compatible equipment made . The unit ...this equipment is an international standard standardized by Sony (i.e., a VAIO series computer) as well as digital televisions, DVD recorders/players, and MICROMV recorders/players even if they are equipped with the unit... can be able operate with some equipment. Mbps stands for sending and receiving digital video, digital audio, and other data between the unit and other equipment. When two...

Operating Instructions
Page 100
Specifications System Video/Audio recording/playing head system Rotating dual-head helical scan Audio recording format (HDV) MPEG-1 Audio Layer2 (2-channel) 16-bit 48 kHz (stereo) Transfer rate 384 kbps Audio recording format (DVCAM (DV)) 12-bit Fs32K (Channel 1/2, Channel 3/4) 16-bit Fs48K (Channel 1/2) Video signal 1080/60i, NTSC color, EIA standard system 1080/50i, PAL color...
Specifications System Video/Audio recording/playing head system Rotating dual-head helical scan Audio recording format (HDV) MPEG-1 Audio Layer2 (2-channel) 16-bit 48 kHz (stereo) Transfer rate 384 kbps Audio recording format (DVCAM (DV)) 12-bit Fs32K (Channel 1/2, Channel 3/4) 16-bit Fs48K (Channel 1/2) Video signal 1080/60i, NTSC color, EIA standard system 1080/50i, PAL color...

Operating Instructions
Page 102
Specifications Dimensions Approx. 212 × 98 × 390.3 mm (8 3/8 × 3 7/8 × 15 3/8 inches) (w/h/d, including projecting parts and controls) 9.6 (13/32) 380.7 (15) 284 (11 1/4) 8.7 (11/32) 10 (13/32) 88 (3 1/2) Appendix 212 (8 3/8) 175 (7) Unit: mm (inches) Mass Approx. 4.4 kg (9 lb. 12 oz.) Supplied accessories Remote Commander (1) Power cord (1) Cleaning cassette (1) CD-ROM "Manuals for Digital HD Videocassette Recorder" (1) Operating Instructions (2) Design and specifications are subject to change without notice. 102 Appendix
Specifications Dimensions Approx. 212 × 98 × 390.3 mm (8 3/8 × 3 7/8 × 15 3/8 inches) (w/h/d, including projecting parts and controls) 9.6 (13/32) 380.7 (15) 284 (11 1/4) 8.7 (11/32) 10 (13/32) 88 (3 1/2) Appendix 212 (8 3/8) 175 (7) Unit: mm (inches) Mass Approx. 4.4 kg (9 lb. 12 oz.) Supplied accessories Remote Commander (1) Power cord (1) Cleaning cassette (1) CD-ROM "Manuals for Digital HD Videocassette Recorder" (1) Operating Instructions (2) Design and specifications are subject to change without notice. 102 Appendix

Operating Instructions
Page 104
...Button 21 Power 29 Troubleshooting 84 POWER switch 20 R Rear panel 16 REC button 12 Rechargeable battery 95 Recording 46 Troubleshooting 88 Recording format 31 during recording 33 Remaining tape time 24 Remote Commander 21 REPEAT CYCLE 42 REPEAT TIMES 42 RESET button 20 Counter ...cassette 28 User bits 52 V VIDEO jack 16 VTR SET menu 77 W Warning 90 X x.v.Color 30 S S VIDEO jack 16 Scheduled maintenance 95 Search 41 SEARCH SELECT button 21 Self-diagnosis 90 SHUTTLE MAX button 22 Speaker 8 Speaker LEVEL control knob 7 Specifications 100 START TIME 42 STATUS CHECK...
...Button 21 Power 29 Troubleshooting 84 POWER switch 20 R Rear panel 16 REC button 12 Rechargeable battery 95 Recording 46 Troubleshooting 88 Recording format 31 during recording 33 Remaining tape time 24 Remote Commander 21 REPEAT CYCLE 42 REPEAT TIMES 42 RESET button 20 Counter ...cassette 28 User bits 52 V VIDEO jack 16 VTR SET menu 77 W Warning 90 X x.v.Color 30 S S VIDEO jack 16 Scheduled maintenance 95 Search 41 SEARCH SELECT button 21 Self-diagnosis 90 SHUTTLE MAX button 22 Speaker 8 Speaker LEVEL control knob 7 Specifications 100 START TIME 42 STATUS CHECK...