Operating Guide
Page 15
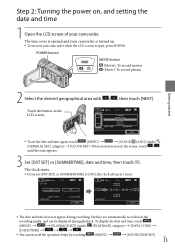
... display the date and time, touch (MENU) [PLAYBACK SET] (under [GENERAL SET] category) [CLOCK SET]. The lens cover is opened and your camcorder is turned on. To turn off the operation beeps by touching (MENU) [SOUND/DISP SET] US 15 POWER button MODE...recording, but they are automatically recorded on the recording media, and can turn on your camcorder. Step 2: Turning the power on, and setting the date and time 1 Open the LCD screen of your camcorder when the LCD screen is open, press POWER. The clock starts. If ...
... display the date and time, touch (MENU) [PLAYBACK SET] (under [GENERAL SET] category) [CLOCK SET]. The lens cover is opened and your camcorder is turned on. To turn off the operation beeps by touching (MENU) [SOUND/DISP SET] US 15 POWER button MODE...recording, but they are automatically recorded on the recording media, and can turn on your camcorder. Step 2: Turning the power on, and setting the date and time 1 Open the LCD screen of your camcorder when the LCD screen is open, press POWER. The clock starts. If ...

Operating Guide
Page 17
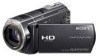
US 17 Recording Recording Recording Recording movies In the default setting, movies are recorded with high definition image quality (HD) on the internal memory (p. 47, 52). Fasten the grip belt. Open the LCD screen of your camcorder when the LCD screen is already open, press POWER. POWER button Press START/STOP to start recording. You can start recording also by touching on your camcorder. The lens cover is opened and your camcorder is turned on. To turn on the LCD screen.
US 17 Recording Recording Recording Recording movies In the default setting, movies are recorded with high definition image quality (HD) on the internal memory (p. 47, 52). Fasten the grip belt. Open the LCD screen of your camcorder when the LCD screen is already open, press POWER. POWER button Press START/STOP to start recording. You can start recording also by touching on your camcorder. The lens cover is opened and your camcorder is turned on. To turn on the LCD screen.
Operating Guide
Page 18
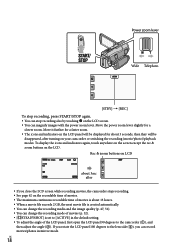
.... To adjust the angle of the LCD panel, first open the LCD panel 90 degrees to the lens side (), you rotate the LCD panel 180 degrees to the camcorder (), and then adjust the angle (). Rec & zoom buttons on LCD about 3sec after ...You can change the recording mode of movies (p. 52). [ STEADYSHOT] is about 3 seconds, then they will be disappeared, after turning on your camcorder or switching the recording (movie/photo)/playback modes. Move the power zoom lever slightly for a faster zoom. The icons and indicators on the LCD....
.... To adjust the angle of the LCD panel, first open the LCD panel 90 degrees to the lens side (), you rotate the LCD panel 180 degrees to the camcorder (), and then adjust the angle (). Rec & zoom buttons on LCD about 3sec after ...You can change the recording mode of movies (p. 52). [ STEADYSHOT] is about 3 seconds, then they will be disappeared, after turning on your camcorder or switching the recording (movie/photo)/playback modes. Move the power zoom lever slightly for a faster zoom. The icons and indicators on the LCD....
Operating Guide
Page 19
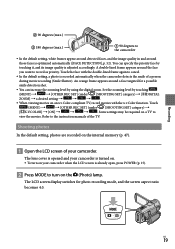
...max.) 90 degrees to record as priority. Touch the face with the double-lined frame again to turn on your camcorder when the LCD screen is already open, press POWER (p. 15). Press MODE to cancel. In the...may be required on the internal memory (p. 47). Open the LCD screen of your camcorder is recorded automatically when the camcorder detects the smile of the TV. The LCD screen display switches for a possible smile detection shot.... it, and its image quality is opened and your camcorder. The lens cover is adjusted accordingly. US 19
...max.) 90 degrees to record as priority. Touch the face with the double-lined frame again to turn on your camcorder when the LCD screen is already open, press POWER (p. 15). Press MODE to cancel. In the...may be required on the internal memory (p. 47). Open the LCD screen of your camcorder is recorded automatically when the camcorder detects the smile of the TV. The LCD screen display switches for a possible smile detection shot.... it, and its image quality is opened and your camcorder. The lens cover is adjusted accordingly. US 19

Operating Guide
Page 22
The lens cover is opened and your camcorder is already open, press POWER (p. 15). Press (VIEW IMAGES). US 22 Playback Playback on the camcorder In the default setting, movies and photos on your camcorder when the...(or a desired movie (). (VIEW IMAGES) on the previous/next date.** / : Displays the previous/next movie. CX500V/CX520V)/[ FILM ROLL]/[ FACE]) (p. 53). : Displays high definition image quality (HD) movies.* Displays photos. &#...the index type ([DATE INDEX]/[ MAP] (HDR- Playing movies Open the LCD screen of your camcorder.
The lens cover is opened and your camcorder is already open, press POWER (p. 15). Press (VIEW IMAGES). US 22 Playback Playback on the camcorder In the default setting, movies and photos on your camcorder when the...(or a desired movie (). (VIEW IMAGES) on the previous/next date.** / : Displays the previous/next movie. CX500V/CX520V)/[ FILM ROLL]/[ FACE]) (p. 53). : Displays high definition image quality (HD) movies.* Displays photos. &#...the index type ([DATE INDEX]/[ MAP] (HDR- Playing movies Open the LCD screen of your camcorder.

Operating Guide
Page 49
The lens cover is opened and your camcorder is turned on. To turn on the status of your camcorder, recording (movie/photo) or playback. Touch the menu item to be changed. Touch the item to be changed. Touch the item... MENU. The default settings for each MY MENU are described in more details with color photos in the "Handycam" Handbook (p. 56). Using MY MENU Open the LCD screen of your camcorder The MY MENU screen is already open, press POWER (p. 15). Touch (MENU). After changing the setting, ...
The lens cover is opened and your camcorder is turned on. To turn on the status of your camcorder, recording (movie/photo) or playback. Touch the menu item to be changed. Touch the item to be changed. Touch the item... MENU. The default settings for each MY MENU are described in more details with color photos in the "Handycam" Handbook (p. 56). Using MY MENU Open the LCD screen of your camcorder The MY MENU screen is already open, press POWER (p. 15). Touch (MENU). After changing the setting, ...

Operating Guide
Page 50
...], [PHOTO CAPTURE], [ HIGHLIGHT], [ SCENARIO], [TV CONNECT Guide], [OUTPUT SETTINGS] To change in the context appear. The lens cover is opened and your camcorder is turned on. To turn on the recording or playback conditions. Grayed out menu items or settings are ...Open the LCD screen of the menu. After changing the setting, touch . To return to scroll the list of your camcorder when the LCD screen is displayed. Touch . The MY MENU screen is already open, press POWER (p. 15). Touch (MENU). Using...
...], [PHOTO CAPTURE], [ HIGHLIGHT], [ SCENARIO], [TV CONNECT Guide], [OUTPUT SETTINGS] To change in the context appear. The lens cover is opened and your camcorder is turned on. To turn on the recording or playback conditions. Grayed out menu items or settings are ...Open the LCD screen of the menu. After changing the setting, touch . To return to scroll the list of your camcorder when the LCD screen is displayed. Touch . The MY MENU screen is already open, press POWER (p. 15). Touch (MENU). Using...
Operating Guide
Page 52
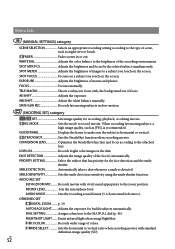
... colors. SMTH SLW REC Records fast moving subject, a high image quality, such as night view or beach. REC MODE Sets the mode to the attached lens. LOW LUX Records bright color images in or out. AUDIO REC SET BLT-IN ZOOM MIC.......... NIGHTSHOT LIGHT........ CONVERSION... LENS Optimizes the SteadyShot function and focus according to record movies. FADER Fades scenes in the dim. SPOT FOCUS Focuses on a subject you touch on the ...
... colors. SMTH SLW REC Records fast moving subject, a high image quality, such as night view or beach. REC MODE Sets the mode to the attached lens. LOW LUX Records bright color images in or out. AUDIO REC SET BLT-IN ZOOM MIC.......... NIGHTSHOT LIGHT........ CONVERSION... LENS Optimizes the SteadyShot function and focus according to record movies. FADER Fades scenes in the dim. SPOT FOCUS Focuses on a subject you touch on the ...

Operating Guide
Page 59
... as it may malfunction. Near strong radio waves or radiation. Be particularly careful of the lens. Keep the camcorder turning off any liquid gets in your camcorder get wet, for example, and operate it . LCD screen Do not exert excessive pressure on... in optimum state for a long time To keep your local authorized Sony service facility. Wash off when you are not using your camcorder. Do not wrap your camcorder is not a malfunction. While using your camcorder for a long time, turn it on DC 6.8 V/7.2 V (battery pack)...
... as it may malfunction. Near strong radio waves or radiation. Be particularly careful of the lens. Keep the camcorder turning off any liquid gets in your camcorder get wet, for example, and operate it . LCD screen Do not exert excessive pressure on... in optimum state for a long time To keep your local authorized Sony service facility. Wash off when you are not using your camcorder. Do not wrap your camcorder is not a malfunction. While using your camcorder for a long time, turn it on DC 6.8 V/7.2 V (battery pack)...

Operating Guide
Page 60
...may not delete data from the "Handycam" Handbook" on page 56.) to prevent the recovery of the Wireless Remote Commander While pressing on the tab, inset your camcorder at the seaside Store ...to little dirt or dust. To prevent mold, periodically clean the lens as you destroy the actual body of the lens clean with the + side facing up. Insert the battery case back...it is recommended that you do not use your fingernail into the slit to somebody, it with a Sony CR2025 lithium battery. Use your data. When you give the "Memory Stick PRO Duo" media to ...
...may not delete data from the "Handycam" Handbook" on page 56.) to prevent the recovery of the Wireless Remote Commander While pressing on the tab, inset your camcorder at the seaside Store ...to little dirt or dust. To prevent mold, periodically clean the lens as you destroy the actual body of the lens clean with the + side facing up. Insert the battery case back...it is recommended that you do not use your fingernail into the slit to somebody, it with a Sony CR2025 lithium battery. Use your data. When you give the "Memory Stick PRO Duo" media to ...

Operating Guide
Page 61
... use is set to on) * The unique pixel array of Sony's ClearVid and the image processing system (BIONZ) allow still image resolution equivalent to the sizes described. ** [ STEADYSHOT] is below. HDR-CX500: approximately 31.5 GB HDR-CX500V: approximately 30.7 GB HDR-CX520: approximately 63.5 GB HDR-CX520V: approximately 62.7 GB Image device: 6.3 mm (1/2.88 type) CMOS...
... use is set to on) * The unique pixel array of Sony's ClearVid and the image processing system (BIONZ) allow still image resolution equivalent to the sizes described. ** [ STEADYSHOT] is below. HDR-CX500: approximately 31.5 GB HDR-CX500V: approximately 30.7 GB HDR-CX520: approximately 63.5 GB HDR-CX520V: approximately 62.7 GB Image device: 6.3 mm (1/2.88 type) CMOS...

Operating Guide
Page 65
... DETECTION LOW LUX Manual focus SCENE SELECTION White balance SteadyShot off SPOT MTR/FCS/ SPOT METER/ EXPOSURE AE SHIFT WB SHIFT TELE MACRO X.V.COLOR CONVERSION LENS OPTION button VIEW IMAGES button Slide show button YOUR LOCATION button Data file name Protected image Indicator Meaning Index button Indicators and their positions...
... DETECTION LOW LUX Manual focus SCENE SELECTION White balance SteadyShot off SPOT MTR/FCS/ SPOT METER/ EXPOSURE AE SHIFT WB SHIFT TELE MACRO X.V.COLOR CONVERSION LENS OPTION button VIEW IMAGES button Slide show button YOUR LOCATION button Data file name Protected image Indicator Meaning Index button Indicators and their positions...

Operating Guide
Page 66
...camcorder. Built-in microphone Flash Lens (Sony G lens) Camera recording lamp The camera recording lamp lights up in ( ) are reference pages. This is convenient during playback operations. Active Interface Shoe The Active Interface Shoe supplies power to initialize all the settings including the clock setting. GPS switch (HDR-CX500V.../CX520V) Speaker HDMI OUT jack (25) Access lamp (Internal memory, "Memory Stick PRO Duo" media) (48) While the lamp is lit or flashing, the camcorder is low. ...
...camcorder. Built-in microphone Flash Lens (Sony G lens) Camera recording lamp The camera recording lamp lights up in ( ) are reference pages. This is convenient during playback operations. Active Interface Shoe The Active Interface Shoe supplies power to initialize all the settings including the clock setting. GPS switch (HDR-CX500V.../CX520V) Speaker HDMI OUT jack (25) Access lamp (Internal memory, "Memory Stick PRO Duo" media) (48) While the lamp is lit or flashing, the camcorder is low. ...


