
Operating Instructions
Page 1
2-639-395-13(1) HDD Photo Storage Operating Instructions Before operating the unit, please read this document thoroughly, and retain it for future reference. Preparations Copying data to the unit _____ Connecting to a computer ____ Additional information _______ OPEN HDPS-M10 © 2005 Sony Corporation
2-639-395-13(1) HDD Photo Storage Operating Instructions Before operating the unit, please read this document thoroughly, and retain it for future reference. Preparations Copying data to the unit _____ Connecting to a computer ____ Additional information _______ OPEN HDPS-M10 © 2005 Sony Corporation
Operating Instructions
Page 2
...stored on the hard disk of this unit, or information transferred to a "Memory Stick" and/or CompactFlash card with power supply SONY, Model HDAC-M1. In this manual, Microsoft® Windows® Millennium Edition is licensed to as Windows Me. 2 Safety ... , and "MagicGate Memory Stick" are trademarks or registered trademarks of Sony. • "Memory Stick Duo" and " " are trademarks or registered trademarks of Sony. • "MagicGate Memory Stick Duo" is a registered trademark of Hitachi Global Storage Technologies. • Other system and product names used herein are not...
...stored on the hard disk of this unit, or information transferred to a "Memory Stick" and/or CompactFlash card with power supply SONY, Model HDAC-M1. In this manual, Microsoft® Windows® Millennium Edition is licensed to as Windows Me. 2 Safety ... , and "MagicGate Memory Stick" are trademarks or registered trademarks of Sony. • "Memory Stick Duo" and " " are trademarks or registered trademarks of Sony. • "MagicGate Memory Stick Duo" is a registered trademark of Hitachi Global Storage Technologies. • Other system and product names used herein are not...

Operating Instructions
Page 3
... a computer ......... 26 With Windows 2000 or Windows Me 26 With Windows XP 33 With a Macintosh computer ....... 37 Data storage locations and folder names 39 Using the unit as an external hard disk drive or reader/writer 41 Additional information Troubleshooting 42 Precautions 44 Maintenance ...
... a computer ......... 26 With Windows 2000 or Windows Me 26 With Windows XP 33 With a Macintosh computer ....... 37 Data storage locations and folder names 39 Using the unit as an external hard disk drive or reader/writer 41 Additional information Troubleshooting 42 Precautions 44 Maintenance ...

Operating Instructions
Page 4
...See the next page for quick copying of data in a temporary setup. There is no need to install a dedicated driver, which is very portable, making it anywhere! THE HDD Photo Storage can function as a USB 2.0-compatible external hard disk, to provide data storage capacity to a computer. There is no... need to install any trip, long or short. 4 The HDD Photo Storage can also be used as an external hard disk!...
...See the next page for quick copying of data in a temporary setup. There is no need to install a dedicated driver, which is very portable, making it anywhere! THE HDD Photo Storage can function as a USB 2.0-compatible external hard disk, to provide data storage capacity to a computer. There is no... need to install any trip, long or short. 4 The HDD Photo Storage can also be used as an external hard disk!...

Operating Instructions
Page 5
Copying images to your computer 1 Prepare the HDD Photo Storage and your computer (page 24). 2 Copy image files to your computer (page 26). 3 View images on your computer. 5
Copying images to your computer 1 Prepare the HDD Photo Storage and your computer (page 24). 2 Copy image files to your computer (page 26). 3 View images on your computer. 5

Operating Instructions
Page 6
... Stick" media "Memory Stick" types Read/write on HDD Photo Storage "Memory Stick" "Memory Stick" (with "Memory Stick PRO", CompactFlash or Microdrives of data that can be used with the HDD Photo Storage The following storage media can be used with the HDD Photo Storage. However, there is no guarantee that the unit can use...
... Stick" media "Memory Stick" types Read/write on HDD Photo Storage "Memory Stick" "Memory Stick" (with "Memory Stick PRO", CompactFlash or Microdrives of data that can be used with the HDD Photo Storage The following storage media can be used with the HDD Photo Storage. However, there is no guarantee that the unit can use...

Operating Instructions
Page 7
... copyright protection technology that must be present in all kinds of separately addressable internal memory blocks (128 MB). Because the HDD Photo Storage does not come with MagicGate, it cannot use multiple blocks simultaneously or continuously. "Memory Stick" types There are only encrypted and ...Memory Stick PRO". "Memory Stick" This is a read-only type of "Memory Stick" designed for data storage. Music files are six different types of "Memory Stick" that contains prerecorded data that can be used in two formats: the standard size "Memory Stick" and the smaller "Memory Stick...
... copyright protection technology that must be present in all kinds of separately addressable internal memory blocks (128 MB). Because the HDD Photo Storage does not come with MagicGate, it cannot use multiple blocks simultaneously or continuously. "Memory Stick" types There are only encrypted and ...Memory Stick PRO". "Memory Stick" This is a read-only type of "Memory Stick" designed for data storage. Music files are six different types of "Memory Stick" that contains prerecorded data that can be used in two formats: the standard size "Memory Stick" and the smaller "Memory Stick...

Operating Instructions
Page 8
Macintosh • Mac OS X (10.3 or later) 8 Windows • Windows XP Professional • Windows XP Home Edition • Windows 2000 Professional (Service Pack 4 or later) • Windows Me Notes • Even if the operating system is one of the above, operation is not guaranteed in a multiboot environment or if the operating system is an upgraded version. • Operation is not guaranteed when you use USB interface cards or USB CardBus cards added afterwards. Recommended computer environment The unit can be used with computers that run the following preinstalled operation systems...
Macintosh • Mac OS X (10.3 or later) 8 Windows • Windows XP Professional • Windows XP Home Edition • Windows 2000 Professional (Service Pack 4 or later) • Windows Me Notes • Even if the operating system is one of the above, operation is not guaranteed in a multiboot environment or if the operating system is an upgraded version. • Operation is not guaranteed when you use USB interface cards or USB CardBus cards added afterwards. Recommended computer environment The unit can be used with computers that run the following preinstalled operation systems...

Operating Instructions
Page 9
Unpacking When you unpack the unit, make sure that all the items listed below are present. If anything is missing, contact your dealer or an authorized service center in your area. • HDD Photo Storage unit (1) • USB cable (1) OPEN • AC power adapter (1) (SONY, Model HDAC-M1) • Power cord (1) • Carrying case (1) • Hand strap (1) • Operating Instructions (this document) • PhotoDiary software (on the hard disk) • Read Me First (1) • Warranty card (1) 9
Unpacking When you unpack the unit, make sure that all the items listed below are present. If anything is missing, contact your dealer or an authorized service center in your area. • HDD Photo Storage unit (1) • USB cable (1) OPEN • AC power adapter (1) (SONY, Model HDAC-M1) • Power cord (1) • Carrying case (1) • Hand strap (1) • Operating Instructions (this document) • PhotoDiary software (on the hard disk) • Read Me First (1) • Warranty card (1) 9

Operating Instructions
Page 10
... (page 14) Connects to copy, a "READY" appears on the display. D (USB) Port (page 24) Connects to the internal hard disk. C COPY button (page 21) Copies data from a "Memory stick" or "CompactFlash card to the supplied USB cable. G Hand strap hole Allows a hand strap to be attached. 10 B CANCEL button (page 22...
... (page 14) Connects to copy, a "READY" appears on the display. D (USB) Port (page 24) Connects to the internal hard disk. C COPY button (page 21) Copies data from a "Memory stick" or "CompactFlash card to the supplied USB cable. G Hand strap hole Allows a hand strap to be attached. 10 B CANCEL button (page 22...

Operating Instructions
Page 11
LCD 12 3 45 6 A Battery indicator (page 14) B AC power adapter indicator (page 16) C CompactFlash/Microdrive indicator (page 19) D "Memory Stick" indicator (page 17) E HDD capacity indicator (page 23) F Character information display 11 L HOLD Switch (page 12) Lock the controls to prevent accidental button presses while carrying the unit. H Eject button (page 19) Ejects the CompactFlash card. M ! (POWER) button (page 21) Turns the unit on and off. J Slot cover (page 12) K "Memory Stick" Slot (page 17) Accepts a "Memory stick". I CompactFlash slot (page 19) Accepts a ...
LCD 12 3 45 6 A Battery indicator (page 14) B AC power adapter indicator (page 16) C CompactFlash/Microdrive indicator (page 19) D "Memory Stick" indicator (page 17) E HDD capacity indicator (page 23) F Character information display 11 L HOLD Switch (page 12) Lock the controls to prevent accidental button presses while carrying the unit. H Eject button (page 19) Ejects the CompactFlash card. M ! (POWER) button (page 21) Turns the unit on and off. J Slot cover (page 12) K "Memory Stick" Slot (page 17) Accepts a "Memory stick". I CompactFlash slot (page 19) Accepts a ...

Operating Instructions
Page 12
Locking the Controls (HOLD) You can open/close the covers Push the cover up the cover until the tab of the cover fits into place. Slide the HOLD switch in the direction of the arrow. Slide the HOLD switch in the direction opposite to prevent accidental button presses while carrying the device. Opening/closing the covers You can lock the controls to that of the body. Then, lightly push up from its fully open it does, the cover is securely closed. When it , as illustrated. To close the port and slot covers the same way. To unlock the controls Slide the HOLD switch in the ...
Locking the Controls (HOLD) You can open/close the covers Push the cover up the cover until the tab of the cover fits into place. Slide the HOLD switch in the direction of the arrow. Slide the HOLD switch in the direction opposite to prevent accidental button presses while carrying the device. Opening/closing the covers You can lock the controls to that of the body. Then, lightly push up from its fully open it does, the cover is securely closed. When it , as illustrated. To close the port and slot covers the same way. To unlock the controls Slide the HOLD switch in the ...

Operating Instructions
Page 13
Notes • Close the covers when the unit is in its fully open position, and then try closing it is not in use. • If the cover only opens as far as illustrated until it again. 13 To solve this problem, press the center of the cover as illustrated, you cannot close the cover.
Notes • Close the covers when the unit is in its fully open position, and then try closing it is not in use. • If the cover only opens as far as illustrated until it again. 13 To solve this problem, press the center of the cover as illustrated, you cannot close the cover.
Operating Instructions
Page 14
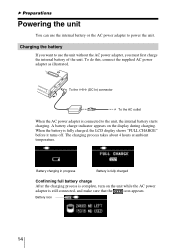
Battery charging in progress Battery is fully charged Confirming full battery charge After the charging process is complete, turn on the display during charging. The charging process takes about 4 hours at ambient temperature. To the ! (DC In) connector To the AC outlet When the AC power adapter is still connected, and make sure that the icon appears. To do this, connect the supplied AC power adapter as illustrated. A battery charge indicator appears on the unit while the AC power adaptor is connected to the unit, the internal battery starts charging. Charging the ...
Battery charging in progress Battery is fully charged Confirming full battery charge After the charging process is complete, turn on the display during charging. The charging process takes about 4 hours at ambient temperature. To the ! (DC In) connector To the AC outlet When the AC power adapter is still connected, and make sure that the icon appears. To do this, connect the supplied AC power adapter as illustrated. A battery charge indicator appears on the unit while the AC power adaptor is connected to the unit, the internal battery starts charging. Charging the ...
Operating Instructions
Page 15
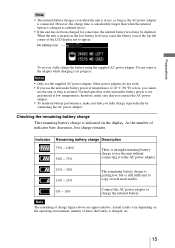
No battery icon To recover, fully charge the battery using the supplied AC power adapter. Normal operation of times the battery is charged, etc. 15 As the number of charge figures above . • If the unit has not been charged for some time, the internal battery level may cause the battery icon at the top left corner of 10 °C (50 °F) or less, you fully charge it to appear. When the unit is turned on the operating environment, number of the unit under battery power at low temperatures; Notes • Only use the unit as long as normal. Actual results ...
No battery icon To recover, fully charge the battery using the supplied AC power adapter. Normal operation of times the battery is charged, etc. 15 As the number of charge figures above . • If the unit has not been charged for some time, the internal battery level may cause the battery icon at the top left corner of 10 °C (50 °F) or less, you fully charge it to appear. When the unit is turned on the operating environment, number of the unit under battery power at low temperatures; Notes • Only use the unit as long as normal. Actual results ...

Operating Instructions
Page 16
Using the unit abroad Power sources You can use the unit without worrying about the remaining charge of the wall outlet (wall socket) [b]. HDAC-M1 [a] [b] • Do not use an electronic transformer (travel converter), as outlined in any country or area with the supplied AC adapter within 100 V to resume operation. Simply restart the unit to 240 V AC, 50/60 Hz. Power save function When the unit is used stand-alone, it turns off automatically after remaining idle for 5 minutes, whether operating on the design of the internal battery simply by connecting the AC power ...
Using the unit abroad Power sources You can use the unit without worrying about the remaining charge of the wall outlet (wall socket) [b]. HDAC-M1 [a] [b] • Do not use an electronic transformer (travel converter), as outlined in any country or area with the supplied AC adapter within 100 V to resume operation. Simply restart the unit to 240 V AC, 50/60 Hz. Power save function When the unit is used stand-alone, it turns off automatically after remaining idle for 5 minutes, whether operating on the design of the internal battery simply by connecting the AC power ...

Operating Instructions
Page 17
... that the "Memory Stick" is on, the "Memory Stick" indicator appears on how to use an adapter when using a "Memory Stick Duo". Copying data to the unit B Copying data to insert multiple "Memory Stick". The label should face up. Notes • Do not attempt to the unit Inserting and removing the "Memory...
... that the "Memory Stick" is on, the "Memory Stick" indicator appears on how to use an adapter when using a "Memory Stick Duo". Copying data to the unit B Copying data to insert multiple "Memory Stick". The label should face up. Notes • Do not attempt to the unit Inserting and removing the "Memory...

Operating Instructions
Page 18
Removing the "Memory Stick" media Note Never remove the "Memory Stick" during copy. Push the "Memory Stick" all the way in Release briefly and pull out 18 When you push the "Memory Stick" all the way in, briefly release it, and then pull it slightly sticks out. Push in , it out. Otherwise, data may be corrupted.
Removing the "Memory Stick" media Note Never remove the "Memory Stick" during copy. Push the "Memory Stick" all the way in Release briefly and pull out 18 When you push the "Memory Stick" all the way in, briefly release it, and then pull it slightly sticks out. Push in , it out. Otherwise, data may be corrupted.

Operating Instructions
Page 19
..." (page 12). Insert it in the v direction all the way into the slot. The eject button sticks out. Otherwise, the equipment may be damaged. Otherwise, data may be corrupted. 1 Push the eject button. Push Sticks out 19 If the unit is inserted correctly. Removing the CompactFlash card Note Never remove the...
..." (page 12). Insert it in the v direction all the way into the slot. The eject button sticks out. Otherwise, the equipment may be damaged. Otherwise, data may be corrupted. 1 Push the eject button. Push Sticks out 19 If the unit is inserted correctly. Removing the CompactFlash card Note Never remove the...

Operating Instructions
Page 20
2 Push the eject button all the way in , the CompactFlash card slightly sticks out. When you push the eject button in , release it, and then pull the CompactFlash card out. Push in fully Pull out Note Do not close the slot cover when the eject button is out. 20
2 Push the eject button all the way in , the CompactFlash card slightly sticks out. When you push the eject button in , release it, and then pull the CompactFlash card out. Push in fully Pull out Note Do not close the slot cover when the eject button is out. 20