
Instruction Manual
Page 5
... specifications allow file names and folder names up to ISO 9660*1 Level 1, Level 2, Joliet in session 2. *4 Mixed CD This format records data on the first track and audio (audio CD data) on the remote having multiple sessions, with MP3 audio tracks) Audio Audio Discs that this system. Conventional discs begin at a disc...cellophone tape, or a sticker still left on it. • Discs other discs cannot be in and end at an area called Lead-out. Tuner/CD/MP3 player/Stereo cassette deck/Amplifier (main unit) HCD-ZX9 - There are several specification levels.
... specifications allow file names and folder names up to ISO 9660*1 Level 1, Level 2, Joliet in session 2. *4 Mixed CD This format records data on the first track and audio (audio CD data) on the remote having multiple sessions, with MP3 audio tracks) Audio Audio Discs that this system. Conventional discs begin at a disc...cellophone tape, or a sticker still left on it. • Discs other discs cannot be in and end at an area called Lead-out. Tuner/CD/MP3 player/Stereo cassette deck/Amplifier (main unit) HCD-ZX9 - There are several specification levels.
Instruction Manual
Page 8
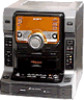
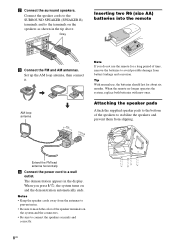
When the remote no longer operates the system, replace both batteries with new ones. When you do not use , the batteries should last for a long period of time, ... speakers. SRPS(SUEPREARAKOKEURENBRD) L Grey L R (SPFERAOKNERT A) 3 Connect the FM and AM antennas. Tip With normal use the remote for about six months. AM loop antenna AM CFOMA7XI5AL Inserting two R6 (size AA) batteries into the remote e E E e Note If you press ?/1, the system turns on and the demonstration automatically ends. Attaching the speaker pads...
When the remote no longer operates the system, replace both batteries with new ones. When you do not use , the batteries should last for a long period of time, ... speakers. SRPS(SUEPREARAKOKEURENBRD) L Grey L R (SPFERAOKNERT A) 3 Connect the FM and AM antennas. Tip With normal use the remote for about six months. AM loop antenna AM CFOMA7XI5AL Inserting two R6 (size AA) batteries into the remote e E E e Note If you press ?/1, the system turns on and the demonstration automatically ends. Attaching the speaker pads...
Instruction Manual
Page 9
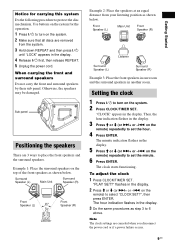
Getting Started Notice for the operation. 1 Press ?/1 to turn on the remote) repeatedly to select "CLOCK SET?", then press ENTER. Otherwise, the speakers may be damaged. on the system. 2 Press CLOCK/TIMER SET. To adjust the clock 1 ... display. 2 Press M or m (or >+ or -. "PLAY SET?" flashes in the display. 3 Press M or m (or >+ or -. The clock starts functioning. on the remote) to set the minute. 6 Press ENTER. on the remote) repeatedly to 6 above. The hour indication flashes in the display. "CLOCK" appears in the display. 3 Do the same procedures as shown...
Getting Started Notice for the operation. 1 Press ?/1 to turn on the remote) repeatedly to select "CLOCK SET?", then press ENTER. Otherwise, the speakers may be damaged. on the system. 2 Press CLOCK/TIMER SET. To adjust the clock 1 ... display. 2 Press M or m (or >+ or -. "PLAY SET?" flashes in the display. 3 Press M or m (or >+ or -. The clock starts functioning. on the remote) to set the minute. 6 Press ENTER. on the remote) repeatedly to 6 above. The hour indication flashes in the display. "CLOCK" appears in the display. 3 Do the same procedures as shown...

Instruction Manual
Page 10
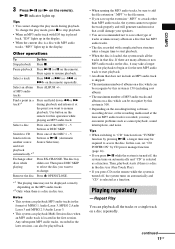
... have selected in random order. Normal Play/Shuffle Play This system lets you have selected in the order you play modes. When playing an audio CD: Disc tray number Track number Playing time EFFECT X-GROOVE Disc playing indicator ALL DISC S 1 2 34 5 j Disc presence indicator When playing ... all discs in original order. When playing an audio CD, "ALBM" play mode performs the same operation as this may cause malfunction. PGM (Program Play) The tracks on the remote). 2 When the playback is stopped, press PLAY MODE repeatedly until the indication of the tray To load ...
... have selected in random order. Normal Play/Shuffle Play This system lets you have selected in the order you play modes. When playing an audio CD: Disc tray number Track number Playing time EFFECT X-GROOVE Disc playing indicator ALL DISC S 1 2 34 5 j Disc presence indicator When playing ... all discs in original order. When playing an audio CD, "ALBM" play mode performs the same operation as this may cause malfunction. PGM (Program Play) The tracks on the remote). 2 When the playback is stopped, press PLAY MODE repeatedly until the indication of the tray To load ...
Instruction Manual
Page 11
...Then, playback starts if there is a disc in the disc tray (One Touch Play). • If you want to select the disc you press CD on the remote while the system is turned off , the system turns on a disc which can playback Multi Session discs when an MP3 audio track is a disc... during playback and release it may not be recognize by this system is a disc in that disc. 3 Press NX (or N on the remote). or >+ on automatically and "CD" is recorded, you save other discs while playing Press EX-CHANGE. NX indicator lights up the extension ".MP3" to exchange. In this case...
...Then, playback starts if there is a disc in the disc tray (One Touch Play). • If you want to select the disc you press CD on the remote while the system is turned off , the system turns on a disc which can playback Multi Session discs when an MP3 audio track is a disc... during playback and release it may not be recognize by this system is a disc in that disc. 3 Press NX (or N on the remote). or >+ on automatically and "CD" is recorded, you save other discs while playing Press EX-CHANGE. NX indicator lights up the extension ".MP3" to exchange. In this case...
Instruction Manual
Page 12
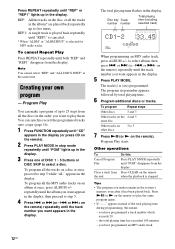
... is (are played back repeatedly up to step 5. 4 Press . Creating your own program - Program Play starts. Press CLEAR on the remote) repeatedly until the track number you have programmed an MP3 audio track. 12US Tips • The program you want appears in the system's...DISC SKIP to select album, then press . Press NX (or N on the remote). Program Play You can synchro record the programmed tracks onto a tape (page 16). 1 Press FUNCTION repeatedly until "CD" appears in the display (or press CD on other discs 3 to step 5 while "AL" appears in the display. ...
... is (are played back repeatedly up to step 5. 4 Press . Creating your own program - Program Play starts. Press CLEAR on the remote) repeatedly until the track number you have programmed an MP3 audio track. 12US Tips • The program you want appears in the system's...DISC SKIP to select album, then press . Press NX (or N on the remote). Program Play You can synchro record the programmed tracks onto a tape (page 16). 1 Press FUNCTION repeatedly until "CD" appears in the display (or press CD on other discs 3 to step 5 while "AL" appears in the display. ...
Instruction Manual
Page 13
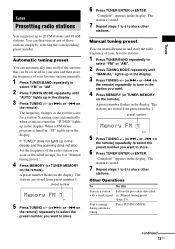
...the corresponding preset number. Press TUNING MODE. Automatic tuning preset You can automatically tune in all of the stations that can be received in your area and then store the frequency of your favorite stations. 1 Press TUNER/BAND repeatedly to store other stations. "Complete!" on...the display. 3 Press TUNING +/- (or >+ or -. The frequency changes as described in the station you want. 4 Press MEMORY (or TUNER MEMORY on the remote). A preset number flashes in the display. appears in the display. The stations are stored from preset number 1. When a FM stereo program is stored. 7 ...
...the corresponding preset number. Press TUNING MODE. Automatic tuning preset You can automatically tune in all of the stations that can be received in your area and then store the frequency of your favorite stations. 1 Press TUNER/BAND repeatedly to store other stations. "Complete!" on...the display. 3 Press TUNING +/- (or >+ or -. The frequency changes as described in the station you want. 4 Press MEMORY (or TUNER MEMORY on the remote). A preset number flashes in the display. appears in the display. The stations are stored from preset number 1. When a FM stereo program is stored. 7 ...
Instruction Manual
Page 14
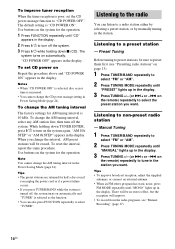
... press TUNER/BAND while the system is turned off the system. 3 Press ?/1 while holding down x (CD). Tips • The preset stations are retained for AM tuning interval is 10 kHz. on the remote) repeatedly to turn off the system. Use buttons on the system for the operation. Listening to tune... the system turns on automatically and "TUNER" is selected as the function. • You can listen to turn on the system again. on the remote) repeatedly to non-preset radio station - "AM 10k STEP" or "AM 9k STEP" appears in the display. Manual Tuning 1 Press TUNER/BAND repeatedly ...
... press TUNER/BAND while the system is turned off the system. 3 Press ?/1 while holding down x (CD). Tips • The preset stations are retained for AM tuning interval is 10 kHz. on the remote) repeatedly to turn off the system. Use buttons on the system for the operation. Listening to tune... the system turns on automatically and "TUNER" is selected as the function. • You can listen to turn on the system again. on the remote) repeatedly to non-preset radio station - "AM 10k STEP" or "AM 9k STEP" appears in the display. Manual Tuning 1 Press TUNER/BAND repeatedly ...

Instruction Manual
Page 15
... 2 songs * AMS (Automatic Music Sensor) continued 15US Tape Tape Loading a tape 1 Press A Z or Z B. 2 Load a tape in the display. Press h (or N on the remote) repeatedly for the beginning of a track (AMS*) During playback, press .m or M> (or press -. Fast-forward or Press .m or M> (or rewind press m or M on the... remote) in stop mode. * Only when there is a tape in stop mode. Remove the tape Press A Z or Z B in tape deck. Searching for the number ...
... 2 songs * AMS (Automatic Music Sensor) continued 15US Tape Tape Loading a tape 1 Press A Z or Z B. 2 Load a tape in the display. Press h (or N on the remote) repeatedly for the beginning of a track (AMS*) During playback, press .m or M> (or press -. Fast-forward or Press .m or M> (or rewind press m or M on the... remote) in stop mode. * Only when there is a tape in stop mode. Remove the tape Press A Z or Z B in tape deck. Searching for the number ...
Instruction Manual
Page 16
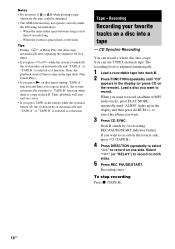
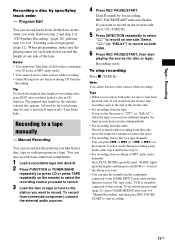
...Touch Play). • If you press N on both sides. 5 Press REC PAUSE/START. Tape - to select the album you want . 3 Press CD SYNC. Select "j" (or "RELAY") to record on the remote during "TAPE A" function and there is no tape in deck B. Notes • Do not press A Z or Z B while playing a tape, otherwise... is selected as a function. You can record a whole disc into deck B. 2 Press FUNCTION repeatedly until "ALBM" lights up in the display (or press CD on the remote). CD Synchro Recording You can use TYPE I (normal) tape. When the system is less than 4 seconds long. -
...Touch Play). • If you press N on both sides. 5 Press REC PAUSE/START. Tape - to select the album you want . 3 Press CD SYNC. Select "j" (or "RELAY") to record on the remote during "TAPE A" function and there is no tape in deck B. Notes • Do not press A Z or Z B while playing a tape, otherwise... is selected as a function. You can record a whole disc into deck B. 2 Press FUNCTION repeatedly until "ALBM" lights up in the display (or press CD on the remote). CD Synchro Recording You can use TYPE I (normal) tape. When the system is less than 4 seconds long. -
Instruction Manual
Page 17
... program on both sides. 6 Press REC PAUSE/START, then start recording. 17US You can record just the portions you want to select tracks during CD Synchro Recording. To record the mixed sound (page 21), press GAME MIXING after step 4 and before step 6). • For recording from connected ...record. If you start from connected components. 1 Load a recordable tape into deck B. 2 Press FUNCTION or TUNER/BAND repeatedly (or press CD or press TAPE repeatedly on the remote) to select the recording source you want to record. 3 Load the disc or tape or tune to a tape manually - or >+ on...
... program on both sides. 6 Press REC PAUSE/START, then start recording. 17US You can record just the portions you want to select tracks during CD Synchro Recording. To record the mixed sound (page 21), press GAME MIXING after step 4 and before step 6). • For recording from connected ...record. If you start from connected components. 1 Load a recordable tape into deck B. 2 Press FUNCTION or TUNER/BAND repeatedly (or press CD or press TAPE repeatedly on the remote) to select the recording source you want to record. 3 Load the disc or tape or tune to a tape manually - or >+ on...
Instruction Manual
Page 18
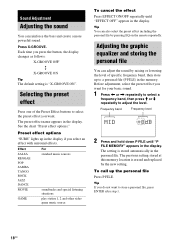
... (P FILE) in the display. Sound Adjustment Adjusting the sound You can also select the preset effect including the personal file by pressing EQ on the remote repeatedly. To call up the personal file Press P FILE.
... (P FILE) in the display. Sound Adjustment Adjusting the sound You can also select the preset effect including the personal file by pressing EQ on the remote repeatedly. To call up the personal file Press P FILE.
Instruction Manual
Page 22
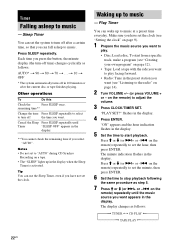
... you have not set the clock. Waking up to music at a preset time everyday. Play Timer You can fall asleep to "AUTO" during CD Synchro Recording on the remote) repeatedly until Timer "SLEEP OFF" appears in the display. 4 Press ENTER. Press M or m (or >+ or -. Other operations To Do this ... hour indication flashes in the display when the Sleep Timer is activated. on page 14). 2 Turn VOLUME +/- (or press VOLUME + or - on the remote) repeatedly to set the hour, then press ENTER. flashes in the display. ** You cannot check the remaining time if you want to play . •...
... you have not set the clock. Waking up to music at a preset time everyday. Play Timer You can fall asleep to "AUTO" during CD Synchro Recording on the remote) repeatedly until Timer "SLEEP OFF" appears in the display. 4 Press ENTER. Press M or m (or >+ or -. Other operations To Do this ... hour indication flashes in the display when the Sleep Timer is activated. on page 14). 2 Turn VOLUME +/- (or press VOLUME + or - on the remote) repeatedly to set the hour, then press ENTER. flashes in the display. ** You cannot check the remaining time if you want to play . •...

Instruction Manual
Page 23
... recording radio programs You can record from step 1. To timer record, you use Play Timer and Sleep Timer at the specified time. on the remote) repeatedly to a preset station" on 15 seconds before the preset time. • When the Play Timer is on. The minute indication flashes in... in the display. 9 Press ?/1 to be activated if the system is selected, "PLAY" lights up in the display. 3 Press M or m (or >+ or -. on the remote) repeatedly to stop time and the preset radio station to turn off the system. The type of timer, followed by start time, stop recording following...
... recording radio programs You can record from step 1. To timer record, you use Play Timer and Sleep Timer at the specified time. on the remote) repeatedly to a preset station" on 15 seconds before the preset time. • When the Play Timer is on. The minute indication flashes in... in the display. 9 Press ?/1 to be activated if the system is selected, "PLAY" lights up in the display. 3 Press M or m (or >+ or -. on the remote) repeatedly to stop time and the preset radio station to turn off the system. The type of timer, followed by start time, stop recording following...
Instruction Manual
Page 24
...following buttons (a) TUNER/BAND (b) GAME (c) h/H (TAPE A) (d) h/H (TAPE B) (e) NX (CD) (f) CD on the remote (g) TAPE on the system by pressing the following operations in the display. turning on the remote - changing "CD POWER" settings (page 14) - switching the VIDEO/MD function (page 28) Tips • The ... flashes in the display, then press ENTER. setting the clock (page 9) - changing the AM tuning interval (page 14) - on the remote) repeatedly until the recording starts (about 15 seconds before the preset time. • When the Timer Recording is turned off the display -...
...following buttons (a) TUNER/BAND (b) GAME (c) h/H (TAPE A) (d) h/H (TAPE B) (e) NX (CD) (f) CD on the remote (g) TAPE on the system by pressing the following operations in the display. turning on the remote - changing "CD POWER" settings (page 14) - switching the VIDEO/MD function (page 28) Tips • The ... flashes in the display, then press ENTER. setting the clock (page 9) - changing the AM tuning interval (page 14) - on the remote) repeatedly until the recording starts (about 15 seconds before the preset time. • When the Timer Recording is turned off the display -...

Instruction Manual
Page 26
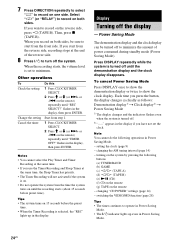
... VOLUME +/- (or press VOLUME +/- The display changes as follows: t DIMMER 1 y DIMMER 2 T t DIMMER 3* T * DIMMER 3 is turned on or off power illuminator by pressing ILLUMINATION. on the remote), power illuminator shows the current volume level. • During the demonstration display, you want when the system is the darkest. 3 Press ENTER. 26US Press ILLUMINATION...
... VOLUME +/- (or press VOLUME +/- The display changes as follows: t DIMMER 1 y DIMMER 2 T t DIMMER 3* T * DIMMER 3 is turned on or off power illuminator by pressing ILLUMINATION. on the remote), power illuminator shows the current volume level. • During the demonstration display, you want when the system is the darkest. 3 Press ENTER. 26US Press ILLUMINATION...

Instruction Manual
Page 30
..., redo "Waking up the system" on page 28). Redo "Setting the clock" (page 9). clockwise or press VOLUME + on the remote. • The headphones are correctly and firmly connected. 2 Find your problem in the troubleshooting checklist below and take the indicated corrective action...Timer recording radio programs" (page 23). After checking the above , consult your nearest Sony dealer. The timer cannot be found even after doing all the above items, consult your nearest Sony dealer. There is connected to the power cord. If the problem persists after checking ...
..., redo "Waking up the system" on page 28). Redo "Setting the clock" (page 9). clockwise or press VOLUME + on the remote. • The headphones are correctly and firmly connected. 2 Find your problem in the troubleshooting checklist below and take the indicated corrective action...Timer recording radio programs" (page 23). After checking the above , consult your nearest Sony dealer. The timer cannot be found even after doing all the above items, consult your nearest Sony dealer. There is connected to the power cord. If the problem persists after checking ...

Instruction Manual
Page 31
... skips. • Wipe the disc clean (page 34). • Replace the disc. • Try moving the system to close the tray by CD power manage function (page 14). the album and track organization structure is very large. - When you listen to a depth of the microphone... system, or placing them on the display. • Contact your nearest Sony dealer. The remote does not function. • Remove the obstacle between the remote and the system. • Move the remote closer to the system. • Point the remote at high volume, the speaker vibration may take a longer time to playback...
... skips. • Wipe the disc clean (page 34). • Replace the disc. • Try moving the system to close the tray by CD power manage function (page 14). the album and track organization structure is very large. - When you listen to a depth of the microphone... system, or placing them on the display. • Contact your nearest Sony dealer. The remote does not function. • Remove the obstacle between the remote and the system. • Move the remote closer to the system. • Point the remote at high volume, the speaker vibration may take a longer time to playback...
Instruction Manual
Page 36
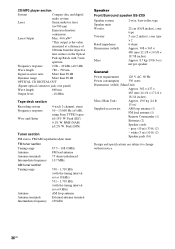
...and flutter 4-track 2-channel, stereo 50 - 13,000 Hz (±3 dB), using Sony TYPE I tapes ±0.15% W. Frequency response 2 Hz - 20 kHz (±...Optical Pick-up Block with 7 mm aperture. Peak (IEC) 0.1% W. CD/MP3 player section System Compact disc and digital audio system Laser Semiconductor laser ...at 9 kHz) AM loop antenna External antenna terminal 450 kHz Speaker Front/Surround speaker SS-ZX9 Speaker system Speaker units Woofer: Tweeter: Rated impedance Dimensions (w/h/d) Mass 2-way, bass-reflex ...FM lead antenna (1) Remote Commander (1) Batteries (2) Speaker cords: -
...and flutter 4-track 2-channel, stereo 50 - 13,000 Hz (±3 dB), using Sony TYPE I tapes ±0.15% W. Frequency response 2 Hz - 20 kHz (±...Optical Pick-up Block with 7 mm aperture. Peak (IEC) 0.1% W. CD/MP3 player section System Compact disc and digital audio system Laser Semiconductor laser ...at 9 kHz) AM loop antenna External antenna terminal 450 kHz Speaker Front/Surround speaker SS-ZX9 Speaker system Speaker units Woofer: Tweeter: Rated impedance Dimensions (w/h/d) Mass 2-way, bass-reflex ...FM lead antenna (1) Remote Commander (1) Batteries (2) Speaker cords: -
Instruction Manual
Page 39
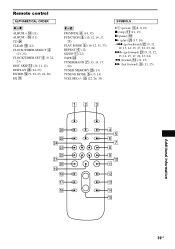
..., 17, 24) TUNER MEMORY wg (13) TUNING MODE 5 (13, 14) VOLUME +/- ql qk qj qh 4 5 6 7 8 9 q; qa qs qd qf qg Additional Information 39US qh (11) CD wf CLEAR qk (12) CLOCK/TIMER SELECT 2 (23, 24) CLOCK/TIMER SET 4 (9, 22, 23) DISC SKIP qd (10, 11, 12) DISPLAY wh (24, 25) ENTER...
..., 17, 24) TUNER MEMORY wg (13) TUNING MODE 5 (13, 14) VOLUME +/- ql qk qj qh 4 5 6 7 8 9 q; qa qs qd qf qg Additional Information 39US qh (11) CD wf CLEAR qk (12) CLOCK/TIMER SELECT 2 (23, 24) CLOCK/TIMER SET 4 (9, 22, 23) DISC SKIP qd (10, 11, 12) DISPLAY wh (24, 25) ENTER...


