
Operating Instructions
Page 2
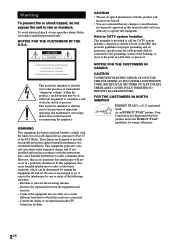
... voltage" within the product's enclosure that to which can radiate radio frequency energy and, if not installed and used in this manual could void your authority to operate this product will not occur in particular, specifies that this equipment does cause harmful interference to ...guidelines for proper grounding and, in a particular installation. Note to CATV system installer: This reminder is encouraged to try to Part 15 of the following measures: - As an ENERGY STAR® partner, Sony Corporation has determined that the cable ground shall be of sufficient magnitude to...
... voltage" within the product's enclosure that to which can radiate radio frequency energy and, if not installed and used in this manual could void your authority to operate this product will not occur in particular, specifies that this equipment does cause harmful interference to ...guidelines for proper grounding and, in a particular installation. Note to CATV system installer: This reminder is encouraged to try to Part 15 of the following measures: - As an ENERGY STAR® partner, Sony Corporation has determined that the cable ground shall be of sufficient magnitude to...
Operating Instructions
Page 3
... Synchro Recording/ Recording Manually/ Program Edit 18 Timer-recording radio programs ......... 19 Sound Adjustment Adjusting the sound - Sleep Timer 23 Waking up optional components ........ 24 Listening to audio from a connected component 25 Recording audio from a connected component 25 Troubleshooting Problems and... 28 Specifications 30 3US Daily Timer 23 Optional Components Hooking up to a tape - Table of Contents List of Button Locations and Reference Pages Main unit 4 Remote Control 5 Getting Started Hooking up the system 6 Inserting two size AA (R6) batteries ...
... Synchro Recording/ Recording Manually/ Program Edit 18 Timer-recording radio programs ......... 19 Sound Adjustment Adjusting the sound - Sleep Timer 23 Waking up optional components ........ 24 Listening to audio from a connected component 25 Recording audio from a connected component 25 Troubleshooting Problems and... 28 Specifications 30 3US Daily Timer 23 Optional Components Hooking up to a tape - Table of Contents List of Button Locations and Reference Pages Main unit 4 Remote Control 5 Getting Started Hooking up the system 6 Inserting two size AA (R6) batteries ...
Operating Instructions
Page 14
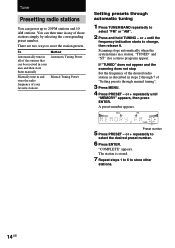
..."TUNED" and "ST" (for a stereo program) appear. Preset number 5 Press PRESET - "COMPLETE" appears. Scanning stops automatically when the system tunes in any of those stations simply by selecting the corresponding preset number. If "TUNED" does not appear and the scanning does not stop...desired radio station as described in steps 2 through 7 of your area and then store them manually Manually tune in your favorite stations Method Automatic Tuning Preset Manual Tuning Preset Setting presets through manual tuning". 3 Press MENU. 4 Press PRESET - or + repeatedly to change, then release...
..."TUNED" and "ST" (for a stereo program) appear. Preset number 5 Press PRESET - "COMPLETE" appears. Scanning stops automatically when the system tunes in any of those stations simply by selecting the corresponding preset number. If "TUNED" does not appear and the scanning does not stop...desired radio station as described in steps 2 through 7 of your area and then store them manually Manually tune in your favorite stations Method Automatic Tuning Preset Manual Tuning Preset Setting presets through manual tuning". 3 Press MENU. 4 Press PRESET - or + repeatedly to change, then release...

Operating Instructions
Page 15
... 1 to 6 to tune in the desired station. 3 Press MENU. 4 Press PRESET - While holding down ENTER, turn off the system. Tuner Setting presets through manual signal tuning". To change the AM tuning interval in some areas). To reset the interval, repeat the same procedure. Note You cannot change... Follow the procedure described in any AM station first, then turn the system back on. A preset number appears. 5 Press PRESET - When you change the AM tuning interval, tune in with a weak "Setting presets through manual tuning 1 Press TUNER/BAND repeatedly to 9 kHz (10 kHz in ...
... 1 to 6 to tune in the desired station. 3 Press MENU. 4 Press PRESET - While holding down ENTER, turn off the system. Tuner Setting presets through manual signal tuning". To change the AM tuning interval in some areas). To reset the interval, repeat the same procedure. Note You cannot change... Follow the procedure described in any AM station first, then turn the system back on. A preset number appears. 5 Press PRESET - When you change the AM tuning interval, tune in with a weak "Setting presets through manual tuning 1 Press TUNER/BAND repeatedly to 9 kHz (10 kHz in ...
Operating Instructions
Page 16
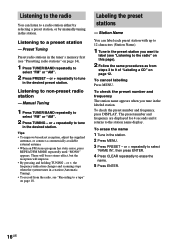
... radio, see "Presetting radio stations" on page 14). 1 Press TUNER/BAND repeatedly to a radio station either by selecting a preset station, or by manually tuning in the station. 2 Press MENU. 3 Press PRESET - The preset number and frequency are displayed for 4 seconds and it returns to non-preset... radio station - or + repeatedly to 9 of "Labeling a CD" on page 18. or +, the frequency indication changes and scanning stops when the system tunes in a station (Automatic Tuning). • To record from steps 3 to tune in the desired station. Station Name You can listen to select "FM...
... radio, see "Presetting radio stations" on page 14). 1 Press TUNER/BAND repeatedly to a radio station either by selecting a preset station, or by manually tuning in the station. 2 Press MENU. 3 Press PRESET - The preset number and frequency are displayed for 4 seconds and it returns to non-preset... radio station - or + repeatedly to 9 of "Labeling a CD" on page 18. or +, the frequency indication changes and scanning stops when the system tunes in a station (Automatic Tuning). • To record from steps 3 to tune in the desired station. Station Name You can listen to select "FM...
Operating Instructions
Page 18
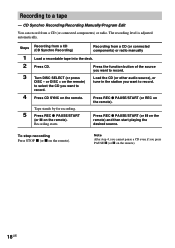
... by for recording. To stop recording Press STOP x (or x on the remote. CD Synchro Recording/Recording Manually/Program Edit You can record from a CD (or connected components) or radio manually Load a recordable tape into the deck. Load the CD (or other audio source), or tune in the ...you cannot pause a CD even if you want to record. Steps 1 2 3 4 5 Recording from a CD (CD Synchro Recording) Recording from a CD (or connected components) or radio. Recording to record. Turn DISC SELECT (or press DISC - Press REC z PAUSE/START (or X on the remote). or DISC + on the remote)...
... by for recording. To stop recording Press STOP x (or x on the remote. CD Synchro Recording/Recording Manually/Program Edit You can record from a CD (or connected components) or radio manually Load a recordable tape into the deck. Load the CD (or other audio source), or tune in the ...you cannot pause a CD even if you want to record. Steps 1 2 3 4 5 Recording from a CD (CD Synchro Recording) Recording from a CD (or connected components) or radio. Recording to record. Turn DISC SELECT (or press DISC - Press REC z PAUSE/START (or X on the remote). or DISC + on the remote)...

Operating Instructions
Page 25
...MD deck, perform the following operation. 1 Turn off the system. 2 Press VIDEO (MD) while holding down STOP x. The function switches to select "VIDEO" or "MD". See "Recording to a tape" on page 24. 2 Start recording manually. To switch the VIDEO function to MD When you want to... cannot switch the function in Power Saving Mode. Optional Components 25US Listening to audio from a connected component 1 Connect the audio cords. See "Hooking up optional components" on page 24. 2 Press VIDEO (MD) to MD. See "Hooking up optional components" on page 18. Tip Once you enable the MD...
...MD deck, perform the following operation. 1 Turn off the system. 2 Press VIDEO (MD) while holding down STOP x. The function switches to select "VIDEO" or "MD". See "Recording to a tape" on page 24. 2 Start recording manually. To switch the VIDEO function to MD When you want to... cannot switch the function in Power Saving Mode. Optional Components 25US Listening to audio from a connected component 1 Connect the audio cords. See "Hooking up optional components" on page 24. 2 Press VIDEO (MD) to MD. See "Hooking up optional components" on page 18. Tip Once you enable the MD...

