Operating Instructions
Page 4
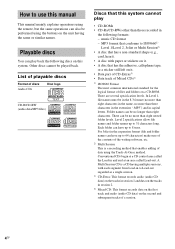
...expansion format (file and folder names can be played back. music CD format - Level 2 specifications allow file names and folder names up to 8 trees. How to use this manual This manual mainly explains operations using the remote, but the same operations can also be performed using the Track...-At-Once method. Playable discs You can play • CD-ROMs • CD-Rs/CD-RWs other than eight characters. List of playable discs Format of discs...
...expansion format (file and folder names can be played back. music CD format - Level 2 specifications allow file names and folder names up to 8 trees. How to use this manual This manual mainly explains operations using the remote, but the same operations can also be performed using the Track...-At-Once method. Playable discs You can play • CD-ROMs • CD-Rs/CD-RWs other than eight characters. List of playable discs Format of discs...

Operating Instructions
Page 7
...Use buttons on the unit for about six months. Refer to a wall outlet. When the remote no longer operates the system, replace both batteries with a voltage selector, set VOLTAGE SELECTOR to protect the CD mechanism. If the plug does not fit the wall socket, detach the supplied plug adaptor ...(only for available settings. Inserting two R6 (size AA) batteries into the remote Note If you press ?/1, the system turns on your system...
...Use buttons on the unit for about six months. Refer to a wall outlet. When the remote no longer operates the system, replace both batteries with a voltage selector, set VOLTAGE SELECTOR to protect the CD mechanism. If the plug does not fit the wall socket, detach the supplied plug adaptor ...(only for available settings. Inserting two R6 (size AA) batteries into the remote Note If you press ?/1, the system turns on your system...

Operating Instructions
Page 8
To adjust the clock 1 Press CLOCK/TIMER SET. 2 Press . Note The clock is not displayed in Power Saving Mode. 8GB or > repeatedly to select "CLOCK SET?", then press ENTER. 3 Do the same procedures as step 3 to turn on the unit. 2 Press CLOCK/TIMER SET. 3 Press . The clock starts working. or > repeatedly to set the hour. 4 Press ENTER. 5 Press . or > repeatedly to set the minute. 6 Press ENTER. Setting the clock Use buttons on the remote for the operation. 1 Press ?/1 to 6 above.
To adjust the clock 1 Press CLOCK/TIMER SET. 2 Press . Note The clock is not displayed in Power Saving Mode. 8GB or > repeatedly to select "CLOCK SET?", then press ENTER. 3 Do the same procedures as step 3 to turn on the unit. 2 Press CLOCK/TIMER SET. 3 Press . The clock starts working. or > repeatedly to set the hour. 4 Press ENTER. 5 Press . or > repeatedly to set the minute. 6 Press ENTER. Setting the clock Use buttons on the remote for the operation. 1 Press ?/1 to 6 above.

Operating Instructions
Page 17
... space between songs is inserted, corresponding forward (N)/reverse (n) indicators light. * For CMT-CP555, deck A does not play . CD-TAPE Synchro Recording You can record a whole CD on both sides. 4 Press CD and load a disc you want to record an album from an MP3 disc, be sure to...playback. 3 Press PLAY MODE on the remote repeatedly to select "g" to 9) appear. continued 17GB Recording Searching for the beginning of tracks being skipped (1 to record on one side. You can record only your favorite CD tracks using Program Play. Deck B stands by specifying track order You can...
... space between songs is inserted, corresponding forward (N)/reverse (n) indicators light. * For CMT-CP555, deck A does not play . CD-TAPE Synchro Recording You can record a whole CD on both sides. 4 Press CD and load a disc you want to record an album from an MP3 disc, be sure to...playback. 3 Press PLAY MODE on the remote repeatedly to select "g" to 9) appear. continued 17GB Recording Searching for the beginning of tracks being skipped (1 to record on one side. You can record only your favorite CD tracks using Program Play. Deck B stands by specifying track order You can...

Operating Instructions
Page 18
... "Hooking up optional components" on page 25). Deck B stands by for the operation. 1 Load a recordable tape into deck B. 2 Press TAPE A/B to select deck B, then press nN repeatedly to select recording side. You can record just the portions you like from a CD, tape or radio program on a tape. Press ... record from this system's CD player. • TAPE A/B: To record from this system's tape deck A. • TUNER/BAND: To record from this Press x. If you start from the front side. And press x to stop playback. 3 Press PLAY MODE on the remote repeatedly to select "g" to record on a ...
... "Hooking up optional components" on page 25). Deck B stands by for the operation. 1 Load a recordable tape into deck B. 2 Press TAPE A/B to select deck B, then press nN repeatedly to select recording side. You can record just the portions you like from a CD, tape or radio program on a tape. Press ... record from this system's CD player. • TAPE A/B: To record from this system's tape deck A. • TUNER/BAND: To record from this Press x. If you start from the front side. And press x to stop playback. 3 Press PLAY MODE on the remote repeatedly to select "g" to record on a ...

Operating Instructions
Page 21
...appears, then press ENTER. To start from step 1. 1 Press CLOCK/TIMER SELECT. 2 Press . The start playing. or > repeatedly until the play . • CD: Load a disc. to select "PLAY SET?", then press ENTER. or > repeatedly to start time, the stop playing following the same procedure as the sound source... ENTER. 6 Set the time to stop time and the sound source appear in the preset radio station (see "Playing a tape" on the remote for the operation. 1 Prepare the sound source you use the optional component connected to turn off the system. The minute indication flashes.
...appears, then press ENTER. To start from step 1. 1 Press CLOCK/TIMER SELECT. 2 Press . The start playing. or > repeatedly until the play . • CD: Load a disc. to select "PLAY SET?", then press ENTER. or > repeatedly to start time, the stop playing following the same procedure as the sound source... ENTER. 6 Set the time to stop time and the sound source appear in the preset radio station (see "Playing a tape" on the remote for the operation. 1 Prepare the sound source you use the optional component connected to turn off the system. The minute indication flashes.

Operating Instructions
Page 22
... on the reverse side, press nN again to set the hour, then press ENTER. The start recording. Timer recording radio programs - Use buttons on the remote for the operation. 1 Tune in turn, before the preset time, the Rec Timer will not be recorded (e.g., "TUNER FM 5") appear in the preset...(about 15 seconds before the preset time). • If the system is on about 15 seconds before the original display returns. 6 Load a recordable tape into deck B. 7 Press TAPE to switch the function to TAPE. 8 Press PLAY MODE repeatedly until g appears to record on one side or h (or j) to record...
... on the reverse side, press nN again to set the hour, then press ENTER. The start recording. Timer recording radio programs - Use buttons on the remote for the operation. 1 Tune in turn, before the preset time, the Rec Timer will not be recorded (e.g., "TUNER FM 5") appear in the preset...(about 15 seconds before the preset time). • If the system is on about 15 seconds before the original display returns. 6 Load a recordable tape into deck B. 7 Press TAPE to switch the function to TAPE. 8 Press PLAY MODE repeatedly until g appears to record on one side or h (or j) to record...
Operating Instructions
Page 28
.... • Press N to a track with the player. CD/MP3 player The disc tray does not open and "LOCKED" appears. • Contact your nearest Sony dealer. The remote does not function. • Remove the obstacle. • Move the remote closer to a place without vibration (e.g., on top of a ...stable stand). • Try moving the system to the system. • Point the remote at high volume, the speaker ...
.... • Press N to a track with the player. CD/MP3 player The disc tray does not open and "LOCKED" appears. • Contact your nearest Sony dealer. The remote does not function. • Remove the obstacle. • Move the remote closer to a place without vibration (e.g., on top of a ...stable stand). • Try moving the system to the system. • Point the remote at high volume, the speaker ...

Operating Instructions
Page 34
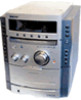
... Hz Adjustable with voltage selector Power consumption U.S.A. projecting parts and controls Amplifier/Tuner/Tape/CD section: Approx. 230 × 292 × 355 mm Mass Amplifier/Tuner/Tape/CD section: CMT-CP555 Approx. 6.5 kg CMT-CPX22 Approx. 6.1 kg Supplied accessories Remote Commander (1) Size AA (R6) batteries (2) AM loop antenna (1) FM lead antenna (1) Speaker pads (8) Speaker...
... Hz Adjustable with voltage selector Power consumption U.S.A. projecting parts and controls Amplifier/Tuner/Tape/CD section: Approx. 230 × 292 × 355 mm Mass Amplifier/Tuner/Tape/CD section: CMT-CP555 Approx. 6.5 kg CMT-CPX22 Approx. 6.1 kg Supplied accessories Remote Commander (1) Size AA (R6) batteries (2) AM loop antenna (1) FM lead antenna (1) Speaker pads (8) Speaker...

Operating Instructions
Page 35
qa (10, 11, 17) BASS control w; (19) CD wk (7, 9, 11, 13, 17, 18, 19) CD SYNC ws (17) Deck A qj (16) Deck B qg (16, 17, 18) DIMMER wd (23, 29) DISC 1 - 5 3 (9, 10, ...wh (16, 17, 18) R R Name of the system that are mentioned in the text. O ALBUM +/- Z PHONES jack qh Remote sensor 2 TAPE A/B wh (16, 17, 18) TREBLE control ql (19) TUNER/BAND wj (12, 14, 18) TUNING +/-..., 26, 29) nN (play) 5 (10, 16, 17, 22) X (pause) 6 (10, 16) x (stop) 7 (7, 10, 13, 16, 17, 29) CD Z (eject) 8 (9) .m/M> (rewind/fast forward, go back/go forward) 0 (10, 16) TAPE Z B(eject) qf (16) A TAPE Z (eject) qk (16)...
qa (10, 11, 17) BASS control w; (19) CD wk (7, 9, 11, 13, 17, 18, 19) CD SYNC ws (17) Deck A qj (16) Deck B qg (16, 17, 18) DIMMER wd (23, 29) DISC 1 - 5 3 (9, 10, ...wh (16, 17, 18) R R Name of the system that are mentioned in the text. O ALBUM +/- Z PHONES jack qh Remote sensor 2 TAPE A/B wh (16, 17, 18) TREBLE control ql (19) TUNER/BAND wj (12, 14, 18) TUNING +/-..., 26, 29) nN (play) 5 (10, 16, 17, 22) X (pause) 6 (10, 16) x (stop) 7 (7, 10, 13, 16, 17, 29) CD Z (eject) 8 (9) .m/M> (rewind/fast forward, go back/go forward) 0 (10, 16) TAPE Z B(eject) qf (16) A TAPE Z (eject) qk (16)...

Operating Instructions
Page 36
...) qh (8, 10, 17, 19, 21) -/+ (tuning) qh (12) ws 1 wa 2 w; 3 ql 4 qk 5 qj 6 qh 7 8 qg 9 qf q; qd (10, 11, 17) ALBUM + qa (10, 11, 17) CD qk (9, 11, 19) CLEAR qg (12) CLOCK/TIMER SELECT 2 (21, 22) CLOCK/TIMER SET 3 (8, 21, 22) DISC SKIP 0 (10, 11) DISPLAY wa (15, 23, 24...) ENTER 9 (8, 11, 13, 21, 22) EQ qf (19) F - qd qa qs Sony Corporation Printed in Malaysia Z FM MODE 4 (14) FUNCTION 6 (9, 11, 12, 14, 16, 19) PLAY MODE w; (9, 11, 16, 17, 18, 22) REPEAT 4 (11) SLEEP ws (20...
...) qh (8, 10, 17, 19, 21) -/+ (tuning) qh (12) ws 1 wa 2 w; 3 ql 4 qk 5 qj 6 qh 7 8 qg 9 qf q; qd (10, 11, 17) ALBUM + qa (10, 11, 17) CD qk (9, 11, 19) CLEAR qg (12) CLOCK/TIMER SELECT 2 (21, 22) CLOCK/TIMER SET 3 (8, 21, 22) DISC SKIP 0 (10, 11) DISPLAY wa (15, 23, 24...) ENTER 9 (8, 11, 13, 21, 22) EQ qf (19) F - qd qa qs Sony Corporation Printed in Malaysia Z FM MODE 4 (14) FUNCTION 6 (9, 11, 12, 14, 16, 19) PLAY MODE w; (9, 11, 16, 17, 18, 22) REPEAT 4 (11) SLEEP ws (20...


