Operating Guide
Page 8
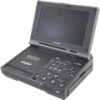
... or playback if the VCR or battery pack reaches a certain temperature. Unauthorized recording of such materials may look different from what you need to use a NTSC 8 TV (for GV-HD700/1 owners) or a PAL TV (for GV-HD700E/1 owners). • Television programs, films, video tapes, and other accessories...To view recorded pictures on the LCD screen shown in this manual Features available for the HDV format only Features available for the DV format only Feature available when the VCR connects to other devices. Notes on the icons used for illustrating the operating procedures. ...
... or playback if the VCR or battery pack reaches a certain temperature. Unauthorized recording of such materials may look different from what you need to use a NTSC 8 TV (for GV-HD700/1 owners) or a PAL TV (for GV-HD700E/1 owners). • Television programs, films, video tapes, and other accessories...To view recorded pictures on the LCD screen shown in this manual Features available for the HDV format only Features available for the DV format only Feature available when the VCR connects to other devices. Notes on the icons used for illustrating the operating procedures. ...
Operating Guide
Page 9
...you can do with your VCR 11 Getting Started Step 1: ... Playback on your VCR 21 Using the Remote Commander 22 Playing the picture on a TV .......... 24 Recording the picture from TV, VCR, etc 29 Locating...settings in your VCR 35 Turning off the LCD screen ......... 35 Switching...35 Displaying the settings in your VCR (Status check 35 Displaying all............. 38 Dubbing/Editing Dubbing to VCR, DVD/HDD recorder, etc 39 Using with an analog video unit and your computer (Signal convert... (PictBridge compliant printer 51 Customizing your VCR Using the menu items 54 List of the menu items ...
...you can do with your VCR 11 Getting Started Step 1: ... Playback on your VCR 21 Using the Remote Commander 22 Playing the picture on a TV .......... 24 Recording the picture from TV, VCR, etc 29 Locating...settings in your VCR 35 Turning off the LCD screen ......... 35 Switching...35 Displaying the settings in your VCR (Status check 35 Displaying all............. 38 Dubbing/Editing Dubbing to VCR, DVD/HDD recorder, etc 39 Using with an analog video unit and your computer (Signal convert... (PictBridge compliant printer 51 Customizing your VCR Using the menu items 54 List of the menu items ...

Operating Guide
Page 10
...basic settings (BEEP/USB SELECT, etc.) Troubleshooting Troubleshooting 66 Warning indicators and messages 73 Additional Information Using your VCR abroad 76 Maintenance and precautions ...... 79 HDV format and recording/playback 79 About the "Memory Stick" media 80 About the "InfoLITHIUM" battery pack 81... About i.LINK 82 About x.v.Color 84 About handling of your VCR ........ 84 Specifications 86 Quick Reference Identifying parts ...
...basic settings (BEEP/USB SELECT, etc.) Troubleshooting Troubleshooting 66 Warning indicators and messages 73 Additional Information Using your VCR abroad 76 Maintenance and precautions ...... 79 HDV format and recording/playback 79 About the "Memory Stick" media 80 About the "InfoLITHIUM" battery pack 81... About i.LINK 82 About x.v.Color 84 About handling of your VCR ........ 84 Specifications 86 Quick Reference Identifying parts ...
Operating Guide
Page 11
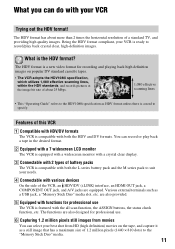
... dots) to the "Memory Stick Duo" media. 11 Being the HDV format compliant, your best shot from movies You can select your VCR is ready to suit your VCR Trying out the HDV format! Features of this VCR 1 Compatible with HDV/DV formats The VCR is a new video format for professional use . 6 Capturing 1.2 million pixels still images from...
... dots) to the "Memory Stick Duo" media. 11 Being the HDV format compliant, your best shot from movies You can select your VCR is ready to suit your VCR Trying out the HDV format! Features of this VCR 1 Compatible with HDV/DV formats The VCR is a new video format for professional use . 6 Capturing 1.2 million pixels still images from...

Operating Guide
Page 16
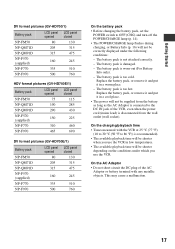
... the remaining battery (Battery Info) Set the POWER switch to malfunction. You can view the battery information for details of storage). HDV format pictures (GV-HD700/1) Battery pack LCD panel LCD panel opened closed NP-FM50 75 115 NP-QM71D 190 285 NP-QM91D 290 430 NP-F570 (... battery (approx.) Charging time Approximate time (min.) required when you use the battery pack NP-FM30/ F330/F530/500/510/710 on the VCR. After a while, the approximate available playback time and battery information appear for about 7 seconds. Battery pack Charging time NP-FM50 150 NP-...
... the remaining battery (Battery Info) Set the POWER switch to malfunction. You can view the battery information for details of storage). HDV format pictures (GV-HD700/1) Battery pack LCD panel LCD panel opened closed NP-FM50 75 115 NP-QM71D 190 285 NP-QM91D 290 430 NP-F570 (... battery (approx.) Charging time Approximate time (min.) required when you use the battery pack NP-FM30/ F330/F530/500/510/710 on the VCR. After a while, the approximate available playback time and battery information appear for about 7 seconds. Battery pack Charging time NP-FM50 150 NP-...
Operating Guide
Page 17
...On the AC Adaptor • Do not short-circuit the DC plug of the VCR, even when the power cord (mains lead) is disconnected from the wall outlet (wall socket). Getting Started DV format pictures (GV-HD700/1) Battery pack LCD panel LCD panel opened closed NP-FM50 80 130 NP-QM71D 205... 315 NP-QM91D 315 475 NP-F570 (supplied) 160 245 NP-F770 335 510 NP-F970 500 760 HDV format pictures (GV-HD700E/1) Battery pack LCD panel LCD panel...
...On the AC Adaptor • Do not short-circuit the DC plug of the VCR, even when the power cord (mains lead) is disconnected from the wall outlet (wall socket). Getting Started DV format pictures (GV-HD700/1) Battery pack LCD panel LCD panel opened closed NP-FM50 80 130 NP-QM71D 205... 315 NP-QM91D 315 475 NP-F570 (supplied) 160 245 NP-F770 335 510 NP-F970 500 760 HDV format pictures (GV-HD700E/1) Battery pack LCD panel LCD panel...
Operating Guide
Page 21
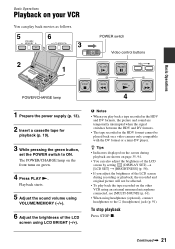
..., the picture and sound are temporarily interrupted when the signal switches between the HDV and DV formats. • The tape recorded in the HDV format cannot be affected. • To play back movies as follows. 5 6 3 2 1 POWER switch Video control buttons Basic Operations POWER/CHARGE lamp 4 1 Prepare the power supply (p....Indicators displayed on the screen during recording or playback, the recorded and original picture will not be played back on the other VCR using an external monaural microphone connected, see [MULTI-SOUND] (p. 61). • When using LCD BRIGHT (-/+).
..., the picture and sound are temporarily interrupted when the signal switches between the HDV and DV formats. • The tape recorded in the HDV format cannot be affected. • To play back movies as follows. 5 6 3 2 1 POWER switch Video control buttons Basic Operations POWER/CHARGE lamp 4 1 Prepare the power supply (p....Indicators displayed on the screen during recording or playback, the recorded and original picture will not be played back on the other VCR using an external monaural microphone connected, see [MULTI-SOUND] (p. 61). • When using LCD BRIGHT (-/+).
Operating Guide
Page 22
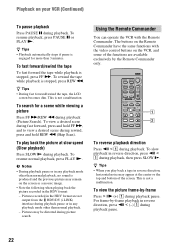
... while playback is not a malfunction. To view a desired scene during fast forward, press and hold REW m (Skip Scan). Pictures recorded in the HDV format are available exclusively by the Remote Commander only. For frame-by -frame Press i C (+) 1 during playback (Picture Search). z Tips •...engaged for a scene while viewing a picture Press FF M/REW m during playback pause. Using the Remote Commander You can operate the VCR with the video control buttons on the VCR, and some of the screen. To slow playback in reverse direction, press c I 1 during playback, then press SLOW y. z...
... while playback is not a malfunction. To view a desired scene during fast forward, press and hold REW m (Skip Scan). Pictures recorded in the HDV format are available exclusively by the Remote Commander only. For frame-by -frame Press i C (+) 1 during playback (Picture Search). z Tips •...engaged for a scene while viewing a picture Press FF M/REW m during playback pause. Using the Remote Commander You can operate the VCR with the video control buttons on the VCR, and some of the screen. To slow playback in reverse direction, press c I 1 during playback, then press SLOW y. z...
Operating Guide
Page 23
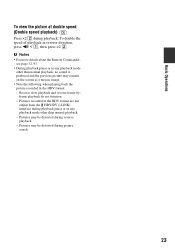
Reverse slow playback and reverse frame-by- Pictures may be distorted during picture search. 23 To double the speed of playback in the HDV format: - Basic Operations To view the picture at double speed (Double speed playback) Press ×2 2 during playback pause or in any playback mode other ...the Remote Commander, see page 32, 93. • During playback pause or in any playback mode other than normal playback. - Pictures recorded in the HDV format are not output from the HDV/DV (i.LINK) interface during playback. Pictures may be distorted during reverse playback. -
Reverse slow playback and reverse frame-by- Pictures may be distorted during picture search. 23 To double the speed of playback in the HDV format: - Basic Operations To view the picture at double speed (Double speed playback) Press ×2 2 during playback pause or in any playback mode other ...the Remote Commander, see page 32, 93. • During playback pause or in any playback mode other than normal playback. - Pictures recorded in the HDV format are not output from the HDV/DV (i.LINK) interface during playback. Pictures may be distorted during reverse playback. -
Operating Guide
Page 24
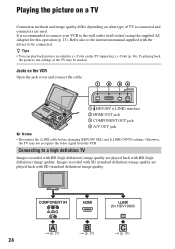
...recorded in x.v.Color on the VCR Open the jack cover and connect the cable. 1 HDV/DV (i.LINK) interface 2 HDMI OUT jack 3 COMPONENT OUT jack 4 A/V OUT jack b Notes • Disconnect the i.LINK cable before changing [HDV/DV SEL] and [i.LINK ... the TV may be connected. To playing back the pictures, the settings of TV is recommended to connect your VCR to a high definition TV Images recorded with HD (high definition) image quality are played back with SD (standard... what type of the TV may not recognize the video signal from the VCR. It is connected and connectors are used.
...recorded in x.v.Color on the VCR Open the jack cover and connect the cable. 1 HDV/DV (i.LINK) interface 2 HDMI OUT jack 3 COMPONENT OUT jack 4 A/V OUT jack b Notes • Disconnect the i.LINK cable before changing [HDV/DV SEL] and [i.LINK ... the TV may be connected. To playing back the pictures, the settings of TV is recommended to connect your VCR to a high definition TV Images recorded with HD (high definition) image quality are played back with SD (standard... what type of the TV may not recognize the video signal from the VCR. It is connected and connectors are used.
Operating Guide
Page 25
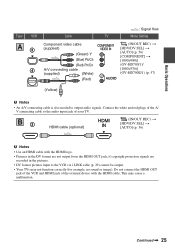
... HDMI cable with the HDMI cable. Basic Operations Type VCR Cable : Signal flow TV Menu Setting Component video cable (supplied) (Green) Y (Blue) PB/CB (Red) PR/CR A/V connecting cable (supplied) (White) (Red) (IN/OUT REC) t [HDV/DV SEL] t [AUTO] (p. 56) [COMPONENT] t [1080i/480i] (GV-HD700/1)/ [1080i/576i] (GV-HD700E/1) (p. 57) (Yellow) b Notes • An A/V connecting cable...
... HDMI cable with the HDMI cable. Basic Operations Type VCR Cable : Signal flow TV Menu Setting Component video cable (supplied) (Green) Y (Blue) PB/CB (Red) PR/CR A/V connecting cable (supplied) (White) (Red) (IN/OUT REC) t [HDV/DV SEL] t [AUTO] (p. 56) [COMPONENT] t [1080i/480i] (GV-HD700/1)/ [1080i/576i] (GV-HD700E/1) (p. 57) (Yellow) b Notes • An A/V connecting cable...
Operating Guide
Page 26
...16:9] or [4:3] according to your TV type (p. 57). 26 Select a cable that fits the terminal on a TV (Continued) Type VCR Cable i.LINK cable (optional) : Signal flow TV Menu Setting (IN/OUT REC) t [HDV/DV SEL] t [AUTO] (p. 56) [i.LINK CONV] t [OFF] (p. 57) b Notes • Your TV needs to... have an i.LINK jack compatible with the supplied component video cable and A/V connecting cable as illustrated in . • The TV needs to...
...16:9] or [4:3] according to your TV type (p. 57). 26 Select a cable that fits the terminal on a TV (Continued) Type VCR Cable i.LINK cable (optional) : Signal flow TV Menu Setting (IN/OUT REC) t [HDV/DV SEL] t [AUTO] (p. 56) [i.LINK CONV] t [OFF] (p. 57) b Notes • Your TV needs to... have an i.LINK jack compatible with the supplied component video cable and A/V connecting cable as illustrated in . • The TV needs to...

Operating Guide
Page 27
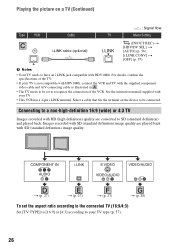
... to output audio signals. Continued , 27 Basic Operations Type VCR Cable : Signal flow TV Menu Setting Component video cable (supplied) (Green) Y (Blue) PB/CB (Red) PR/CR A/V connecting cable (supplied) (White) (Red) (IN/OUT REC) t [HDV/DV SEL] t [AUTO] (p. 56) [COMPONENT] t [1080i/480i] (GV-HD700/1)/ [1080i/576i] (GV-HD700E/1) (p. 57) [TV TYPE] t [16:9]/[4:3] (p. 57) (Yellow) b Notes...
... to output audio signals. Continued , 27 Basic Operations Type VCR Cable : Signal flow TV Menu Setting Component video cable (supplied) (Green) Y (Blue) PB/CB (Red) PR/CR A/V connecting cable (supplied) (White) (Red) (IN/OUT REC) t [HDV/DV SEL] t [AUTO] (p. 56) [COMPONENT] t [1080i/480i] (GV-HD700/1)/ [1080i/576i] (GV-HD700E/1) (p. 57) [TV TYPE] t [16:9]/[4:3] (p. 57) (Yellow) b Notes...

Operating Guide
Page 28
...digital audio. 28 Connect the VCR to the LINE IN input on the other VCR to LINE (VIDEO 1, VIDEO 2, etc.). b Notes • When the A/V connecting cable is an interface to send both video/audio signals. Set the input selector on the other VCR using more than the i.LINK... picture on a TV (Continued) Type VCR Cable TV A/V connecting cable (supplied) (Yellow) (White) (Red) : Signal flow Menu Setting (IN/OUT REC) t [HDV/DV SEL] t [AUTO] (p. 56) [TV TYPE] t [16:9]/[4:3] (p. 57) When connecting to your TV/VCR has a 21-pin adaptor (EUROCONNECTOR) (GV-HD700E/1 only) Use a 21-pin ...
...digital audio. 28 Connect the VCR to the LINE IN input on the other VCR to LINE (VIDEO 1, VIDEO 2, etc.). b Notes • When the A/V connecting cable is an interface to send both video/audio signals. Set the input selector on the other VCR using more than the i.LINK... picture on a TV (Continued) Type VCR Cable TV A/V connecting cable (supplied) (Yellow) (White) (Red) : Signal flow Menu Setting (IN/OUT REC) t [HDV/DV SEL] t [AUTO] (p. 56) [TV TYPE] t [16:9]/[4:3] (p. 57) When connecting to your TV/VCR has a 21-pin adaptor (EUROCONNECTOR) (GV-HD700E/1 only) Use a 21-pin ...
Operating Guide
Page 29
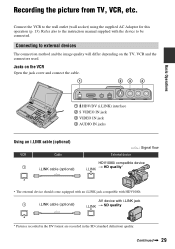
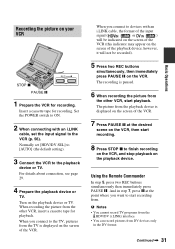
...HDV1080i. Connecting to external devices The connection method and the image quality will differ depending on the VCR Open the jack cover and connect the cable. Connect the VCR to be connected. Refer also to the instruction manual supplied with the device to the wall outlet...for this operation (p. 13). Jacks on the TV, VCR and the connectors used. Recording the picture from TV, VCR, etc. Basic Operations 1 HDV/DV (i.LINK) interface 2 S VIDEO IN jack 3 VIDEO IN jack 4 AUDIO IN jacks Using an i.LINK cable (optional) VCR Cable i.LINK cable (optional) External device : Signal ...
...HDV1080i. Connecting to external devices The connection method and the image quality will differ depending on the VCR Open the jack cover and connect the cable. Connect the VCR to be connected. Refer also to the instruction manual supplied with the device to the wall outlet...for this operation (p. 13). Jacks on the TV, VCR and the connectors used. Recording the picture from TV, VCR, etc. Basic Operations 1 HDV/DV (i.LINK) interface 2 S VIDEO IN jack 3 VIDEO IN jack 4 AUDIO IN jacks Using an i.LINK cable (optional) VCR Cable i.LINK cable (optional) External device : Signal ...

Operating Guide
Page 30
.... (Continued) b Notes • Disconnect the i.LINK cable before changing [HDV/DV SEL] and [i.LINK CONV] settings. z Tips • When you connect with audio/video jacks* t SD quality * When connecting the VCR to a monaural device, connect the yellow plug of the A/V connecting cable to the video jack on the device, and connect the white (left...
.... (Continued) b Notes • Disconnect the i.LINK cable before changing [HDV/DV SEL] and [i.LINK CONV] settings. z Tips • When you connect with audio/video jacks* t SD quality * When connecting the VCR to a monaural device, connect the yellow plug of the A/V connecting cable to the video jack on the device, and connect the white (left...
Operating Guide
Page 31
...is paused. 6 When recording the picture from . And in the DV format. Continued , 31 Basic Operations Normally set [HDV/DV SEL] to [AUTO] (the default setting). 3 Connect the VCR to devices with an i.LINK cable, set the input signal to the TV, pictures from DV devices only in step ... picture on the playback device or TV. b Notes • You cannot record TV programs from the HDV/DV (i.LINK) interface. • You can record pictures from the TV is displayed on the VCR, then start recording. 8 Press STOP x to start playback. When you want to finish recording on ...
...is paused. 6 When recording the picture from . And in the DV format. Continued , 31 Basic Operations Normally set [HDV/DV SEL] to [AUTO] (the default setting). 3 Connect the VCR to devices with an i.LINK cable, set the input signal to the TV, pictures from DV devices only in step ... picture on the playback device or TV. b Notes • You cannot record TV programs from the HDV/DV (i.LINK) interface. • You can record pictures from the TV is displayed on the VCR, then start recording. 8 Press STOP x to start playback. When you want to finish recording on ...
Operating Guide
Page 32
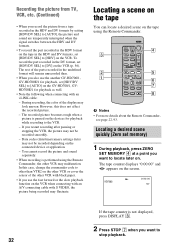
If you use the another GV-HD700/1, GV-HD700E/1 for playback as well. • Note the following when connecting with black paper. • If you restart recording after pausing or stopping the VCR, the picture may malfunction. Locating a scene on the tape You can locate a desired scene on the...an A/V connecting cable with S VIDEO, the picture being recorded may fluctuate. The rest of the other VCR may not be recorded depending on the other VCR or cover the sensor of the parts recorded in the DV format, set [HDV/DV SEL] to [HDV] on the GV-HD700/1, GVHD700E/1 for playback, set ...
If you use the another GV-HD700/1, GV-HD700E/1 for playback as well. • Note the following when connecting with black paper. • If you restart recording after pausing or stopping the VCR, the picture may malfunction. Locating a scene on the tape You can locate a desired scene on the...an A/V connecting cable with S VIDEO, the picture being recorded may fluctuate. The rest of the other VCR may not be recorded depending on the other VCR or cover the sensor of the parts recorded in the DV format, set [HDV/DV SEL] to [HDV] on the GV-HD700/1, GVHD700E/1 for playback, set ...

Operating Guide
Page 35
... recorded for easy scene search on the tape. The item is displayed in the following items. • Audio setup (p. 61) • Output signal setup ([HDV/DV SEL], etc.) (p. 56) • Functions assigned to the ASSIGN buttons (p. 36) • LCD SET (p. 58) 1 Press STATUS CHECK 4. ...2 Select the desired item using V/v/B/b. Press DISPLAY/BATT INFO 3. Displaying the settings in your VCR In the counter display, you press V/v: AUDIO y OUTPUT y ASSIGN y LCD SET Continued , 35 Basic Operations V/v/B/b Turning off the LCD screen You can ...
... recorded for easy scene search on the tape. The item is displayed in the following items. • Audio setup (p. 61) • Output signal setup ([HDV/DV SEL], etc.) (p. 56) • Functions assigned to the ASSIGN buttons (p. 36) • LCD SET (p. 58) 1 Press STATUS CHECK 4. ...2 Select the desired item using V/v/B/b. Press DISPLAY/BATT INFO 3. Displaying the settings in your VCR In the counter display, you press V/v: AUDIO y OUTPUT y ASSIGN y LCD SET Continued , 35 Basic Operations V/v/B/b Turning off the LCD screen You can ...

Operating Guide
Page 36
...; SEARCH > (p. 33, 34) • SEARCH . (p. 33, 34) MENU 36 All the area surrounding the picture frame is no problem with HDV/DV jack or VIDEO IN/S VIDEO IN jack, fluctuation may need to assign some functions to the ASSIGN buttons. You can check all scan display, a black frame appears around... the picture frame. Changing/checking the settings in your VCR (Continued) To turn off the setup value Press STATUS CHECK 4...
...; SEARCH > (p. 33, 34) • SEARCH . (p. 33, 34) MENU 36 All the area surrounding the picture frame is no problem with HDV/DV jack or VIDEO IN/S VIDEO IN jack, fluctuation may need to assign some functions to the ASSIGN buttons. You can check all scan display, a black frame appears around... the picture frame. Changing/checking the settings in your VCR (Continued) To turn off the setup value Press STATUS CHECK 4...
