
Operating Instructions
Page 4
...characteristics 19 Customizing the equalizer curve - Table of Contents Getting Started Resetting the unit 6 Canceling the DEMO mode 6 Preparing the card remote commander 6 Setting the clock 6 Detaching the front panel 7 Attaching the front panel 7 Location of MP3/WMA/AAC files 21 About... by name - SET 19 Using optional equipment 21 Auxiliary audio equipment 21 Additional Information Precautions 21 Playback order of controls and basic operations Main unit 8 Card remote commander RM-X151 10 Searching for a track 11 Searching a track by listening to track passages - ZAPPIN 12...
...characteristics 19 Customizing the equalizer curve - Table of Contents Getting Started Resetting the unit 6 Canceling the DEMO mode 6 Preparing the card remote commander 6 Setting the clock 6 Detaching the front panel 7 Attaching the front panel 7 Location of MP3/WMA/AAC files 21 About... by name - SET 19 Using optional equipment 21 Auxiliary audio equipment 21 Additional Information Precautions 21 Playback order of controls and basic operations Main unit 8 Card remote commander RM-X151 10 Searching for a track 11 Searching a track by listening to track passages - ZAPPIN 12...

Operating Instructions
Page 6
... to select "DEMO-OFF." 4 Press and hold the select button. Preparing the card remote commander Remove the insulation film. The hour indication flashes. 6 The setup display appears....appears. 2 Press the select button repeatedly until "DEMO" appears. 3 Rotate the control dial to the previous display. Note Pressing the RESET button will erase the clock setting and some stored contents... clock starts. Setting the clock The clock uses a 12-hour digital indication. 1 Press and hold the select button. To move the digital indication, press -./ +>. 5 After setting the minute, press the...
... to select "DEMO-OFF." 4 Press and hold the select button. Preparing the card remote commander Remove the insulation film. The hour indication flashes. 6 The setup display appears....appears. 2 Press the select button repeatedly until "DEMO" appears. 3 Rotate the control dial to the previous display. Note Pressing the RESET button will erase the clock setting and some stored contents... clock starts. Setting the clock The clock uses a 12-hour digital indication. 1 Press and hold the select button. To move the digital indication, press -./ +>. 5 After setting the minute, press the...

Operating Instructions
Page 9
... Radio accordingly. *3 When the SAT tuner is pressed, the connected device ("HD," "XM" or "SR") will appear in RDS. F Receptor for the card remote commander G Display window H OPEN button page 7 I AUX input jack page 21 To connect a portable audio device. select setup items (press and rotate). select... Inside Alert LED page 21 Q RESET button page 6 *1 If an HD Radio tuner or SAT tuner is connected: when (SOURCE/OFF) is connected. 9 E Control dial/select button page 19 To adjust volume (rotate); N USB connector (located on the TUNE TRAY) page 15, 16 To connect to place a USB device...
... Radio accordingly. *3 When the SAT tuner is pressed, the connected device ("HD," "XM" or "SR") will appear in RDS. F Receptor for the card remote commander G Display window H OPEN button page 7 I AUX input jack page 21 To connect a portable audio device. select setup items (press and rotate). select... Inside Alert LED page 21 Q RESET button page 6 *1 If an HD Radio tuner or SAT tuner is connected: when (SOURCE/OFF) is connected. 9 E Control dial/select button page 19 To adjust volume (rotate); N USB connector (located on the TUNE TRAY) page 15, 16 To connect to place a USB device...
Operating Instructions
Page 10
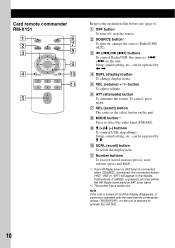
...remote commander RM-X151 1 2 3 4 OFF ATT SOURCE SEL MODE + - change display items. E VOL (volume) +*2/- D DSPL (display) button To change the source (Radio/USB/ AUX). G SEL (select) button The same as -./ +> on the unit. H MODE button*1 Press to activate the unit first. 10 I M (+)/m (-) buttons To control... USB, skip albums. Setup, sound setting, etc., can be operated by M m. Furthermore, if (MODE) is pressed, the connected device ("HD," "XM" or "SR") will appear in the display. Note If the unit is pressed to select the radio band (FM/AM). stop...
...remote commander RM-X151 1 2 3 4 OFF ATT SOURCE SEL MODE + - change display items. E VOL (volume) +*2/- D DSPL (display) button To change the source (Radio/USB/ AUX). G SEL (select) button The same as -./ +> on the unit. H MODE button*1 Press to activate the unit first. 10 I M (+)/m (-) buttons To control... USB, skip albums. Setup, sound setting, etc., can be operated by M m. Furthermore, if (MODE) is pressed, the connected device ("HD," "XM" or "SR") will appear in the display. Note If the unit is pressed to select the radio band (FM/AM). stop...
Operating Instructions
Page 12
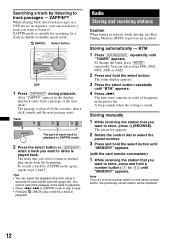
...from FM1, FM2, FM3, AM1 or AM2. 2 Press and hold a number button ((1) to (6)) until "MEMORY" appears. (with the card remote commander) 1 While receiving the station that you want to playback. You cannot select the passage of each track to playback in sequence, you can ...listening to select the preset number. 3 Press and hold the select button until "MEMORY" appears. Storing automatically - The preset list appears. 2 Rotate the control dial to track passages - Note If you select returns to playback. • Press +>/-. Tips • You can select from the beginning. BTM 1 ...
...from FM1, FM2, FM3, AM1 or AM2. 2 Press and hold a number button ((1) to (6)) until "MEMORY" appears. (with the card remote commander) 1 While receiving the station that you want to playback. You cannot select the passage of each track to playback in sequence, you can ...listening to select the preset number. 3 Press and hold the select button until "MEMORY" appears. Storing automatically - The preset list appears. 2 Rotate the control dial to track passages - Note If you select returns to playback. • Press +>/-. Tips • You can select from the beginning. BTM 1 ...
Operating Instructions
Page 13
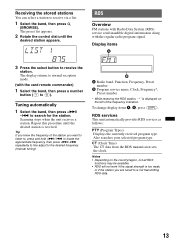
Receiving the stored stations You can select a station to the desired frequency (manual tuning). The preset list appears. 2 Rotate the control dial until the desired station is not transmitting RDS data. 13 Tuning automatically 1 Select the band, then press +>/ -. CT...; Depending on the left of the station you know the frequency of the frequency indication. RDS Overview FM stations with Radio Data System (RDS) service send inaudible digital information along with the card remote commander) 1 Select the band, then press a number button ((1) to receive the station. to ,...
Receiving the stored stations You can select a station to the desired frequency (manual tuning). The preset list appears. 2 Rotate the control dial until the desired station is not transmitting RDS data. 13 Tuning automatically 1 Select the band, then press +>/ -. CT...; Depending on the left of the station you know the frequency of the frequency indication. RDS Overview FM stations with Radio Data System (RDS) service send inaudible digital information along with the card remote commander) 1 Select the band, then press a number button ((1) to receive the station. to ,...
Operating Instructions
Page 23
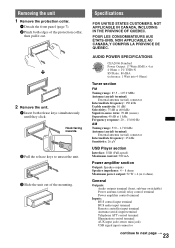
...< 1% THD+N SN Ratio: 80 dBA (reference: 1 Watt into 4 Ohms) Tuner section FM Tuning range: 87.5 - 107.9 MHz Antenna (aerial) terminal: External antenna (aerial) connector ...Player section Interface: USB (Full-speed) Maximum current: 500 mA Power amplifier section Output: Speaker outputs Speaker impedance: 4 - 8 ohms Maximum power output: 52 W × 4 (at 4 ohms) General Outputs: Audio outputs terminal (front, sub/rear switchable) Power antenna (aerial) relay control terminal Power amplifier control terminal Inputs: BUS control input terminal BUS audio input terminal Remote controller...
...< 1% THD+N SN Ratio: 80 dBA (reference: 1 Watt into 4 Ohms) Tuner section FM Tuning range: 87.5 - 107.9 MHz Antenna (aerial) terminal: External antenna (aerial) connector ...Player section Interface: USB (Full-speed) Maximum current: 500 mA Power amplifier section Output: Speaker outputs Speaker impedance: 4 - 8 ohms Maximum power output: 52 W × 4 (at 4 ohms) General Outputs: Audio outputs terminal (front, sub/rear switchable) Power antenna (aerial) relay control terminal Power amplifier control terminal Inputs: BUS control input terminal BUS audio input terminal Remote controller...
Operating Instructions
Page 24
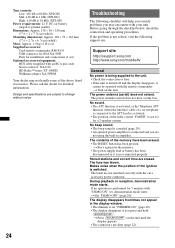
... Set "DEMO-OFF" (page 20). Before going through the checklist below, check the connection and operating procedures. Support site http://esupport.sony.com http://www.sony.com/mobileAV General No power is being supplied to the unit. • Check the connection or fuse. • If the unit is... mode starts. t Press (SOURCE/OFF) on the unit. Please ask the dealer for 5 minutes with the remote commander. If the problem is set for a 2-speaker system. The contents of the fader control "FADER" is activated. • The position of the memory have a relay box. No sound. •...
... Set "DEMO-OFF" (page 20). Before going through the checklist below, check the connection and operating procedures. Support site http://esupport.sony.com http://www.sony.com/mobileAV General No power is being supplied to the unit. • Check the connection or fuse. • If the unit is... mode starts. t Press (SOURCE/OFF) on the unit. Please ask the dealer for 5 minutes with the remote commander. If the problem is set for a 2-speaker system. The contents of the fader control "FADER" is activated. • The position of the memory have a relay box. No sound. •...


