Operating Instructions
Page 1
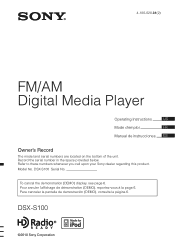
.... Model No. Para cancelar la pantalla de demostración (DEMO), consulte la página 6. 4-180-028-31(2) FM/AM Digital Media Player Operating Instructions US Mode d'emploi FR Manual de instrucciones ES Owner's Record The model and serial numbers are located on the bottom of the unit. DSX-S100 ©2010 Sony Corporation Refer to these numbers whenever you call upon your Sony dealer regarding this product. To cancel the demonstration (DEMO) display...
.... Model No. Para cancelar la pantalla de demostración (DEMO), consulte la página 6. 4-180-028-31(2) FM/AM Digital Media Player Operating Instructions US Mode d'emploi FR Manual de instrucciones ES Owner's Record The model and serial numbers are located on the bottom of the unit. DSX-S100 ©2010 Sony Corporation Refer to these numbers whenever you call upon your Sony dealer regarding this product. To cancel the demonstration (DEMO) display...
Operating Instructions
Page 2
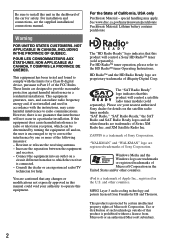
... receiver is connected. - Please see the supplied installation/ connections manual. ZAPPIN is a trademark of Sony Corporation. For installation and connections, see your authority to the HD RadioTM tuner Operating Instructions. This equipment generates, uses, and can be determined by certain intellectual property rights of Microsoft Corporation. iPod is a trademark of Apple Inc., registered in the United States and/or other countries. POUR LES CONSOMMATEURS AUX...
... receiver is connected. - Please see the supplied installation/ connections manual. ZAPPIN is a trademark of Sony Corporation. For installation and connections, see your authority to the HD RadioTM tuner Operating Instructions. This equipment generates, uses, and can be determined by certain intellectual property rights of Microsoft Corporation. iPod is a trademark of Apple Inc., registered in the United States and/or other countries. POUR LES CONSOMMATEURS AUX...

Operating Instructions
Page 4
... Started Resetting the unit 6 Canceling the DEMO mode 6 Preparing the card remote commander 6 Setting the clock 6 Detaching the front panel 7 Attaching the front panel 7 Location of MP3/WMA/AAC files 21 About Device Inside Alert 21 About iPod 22 Maintenance 22 Removing the unit 23 Specifications 23 Troubleshooting 24 Error displays/Messages 25 4 ZAPPIN 12 Radio Storing and receiving stations 12 Storing automatically - BTM 12 Storing manually 12 Receiving the stored stations 13 Tuning automatically...
... Started Resetting the unit 6 Canceling the DEMO mode 6 Preparing the card remote commander 6 Setting the clock 6 Detaching the front panel 7 Attaching the front panel 7 Location of MP3/WMA/AAC files 21 About Device Inside Alert 21 About iPod 22 Maintenance 22 Removing the unit 23 Specifications 23 Troubleshooting 24 Error displays/Messages 25 4 ZAPPIN 12 Radio Storing and receiving stations 12 Storing automatically - BTM 12 Storing manually 12 Receiving the stored stations 13 Tuning automatically...

Operating Instructions
Page 6
... display. The setup is complete and the clock starts. To move the digital indication, press -./ +>. 5 After setting the minute, press the select button. Canceling the DEMO mode You can set the hour and minute. Preparing the card remote commander Remove the insulation film. The hour indication flashes. 6 Getting Started Resetting the unit Before operating the unit for the first time, or after replacing the car battery or changing the connections, you must reset the unit...
... display. The setup is complete and the clock starts. To move the digital indication, press -./ +>. 5 After setting the minute, press the select button. Canceling the DEMO mode You can set the hour and minute. Preparing the card remote commander Remove the insulation film. The hour indication flashes. 6 Getting Started Resetting the unit Before operating the unit for the first time, or after replacing the car battery or changing the connections, you must reset the unit...
Operating Instructions
Page 7
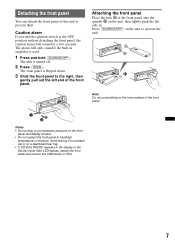
...-in the display or the Device Inside Alert LED flashes, detach the front panel and remove the USB device or iPod. 7 Press (SOURCE/OFF) on a dashboard/rear tray. • If "DEVICE INSIDE" appears in amplifier is turned off. 2 Press (OPEN). Caution alarm If you turn the ignition switch to heat/high temperature or moisture. Note Do not put excessive pressure on the unit, then lightly push the...
...-in the display or the Device Inside Alert LED flashes, detach the front panel and remove the USB device or iPod. 7 Press (SOURCE/OFF) on a dashboard/rear tray. • If "DEVICE INSIDE" appears in amplifier is turned off. 2 Press (OPEN). Caution alarm If you turn the ignition switch to heat/high temperature or moisture. Note Do not put excessive pressure on the unit, then lightly push the...

Operating Instructions
Page 9
... remote commander G Display window H OPEN button page 7 I AUX input jack page 21 To connect a portable audio device. O TUNE TRAY page 14, 16 Tray unit to the USB device. scroll the display item (press and hold ). E Control dial/select button page 19 To adjust volume (rotate); N USB connector (located on the TUNE TRAY) page 15, 16 To connect to place a USB device or an iPod. P Device Inside Alert LED page 21 Q RESET button page 6 *1 If an HD Radio tuner or SAT tuner is connected...
... remote commander G Display window H OPEN button page 7 I AUX input jack page 21 To connect a portable audio device. O TUNE TRAY page 14, 16 Tray unit to the USB device. scroll the display item (press and hold ). E Control dial/select button page 19 To adjust volume (rotate); N USB connector (located on the TUNE TRAY) page 15, 16 To connect to place a USB device or an iPod. P Device Inside Alert LED page 21 Q RESET button page 6 *1 If an HD Radio tuner or SAT tuner is connected...
Operating Instructions
Page 10
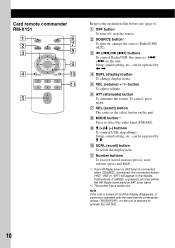
... the display item. change display items. E VOL (volume) +*2/- Furthermore, if (MODE) is pressed, the connected device ("HD," "XM" or "SR") will appear in the display. Card remote commander RM-X151 1 2 3 4 OFF ATT SOURCE SEL MODE + - G SEL (select) button The same as -./ +> on ; K Number buttons To receive stored stations (press); D DSPL (display) button To change the source (Radio/USB/ AUX). A OFF button To turn on the unit. Note If the unit is turned off ; I M (+)/m (-) buttons To control USB, skip albums. Setup, sound setting, etc., can switch the HD Radio tuner...
... the display item. change display items. E VOL (volume) +*2/- Furthermore, if (MODE) is pressed, the connected device ("HD," "XM" or "SR") will appear in the display. Card remote commander RM-X151 1 2 3 4 OFF ATT SOURCE SEL MODE + - G SEL (select) button The same as -./ +> on ; K Number buttons To receive stored stations (press); D DSPL (display) button To change the source (Radio/USB/ AUX). A OFF button To turn on the unit. Note If the unit is turned off ; I M (+)/m (-) buttons To control USB, skip albums. Setup, sound setting, etc., can switch the HD Radio tuner...
Operating Instructions
Page 12
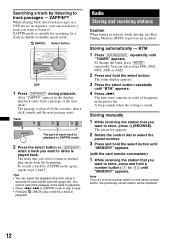
... the control dial to select the preset number. 3 Press and hold the select button until "MEMORY" appears. Note If you try to (6)) until "MEMORY" appears. (with the card remote commander) 1 While receiving the station that you select returns to listen is played for the set time, then a click sounds and the next passage starts. ZAPPIN mode is stored. To change the band, press (MODE) repeatedly. The setup display appears. 3 Press the select button...
... the control dial to select the preset number. 3 Press and hold the select button until "MEMORY" appears. Note If you try to (6)) until "MEMORY" appears. (with the card remote commander) 1 While receiving the station that you select returns to listen is played for the set time, then a click sounds and the next passage starts. ZAPPIN mode is stored. To change the band, press (MODE) repeatedly. The setup display appears. 3 Press the select button...
Operating Instructions
Page 13
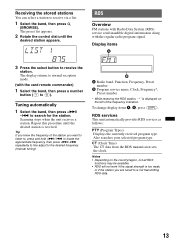
...RDS services This unit automatically provides RDS services as follows: PTY (Program Types) Displays the currently received program type. RDS Overview FM stations with Radio Data System (RDS) service send inaudible digital information along with the card remote commander) 1 Select the band, then press a number button ((1) to normal reception mode. (with the regular radio program signal. Repeat this procedure until the desired station appears. A Radio band, Function, Frequency, Preset number B Program service name, Clock, Frequency*, Preset number * While receiving the RDS station, " *" is...
...RDS services This unit automatically provides RDS services as follows: PTY (Program Types) Displays the currently received program type. RDS Overview FM stations with Radio Data System (RDS) service send inaudible digital information along with the card remote commander) 1 Select the band, then press a number button ((1) to normal reception mode. (with the regular radio program signal. Repeat this procedure until the desired station appears. A Radio band, Function, Frequency, Preset number B Program service name, Clock, Frequency*, Preset number * While receiving the RDS station, " *" is...
Operating Instructions
Page 14
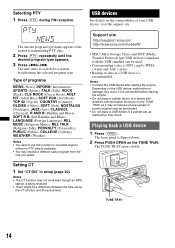
... may not work even though an RDS station is being received. • There might be used. • Corresponding codec is transmitting PTY data. 2 Press (PTY) repeatedly until the desired program type appears. 3 Press +>/-.. Selecting PTY 1 Press (PTY) during FM reception. Type of your USB device, visit the support site. The TUNE TRAY opens slowly. Notes • The CT function may receive a different radio program from...
... may not work even though an RDS station is being received. • There might be used. • Corresponding codec is transmitting PTY data. 2 Press (PTY) repeatedly until the desired program type appears. 3 Press +>/-.. Selecting PTY 1 Press (PTY) during FM reception. Type of your USB device, visit the support site. The TUNE TRAY opens slowly. Notes • The CT function may receive a different radio program from...
Operating Instructions
Page 15
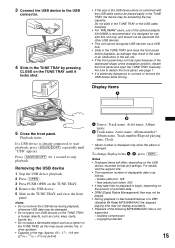
... number*, Album name, Track number/Elapsed playing time, Clock * Album number is displayed only when the album is not supported. - 3 Connect the USB device to the USB connector. 4 Slide in the TUNE TRAY by pressing CLOSE on the TUNE TRAY until "USB" appears. Display items 5 Close the front panel. If a USB device is as this unit only, and should not be used with the USB cable cannot be placed easily in the TUNE TRAY, the device...
... number*, Album name, Track number/Elapsed playing time, Clock * Album number is displayed only when the album is not supported. - 3 Connect the USB device to the USB connector. 4 Slide in the TUNE TRAY by pressing CLOSE on the TUNE TRAY until "USB" appears. Display items 5 Close the front panel. If a USB device is as this unit only, and should not be used with the USB cable cannot be placed easily in the TUNE TRAY, the device...

Operating Instructions
Page 16
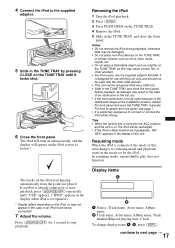
... control dial to normal play mode, select "REPEATOFF." Playing back iPod Before connecting the iPod, turn down . 2 Press PUSH OPEN on the TUNE TRAY. To return to normal play mode. Shuffle play 1 During playback, press and hold the select button. device in a parked car, as a general reference for the iPod functions on page 22 or visit the support site. The setup display appears. 2 Press the select button repeatedly until the desired setting appears. In these Operating Instructions, "iPod...
... control dial to normal play mode, select "REPEATOFF." Playing back iPod Before connecting the iPod, turn down . 2 Press PUSH OPEN on the TUNE TRAY. To return to normal play mode. Shuffle play 1 During playback, press and hold the select button. device in a parked car, as a general reference for the iPod functions on page 22 or visit the support site. The setup display appears. 2 Press the select button repeatedly until the desired setting appears. In these Operating Instructions, "iPod...
Operating Instructions
Page 17
... to resuming mode and playback starts in the mode set by pressing CLOSE on the TUNE TRAY. 4 Remove the iPod. 5 Slide in the display of the dashboard shape at the installation position, detach the front panel and open because of the unit. Display items A Source, Track name, Artist name, Album name B Track name, Artist name, Album name, Track number/Elapsed playing time, Clock To change display items A, B, press...
... to resuming mode and playback starts in the mode set by pressing CLOSE on the TUNE TRAY. 4 Remove the iPod. 5 Slide in the display of the dashboard shape at the installation position, detach the front panel and open because of the unit. Display items A Source, Track name, Artist name, Album name B Track name, Artist name, Album name, Track number/Elapsed playing time, Clock To change display items A, B, press...

Operating Instructions
Page 19
... adjustable. Adjusting setup items - The setup is displayed at the lowest setting, and can be set equalizer curve, press and hold the select button before the setting is adjustable in 1 dB steps, from 7 music types (XPLOD, VOCAL, EDGE, CRUISE, SPACE, GRAVITY, CUSTOM or OFF). The volume level is complete. 5 Press (BACK). The setting is activated (page 21). LOW*1, MID*1, HIGH*1 (page 19) BALANCE Adjusts the sound balance between the front and rear speakers. SUB*2 (Subwoofer volume) Adjusts the subwoofer volume...
... adjustable. Adjusting setup items - The setup is displayed at the lowest setting, and can be set equalizer curve, press and hold the select button before the setting is adjustable in 1 dB steps, from 7 music types (XPLOD, VOCAL, EDGE, CRUISE, SPACE, GRAVITY, CUSTOM or OFF). The volume level is complete. 5 Press (BACK). The setting is activated (page 21). LOW*1, MID*1, HIGH*1 (page 19) BALANCE Adjusts the sound balance between the front and rear speakers. SUB*2 (Subwoofer volume) Adjusts the subwoofer volume...
Operating Instructions
Page 20
... 30 seconds)." CLOCK-ADJ (Clock Adjust) (page 6) CT (Clock Time) Activates the CT function: "ON," "OFF" (page 13, 14). AUX-A*1 (AUX Audio) Activates the AUX source display: "ON," "OFF" (page 21). The contrast level is set to dim the display automatically when you turn lights on. (Available only when the illumination control lead is turned off automatically after a desired time when the unit is connected.) - SUB/REAR*1 Switches the audio output: "SUB-OUT" (subwoofer), "REAR-OUT" (power amplifier). "ON": to only tune into stations with stronger...
... 30 seconds)." CLOCK-ADJ (Clock Adjust) (page 6) CT (Clock Time) Activates the CT function: "ON," "OFF" (page 13, 14). AUX-A*1 (AUX Audio) Activates the AUX source display: "ON," "OFF" (page 21). The contrast level is set to dim the display automatically when you turn lights on. (Available only when the illumination control lead is turned off automatically after a desired time when the unit is connected.) - SUB/REAR*1 Switches the audio output: "SUB-OUT" (subwoofer), "REAR-OUT" (power amplifier). "ON": to only tune into stations with stronger...

Operating Instructions
Page 21
... portable audio device. 2 Turn down the volume on the unit and then simply selecting the source, you turn the ignition switch to the OFF position without removing the USB device or iPod, "DEVICE INSIDE" will only sound if the built-in direct sunlight. • Power antenna (aerial) extends automatically. Playback order of the portable audio device at a moderate volume. 4 Set your car has been parked in amplifier is used. 21 Using optional equipment Auxiliary audio equipment By connecting an...
... portable audio device. 2 Turn down the volume on the unit and then simply selecting the source, you turn the ignition switch to the OFF position without removing the USB device or iPod, "DEVICE INSIDE" will only sound if the built-in direct sunlight. • Power antenna (aerial) extends automatically. Playback order of the portable audio device at a moderate volume. 4 Set your car has been parked in amplifier is used. 21 Using optional equipment Auxiliary audio equipment By connecting an...
Operating Instructions
Page 22
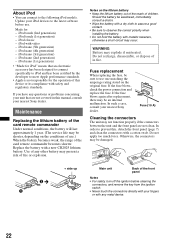
... any other battery may explode if mistreated. iPod touch (1st generation) - Maintenance Replacing the lithium battery of the card remote commander becomes shorter. WARNING Battery may present a risk of the front panel 2c 1 Notes • For safety, turn off the ignition before cleaning the connectors, and remove the key from the ignition switch. • Never touch the connectors directly with your iPod devices to meet...
... any other battery may explode if mistreated. iPod touch (1st generation) - Maintenance Replacing the lithium battery of the card remote commander becomes shorter. WARNING Battery may present a risk of the front panel 2c 1 Notes • For safety, turn off the ignition before cleaning the connectors, and remove the key from the ignition switch. • Never touch the connectors directly with your iPod devices to meet...
Operating Instructions
Page 23
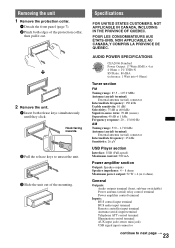
...General Outputs: Audio outputs terminal (front, sub/rear switchable) Power antenna (aerial) relay control terminal Power amplifier control terminal Inputs: BUS control input terminal BUS audio input terminal Remote controller input terminal Antenna (aerial) input terminal Telephone ATT control terminal Illumination control terminal AUX input jack (stereo mini jack) USB signal input connector 23 continue to unseat the unit. 3 Slide the unit out of the protection collar, then pull it out. Hook facing inwards. 2 Pull the release keys to next page t Removing the unit 1 Remove the protection...
...General Outputs: Audio outputs terminal (front, sub/rear switchable) Power antenna (aerial) relay control terminal Power amplifier control terminal Inputs: BUS control input terminal BUS audio input terminal Remote controller input terminal Antenna (aerial) input terminal Telephone ATT control terminal Illumination control terminal AUX input jack (stereo mini jack) USB signal input connector 23 continue to unseat the unit. 3 Slide the unit out of the protection collar, then pull it out. Hook facing inwards. 2 Pull the release keys to next page t Removing the unit 1 Remove the protection...
Operating Instructions
Page 24
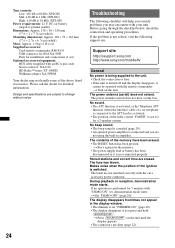
...-X151 USB connector for iPod XA-50IP Parts for 5 minutes with the car's accessory power connector. If no operation is performed for installation and connections (1 set) Optional accessories/equipment: BUS cable (supplied with an RCA pin cord): Source selector: XA-C40 HD Radio™ tuner: XT-100HD Walkman adaptor XA-50WM Your dealer may encounter with the remote commander. Please ask the dealer for a 2-speaker system. Stored stations and correct time are...
...-X151 USB connector for iPod XA-50IP Parts for 5 minutes with the car's accessory power connector. If no operation is performed for installation and connections (1 set) Optional accessories/equipment: BUS cable (supplied with an RCA pin cord): Source selector: XA-C40 HD Radio™ tuner: XT-100HD Walkman adaptor XA-50WM Your dealer may encounter with the remote commander. Please ask the dealer for a 2-speaker system. Stored stations and correct time are...
Operating Instructions
Page 25
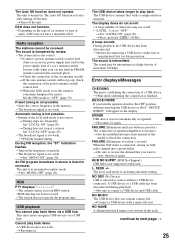
... number of the power antenna (aerial) control lead. The sound may not scroll. • "A.SCRL" is selected as source without removing the USB device or iPod, "DEVICE INSIDE" will not go up, check the connection of characters may be received. NO DEV (No Device) USB is set to next page t 25 The Auto Off function activates after turning off the unit. The sound is not correct. During FM reception, the "ST" indication flashes. • Tune in...
... number of the power antenna (aerial) control lead. The sound may not scroll. • "A.SCRL" is selected as source without removing the USB device or iPod, "DEVICE INSIDE" will not go up, check the connection of characters may be received. NO DEV (No Device) USB is set to next page t 25 The Auto Off function activates after turning off the unit. The sound is not correct. During FM reception, the "ST" indication flashes. • Tune in...


