
Instruction Manual
Page 1
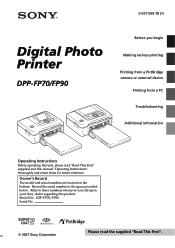
... serial number in the space provided below. Model No. Owner's Record The model and serial numbers are located on the bottom. 3-097-069-13 (1) Digital Photo Printer DPP-FP70/FP90 Before you call upon your Sony dealer regarding this manual "Operating Instructions" thoroughly and retain them for future reference.
... serial number in the space provided below. Model No. Owner's Record The model and serial numbers are located on the bottom. 3-097-069-13 (1) Digital Photo Printer DPP-FP70/FP90 Before you call upon your Sony dealer regarding this manual "Operating Instructions" thoroughly and retain them for future reference.
Instruction Manual
Page 2
...Sony Customer Information Services Center 1-800-222-SONY (7669) The number below is for the recycling of electrical and electronic equipment. If this equipment does cause harmful interference to radio or television reception, which the receiver is no guarantee that this digital photo printer... the picture of the FCC Rules. Regulatory Information Declaration of Conformity Trade Name: SONY Model No.: DPP-FP90 Responsible Party: Sony Electronics .... Declaration of Conformity Trade Name: SONY Model No.: DPP-FP70 Responsible Party: Address: Sony Electronics Inc. 16530 Via Esprillo, ...
...Sony Customer Information Services Center 1-800-222-SONY (7669) The number below is for the recycling of electrical and electronic equipment. If this equipment does cause harmful interference to radio or television reception, which the receiver is no guarantee that this digital photo printer... the picture of the FCC Rules. Regulatory Information Declaration of Conformity Trade Name: SONY Model No.: DPP-FP90 Responsible Party: Sony Electronics .... Declaration of Conformity Trade Name: SONY Model No.: DPP-FP70 Responsible Party: Address: Sony Electronics Inc. 16530 Via Esprillo, ...
Instruction Manual
Page 3
...for effective use or malfunction of the printer or memory card. Backup recommendations To avoid potential risk of data loss...pictures or publications, or any other countries. • IBM and PC/AT are registered trademarks of International Business Machines Corporation. • Intel and Pentium are trademarks of Sony Corporation. • This unit is a trademark of Fuji Photo Film Co., Ltd. 3 GB Sony..., use only. For more detailed information about recycling of your nearest Sony service station. Please regard the displayed image as the supplied one and approved by...
...for effective use or malfunction of the printer or memory card. Backup recommendations To avoid potential risk of data loss...pictures or publications, or any other countries. • IBM and PC/AT are registered trademarks of International Business Machines Corporation. • Intel and Pentium are trademarks of Sony Corporation. • This unit is a trademark of Fuji Photo Film Co., Ltd. 3 GB Sony..., use only. For more detailed information about recycling of your nearest Sony service station. Please regard the displayed image as the supplied one and approved by...
Instruction Manual
Page 5
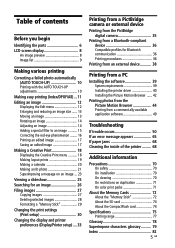
... procedures 36 Printing from an external device 38 Printing from a PC Installing the software 39 System requirements 39 Installing the printer driver 40 Installing the Picture Motion Browser ...... 42 Printing photos from the Picture Motion Browser 44 Printing from a commercially-available application software 49 Troubleshooting If trouble occurs 50 If an error message appears...
... procedures 36 Printing from an external device 38 Printing from a PC Installing the software 39 System requirements 39 Installing the printer driver 40 Installing the Picture Motion Browser ...... 42 Printing photos from the Picture Motion Browser 44 Printing from a commercially-available application software 49 Troubleshooting If trouble occurs 50 If an error message appears...
Instruction Manual
Page 6
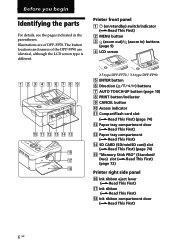
...The button locations and names of DPP-FP70. Printer front panel 1 1 (on/standby) switch/indicator (.Read This First) 2 MENU button 3 (zoom out)/ (zoom in the parentheses. Before you begin Identifying the parts For details, see the pages indicated in ) buttons (page 9) 4 LCD screen 2.5 type DPP-FP70 / 3.6 type DPP-FP90 5 ENTER button 6 ...card) slot (.Read This First) (page 74) qg "Memory Stick PRO" (Standard/ Duo) slot (.Read This First) (page 72) Printer right side panel qh Ink ribbon eject lever (.Read This First) qj Ink ribbon (.Read This First) qk Ink ribbon compartment door (.Read This...
...The button locations and names of DPP-FP70. Printer front panel 1 1 (on/standby) switch/indicator (.Read This First) 2 MENU button 3 (zoom out)/ (zoom in the parentheses. Before you begin Identifying the parts For details, see the pages indicated in ) buttons (page 9) 4 LCD screen 2.5 type DPP-FP70 / 3.6 type DPP-FP90 5 ENTER button 6 ...card) slot (.Read This First) (page 74) qg "Memory Stick PRO" (Standard/ Duo) slot (.Read This First) (page 72) Printer right side panel qh Ink ribbon eject lever (.Read This First) qj Ink ribbon (.Read This First) qk Ink ribbon compartment door (.Read This...
Instruction Manual
Page 7
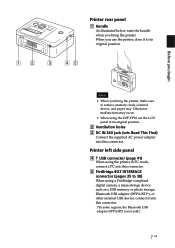
...-compliant digital camera, a mass-storage device such as a USB memory or photo storage, Bluetooth USB adaptor (DPPA-BT1*), or other external USB device, connect it to its original position. Notes • When you use the printer, close it into this connector. (*In some regions, the Bluetooth USB adaptor... side panel 4 USB connector (page 41) When using the printer in PC mode, connect a PC into this connector. 5 PictBridge/EXT INTERFACE connector (pages 35 to 38) When using the DPP-FP90, set the LCD panel to its original position. 2 Ventilation holes 3 DC IN 24V jack (.Read This ...
...-compliant digital camera, a mass-storage device such as a USB memory or photo storage, Bluetooth USB adaptor (DPPA-BT1*), or other external USB device, connect it to its original position. Notes • When you use the printer, close it into this connector. (*In some regions, the Bluetooth USB adaptor... side panel 4 USB connector (page 41) When using the printer in PC mode, connect a PC into this connector. 5 PictBridge/EXT INTERFACE connector (pages 35 to 38) When using the DPP-FP90, set the LCD panel to its original position. 2 Ventilation holes 3 DC IN 24V jack (.Read This ...

Instruction Manual
Page 10
... image, out-of FotoNation Inc. If brightness of the camera. • Depending on the image, face may not be corrected. Making various printing Correcting a failed photo automatically (AUTO TOUCH-UP) What is displayed. Press g/G repeatedly until the desired image is "AUTO TOUCH-UP" feature? Notes • Depending on the image, red... PRINT 1 Select an image or images. If you have selected multiple images when pressing AUTO TOUCH-UP All the selected images are adjusted. In this printer uses the technology of -focus phenomenon may not be automatically detected.
... image, out-of FotoNation Inc. If brightness of the camera. • Depending on the image, face may not be corrected. Making various printing Correcting a failed photo automatically (AUTO TOUCH-UP) What is displayed. Press g/G repeatedly until the desired image is "AUTO TOUCH-UP" feature? Notes • Depending on the image, red... PRINT 1 Select an image or images. If you have selected multiple images when pressing AUTO TOUCH-UP All the selected images are adjusted. In this printer uses the technology of -focus phenomenon may not be automatically detected.
Instruction Manual
Page 11
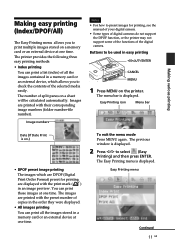
... Format) preset for printing, see the manual of your digital camera. • Some types of digital cameras do not support the DPOF function, or the printer may not support some of the functions of the selected media easily. The previous window is on the... printer. The Easy Printing menu is displayed. The menu bar is displayed. The printer provides the following three easy printing methods: • Index printing You can print a list (index) of all the images stored in...
... Format) preset for printing, see the manual of your digital camera. • Some types of digital cameras do not support the DPOF function, or the printer may not support some of the functions of the selected media easily. The previous window is on the... printer. The Easy Printing menu is displayed. The menu bar is displayed. The printer provides the following three easy printing methods: • Index printing You can print a list (index) of all the images stored in...
Instruction Manual
Page 12
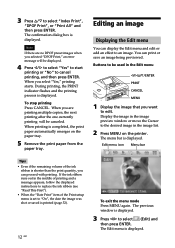
During printing, the PRINT indicator flashes and the printing process is completed, the print paper automatically emerges on the printer. When printing is displayed. The menu bar is displayed. Editing an image Displaying the Edit menu You can print or save an image being previewed. ...
During printing, the PRINT indicator flashes and the printing process is completed, the print paper automatically emerges on the printer. When printing is displayed. The menu bar is displayed. Editing an image Displaying the Edit menu You can print or save an image being previewed. ...

Instruction Manual
Page 13
... 12). 2 Press (zoom in) to enlarge an image or (zoom out) to reduce the size of an image. The g/G/f/F appears on its size. Adjusts the picture quality of it. Reduces the red-eye phenomenon. Saves the edited image. The image moves to select (Move) and then press ENTER. Exits the Edit... (page 17). 13 GB Each time you can set part of an image by pressing the buttons on the printer. Rotates an image. The image is fixed to 60% Note The picture quality of an enlarged image may be deteriorated depending on the left/ right/above/down the image and you press...
... 12). 2 Press (zoom in) to enlarge an image or (zoom out) to reduce the size of an image. The g/G/f/F appears on its size. Adjusts the picture quality of it. Reduces the red-eye phenomenon. Saves the edited image. The image moves to select (Move) and then press ENTER. Exits the Edit... (page 17). 13 GB Each time you can set part of an image by pressing the buttons on the printer. Rotates an image. The image is fixed to 60% Note The picture quality of an enlarged image may be deteriorated depending on the left/ right/above/down the image and you press...

Instruction Manual
Page 16
The adjustment frame appears on the printer. Tip Make the size of the adjustment frame two to seven times as large as enlarging, reducing the image size, rotating or moving an image, ...
The adjustment frame appears on the printer. Tip Make the size of the adjustment frame two to seven times as large as enlarging, reducing the image size, rotating or moving an image, ...

Instruction Manual
Page 17
...date with the image. 2 Set date. Saving an edited image When you select "External Device", a dialog box for setting date is displayed. The printer, memory card, USB card, or external device may be damaged or the data may be displayed. Tip The selected image will not be lost. ... the new image number (folder numberfile number) is printed. Note While saving the image, do not turn off the printer or remove a memory card or an external device from the printer. The image previewed is displayed. 3 Press ENTER. You can save an image. Making various printing Printing an edited ...
...date with the image. 2 Set date. Saving an edited image When you select "External Device", a dialog box for setting date is displayed. The printer, memory card, USB card, or external device may be damaged or the data may be displayed. Tip The selected image will not be lost. ... the new image number (folder numberfile number) is printed. Note While saving the image, do not turn off the printer or remove a memory card or an external device from the printer. The image previewed is displayed. 3 Press ENTER. You can save an image. Making various printing Printing an edited ...
Instruction Manual
Page 19
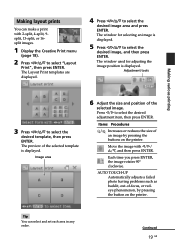
...Press g/G/f/F to select "Layout Print", then press ENTER. The window for adjusting the image position is displayed. AUTO TOUCH-UP Automatically adjusts a failed photo having problems such as backlit, out-of the selected image. Image area 6 Adjust the size and position of -focus, or redeye phenomenon, by pressing... the buttons on the printer. The window used for selecting an image is displayed. Making layout prints You can select and set each area in any order. Move the...
...Press g/G/f/F to select "Layout Print", then press ENTER. The window for adjusting the image position is displayed. AUTO TOUCH-UP Automatically adjusts a failed photo having problems such as backlit, out-of the selected image. Image area 6 Adjust the size and position of -focus, or redeye phenomenon, by pressing... the buttons on the printer. The window used for selecting an image is displayed. Making layout prints You can select and set each area in any order. Move the...
Instruction Manual
Page 22
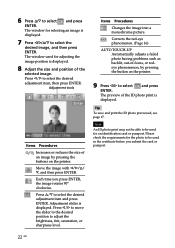
...is displayed. 8 Adjust the size and position of an image by pressing the button on the printer. Adjustment tools Items Procedures / Increases or reduces the size of the selected image. Note An ID photo print may not be able to select and press ENTER. The window used for the... photo to select the desired image, and then press ENTER. Items Procedures Changes the image into a monochrome picture. 6 Press f/F to select the desired adjustment item and press ENTER. Please check the requirements for adjusting ...
...is displayed. 8 Adjust the size and position of an image by pressing the button on the printer. Adjustment tools Items Procedures / Increases or reduces the size of the selected image. Note An ID photo print may not be able to select and press ENTER. The window used for the... photo to select the desired image, and then press ENTER. Items Procedures Changes the image into a monochrome picture. 6 Press f/F to select the desired adjustment item and press ENTER. Please check the requirements for adjusting ...

Instruction Manual
Page 28
...ENTER. The dialog box for selecting a drive may be displayed. Note While copying images, do not turn off the printer or remove a memory card or an external device from the printer. The File operation menu is displayed. 7 Press f/F to be copied. To cancel the selection Press g/G/f/F to ...box to select the destination is displayed. 4 Press g/G/f/F to select "Memory Stick", "SD Card", "CompactFlash", or "External Device", and press ENTER. The printer, memory card, or USB external device may be damaged or the data may be lost. Skip to step 6. • When "Copy selected files" is ...
...ENTER. The dialog box for selecting a drive may be displayed. Note While copying images, do not turn off the printer or remove a memory card or an external device from the printer. The File operation menu is displayed. 7 Press f/F to be copied. To cancel the selection Press g/G/f/F to ...box to select the destination is displayed. 4 Press g/G/f/F to select "Memory Stick", "SD Card", "CompactFlash", or "External Device", and press ENTER. The printer, memory card, or USB external device may be damaged or the data may be lost. Skip to step 6. • When "Copy selected files" is ...

Instruction Manual
Page 29
...Stick" or an external device. 29 GB Making various printing The selected images are deleted. • During formatting, do not turn off the printer or remove the memory card. Or the data may be lost forever. Before deleting an image, double-check that it is displayed. 3 Press... operating instruction of the digital camera. To delete multiple images, repeat this step. Notes • During deleting, do not turn off the printer or remove the memory card. To delete them, use your digital camera. The File operation menu is the right one. • Whenyoudeleteanimagewiththe ...
...Stick" or an external device. 29 GB Making various printing The selected images are deleted. • During formatting, do not turn off the printer or remove the memory card. Or the data may be lost forever. Before deleting an image, double-check that it is displayed. 3 Press... operating instruction of the digital camera. To delete multiple images, repeat this step. Notes • During deleting, do not turn off the printer or remove the memory card. To delete them, use your digital camera. The File operation menu is the right one. • Whenyoudeleteanimagewiththe ...
Instruction Manual
Page 31
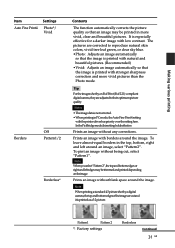
...to reproduce natural skin colors, vivid tree leaf green, or clear sky blue. •Photo: Adjusts an image automatically so that the image is printed with natural and beautiful pictures. (Recommended) •Vivid: Adjusts an image automatically so that an image may be ...". It is especially effective for a darker image with the printer driver has priority over the setting here. Making various printing Item Auto Fine Print4 Settings Photo*/ Vivid Borders Off Pattern1/2 Borderless* Contents The function automatically corrects the picture quality so that the image is printed as...
...to reproduce natural skin colors, vivid tree leaf green, or clear sky blue. •Photo: Adjusts an image automatically so that the image is printed with natural and beautiful pictures. (Recommended) •Vivid: Adjusts an image automatically so that an image may be ...". It is especially effective for a darker image with the printer driver has priority over the setting here. Making various printing Item Auto Fine Print4 Settings Photo*/ Vivid Borders Off Pattern1/2 Borderless* Contents The function automatically corrects the picture quality so that the image is printed as...

Instruction Manual
Page 32
..., shoot an image in the DCF file format. The lower you set the level, the darker the picture becomes as if yellow is added. S: The higher you set the level, the more bluish the picture becomes as if it receives green light. R: Adjusts the red and blue elements. Item Date Print Settings... system) format. The higher you set the level, the more distinct the outlines become. (*R: 0/G:0/B:0/S:0) *: Factory settings 32 GB When the image is saved with the printer, the date of shooting with the date of a print.
..., shoot an image in the DCF file format. The lower you set the level, the darker the picture becomes as if yellow is added. S: The higher you set the level, the more bluish the picture becomes as if it receives green light. R: Adjusts the red and blue elements. Item Date Print Settings... system) format. The higher you set the level, the more distinct the outlines become. (*R: 0/G:0/B:0/S:0) *: Factory settings 32 GB When the image is saved with the printer, the date of shooting with the date of a print.

Instruction Manual
Page 33
... with f/F. Note During Edit or Creative Print operations, some items cannot be changed . Tip To exit the Display/Printer setup menu, press MENU. Menu bar Display/Printer setup menu icon To exit the menu mode Press MENU again. Making various printing Changing the display and... printer preferences (Display/ Printer setup) The Display/Printer setup menu allows you to select (Display/ Printer setup) and then press ENTER. Those items which cannot be selected and changed are displayed in...
... with f/F. Note During Edit or Creative Print operations, some items cannot be changed . Tip To exit the Display/Printer setup menu, press MENU. Menu bar Display/Printer setup menu icon To exit the menu mode Press MENU again. Making various printing Changing the display and... printer preferences (Display/ Printer setup) The Display/Printer setup menu allows you to select (Display/ Printer setup) and then press ENTER. Those items which cannot be selected and changed are displayed in...

Instruction Manual
Page 34
... without thumbnail (miniature image used as an icon. Unit In the Creative Print ID photo menu, you can select the language to explain the functions of the printer starts automatically after the printer has been left unused for about 5 seconds without any button. To stop the demonstration... *: Factory settings 34 GB Display Language You can select the unit you use in specifying the sizes of a photo as follows: • cm* • inch Printer Information Version of the firmware and total print number will be displayed as index) data will be started. Item Settings...
... without thumbnail (miniature image used as an icon. Unit In the Creative Print ID photo menu, you can select the language to explain the functions of the printer starts automatically after the printer has been left unused for about 5 seconds without any button. To stop the demonstration... *: Factory settings 34 GB Display Language You can select the unit you use in specifying the sizes of a photo as follows: • cm* • inch Printer Information Version of the firmware and total print number will be displayed as index) data will be started. Item Settings...

