
Operating Instructions
Page 10
... the viewfinder 22 Step 4 Setting the date and time ........ 23 Simple setting of contents Read this manual 12 Checking the supplied accessories ..... 14 Step 1 Preparing the power source ... 15 Installing/removing the battery pack 15 Charging the installed battery pack 16 Showing ...modes 58 Displaying the indicators during playback - Slide Show 62 Viewing recordings on a finalized disc - BATTERY INFO 18 Connecting to match your camcorder ...... 56 Choosing and viewing a recording - Review 55 Deleting the last scene (DVD-RWs only 55 Viewing the recordings Playing a disc...
... the viewfinder 22 Step 4 Setting the date and time ........ 23 Simple setting of contents Read this manual 12 Checking the supplied accessories ..... 14 Step 1 Preparing the power source ... 15 Installing/removing the battery pack 15 Charging the installed battery pack 16 Showing ...modes 58 Displaying the indicators during playback - Slide Show 62 Viewing recordings on a finalized disc - BATTERY INFO 18 Connecting to match your camcorder ...... 56 Choosing and viewing a recording - Review 55 Deleting the last scene (DVD-RWs only 55 Viewing the recordings Playing a disc...
Operating Instructions
Page 14
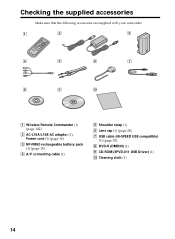
Checking the supplied accessories Make sure that the following accessories are supplied with your camcorder. 1 2 3 4 5 6 7 8 9 0 1 Wireless Remote Commander (1) (page 142) 2 AC-L15A/L15B AC adaptor (1), Power cord (1) (page 16) 3 NP-FM50 rechargeable battery pack (1) (page 15) 4 A/V connecting cable (1) 5 Shoulder strap (1) 6 Lens cap (1) (page 28) 7 USB cable (Hi-SPEED USB compatible) (1) (page 92) 8 DVD-R (DMR30) (1) 9 CD-ROM (SPVD-011 USB Driver) (1) q; Cleaning cloth (1) 14
Checking the supplied accessories Make sure that the following accessories are supplied with your camcorder. 1 2 3 4 5 6 7 8 9 0 1 Wireless Remote Commander (1) (page 142) 2 AC-L15A/L15B AC adaptor (1), Power cord (1) (page 16) 3 NP-FM50 rechargeable battery pack (1) (page 15) 4 A/V connecting cable (1) 5 Shoulder strap (1) 6 Lens cap (1) (page 28) 7 USB cable (Hi-SPEED USB compatible) (1) (page 92) 8 DVD-R (DMR30) (1) 9 CD-ROM (SPVD-011 USB Driver) (1) q; Cleaning cloth (1) 14

Operating Instructions
Page 132
...When you are closed in summer, your camcorder may be done correctly. Be particularly careful of whether it is in use the accessories recommended in a hot and humid place. On placement Regardless of the lens. •Keep the POWER to off your camcorder, and leave it for about an hour... display. conditioned car or room to a hot place outside. •You use your camcorder in a cold place, a residual image may appear on the surface of the LCD screen may heat up by a Sony dealer before operating it any further. •Avoid rough handling or mechanical shock. This ...
...When you are closed in summer, your camcorder may be done correctly. Be particularly careful of whether it is in use the accessories recommended in a hot and humid place. On placement Regardless of the lens. •Keep the POWER to off your camcorder, and leave it for about an hour... display. conditioned car or room to a hot place outside. •You use your camcorder in a cold place, a residual image may appear on the surface of the LCD screen may heat up by a Sony dealer before operating it any further. •Avoid rough handling or mechanical shock. This ...
Operating Instructions
Page 135
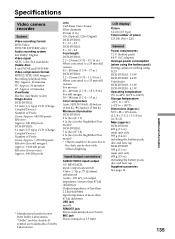
...) Number of Pixels Gross: Approx. 680 000 pixels Effective : Approx. 340 000 pixels DCR-DVD201: 3.6 mm (1/5 type) CCD (Charge Coupled Device) Number of Dolby Laboratories. Lens Carl Zeiss Vario-Tessar Filter diameter: 25 mm (1 in.) 10× (Optical), 120× (Digital) DCR-DVD101: F = 1.7 - 2.3 DCR-DVD201: F = 1.8 - ... main unit only 595 g (14 oz) including the battery pack, disc and lens cap DCR-DVD201 500 g (11 oz) main unit only 605 g (15 oz) including the battery pack, disc and lens cap Supplied accessories See page 14. "Dolby" and the double-D symbol are trademarks of Pixels Gross:...
...) Number of Pixels Gross: Approx. 680 000 pixels Effective : Approx. 340 000 pixels DCR-DVD201: 3.6 mm (1/5 type) CCD (Charge Coupled Device) Number of Dolby Laboratories. Lens Carl Zeiss Vario-Tessar Filter diameter: 25 mm (1 in.) 10× (Optical), 120× (Digital) DCR-DVD101: F = 1.7 - 2.3 DCR-DVD201: F = 1.8 - ... main unit only 595 g (14 oz) including the battery pack, disc and lens cap DCR-DVD201 500 g (11 oz) main unit only 605 g (15 oz) including the battery pack, disc and lens cap Supplied accessories See page 14. "Dolby" and the double-D symbol are trademarks of Pixels Gross:...

Operating Instructions
Page 138
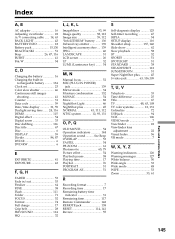
Identifying parts and controls q; qd Viewfinder lens adjustment dial (page 22) qf POWER button (page 19) qg BATT (battery) release button (page 15) qh DC IN jack (page 16) qj Lens cap (page 28) qk Tripod receptacle Make sure that the length of the tripod screw is less than 5.5 mm (7/32 inch). Otherwise, you cannot attach the tripod securely, and the screw may damage your camcorder. 138 Mode dial (page 19) qa POWER/CHG lamp (page 16) qs REMOTE jack Use to connect to optional accessories. qh qa qs qj qd qf qg qk q;
Identifying parts and controls q; qd Viewfinder lens adjustment dial (page 22) qf POWER button (page 19) qg BATT (battery) release button (page 15) qh DC IN jack (page 16) qj Lens cap (page 28) qk Tripod receptacle Make sure that the length of the tripod screw is less than 5.5 mm (7/32 inch). Otherwise, you cannot attach the tripod securely, and the screw may damage your camcorder. 138 Mode dial (page 19) qa POWER/CHG lamp (page 16) qs REMOTE jack Use to connect to optional accessories. qh qa qs qj qd qf qg qk q;

Operating Instructions
Page 139
... accessory securely. wf AUDIO/VIDEO jack (page 63) wg Microphone wh DISPLAY/BATT INFO button (page 18) wj BACK LIGHT button (page 43) wk VISUAL INDEX button (page 56) wl Multi-selector (page 23) Notes on and off. This jack also accepts a "plug-in-power" microphone. Shoe cover wa Lens ...ws Remote sensor/Infrared ray emitter wd MIC (PLUG IN POWER) jack Connect an external microphone (optional). To connect an accessory, press down and push it is linked to the POWER button, allowing you to turn...
... accessory securely. wf AUDIO/VIDEO jack (page 63) wg Microphone wh DISPLAY/BATT INFO button (page 18) wj BACK LIGHT button (page 43) wk VISUAL INDEX button (page 56) wl Multi-selector (page 23) Notes on and off. This jack also accepts a "plug-in-power" microphone. Shoe cover wa Lens ...ws Remote sensor/Infrared ray emitter wd MIC (PLUG IN POWER) jack Connect an external microphone (optional). To connect an accessory, press down and push it is linked to the POWER button, allowing you to turn...
Operating Instructions
Page 145
...SOUND 114 HQ 32 I, J, K, L ImageMixer 93, 99 Image quality 38, 112 Image size 39, 112 "InfoLITHIUM" battery ...... 130 Infrared ray emitter 139 Intelligent accessory shoe .... 139 JPEG 40 LANDSCAPE 51 LCD screen 20 LP 32 LUMI. (Luminance key) ........ 54 M, N Manual focus 52 MIC (PLUG IN POWER) jack ... 25 Title 67 TV 48, 63, 108 TV color systems 12, 131 Unfinalize 72 USB jack 94 VCR 106 VIDEO mode 7 Viewfinder 22 Viewfinder lens adjustment 22 Visual Index 56 VR mode 7 W, X, Y, Z Warning indicators 126 Warning messages 127 White balance 50 Wide-angle 33 Wide mode 48...
...SOUND 114 HQ 32 I, J, K, L ImageMixer 93, 99 Image quality 38, 112 Image size 39, 112 "InfoLITHIUM" battery ...... 130 Infrared ray emitter 139 Intelligent accessory shoe .... 139 JPEG 40 LANDSCAPE 51 LCD screen 20 LP 32 LUMI. (Luminance key) ........ 54 M, N Manual focus 52 MIC (PLUG IN POWER) jack ... 25 Title 67 TV 48, 63, 108 TV color systems 12, 131 Unfinalize 72 USB jack 94 VCR 106 VIDEO mode 7 Viewfinder 22 Viewfinder lens adjustment 22 Visual Index 56 VR mode 7 W, X, Y, Z Warning indicators 126 Warning messages 127 White balance 50 Wide-angle 33 Wide mode 48...