Operating Instructions
Page 5
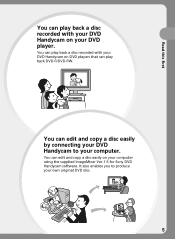
Read this first You can play back a disc recorded with your DVD Handycam on DVD players that can play back a disc recorded with your DVD Handycam on your computer. You can edit and copy a disc easily on your own original DVD disc. 5 You can play back DVD-R/DVD-RW. You can edit and copy a disc easily by connecting your DVD Handycam to produce your DVD player. It also enables you to your computer using the supplied ImageMixer Ver.1.5 for Sony DVD Handycam software.
Read this first You can play back a disc recorded with your DVD Handycam on DVD players that can play back a disc recorded with your DVD Handycam on your computer. You can edit and copy a disc easily on your own original DVD disc. 5 You can play back DVD-R/DVD-RW. You can edit and copy a disc easily by connecting your DVD Handycam to produce your DVD player. It also enables you to your computer using the supplied ImageMixer Ver.1.5 for Sony DVD Handycam software.

Operating Instructions
Page 9
... produce an original DVD by connecting your DVD Handycam to record additional material, edit, or format a disc after finalizing it becomes compatible with the supplied software. You may not be erased. 9
... produce an original DVD by connecting your DVD Handycam to record additional material, edit, or format a disc after finalizing it becomes compatible with the supplied software. You may not be erased. 9
Operating Instructions
Page 11
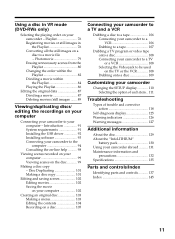
... images in VR mode (DVD-RWs only) Selecting the playing order on your camcorder - Introduction 91 System requirements 91 Installing the USB driver 92 Installing software 93 Connecting your camcorder to the computer 94 Consulting the on-line help .......... 98 Viewing scenes recorded on your computer 99 Viewing scenes on your...
... images in VR mode (DVD-RWs only) Selecting the playing order on your camcorder - Introduction 91 System requirements 91 Installing the USB driver 92 Installing software 93 Connecting your camcorder to the computer 94 Consulting the on-line help .......... 98 Viewing scenes recorded on your computer 99 Viewing scenes on your...
Operating Instructions
Page 12
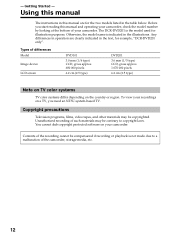
... model number by looking at the bottom of the recording cannot be contrary to a malfunction of differences Model Image device LCD screen DVD101 3.0 mm (1/6 type) CCD, gross approx. 680 000 pixels 6.2 cm (2.5 type) DVD201 3.6 mm (1/5 type) CCD, ...TV color systems differ depending on your camcorder. Otherwise, the model name is the model used for example, "DCR-DVD201 only". Unauthorized recording of such materials may be copyrighted. Copyright precautions Television programs, films, video tapes,...-based TV. You cannot dub copyright protected software on the country or region.
... model number by looking at the bottom of the recording cannot be contrary to a malfunction of differences Model Image device LCD screen DVD101 3.0 mm (1/6 type) CCD, gross approx. 680 000 pixels 6.2 cm (2.5 type) DVD201 3.6 mm (1/5 type) CCD, ...TV color systems differ depending on your camcorder. Otherwise, the model name is the model used for example, "DCR-DVD201 only". Unauthorized recording of such materials may be copyrighted. Copyright precautions Television programs, films, video tapes,...-based TV. You cannot dub copyright protected software on the country or region.

Operating Instructions
Page 91
... required to connect your camcorder to [FULL-SPEED] in (SETUP MENU) in a multi-boot environment. The USB driver along with the application software required for installation: at least 250 MB Available hard disk space recommended: at least 2 GB (depending on your computer. Notes •Scenes... may increase when you connect a USB interface not compatible with a Mac OS or Mac OSX. Introduction A USB driver and application software installation is compatible with 4 MB or more Hard disk: Available free space required for editing scenes can be that of VRAM, Minimum 800 &#...
... required to connect your camcorder to [FULL-SPEED] in (SETUP MENU) in a multi-boot environment. The USB driver along with the application software required for installation: at least 250 MB Available hard disk space recommended: at least 2 GB (depending on your computer. Notes •Scenes... may increase when you connect a USB interface not compatible with a Mac OS or Mac OSX. Introduction A USB driver and application software installation is compatible with 4 MB or more Hard disk: Available free space required for editing scenes can be that of VRAM, Minimum 800 &#...

Operating Instructions
Page 92
... the steps in "If you are using Windows 2000 Professional or Windows XP Home Edition/Professional Log on as administrator. 1 Turn on , close all the software. 2 Insert the supplied CD-ROM into the CD-ROM drive of your computer - The USB driver installation starts. [InstallShield Wizard Complete] dialog box appears after...
... the steps in "If you are using Windows 2000 Professional or Windows XP Home Edition/Professional Log on as administrator. 1 Turn on , close all the software. 2 Insert the supplied CD-ROM into the CD-ROM drive of your computer - The USB driver installation starts. [InstallShield Wizard Complete] dialog box appears after...
Operating Instructions
Page 93
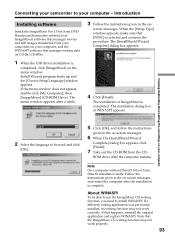
... use the ImageMixer CD writing function, you need to as ImageMixer) software that manages movies and still images transferred from the CD- Introduction Installing software Install the ImageMixer Ver.1.5 for Sony DVD Handycam (hereinafter referred to install WINASPI. Follow the instructions given ... Wizard Complete] dialog box appears, click [Finish]. 7 Take out the CD-ROM from your camcorder on your computer, and the WINASPI software that manages writing data on your computer - screen messages. Note On a computer without DirectX 8.0a or later, DirectX installation starts. The...
... use the ImageMixer CD writing function, you need to as ImageMixer) software that manages movies and still images transferred from the CD- Introduction Installing software Install the ImageMixer Ver.1.5 for Sony DVD Handycam (hereinafter referred to install WINASPI. Follow the instructions given ... Wizard Complete] dialog box appears, click [Finish]. 7 Take out the CD-ROM from your camcorder on your computer, and the WINASPI software that manages writing data on your computer - screen messages. Note On a computer without DirectX 8.0a or later, DirectX installation starts. The...
Operating Instructions
Page 94
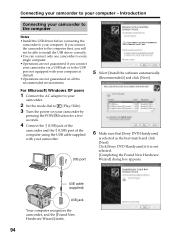
...the camcorder, and the [Found New Hardware Wizard] starts. 94 Click [Sony DVD Handycam] if it is selected as the best match and click [Next]. USB port 6 Make sure that [Sony DVD Handycam] is not selected. [Completing the Found New Hardware Wizard] ...dialog box appears. Connecting your camcorder to your computer. For Microsoft Windows XP users 1 Connect the AC adaptor to your camcorder. 2 Set the mode dial to (Play/Edit). 3 Turn the power on all the recommended environments. 5 Select [Install the software...
...the camcorder, and the [Found New Hardware Wizard] starts. 94 Click [Sony DVD Handycam] if it is selected as the best match and click [Next]. USB port 6 Make sure that [Sony DVD Handycam] is not selected. [Completing the Found New Hardware Wizard] ...dialog box appears. Connecting your camcorder to your computer. For Microsoft Windows XP users 1 Connect the AC adaptor to your camcorder. 2 Set the mode dial to (Play/Edit). 3 Turn the power on all the recommended environments. 5 Select [Install the software...

Operating Instructions
Page 98
Introduction If you can find detailed operating instructions for ImageMixer software. 1 Click located at the top right of the window. Perform the following procedure to install the USB driver correctly. 1 Disconnect your camcorder from the table ...
Introduction If you can find detailed operating instructions for ImageMixer software. 1 Click located at the top right of the window. Perform the following procedure to install the USB driver correctly. 1 Disconnect your camcorder from the table ...
Operating Instructions
Page 99
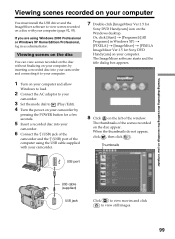
...seconds. 5 Insert a recorded disc into your camcorder and connecting it to your computer. 7 Double-click [ImageMixer Ver.1.5 for Sony DVD Handycam] on your computer. The ImageMixer software starts and the title dialog box appears. 1 Turn on your computer and allow Windows to load. 2 Connect the AC ...Windows 2000 Professional or Windows XP Home Edition/Professional, log in Windows XP) t [PIXELA] t [ImageMixer] t [PIXELA ImageMixer Ver.1.5 for Sony DVD Handycam] icon on the Windows desktop. The thumbnails of the scenes recorded on the disc appear. If you are using the USB cable supplied...
...seconds. 5 Insert a recorded disc into your camcorder and connecting it to your computer. 7 Double-click [ImageMixer Ver.1.5 for Sony DVD Handycam] on your computer. The ImageMixer software starts and the title dialog box appears. 1 Turn on your computer and allow Windows to load. 2 Connect the AC ...Windows 2000 Professional or Windows XP Home Edition/Professional, log in Windows XP) t [PIXELA] t [ImageMixer] t [PIXELA ImageMixer Ver.1.5 for Sony DVD Handycam] icon on the Windows desktop. The thumbnails of the scenes recorded on the disc appear. If you are using the USB cable supplied...

Operating Instructions
Page 100
To view the album 1 Click . 2 Double-click the scene to your computer display. •When anything goes wrong with the operation, close all the software and restart the computer. Install the USB driver again following the steps in the preview window. Viewing scenes recorded on your computer 1 Click the thumbnail ...
To view the album 1 Click . 2 Double-click the scene to your computer display. •When anything goes wrong with the operation, close all the software and restart the computer. Install the USB driver again following the steps in the preview window. Viewing scenes recorded on your computer 1 Click the thumbnail ...
Operating Instructions
Page 101
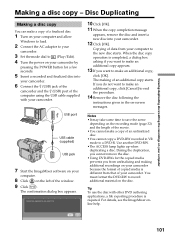
... the procedure. 14 Remove the disc following the instructions given in VR mode to a DVD-R. USB port USB cable (supplied) USB jack 7 Start the ImageMixer software on your computer. 8 Click on your camcorder because the format of copied media is different from that of a finalized disc. 1 Turn on your computer and...
... the procedure. 14 Remove the disc following the instructions given in VR mode to a DVD-R. USB port USB cable (supplied) USB jack 7 Start the ImageMixer software on your computer. 8 Click on your camcorder because the format of copied media is different from that of a finalized disc. 1 Turn on your computer and...