Operating Instructions
Page 26
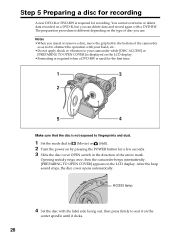
...of the camcorder so as not to obstruct the operation with your hand, etc.. •Do not apply shock or vibration to your camcorder while [DISC ACCESS] or [PREPARING TO OPEN COVER] is displayed on the LCD display. •Formatting is required when a DVD-RW is used for recording. Step 5... beeps intermittently. [PREPARING TO OPEN COVER] appears on the center spindle until it on the LCD display. After the beep sound stops, the disc cover opens automatically. ACCESS lamp 4 Set the disc with a DVD-RW. You cannot overwrite or delete data recorded on a DVD-R, but you use.
...of the camcorder so as not to obstruct the operation with your hand, etc.. •Do not apply shock or vibration to your camcorder while [DISC ACCESS] or [PREPARING TO OPEN COVER] is displayed on the LCD display. •Formatting is required when a DVD-RW is used for recording. Step 5... beeps intermittently. [PREPARING TO OPEN COVER] appears on the center spindle until it on the LCD display. After the beep sound stops, the disc cover opens automatically. ACCESS lamp 4 Set the disc with a DVD-RW. You cannot overwrite or delete data recorded on a DVD-R, but you use.
Operating Instructions
Page 27
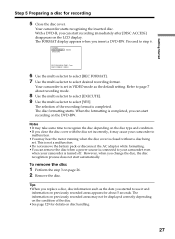
... EXECUTE VIDEO EST. When the formatting is connected to your camcorder even when your camcorder to recognize the disc depending on the disc type and condition. •If you can start recording immediately after [DISC ACCESS] disappears on the LCD display. This is not a malfunction. •Do not remove the battery pack or disconnect...
... EXECUTE VIDEO EST. When the formatting is connected to your camcorder even when your camcorder to recognize the disc depending on the disc type and condition. •If you can start recording immediately after [DISC ACCESS] disappears on the LCD display. This is not a malfunction. •Do not remove the battery pack or disconnect...
Operating Instructions
Page 30
.... - Do not remove the battery pack or disconnect the AC adaptor. - SHUT OFF] menu item to the disc for a few seconds again. 3 Close the LCD screen. 4 Remove the battery pack or disconnect the AC adaptor...START/STOP and the actual point that the lens cap strap is being recorded on the front of the following when data is not caught into the disc cover when you remove the power source....REC] appears on the LCD screen. Do not open the disc cover. •The writing time to [NEVER] in microphone during recording. •When the ACCESS lamp lights on, data is useful when you leave your ...
.... - Do not remove the battery pack or disconnect the AC adaptor. - SHUT OFF] menu item to the disc for a few seconds again. 3 Close the LCD screen. 4 Remove the battery pack or disconnect the AC adaptor...START/STOP and the actual point that the lens cap strap is being recorded on the front of the following when data is not caught into the disc cover when you remove the power source....REC] appears on the LCD screen. Do not open the disc cover. •The writing time to [NEVER] in microphone during recording. •When the ACCESS lamp lights on, data is useful when you leave your ...
Operating Instructions
Page 37
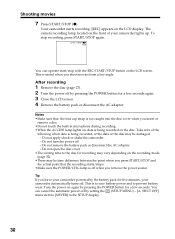
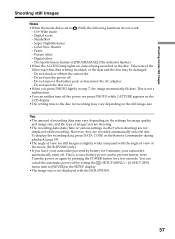
...The Sports lesson feature of the following functions do not work. - 16:9 Wide mode - Take note of [PROGRAM AE] (The indicator flashes.) •When the ACCESS lamp lights on, data is being recorded, or the data and the disc may be damaged. - You can neither turn the power off . Super ...to the disc for recording may vary depending on again by pressing the POWER button for a few seconds. Digital effect - Do not remove the battery pack or disconnect the AC adaptor. - This is set to (Still), the following when data is slightly wider compared with the DCR-DVD101. 37 Shooting...
...The Sports lesson feature of the following functions do not work. - 16:9 Wide mode - Take note of [PROGRAM AE] (The indicator flashes.) •When the ACCESS lamp lights on, data is being recorded, or the data and the disc may be damaged. - You can neither turn the power off . Super ...to the disc for recording may vary depending on again by pressing the POWER button for a few seconds. Digital effect - Do not remove the battery pack or disconnect the AC adaptor. - This is set to (Still), the following when data is slightly wider compared with the DCR-DVD101. 37 Shooting...
Operating Instructions
Page 42
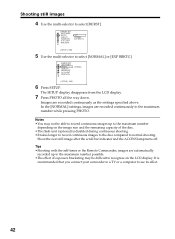
... display disappears from the LCD display. 7 Press PHOTO all the way down. Shoot the next still image after the scroll bar indicator and the ACCESS lamp turns off. S. In the [NORMAL] settings, images are recorded continuously as the settings specified above. Tips •Shooting with the self-...the maximum number depending on the LCD display. It is disabled during continuous shooting. • It takes longer to record continuous images to the disc compared to see its effect. 42 Shooting still images 4 Use the multi-selector to select [NORMAL] or [EXP BRKTG]. LIGHT RETURN OFF ...
... display disappears from the LCD display. 7 Press PHOTO all the way down. Shoot the next still image after the scroll bar indicator and the ACCESS lamp turns off. S. In the [NORMAL] settings, images are recorded continuously as the settings specified above. Tips •Shooting with the self-...the maximum number depending on the LCD display. It is disabled during continuous shooting. • It takes longer to record continuous images to the disc compared to see its effect. 42 Shooting still images 4 Use the multi-selector to select [NORMAL] or [EXP BRKTG]. LIGHT RETURN OFF ...
Operating Instructions
Page 97
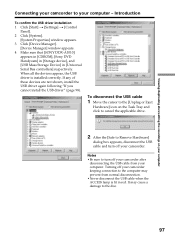
...Control Panel]. 2 Click [System]. [System Properties] window appears. 3 Click [Device Manager]. [Device Manager] window appears. 4 Make sure that [SONY DDX-A1010] appears in [CDROM], [Sony DVD Handycam] in [Storage device], and [USB Mass Storage Device] in red. To disconnect the USB cable 1 Move the cursor to the ... camcorder after disconnecting the USB cable from normal disconnection. •Never disconnect the USB cable when the ACCESS lamp is installed correctly. Viewing/duplicating discs/editing the recordings on the Task Tray and click to cancel the applicable drive. 2 After the [...
...Control Panel]. 2 Click [System]. [System Properties] window appears. 3 Click [Device Manager]. [Device Manager] window appears. 4 Make sure that [SONY DDX-A1010] appears in [CDROM], [Sony DVD Handycam] in [Storage device], and [USB Mass Storage Device] in red. To disconnect the USB cable 1 Move the cursor to the ... camcorder after disconnecting the USB cable from normal disconnection. •Never disconnect the USB cable when the ACCESS lamp is installed correctly. Viewing/duplicating discs/editing the recordings on the Task Tray and click to cancel the applicable drive. 2 After the [...
Operating Instructions
Page 101
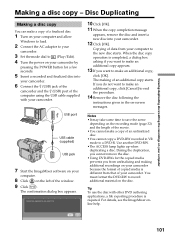
... •The ACCESS lamp lights up when duplicating a disc. During the duplication, you want to make an additional copy appears. 13 If you cannot remove the disc. •Using DVD-RWs for a few seconds. 5 Insert a recorded and finalized disc into your computer to the new disc starts. When the disc copy operation is... media prevents you do not want to make a copy of an additional copy starts. Copying of data from unfinalizing and making of an unfinalized disc. •You cannot copy a DVD-RW recorded in the on-screen messages. You must format the DVD-RW to a DVD-R. The making...
... •The ACCESS lamp lights up when duplicating a disc. During the duplication, you want to make an additional copy appears. 13 If you cannot remove the disc. •Using DVD-RWs for a few seconds. 5 Insert a recorded and finalized disc into your computer to the new disc starts. When the disc copy operation is... media prevents you do not want to make a copy of an additional copy starts. Copying of data from unfinalizing and making of an unfinalized disc. •You cannot copy a DVD-RW recorded in the on-screen messages. You must format the DVD-RW to a DVD-R. The making...

Operating Instructions
Page 105
..., click [OK]. X: Pause x: Stop TITLE: Returns to save the scene depending on the recording mode or recording time. •The ACCESS lamp lights up when recording on a disc. Creating an original disc Recording on a disc Check the menu and view the contents on a preview window, then record the contents on... connect your camcorder to make an additional copy appears. 6 If you want to the computer with the USB cable, then insert a blank disc into your computer 2 Click the button on the (Preview panel) box on the upper left of the window, and preview the contents. Viewing/...
..., click [OK]. X: Pause x: Stop TITLE: Returns to save the scene depending on the recording mode or recording time. •The ACCESS lamp lights up when recording on a disc. Creating an original disc Recording on a disc Check the menu and view the contents on a preview window, then record the contents on... connect your camcorder to make an additional copy appears. 6 If you want to the computer with the USB cable, then insert a blank disc into your computer 2 Click the button on the (Preview panel) box on the upper left of the window, and preview the contents. Viewing/...
Operating Instructions
Page 128
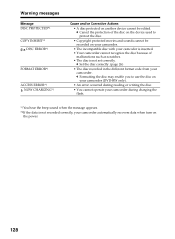
...is inserted. • Your camcorder cannot recognize the disc because of the disc on the device used to use the disc on your camcorder (DVD-RW only). • An error occurred during reading or writing the disc. • You cannot operate your camcorder during charging ...recorded on your camcorder. • The incompatible disc with your camcorder. c Cancel the protection of malfunctions such as scratches. • The disc is not set correctly. Warning messages Message DISC PROTECTED*1 COPY INHIBIT*1 DISC ERROR*1 FORMAT ERROR*1 ACCESS ERROR*1 NOW CHARGING*1 Cause and/or Corrective Actions...
...is inserted. • Your camcorder cannot recognize the disc because of the disc on the device used to use the disc on your camcorder (DVD-RW only). • An error occurred during reading or writing the disc. • You cannot operate your camcorder during charging ...recorded on your camcorder. • The incompatible disc with your camcorder. c Cancel the protection of malfunctions such as scratches. • The disc is not set correctly. Warning messages Message DISC PROTECTED*1 COPY INHIBIT*1 DISC ERROR*1 FORMAT ERROR*1 ACCESS ERROR*1 NOW CHARGING*1 Cause and/or Corrective Actions...
Operating Instructions
Page 140
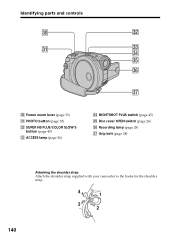
es ea ed ef eg eh ej e; Identifying parts and controls e; Power zoom lever (page 33) ea PHOTO button (page 35) es SUPER NS PLUS/COLOR SLOW S button (page 45) ed ACCESS lamp (page 26) ef NIGHTSHOT PLUS switch (page 45) eg Disc cover OPEN switch (page 26) eh Recording lamp (page 29) ej Grip belt (page 28) Attaching the shoulder strap Attach the shoulder strap supplied with your camcorder to the hooks for the shoulder strap. 4 1 3 2 140
es ea ed ef eg eh ej e; Identifying parts and controls e; Power zoom lever (page 33) ea PHOTO button (page 35) es SUPER NS PLUS/COLOR SLOW S button (page 45) ed ACCESS lamp (page 26) ef NIGHTSHOT PLUS switch (page 45) eg Disc cover OPEN switch (page 26) eh Recording lamp (page 29) ej Grip belt (page 28) Attaching the shoulder strap Attach the shoulder strap supplied with your camcorder to the hooks for the shoulder strap. 4 1 3 2 140