
Operating Instructions
Page 91
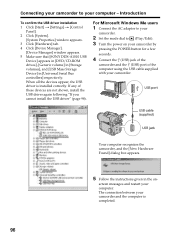
... scenes stored on your computer. The USB driver along with the application software required for editing scenes can be provided as standard. System requirements OS: Microsoft Windows Me, Microsoft Windows 2000 Professional, Microsoft Windows XP Home Edition or Microsoft Windows XP Professional. Consult the computer manufacturer for installation...speakers Memory: 64 MB or more of VRAM, Minimum 800 × 600 Hi color (16 bit color, 65 000 colors), DirectDraw display driver capability (At 800 × 600 or less, 256 colors and less, this happens, set [USB SPEED] to your computer. Notes &#...
... scenes stored on your computer. The USB driver along with the application software required for editing scenes can be provided as standard. System requirements OS: Microsoft Windows Me, Microsoft Windows 2000 Professional, Microsoft Windows XP Home Edition or Microsoft Windows XP Professional. Consult the computer manufacturer for installation...speakers Memory: 64 MB or more of VRAM, Minimum 800 × 600 Hi color (16 bit color, 65 000 colors), DirectDraw display driver capability (At 800 × 600 or less, 256 colors and less, this happens, set [USB SPEED] to your computer. Notes &#...

Operating Instructions
Page 92
... connect the USB cable before connecting the USB cable to your computer. The installation menu window appears. 3 Move the cursor to [USB Driver] and click. Note If you cannot install the USB driver" (page 98). 92 The USB driver installation starts. [InstallShield Wizard Complete] dialog box appears after a while. 5 Click [Finish]. InstallShield Wizard program...
... connect the USB cable before connecting the USB cable to your computer. The installation menu window appears. 3 Move the cursor to [USB Driver] and click. Note If you cannot install the USB driver" (page 98). 92 The USB driver installation starts. [InstallShield Wizard Complete] dialog box appears after a while. 5 Click [Finish]. InstallShield Wizard program...
Operating Instructions
Page 93
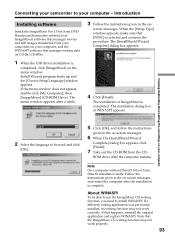
...your camcorder on your computer, and the WINASPI software that manages writing data on CD-Rs/CD-RWs. 1 When the USB driver installation is completed. If that happens, reinstall the original application and replace WINASPI. The installation dialog box of ImageMixer is completed...[ImageMixer] on - Introduction Installing software Install the ImageMixer Ver.1.5 for Sony DVD Handycam (hereinafter referred to install WINASPI. Install Wizard program starts up and the [Choose Setup Language] window appears. If the menu window does not appear, double-click [My Computer], then [ImageMixer] (CD...
...your camcorder on your computer, and the WINASPI software that manages writing data on CD-Rs/CD-RWs. 1 When the USB driver installation is completed. If that happens, reinstall the original application and replace WINASPI. The installation dialog box of ImageMixer is completed...[ImageMixer] on - Introduction Installing software Install the ImageMixer Ver.1.5 for Sony DVD Handycam (hereinafter referred to install WINASPI. Install Wizard program starts up and the [Choose Setup Language] window appears. If the menu window does not appear, double-click [My Computer], then [ImageMixer] (CD...
Operating Instructions
Page 94
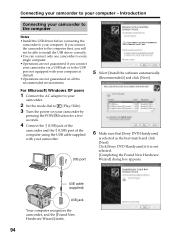
...computer Notes •Install the USB driver before connecting the camcorder to your computer - Connecting your camcorder to your computer. USB port 6 Make sure that [Sony DVD Handycam] is not selected. [Completing the Found New Hardware Wizard] dialog box appears. Click [Sony DVD Handycam] if it is ...and click [Next]. USB cable (supplied) USB jack Your computer recognizes the camcorder, and the [Found New Hardware Wizard] starts. 94 For Microsoft Windows XP users 1 Connect the AC adaptor to your camcorder. 2 Set the mode dial to (Play/Edit). 3 Turn the power on your camcorder ...
...computer Notes •Install the USB driver before connecting the camcorder to your computer - Connecting your camcorder to your computer. USB port 6 Make sure that [Sony DVD Handycam] is not selected. [Completing the Found New Hardware Wizard] dialog box appears. Click [Sony DVD Handycam] if it is ...and click [Next]. USB cable (supplied) USB jack Your computer recognizes the camcorder, and the [Found New Hardware Wizard] starts. 94 For Microsoft Windows XP users 1 Connect the AC adaptor to your camcorder. 2 Set the mode dial to (Play/Edit). 3 Turn the power on your camcorder ...
Operating Instructions
Page 95
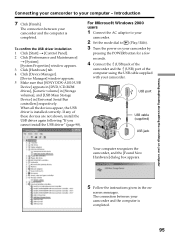
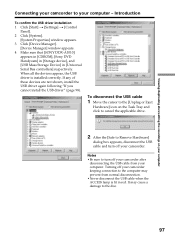
... controllers] respectively. The connection between your camcorder and the computer is completed. Introduction 7 Click [Finish]. For Microsoft Windows 2000 users 1 Connect the AC adaptor to your camcorder. 2 Set the mode dial to your computer - When all the devices...camcorder. screen messages. To confirm the USB driver installation 1 Click [Start] t [Control Panel]. 2 Click [Performance and Maintenance] t [System]. [System Properties] window appears. 3 Click [Hardware] tab. 4 Click [Device Manager]. [Device Manager] window appears. 5 Make sure that [SONY DDX-A1010 USB Device] appears in [...
... controllers] respectively. The connection between your camcorder and the computer is completed. Introduction 7 Click [Finish]. For Microsoft Windows 2000 users 1 Connect the AC adaptor to your camcorder. 2 Set the mode dial to your computer - When all the devices...camcorder. screen messages. To confirm the USB driver installation 1 Click [Start] t [Control Panel]. 2 Click [Performance and Maintenance] t [System]. [System Properties] window appears. 3 Click [Hardware] tab. 4 Click [Device Manager]. [Device Manager] window appears. 5 Make sure that [SONY DDX-A1010 USB Device] appears in [...
Operating Instructions
Page 96
... appears. 5 Follow the instructions given in [Universal Serial Bus controllers] respectively. When all the devices appear, the USB driver is completed. 96 If any of the computer using the USB cable supplied with your camcorder and the computer is installed... between your camcorder. Introduction To confirm the USB driver installation 1 Click [Start] t [Settings] t [Control Panel]. 2 Click [System]. [System Properties] window appears. 3 Click [Hardware] tab. 4 Click [Device Manager]. [Device Manager] window appears. 5 Make sure that [SONY DDX-A1010 USB Device] appears in [DVD/CD...
... appears. 5 Follow the instructions given in [Universal Serial Bus controllers] respectively. When all the devices appear, the USB driver is completed. 96 If any of the computer using the USB cable supplied with your camcorder and the computer is installed... between your camcorder. Introduction To confirm the USB driver installation 1 Click [Start] t [Settings] t [Control Panel]. 2 Click [System]. [System Properties] window appears. 3 Click [Hardware] tab. 4 Click [Device Manager]. [Device Manager] window appears. 5 Make sure that [SONY DDX-A1010 USB Device] appears in [DVD/CD...
Operating Instructions
Page 97
...dialog box appears, disconnect the USB cable and turn off your camcorder. When all the devices appear, the USB driver is lit in [Universal Serial Bus controllers] respectively. If any of these devices are not shown, install the USB... driver again following "If you cannot install the USB driver" (page 98). Introduction To confirm the USB driver installation 1 Click [Start] t [Settings] t [Control Panel]. 2 Click [System]. [System Properties] window appears. 3 Click [Device Manager]. [Device Manager] window appears. 4 Make sure that [SONY DDX-A1010] appears in [CDROM], [Sony DVD ...
...dialog box appears, disconnect the USB cable and turn off your camcorder. When all the devices appear, the USB driver is lit in [Universal Serial Bus controllers] respectively. If any of these devices are not shown, install the USB... driver again following "If you cannot install the USB driver" (page 98). Introduction To confirm the USB driver installation 1 Click [Start] t [Settings] t [Control Panel]. 2 Click [System]. [System Properties] window appears. 3 Click [Device Manager]. [Device Manager] window appears. 4 Make sure that [SONY DDX-A1010] appears in [CDROM], [Sony DVD ...

Operating Instructions
Page 98
...the operating instructions of contents. To close the on -line help Click the button at the top right of the window. For details, refer to install the USB driver correctly. 1 Disconnect your camcorder from the table of the CD-ROM supplied with your camcorder. 98 Or, click... [Start] t [Programs] ([All Programs] in Windows XP) t [PIXELA] t [ImageMixer] t [Help]. Connecting your camcorder to the computer" (page 94). The USB driver installation and the connection between your computer was completed. Perform the following "Connecting your camcorder ...
...the operating instructions of contents. To close the on -line help Click the button at the top right of the window. For details, refer to install the USB driver correctly. 1 Disconnect your camcorder from the table of the CD-ROM supplied with your camcorder. 98 Or, click... [Start] t [Programs] ([All Programs] in Windows XP) t [PIXELA] t [ImageMixer] t [Help]. Connecting your camcorder to the computer" (page 94). The USB driver installation and the connection between your computer was completed. Perform the following "Connecting your camcorder ...
Operating Instructions
Page 99
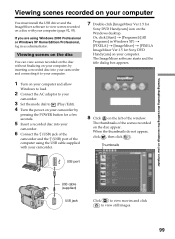
... can view scenes recorded on the disc without finalizing on your computer, by pressing the POWER button for Sony DVD Handycam] on your computer. The thumbnails of the scenes recorded on the Windows desktop. When the thumbnails do not appear, click , then click . Thumbnails USB port USB cable (...recordings on your computer Viewing scenes recorded on your computer You must install the USB driver and the ImageMixer software to view scenes recorded on a disc with your camcorder. 8 Click on the left of the window. If you are using the USB cable supplied with your computer (page 92, ...
... can view scenes recorded on the disc without finalizing on your computer, by pressing the POWER button for Sony DVD Handycam] on your computer. The thumbnails of the scenes recorded on the Windows desktop. When the thumbnails do not appear, click , then click . Thumbnails USB port USB cable (...recordings on your computer Viewing scenes recorded on your computer You must install the USB driver and the ImageMixer software to view scenes recorded on a disc with your camcorder. 8 Click on the left of the window. If you are using the USB cable supplied with your computer (page 92, ...

Operating Instructions
Page 100
The selected scene is complete, the USB driver will not be properly registered. To return to the thumbnails list, click at the top right of the window. Install the USB driver again following the steps in the preview window. Notes •If you have selected a movie, click and start ...playback. When you connect the USB cable before USB driver installation is saved on your computer display. •...
The selected scene is complete, the USB driver will not be properly registered. To return to the thumbnails list, click at the top right of the window. Install the USB driver again following the steps in the preview window. Notes •If you have selected a movie, click and start ...playback. When you connect the USB cable before USB driver installation is saved on your computer display. •...