
Operating Instructions
Page 2
... may result in the U.S.A. For customers in hazardous radiation exposure. Telephone No.: 858-942-2230 This device complies with superior picture and sound quality. Regulatory Information Declaration of procedures other than those specified herein may cause undesired operation. 2 and CANADA RECYCLING ... presence of the FCC Rules. Use of controls or adjustments or performance of Conformity Trade Name: SONY Model No.: DCR-DVD101 Responsible Party:Sony Electronics Inc. Welcome! Your Handycam is very easy to persons. You will increase eye hazard. CAUTION The use .
... may result in the U.S.A. For customers in hazardous radiation exposure. Telephone No.: 858-942-2230 This device complies with superior picture and sound quality. Regulatory Information Declaration of procedures other than those specified herein may cause undesired operation. 2 and CANADA RECYCLING ... presence of the FCC Rules. Use of controls or adjustments or performance of Conformity Trade Name: SONY Model No.: DCR-DVD101 Responsible Party:Sony Electronics Inc. Welcome! Your Handycam is very easy to persons. You will increase eye hazard. CAUTION The use .
Operating Instructions
Page 10
...On shooting movies 47 On shooting still images 47 Shooting for the wide-screen TV - 16:9 Wide mode 48 Adjusting the white balance manually 50 Shooting techniques to ...a DVD drive installed .... 70 Recording on a finalized disc - Formatting (DVD-RWs only) ..... 74 Picture effect/Digital effect ... 54 Checking/Deleting the last scene ....... 55 Checking the last scene - BACK LIGHT...Shooting still images 35 Selecting the still image quality and size 38 Shooting images continuously (BURST, DCR-DVD201 only) .. 41 Adjusting the exposure 43 Adjusting the exposure for movies only) ....... ...
...On shooting movies 47 On shooting still images 47 Shooting for the wide-screen TV - 16:9 Wide mode 48 Adjusting the white balance manually 50 Shooting techniques to ...a DVD drive installed .... 70 Recording on a finalized disc - Formatting (DVD-RWs only) ..... 74 Picture effect/Digital effect ... 54 Checking/Deleting the last scene ....... 55 Checking the last scene - BACK LIGHT...Shooting still images 35 Selecting the still image quality and size 38 Shooting images continuously (BURST, DCR-DVD201 only) .. 41 Adjusting the exposure 43 Adjusting the exposure for movies only) ....... ...
Operating Instructions
Page 22
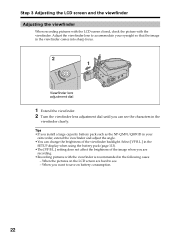
... 3 Adjusting the LCD screen and the viewfinder Adjusting the viewfinder When recording pictures with the LCD screen closed, check the picture with the viewfinder is recommended in the viewfinder clearly. When the pictures on battery consumption. 22 Tips •If you install a large capacity battery... pack such as the NP-QM91/QM91D in your eyesight so that the image in the viewfinder comes into sharp focus. 2 1 Viewfinder lens adjustment dial 1 Extend the ...
... 3 Adjusting the LCD screen and the viewfinder Adjusting the viewfinder When recording pictures with the LCD screen closed, check the picture with the viewfinder is recommended in the viewfinder clearly. When the pictures on battery consumption. 22 Tips •If you install a large capacity battery... pack such as the NP-QM91/QM91D in your eyesight so that the image in the viewfinder comes into sharp focus. 2 1 Viewfinder lens adjustment dial 1 Extend the ...
Operating Instructions
Page 33
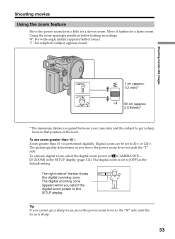
...to the "W" side until the focus is performed digitally. To use zoom greater than 10 × Zoom greater than 10 × is sharp. 33 W: For wide-angle (subject appears farther away) T : For telephoto (subject appears closer) Shooting movies/still images 1 cm (approx. 1/2 inch)* 80 cm (approx. 2...* The minimum distance required between your camcoder and the subject to get a sharp focus, move the power zoom lever towards the "T" side. The picture quality deteriorates as the default setting. Move it further for a slower zoom. Tip If you cannot get a sharp focus in the SETUP display....
...to the "W" side until the focus is performed digitally. To use zoom greater than 10 × Zoom greater than 10 × is sharp. 33 W: For wide-angle (subject appears farther away) T : For telephoto (subject appears closer) Shooting movies/still images 1 cm (approx. 1/2 inch)* 80 cm (approx. 2...* The minimum distance required between your camcoder and the subject to get a sharp focus, move the power zoom lever towards the "T" side. The picture quality deteriorates as the default setting. Move it further for a slower zoom. Tip If you cannot get a sharp focus in the SETUP display....

Operating Instructions
Page 34
However, the picture will be normal when recorded. 180° 90° Open and rotate the LCD screen 180 degrees as shown above. Shooting movies Shooting with the subject checking the image - When the mode dial is set to (Movie), Xz appears in the standby mode, and z appears in the viewfinder and on the LCD display is a mirror-image. The indicator appears in the recording mode. Some indicators appear mirror-reversed and others are not displayed. 34 Mirror mode The picture on the LCD display.
However, the picture will be normal when recorded. 180° 90° Open and rotate the LCD screen 180 degrees as shown above. Shooting movies Shooting with the subject checking the image - When the mode dial is set to (Movie), Xz appears in the standby mode, and z appears in the viewfinder and on the LCD display is a mirror-image. The indicator appears in the recording mode. Some indicators appear mirror-reversed and others are not displayed. 34 Mirror mode The picture on the LCD display.
Operating Instructions
Page 37
SteadyShot - Super NightShot plus - Take note of the following functions do not work. - 16:9 Wide mode - Do not remove the battery pack or disconnect the AC adaptor. - This is being recorded, or the ...the mode dial is to save battery power and to prevent battery wear. Do not shock or vibrate the camcorder. - Digital effect - Picture effect - Fader - This is set to the disc for recording may vary depending on the settings for a few seconds. Do not ... you press PHOTO lightly in the SETUP display. •The image size is slightly wider compared with the DCR-DVD101. 37
SteadyShot - Super NightShot plus - Take note of the following functions do not work. - 16:9 Wide mode - Do not remove the battery pack or disconnect the AC adaptor. - This is being recorded, or the ...the mode dial is to save battery power and to prevent battery wear. Do not shock or vibrate the camcorder. - Digital effect - Picture effect - Fader - This is set to the disc for recording may vary depending on the settings for a few seconds. Do not ... you press PHOTO lightly in the SETUP display. •The image size is slightly wider compared with the DCR-DVD101. 37
Operating Instructions
Page 43
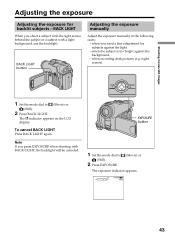
...) or The exposure indicator appears. 0:00:00 -R VIDEO 43 EXPOSURE button 1 Set the mode dial to (Movie) or (Still). 2 Press BACK LIGHT. when recording dark pictures (e.g. Note If you need a fine adjustment for backlit subjects - BACK LIGHT When you shoot a subject with the light source behind the subject or a subject with...
...) or The exposure indicator appears. 0:00:00 -R VIDEO 43 EXPOSURE button 1 Set the mode dial to (Movie) or (Still). 2 Press BACK LIGHT. when recording dark pictures (e.g. Note If you need a fine adjustment for backlit subjects - BACK LIGHT When you shoot a subject with the light source behind the subject or a subject with...

Operating Instructions
Page 45
... again. PROGRAM AE (The indicator flashes) - NightShot plus and Super NightShot plus , you cannot use the following functions: - At this time, the motion of the picture may cause your finger. •While using infrared rays, such as NightShot plus and Super NightShot plus , you cannot use the following functions: - PROGRAM AE...
... again. PROGRAM AE (The indicator flashes) - NightShot plus and Super NightShot plus , you cannot use the following functions: - At this time, the motion of the picture may cause your finger. •While using infrared rays, such as NightShot plus and Super NightShot plus , you cannot use the following functions: - PROGRAM AE...
Operating Instructions
Page 46
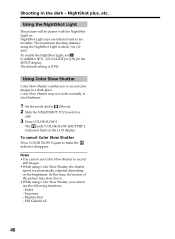
... OFF. 3 Press COLOR SLOW S. Notes •You cannot use the following functions: - Digital effect - PROGRAM AE 46 Using the NightShot Light The picture will be clearer with the NightShot Light on the brightness. Exposure - Using Color Slow Shutter Color Slow Shutter enables you cannot use Color Slow Shutter...Set the mode dial to (Movie). 2 Slide the NIGHTSHOT PLUS switch to [ON] in the dark - At this time, the motion of the picture may not work normally in a dark place. The and ["COLOR SLOW SHUTTER"] indicators flash on the LCD display. Fader - To cancel Color Slow...
... OFF. 3 Press COLOR SLOW S. Notes •You cannot use the following functions: - Digital effect - PROGRAM AE 46 Using the NightShot Light The picture will be clearer with the NightShot Light on the brightness. Exposure - Using Color Slow Shutter Color Slow Shutter enables you cannot use Color Slow Shutter...Set the mode dial to (Movie). 2 Slide the NIGHTSHOT PLUS switch to [ON] in the dark - At this time, the motion of the picture may not work normally in a dark place. The and ["COLOR SLOW SHUTTER"] indicators flash on the LCD display. Fader - To cancel Color Slow...
Operating Instructions
Page 48
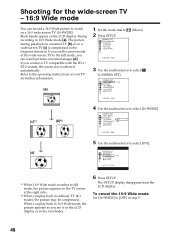
...dial to 2 Press SETUP. LIGHT RETURN ON [ SETUP ] : END *1 When 16:9 Wide mode switches to [OFF] in 16:9 Wide mode [a]. To cancel the 16:9 Wide mode Set [16:9WIDE] to full mode, the picture appears on the TV screen at the right ratio. *2 When you connect a TV compatible ...-2 system, the screen size is compressed in ordinary TV (4:3 mode), the picture may be compressed. Refer to the operating instructions of your TV for the wide-screen TV - 16:9 Wide mode You can record a 16:9 Wide picture to watch pictures of the wide-screen TV to select [ON]. LIGHT RETURN OFF ON [ SETUP ] :...
...dial to 2 Press SETUP. LIGHT RETURN ON [ SETUP ] : END *1 When 16:9 Wide mode switches to [OFF] in 16:9 Wide mode [a]. To cancel the 16:9 Wide mode Set [16:9WIDE] to full mode, the picture appears on the TV screen at the right ratio. *2 When you connect a TV compatible ...-2 system, the screen size is compressed in ordinary TV (4:3 mode), the picture may be compressed. Refer to the operating instructions of your TV for the wide-screen TV - 16:9 Wide mode You can record a 16:9 Wide picture to watch pictures of the wide-screen TV to select [ON]. LIGHT RETURN OFF ON [ SETUP ] :...
Operating Instructions
Page 49
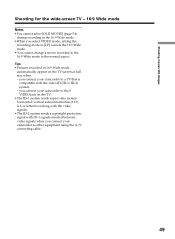
...to the S VIDEO jack on the TV screen at full size when: - Tips •Pictures recorded in the 16:9 Wide mode to the normal aspect. Shooting movies/still images Shooting for the wide-screen TV - 16:9 Wide mode Notes •You cannot select [OLD MOVIE] (page 54) during recording in the.... •When you select VIDEO mode, setting the recording mode to [LP] cancels the 16:9 Wide mode. •You cannot change a movie recorded in 16:9 Wide mode automatically appear on the TV. •The ID-1 system sends aspect ratio (screen horizontal/vertical ratio) information (16:9, 4:3, or letter box)...
...to the S VIDEO jack on the TV screen at full size when: - Tips •Pictures recorded in the 16:9 Wide mode to the normal aspect. Shooting movies/still images Shooting for the wide-screen TV - 16:9 Wide mode Notes •You cannot select [OLD MOVIE] (page 54) during recording in the.... •When you select VIDEO mode, setting the recording mode to [LP] cancels the 16:9 Wide mode. •You cannot change a movie recorded in 16:9 Wide mode automatically appear on the TV. •The ID-1 system sends aspect ratio (screen horizontal/vertical ratio) information (16:9, 4:3, or letter box)...
Operating Instructions
Page 50
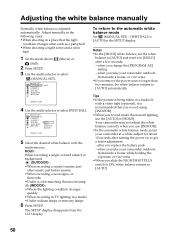
... Normally white balance is being taken in a place that you record using [INDOOR]. •When you use the [AUTO] or [HOLD]. Tips •If the picture is adjusted automatically. Adjust manually in the following cases: •When shooting in a studio lit with the multi-selector.
... Normally white balance is being taken in a place that you record using [INDOOR]. •When you use the [AUTO] or [HOLD]. Tips •If the picture is adjusted automatically. Adjust manually in the following cases: •When shooting in a studio lit with the multi-selector.

Operating Instructions
Page 53
... indicator changes as follows: FADER t OVERLAP t WIPE no indicator (off) The last selected fader mode is being stored, the indicators flash fast, and the playback picture disappears temporarily. 53
... indicator changes as follows: FADER t OVERLAP t WIPE no indicator (off) The last selected fader mode is being stored, the indicators flash fast, and the playback picture disappears temporarily. 53
Operating Instructions
Page 54
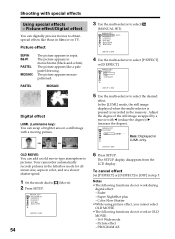
...SETUP display disappears from the LCD display. Notes •The following functions do not work in OLD MOVIE: - 16:9 Wide mode - Color Slow Shutter •While using picture effect, you cannot select OLD MOVIE. •The following functions do not work during digital effect: - MANUAL SET PROGRAM...D EFFECT WHT BAL AUTO SHTR (Movie). [ SETUP ] : END 54 3 Use the multi-selector to obtain special effects like a pale pastel drawing. The picture appears in color, and at a slower shutter speed. 1 Set the mode dial to [OFF] in the memory. Fader - OLD MOVIE: You can swap ...
...SETUP display disappears from the LCD display. Notes •The following functions do not work in OLD MOVIE: - 16:9 Wide mode - Color Slow Shutter •While using picture effect, you cannot select OLD MOVIE. •The following functions do not work during digital effect: - MANUAL SET PROGRAM...D EFFECT WHT BAL AUTO SHTR (Movie). [ SETUP ] : END 54 3 Use the multi-selector to obtain special effects like a pale pastel drawing. The picture appears in color, and at a slower shutter speed. 1 Set the mode dial to [OFF] in the memory. Fader - OLD MOVIE: You can swap ...
Operating Instructions
Page 56
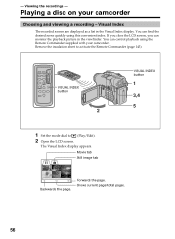
Movie tab Still image tab 001 JAN 1 03 1/2 6:00PM Backwards the page. Viewing the recordings - You can monitor the playback picture in the Visual Index display. Visual Index The recorded scenes are displayed as a list in the viewfinder. If you close the LCD screen, you can ...
Movie tab Still image tab 001 JAN 1 03 1/2 6:00PM Backwards the page. Viewing the recordings - You can monitor the playback picture in the Visual Index display. Visual Index The recorded scenes are displayed as a list in the viewfinder. If you close the LCD screen, you can ...

Operating Instructions
Page 58
...To advance the scene Press > during playback. or > during playback. Marks of the camcorder: Marks of the scene Press . To view the picture at slow speed (slow playback) Press on the Remote Commander during playback. To pause playback (view a still image) Press X during playback ... Remote Commander. To resume normal playback, press X again. To play a previous scene Press . To locate a scene while monitoring the picture Press and hold . On the Remote Commander, press or .* Pressing or repeatedly switches the playback speed from playback to the beginning of ...
...To advance the scene Press > during playback. or > during playback. Marks of the camcorder: Marks of the scene Press . To view the picture at slow speed (slow playback) Press on the Remote Commander during playback. To pause playback (view a still image) Press X during playback ... Remote Commander. To resume normal playback, press X again. To play a previous scene Press . To locate a scene while monitoring the picture Press and hold . On the Remote Commander, press or .* Pressing or repeatedly switches the playback speed from playback to the beginning of ...
Operating Instructions
Page 63
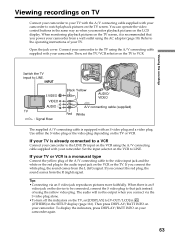
... Switch the TV input to LINE. If your TV or VCR is an S video jack on the device to be output when you monitor playback pictures on the LCD display. When there is a monaural type Connect the yellow plug of the A/V connecting cable to the video input jack and the white... AC adaptor (page 18). Then, set [DISPLAY] to [V-OUT/LCD] in (OTHERS) in the same way as when you connect via an S video jack reproduces pictures more faithfully. Tips •Connecting via the S video plug alone. •To turn off the indicators on the TV, set the TV/VCR selector on...
... Switch the TV input to LINE. If your TV or VCR is an S video jack on the device to be output when you monitor playback pictures on the LCD display. When there is a monaural type Connect the yellow plug of the A/V connecting cable to the video input jack and the white... AC adaptor (page 18). Then, set [DISPLAY] to [V-OUT/LCD] in (OTHERS) in the same way as when you connect via an S video jack reproduces pictures more faithfully. Tips •Connecting via the S video plug alone. •To turn off the indicators on the TV, set the TV/VCR selector on...
Operating Instructions
Page 106
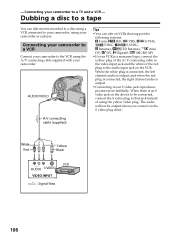
... using a VCR connected to your camcorder, using the A/V connecting cable supplied with your camcorder to be output when you connect via an S video jack reproduces pictures more faithfully. When there is an S video jack on the VCR. Dubbing a disc to a tape You can edit on VCRs that jack instead of the...
... using a VCR connected to your camcorder, using the A/V connecting cable supplied with your camcorder to be output when you connect via an S video jack reproduces pictures more faithfully. When there is an S video jack on the VCR. Dubbing a disc to a tape You can edit on VCRs that jack instead of the...
Operating Instructions
Page 109
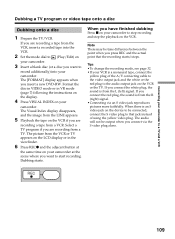
... on your camcorder to stop recording and stop the playback on your camcorder at the scene where you connect via an S video jack reproduces pictures more faithfully. The picture from the R (right) signal. •Connecting via the S video plug alone. REC 109 Dubbing starts. The audio will not be output when you...
... on your camcorder to stop recording and stop the playback on your camcorder at the scene where you connect via an S video jack reproduces pictures more faithfully. The picture from the R (right) signal. •Connecting via the S video plug alone. REC 109 Dubbing starts. The audio will not be output when you...
Operating Instructions
Page 112
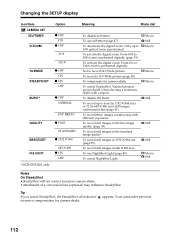
...Movie Movie Movie Still Still Still Movie Still Notes On SteadyShot •SteadyShot will not correct excessive camera shake. •Attachment of a conversion lens (optional) may influence SteadyShot. To use NightShot Light (page 45). To record up to four (in 1152 ✕ 864 size)... z FINE STANDARD IMAGESIZE* z 1152 ✕ 864 N.S.LIGHT * DCR-DVD201 only 640 ✕ 480 z ON OFF Meaning Mode dial To disable self-timer. To deactivate the digital zoom. From 10✕ to record 16:9 Wide picture. To cancel SteadyShot. To record three images continuously with a tripod....
...Movie Movie Movie Still Still Still Movie Still Notes On SteadyShot •SteadyShot will not correct excessive camera shake. •Attachment of a conversion lens (optional) may influence SteadyShot. To use NightShot Light (page 45). To record up to four (in 1152 ✕ 864 size)... z FINE STANDARD IMAGESIZE* z 1152 ✕ 864 N.S.LIGHT * DCR-DVD201 only 640 ✕ 480 z ON OFF Meaning Mode dial To disable self-timer. To deactivate the digital zoom. From 10✕ to record 16:9 Wide picture. To cancel SteadyShot. To record three images continuously with a tripod....