
Limited Warranty (US Only)
Page 1
... all parts costs. 3. PARTS: In addition, Sony will repair or replace the Product, at its original packaging or packaging affording an equal degree of a service problem, or for all labor charges. 2. 4-557-172-02 General Stereo/Hifi Components/Tape Decks ® CD Players/Mini Disc Players/Audio Systems Hifi Audio LIMITED WARRANTY Sony Electronics Inc. ("Sony") warrants this Product is valid only in material or workmanship as fuses or batteries...
... all parts costs. 3. PARTS: In addition, Sony will repair or replace the Product, at its original packaging or packaging affording an equal degree of a service problem, or for all labor charges. 2. 4-557-172-02 General Stereo/Hifi Components/Tape Decks ® CD Players/Mini Disc Players/Audio Systems Hifi Audio LIMITED WARRANTY Sony Electronics Inc. ("Sony") warrants this Product is valid only in material or workmanship as fuses or batteries...
Operating Instructions
Page 1
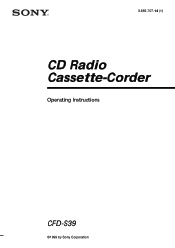
3-865-707-14 (1) CD Radio Cassette-Corder Operating Instructions CFD-S39 ©1999 by Sony Corporation
3-865-707-14 (1) CD Radio Cassette-Corder Operating Instructions CFD-S39 ©1999 by Sony Corporation
Operating Instructions
Page 2
... built-in the battery compartment. Owner's Record The model number is located at the bottom and the serial number is located in cabinet. If this equipment. Information For customers in the literature accompanying the appliance. However, there is no guarantee that to comply with this product. CFD-S39 Serial No. 2 Introduction This symbol is intended to alert the user to rain or...
... built-in the battery compartment. Owner's Record The model number is located at the bottom and the serial number is located in cabinet. If this equipment. Information For customers in the literature accompanying the appliance. However, there is no guarantee that to comply with this product. CFD-S39 Serial No. 2 Introduction This symbol is intended to alert the user to rain or...
Operating Instructions
Page 3
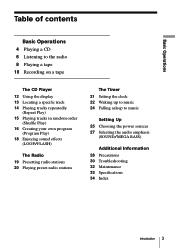
... radio 8 Playing a tape 10 Recording on a tape The CD Player 12 Using the display 13 Locating a specific track 14 Playing tracks repeatedly (Repeat Play) 15 Playing tracks in random order (Shuffle Play) 16 Creating your own program (Program Play) 18 Enjoying sound effects (LOOP/FLASH) The Radio 19 Presetting radio stations 20 Playing preset radio stations The Timer 21 Setting the clock 22 Waking up to music 24 Falling asleep to music Setting Up 25 Choosing the power sources 27 Selecting the audio emphasis (SOUND/MEGA BASS) Additional Information 28 Precautions 30 Troubleshooting...
... radio 8 Playing a tape 10 Recording on a tape The CD Player 12 Using the display 13 Locating a specific track 14 Playing tracks repeatedly (Repeat Play) 15 Playing tracks in random order (Shuffle Play) 16 Creating your own program (Program Play) 18 Enjoying sound effects (LOOP/FLASH) The Radio 19 Presetting radio stations 20 Playing preset radio stations The Timer 21 Setting the clock 22 Waking up to music 24 Falling asleep to music Setting Up 25 Choosing the power sources 27 Selecting the audio emphasis (SOUND/MEGA BASS) Additional Information 28 Precautions 30 Troubleshooting...
Operating Instructions
Page 4
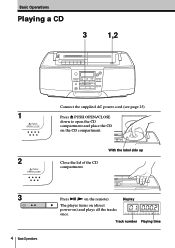
The player turns on (direct power-on the CD compartment. Press 6 PUSH OPEN/CLOSE down to open the CD compartment and place the CD on ) and plays all the tracks once. With the label side up 3 CD 4 BasicOperations Press ^ (( on the remote). Display Track number Playing time Basic Operations Playing a CD 3 1,2 1 PUSH OPEN/CLOSE 2 PUSH OPEN/CLOSE Connect the supplied AC power cord (see page 25). Close the lid of the CD compartment.
The player turns on (direct power-on the CD compartment. Press 6 PUSH OPEN/CLOSE down to open the CD compartment and place the CD on ) and plays all the tracks once. With the label side up 3 CD 4 BasicOperations Press ^ (( on the remote). Display Track number Playing time Basic Operations Playing a CD 3 1,2 1 PUSH OPEN/CLOSE 2 PUSH OPEN/CLOSE Connect the supplied AC power cord (see page 25). Close the lid of the CD compartment.

Operating Instructions
Page 6
.... Press RADIO BAND until the frequency digits begin to change in the display (direct power-on the remote) until the band you want appears in the display. The player automatically scans the radio frequencies and stops when it finds a clear station. on ). Listening to the radio 1 2 1 RADIO BAND PRESET Connect the supplied AC power cord (see page 25). Indicates an FM stereo broadcast 6 BasicOperations Display 2 TIME SET TUNE Hold down TIME SET•TUNE + or - (TUNE + or...
.... Press RADIO BAND until the frequency digits begin to change in the display (direct power-on the remote) until the band you want appears in the display. The player automatically scans the radio frequencies and stops when it finds a clear station. on ). Listening to the radio 1 2 1 RADIO BAND PRESET Connect the supplied AC power cord (see page 25). Indicates an FM stereo broadcast 6 BasicOperations Display 2 TIME SET TUNE Hold down TIME SET•TUNE + or - (TUNE + or...
Operating Instructions
Page 8
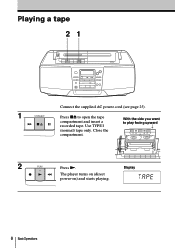
Playing a tape 21 1 STOP/EJECT Connect the supplied AC power cord (see page 25). With the side you want to open the tape compartment and insert a recorded tape. Use TYPE I (normal) tape only. Display 8 BasicOperations Press p6 to play facing upward 2 PLAY Press (. The player turns on (direct power-on) and starts playing. Close the compartment.
Playing a tape 21 1 STOP/EJECT Connect the supplied AC power cord (see page 25). With the side you want to open the tape compartment and insert a recorded tape. Use TYPE I (normal) tape only. Display 8 BasicOperations Press p6 to play facing upward 2 PLAY Press (. The player turns on (direct power-on) and starts playing. Close the compartment.

Operating Instructions
Page 9
... sides of the arrow. Basic Operations Tip Next time you want to listen to Basic Operations 9 Use these buttons for additional operations 0 ) p6 P VOLUME +, - The player turns on the remote). Press the button again to resume play the reverse side fast-forward or rewind the tape pause playback eject the cassette turn on/off the player Do this Press VOLUME +, - (VOL +, - POWER DIR MODE DIR To adjust the volume stop playback play after pause.
... sides of the arrow. Basic Operations Tip Next time you want to listen to Basic Operations 9 Use these buttons for additional operations 0 ) p6 P VOLUME +, - The player turns on the remote). Press the button again to resume play the reverse side fast-forward or rewind the tape pause playback eject the cassette turn on/off the player Do this Press VOLUME +, - (VOL +, - POWER DIR MODE DIR To adjust the volume stop playback play after pause.
Operating Instructions
Page 10
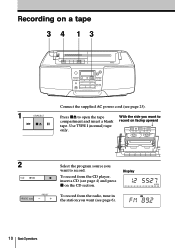
Use TYPE I (normal) tape only. With the side you want to record on facing upward 2 CD RADIO BAND PRESET Select the program source you want to open the tape compartment and insert a blank tape. To record from the radio, tune in the station you want (see page 25). Press p6 to record. Recording on the CD section. Display To record from the CD player, insert a CD (see page 4) and press p on a tape 3 4 13 1 STOP/EJECT Connect the supplied AC power cord (see page 6). 10 BasicOperations
Use TYPE I (normal) tape only. With the side you want to record on facing upward 2 CD RADIO BAND PRESET Select the program source you want to open the tape compartment and insert a blank tape. To record from the radio, tune in the station you want (see page 25). Press p6 to record. Recording on the CD section. Display To record from the CD player, insert a CD (see page 4) and press p on a tape 3 4 13 1 STOP/EJECT Connect the supplied AC power cord (see page 6). 10 BasicOperations
Operating Instructions
Page 13
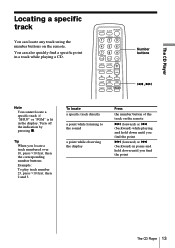
... 2 and 3. To locate a specific track directly a point while listening to the sound a point while observing the display Press the number button of the track on the remote. STANDBY SLEEP POWER CD/RADIO (AC ONLY) MODE 0/10 10 VOL BAND TUNE FUNCTION TUNE LOOP FLASH SOUND Number buttons =, + Note You cannot locate a specific track if "SHUF" or "PGM" is lit in the display. Turn off the indication by pressing p. The CD Player Locating a specific track You can also...
... 2 and 3. To locate a specific track directly a point while listening to the sound a point while observing the display Press the number button of the track on the remote. STANDBY SLEEP POWER CD/RADIO (AC ONLY) MODE 0/10 10 VOL BAND TUNE FUNCTION TUNE LOOP FLASH SOUND Number buttons =, + Note You cannot locate a specific track if "SHUF" or "PGM" is lit in the display. Turn off the indication by pressing p. The CD Player Locating a specific track You can also...

Operating Instructions
Page 14
... The CD Player 1 Press p. Playing tracks repeatedly (Repeat Play) You can play tracks repeatedly in normal, shuffle or program play modes (see step 3 on page 16). 3 Press (. STANDBY SLEEP POWER CD/RADIO (AC ONLY) MODE 0/10 10 VOL BAND TUNE FUNCTION TUNE LOOP FLASH SOUND Number buttons MODE ( p On the player • Press PLAY MODE• MONO/ST to repeat. 1 Press MODE until "REP ALL" appears. 2 Press (. 1 Press MODE until "SHUF REP" appears. 2 Press (. 1 Press MODE until "REP" disappears from the display. "Cd...
... The CD Player 1 Press p. Playing tracks repeatedly (Repeat Play) You can play tracks repeatedly in normal, shuffle or program play modes (see step 3 on page 16). 3 Press (. STANDBY SLEEP POWER CD/RADIO (AC ONLY) MODE 0/10 10 VOL BAND TUNE FUNCTION TUNE LOOP FLASH SOUND Number buttons MODE ( p On the player • Press PLAY MODE• MONO/ST to repeat. 1 Press MODE until "REP ALL" appears. 2 Press (. 1 Press MODE until "SHUF REP" appears. 2 Press (. 1 Press MODE until "REP" disappears from the display. "Cd...
Operating Instructions
Page 16
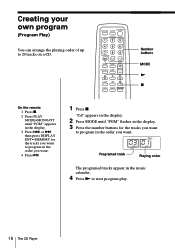
... SLEEP POWER CD/RADIO (AC ONLY) MODE 0/10 10 VOL BAND TUNE FUNCTION TUNE LOOP FLASH SOUND Number buttons MODE ( p On the remote 1 Press p. 2 Press PLAY MODE•MONO/ST until "PGM" flashes in the display. 3 Press the number buttons for the tracks you want to program in the music calender. 4 Press ( to start program play. 16 The CD Player Programed track Playing order The programed tracks appear in the order you want . 4 Press ^. 1 Press p. "Cd" appears in the display. 2 Press MODE...
... SLEEP POWER CD/RADIO (AC ONLY) MODE 0/10 10 VOL BAND TUNE FUNCTION TUNE LOOP FLASH SOUND Number buttons MODE ( p On the remote 1 Press p. 2 Press PLAY MODE•MONO/ST until "PGM" flashes in the display. 3 Press the number buttons for the tracks you want to program in the music calender. 4 Press ( to start program play. 16 The CD Player Programed track Playing order The programed tracks appear in the order you want . 4 Press ^. 1 Press p. "Cd" appears in the display. 2 Press MODE...
Operating Instructions
Page 20
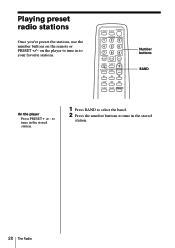
STANDBY SLEEP POWER CD/RADIO (AC ONLY) MODE 0/10 10 VOL BAND TUNE FUNCTION TUNE LOOP FLASH SOUND Number buttons BAND On the player Press PRESET + or - to tune in the stored station. 1 Press BAND to select the band. 2 Press the number buttons to tune in to tune in the stored station. 20 The Radio Playing preset radio stations Once you've preset the stations, use the number buttons on the player to your favorite stations. on the remote or PRESET +/-
STANDBY SLEEP POWER CD/RADIO (AC ONLY) MODE 0/10 10 VOL BAND TUNE FUNCTION TUNE LOOP FLASH SOUND Number buttons BAND On the player Press PRESET + or - to tune in the stored station. 1 Press BAND to select the band. 2 Press the number buttons to tune in to tune in the stored station. 20 The Radio Playing preset radio stations Once you've preset the stations, use the number buttons on the player to your favorite stations. on the remote or PRESET +/-

Operating Instructions
Page 24
... the preset time. STANDBY SLEEP POWER CD/RADIO (AC ONLY) SLEEP MODE 0/10 10 VOL BAND TUNE FUNCTION TUNE LOOP FLASH SOUND Tip • You can fall asleep while listening to music. Note When you want. 2 Press SLEEP to display "SLEEP." 3 Press SLEEP to turn off the power. Falling asleep to music You can set the player to turn off automatically after the set time has elapsed. 24 The Timer 1 Play the music...
... the preset time. STANDBY SLEEP POWER CD/RADIO (AC ONLY) SLEEP MODE 0/10 10 VOL BAND TUNE FUNCTION TUNE LOOP FLASH SOUND Tip • You can fall asleep while listening to music. Note When you want. 2 Press SLEEP to display "SLEEP." 3 Press SLEEP to turn off the power. Falling asleep to music You can set the player to turn off automatically after the set time has elapsed. 24 The Timer 1 Play the music...

Operating Instructions
Page 26
... longer operates the player, replace all the batteries with new ones. 4 Using the player on batteries Insert six size D (R20) batteries (not supplied) into the remote Note When you operate the player on batteries, you replace the batteries, be damaged. Choosing the power sources (continued) 3 Inserting batteries into the battery compartment. Replace all the batteries with new ones. • Before you cannot turn on batteries, disconnect the AC power cord from the player. To use , the batteries...
... longer operates the player, replace all the batteries with new ones. 4 Using the player on batteries Insert six size D (R20) batteries (not supplied) into the remote Note When you operate the player on batteries, you replace the batteries, be damaged. Choosing the power sources (continued) 3 Inserting batteries into the battery compartment. Replace all the batteries with new ones. • Before you cannot turn on batteries, disconnect the AC power cord from the player. To use , the batteries...
Operating Instructions
Page 28
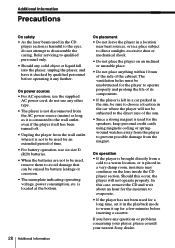
... be unobstructed for the speakers, keep personal credit cards using magnetic coding or springwound watches away from the player to the direct rays of the cabinet. On operation • If the player is brought directly from the wall outlet when it up for an extended period of time. • For battery operation, use the supplied AC power cord; Should this case, remove the CD and wait about...
... be unobstructed for the speakers, keep personal credit cards using magnetic coding or springwound watches away from the player to the direct rays of the cabinet. On operation • If the player is brought directly from the wall outlet when it up for an extended period of time. • For battery operation, use the supplied AC power cord; Should this case, remove the CD and wait about...
Operating Instructions
Page 30
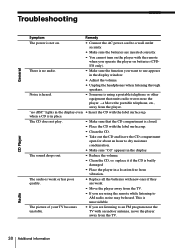
... speakers. CD Player Radio 30 Additional Information The sound drops out. • Reduce the volume. • Clean the CD, or replace it if the CD is no dISC" lights in a location free from the player. "no audio. • Make sure the function you operate the player on the player with the remote when you want to use appears in place. Troubleshooting General Symptom Remedy The power is not on. • Connect the AC power cord...
... speakers. CD Player Radio 30 Additional Information The sound drops out. • Reduce the volume. • Clean the CD, or replace it if the CD is no dISC" lights in a location free from the player. "no audio. • Make sure the function you operate the player on the player with the remote when you want to use appears in place. Troubleshooting General Symptom Remedy The power is not on. • Connect the AC power cord...

Operating Instructions
Page 31
... sound is poor. The timer does not operate. Use TYPE I (normal) tape and play . Timer Remote After trying the above remedies, if you still have problems, unplug the AC power cord and remove all the batteries in the remote with new ones if they are weak. • Make sure that you press an operation button. After all the indications in the display disappear, plug the power cord and insert the batteries again. Tape Player...
... sound is poor. The timer does not operate. Use TYPE I (normal) tape and play . Timer Remote After trying the above remedies, if you still have problems, unplug the AC power cord and remove all the batteries in the remote with new ones if they are weak. • Make sure that you press an operation button. After all the indications in the display disappear, plug the power cord and insert the batteries again. Tape Player...
Operating Instructions
Page 33
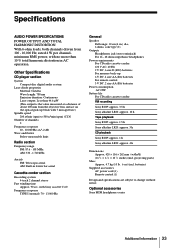
...AC operation. Optional accessories Sony MDR headphones series Additional Information 33 Other Specifications CD player section System Compact disc digital audio system Laser diode properties Material: GaAlAs Wave length: 780 nm Emission duration: Continuous Laser output: Less than 10 % total harmonic distortion in ferrite bar aerial Cassette-corder section Recording system 4-track 2 channel stereo Fast winding time Approx. 90 sec. projecting parts) Mass Approx. 4.7 kg (10 lb. 6 oz) (incl. batteries) Supplied accessories AC power cord (1) Remote control (1) Design and specifications are...
...AC operation. Optional accessories Sony MDR headphones series Additional Information 33 Other Specifications CD player section System Compact disc digital audio system Laser diode properties Material: GaAlAs Wave length: 780 nm Emission duration: Continuous Laser output: Less than 10 % total harmonic distortion in ferrite bar aerial Cassette-corder section Recording system 4-track 2 channel stereo Fast winding time Approx. 90 sec. projecting parts) Mass Approx. 4.7 kg (10 lb. 6 oz) (incl. batteries) Supplied accessories AC power cord (1) Remote control (1) Design and specifications are...
Operating Instructions
Page 34
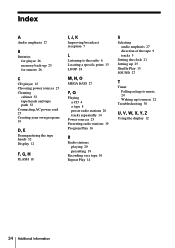
...K Improving broadcast reception 7 L Listening to the radio 6 Locating a specific point 13 LOOP 18 M, N, O MEGA BASS 27 P, Q Playing a CD 4 a tape 8 preset radio stations 20 tracks repeatedly 14 Power sources 25 Presetting radio stations 19 Program Play 16 R Radio stations playing 20 presetting 19 Recording on a tape 10 Repeat Play 14 S Selecting audio emphasis 27 direction of the tape 9 tracks 5 Setting the clock 21 Setting up 25 Shuffle Play 15 SOUND 27 T Timer Falling asleep to music 24 Waking up to music 22 Troubleshooting 30 U, V, W, X, Y, Z Using the display 12 34 Additional Information
...K Improving broadcast reception 7 L Listening to the radio 6 Locating a specific point 13 LOOP 18 M, N, O MEGA BASS 27 P, Q Playing a CD 4 a tape 8 preset radio stations 20 tracks repeatedly 14 Power sources 25 Presetting radio stations 19 Program Play 16 R Radio stations playing 20 presetting 19 Recording on a tape 10 Repeat Play 14 S Selecting audio emphasis 27 direction of the tape 9 tracks 5 Setting the clock 21 Setting up 25 Shuffle Play 15 SOUND 27 T Timer Falling asleep to music 24 Waking up to music 22 Troubleshooting 30 U, V, W, X, Y, Z Using the display 12 34 Additional Information


