
Limited Warranty (U.S. Only)
Page 1
... ALL FAULTS or consumables (such as set forth below. LIMITATION ON DAMAGES: SONY SHALL NOT BE LIABLE FOR ANY INCIDENTAL OR CONSEQUENTIAL DAMAGES FOR BREACH OF ANY EXPRESS OR IMPLIED WARRANTY ON THIS PRODUCT. If Sony elects to any repair, replacement part or replacement product for the time periods and as fuses or batteries). This Limited Warranty covers only the...
... ALL FAULTS or consumables (such as set forth below. LIMITATION ON DAMAGES: SONY SHALL NOT BE LIABLE FOR ANY INCIDENTAL OR CONSEQUENTIAL DAMAGES FOR BREACH OF ANY EXPRESS OR IMPLIED WARRANTY ON THIS PRODUCT. If Sony elects to any repair, replacement part or replacement product for the time periods and as fuses or batteries). This Limited Warranty covers only the...

Installation/Connections Instructions
Page 1
3-261-841-61 (1) 2 A FM/AM Compact Disc Player Installation/Connections Instalación/Conexiones B AUDIO OUT REAR CDX-SW200 © 2004 Sony Corporation Printed in Korea 1 1 2 3 × 4 4 5 × 2 Equipment used in illustrations (not supplied) Equipo utilizado en las ilustraciones (no suministrado) Front speaker Altavoces delanteros Power amplifier Amplificador de potencia Rear speaker Altavoces traseros Cautions • This unit is designed for amplifiers. Parts Iist (1) • The numbers in the list are keyed to...
3-261-841-61 (1) 2 A FM/AM Compact Disc Player Installation/Connections Instalación/Conexiones B AUDIO OUT REAR CDX-SW200 © 2004 Sony Corporation Printed in Korea 1 1 2 3 × 4 4 5 × 2 Equipment used in illustrations (not supplied) Equipo utilizado en las ilustraciones (no suministrado) Front speaker Altavoces delanteros Power amplifier Amplificador de potencia Rear speaker Altavoces traseros Cautions • This unit is designed for amplifiers. Parts Iist (1) • The numbers in the list are keyed to...

Primary User Manual
Page 1
3-261-840-51 (1) FM/AM Compact Disc Player Operating Instructions US Manual de instrucciones ES Owner's Record The model and serial numbers are located on the bottom of the unit. Refer to these numbers in the space provided below. CDX-SW200 Serial No. Record these numbers whenever you call upon your Sony dealer regarding this product. CDX-SW200 © 2004 Sony Corporation For installation and connections, see the supplied installation/connections manual. Model No. Para obtener informació...
3-261-840-51 (1) FM/AM Compact Disc Player Operating Instructions US Manual de instrucciones ES Owner's Record The model and serial numbers are located on the bottom of the unit. Refer to these numbers in the space provided below. CDX-SW200 Serial No. Record these numbers whenever you call upon your Sony dealer regarding this product. CDX-SW200 © 2004 Sony Corporation For installation and connections, see the supplied installation/connections manual. Model No. Para obtener informació...
Primary User Manual
Page 2
... B digital device, pursuant to Part 15 of the following measures: - Reorient or relocate the receiving antenna. - You can radiate radio frequency energy and, if not installed and used in a particular installation. Warning This equipment has been tested and found to comply with this product will not occur in accordance with : Optional controller accessory Card remote commander RM-X114 2 If this Sony Compact Disc Player. Welcome...
... B digital device, pursuant to Part 15 of the following measures: - Reorient or relocate the receiving antenna. - You can radiate radio frequency energy and, if not installed and used in a particular installation. Warning This equipment has been tested and found to comply with this product will not occur in accordance with : Optional controller accessory Card remote commander RM-X114 2 If this Sony Compact Disc Player. Welcome...
Primary User Manual
Page 3
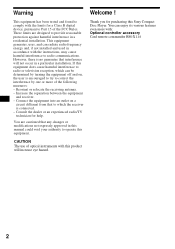
... Tuning Memory (BTM 10 Receiving the stored stations 11 Storing only the desired stations 11 Other Functions Adjusting the balance and fader 12 Quickly attenuating the sound 12 Changing the sound and display settings 12 Setting the equalizer (EQ3 13 Additional Information Maintenance 14 Removing the unit 15 Specifications 16 Troubleshooting 17 Error displays/Message 18 3 Table of Contents Location of controls 4 Precautions 5 Notes on discs 6 Getting Started Resetting the unit 7 Detaching the front panel 7 Setting the clock 8 CD Player Playing a disc 9 Display...
... Tuning Memory (BTM 10 Receiving the stored stations 11 Storing only the desired stations 11 Other Functions Adjusting the balance and fader 12 Quickly attenuating the sound 12 Changing the sound and display settings 12 Setting the equalizer (EQ3 13 Additional Information Maintenance 14 Removing the unit 15 Specifications 16 Troubleshooting 17 Error displays/Message 18 3 Table of Contents Location of controls 4 Precautions 5 Notes on discs 6 Getting Started Resetting the unit 7 Detaching the front panel 7 Setting the clock 8 CD Player Playing a disc 9 Display...
Primary User Manual
Page 4
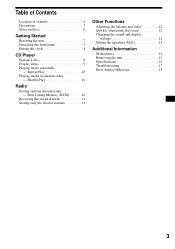
... Tuning Memory) button 10 n DSPL (display mode change) button 8, 9 o EQ3 button 13 p Receptor for details. Location of the unit, behind the front panel) 7 l Number buttons 12 Radio: Storing the desired station on /Radio/CD) button Selecting the source. SEL MODE SOURCE ATT SENS 1 REP SHUF 2 3 4 5 SEEK OFF EQ3 6 BTM DSPL CDX-SW200 a Volume +/- CD: Skipping tracks/fast-forwarding, reversing a track. * Warning when installing in stations automatically/finding a station manually. Otherwise, the display does not turn off ) button* 7, 9 f Z (eject) button 9 g (front panel release...
... Tuning Memory) button 10 n DSPL (display mode change) button 8, 9 o EQ3 button 13 p Receptor for details. Location of the unit, behind the front panel) 7 l Number buttons 12 Radio: Storing the desired station on /Radio/CD) button Selecting the source. SEL MODE SOURCE ATT SENS 1 REP SHUF 2 3 4 5 SEEK OFF EQ3 6 BTM DSPL CDX-SW200 a Volume +/- CD: Skipping tracks/fast-forwarding, reversing a track. * Warning when installing in stations automatically/finding a station manually. Otherwise, the display does not turn off ) button* 7, 9 f Z (eject) button 9 g (front panel release...
Primary User Manual
Page 5
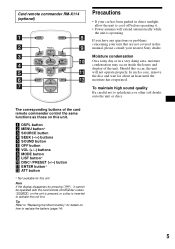
... the lenses and display of the card remote commander control the same functions as those on how to replace the battery (page 14). 5 To maintain high sound quality Be careful not to cool off before operating it cannot be operated with the card remote commander unless (SOURCE) on the unit is pressed, or a disc is operating. a DSPL button b MENU button* c SOURCE button d SEEK (-/+) buttons e SOUND button f OFF button g VOL (+/-) buttons h MODE button i LIST button* j DISC*/PRESET (+/-) button k ENTER button* l ATT button * Not available...
... the lenses and display of the card remote commander control the same functions as those on how to replace the battery (page 14). 5 To maintain high sound quality Be careful not to cool off before operating it cannot be operated with the card remote commander unless (SOURCE) on the unit is pressed, or a disc is operating. a DSPL button b MENU button* c SOURCE button d SEEK (-/+) buttons e SOUND button f OFF button g VOL (+/-) buttons h MODE button i LIST button* j DISC*/PRESET (+/-) button k ENTER button* l ATT button * Not available...
Primary User Manual
Page 6
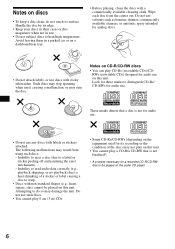
... its edge. • Keep your discs in their cases or disc magazines when not in a parked car or on a dashboard/rear tray. • Before playing, clean the discs with non-standard shapes (e.g., heart, square, star) cannot be played on the audio CD player. 6 Avoid leaving them in use. • Do not subject discs to heat/high temperature. Notes on CD-R/CD...
... its edge. • Keep your discs in their cases or disc magazines when not in a parked car or on a dashboard/rear tray. • Before playing, clean the discs with non-standard shapes (e.g., heart, square, star) cannot be played on the audio CD player. 6 Avoid leaving them in use. • Do not subject discs to heat/high temperature. Notes on CD-R/CD...
Primary User Manual
Page 7
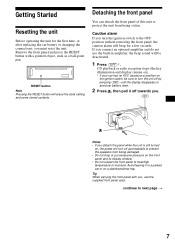
... the RESET button will beep for the first time, or after replacing the car battery or changing the connections, you detach the panel while the unit is still turned on a dashboard/rear tray. Detaching the front panel You can detach the front panel of this unit to protect the unit from being damaged. • Do not drop or put excessive pressure on the front panel and its display window...
... the RESET button will beep for the first time, or after replacing the car battery or changing the connections, you detach the panel while the unit is still turned on a dashboard/rear tray. Detaching the front panel You can detach the front panel of this unit to protect the unit from being damaged. • Do not drop or put excessive pressure on the front panel and its display window...

Primary User Manual
Page 8
... flashes. 3 Press the volume +/- button to 10:08 1 Press (DSPL) for 2 seconds. After the clock setting is completed, the display returns to part B of the unit as illustrated and push the left side into position until it clicks. Attaching the front panel Attach part A of the front panel to normal play mode. 8 The clock starts. Setting the clock The clock uses a 12-hour digital indication. Example: To set the clock...
... flashes. 3 Press the volume +/- button to 10:08 1 Press (DSPL) for 2 seconds. After the clock setting is completed, the display returns to part B of the unit as illustrated and push the left side into position until it clicks. Attaching the front panel Attach part A of the front panel to normal play mode. 8 The clock starts. Setting the clock The clock uses a 12-hour digital indication. Example: To set the clock...

Primary User Manual
Page 9
... can be displayed. To Press Switch display item (DSPL) 9 Source Track number Displayable items • Elapsed playing time • Clock Playback starts automatically. If a disc is over, playback restarts from the first track of the disc. • When the last track on the disc is playing, if (SEEK) (-) or (SEEK) (+) is pressed, playback skips to start playback. Automatic Music Sensor Fast-forward/ reverse - Manual Search...
... can be displayed. To Press Switch display item (DSPL) 9 Source Track number Displayable items • Elapsed playing time • Clock Playback starts automatically. If a disc is over, playback restarts from the first track of the disc. • When the last track on the disc is playing, if (SEEK) (-) or (SEEK) (+) is pressed, playback skips to start playback. Automatic Music Sensor Fast-forward/ reverse - Manual Search...
Primary User Manual
Page 10
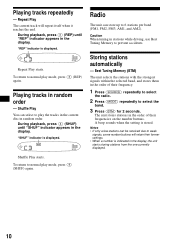
... Play starts. Playing tracks repeatedly - Playing tracks in stations while driving, use Best Tuning Memory to prevent accidents. To return to normal play mode, press (3) (REP) again. Best Tuning Memory (BTM) The unit selects the stations with the strongest signals within the selected band, and stores them in the order of their frequencies on the number buttons. Repeat Play The current track will retain their frequency. 1 Press (SOURCE) repeatedly to select the radio. 2 Press (MODE...
... Play starts. Playing tracks repeatedly - Playing tracks in stations while driving, use Best Tuning Memory to prevent accidents. To return to normal play mode, press (3) (REP) again. Best Tuning Memory (BTM) The unit selects the stations with the strongest signals within the selected band, and stores them in the order of their frequencies on the number buttons. Repeat Play The current track will retain their frequency. 1 Press (SOURCE) repeatedly to select the radio. 2 Press (MODE...

Primary User Manual
Page 11
... mode, press (SENS) again ("MONO" indicator turns off ). If preset tuning does not work - Automatic tuning/Local Seek Mode Automatic tuning: Press (SEEK) (+) or (SEEK) (-) to (6)) on any chosen number button. 1 Press (SOURCE) repeatedly to select the radio. 2 Press (MODE) repeatedly to select the band. 3 Press (SEEK) (+) or (SEEK) (-) to tune in the display. Receiving the stored stations 1 Press (SOURCE) repeatedly to select the radio. 2 Press (MODE) repeatedly to select the band. 3 Press the number button...
... mode, press (SENS) again ("MONO" indicator turns off ). If preset tuning does not work - Automatic tuning/Local Seek Mode Automatic tuning: Press (SEEK) (+) or (SEEK) (-) to (6)) on any chosen number button. 1 Press (SOURCE) repeatedly to select the radio. 2 Press (MODE) repeatedly to select the band. 3 Press (SEEK) (+) or (SEEK) (-) to tune in the display. Receiving the stored stations 1 Press (SOURCE) repeatedly to select the radio. 2 Press (MODE) repeatedly to select the band. 3 Press the number button...

Primary User Manual
Page 12
... the preset number button simultaneously again. 12 Selecting the desired item Press (SEL) and the desired preset number button simultaneously. (SEL) + (4): DEMO* (SEL) + (6): BEEP * When the unit is turned off . Other Functions Adjusting the balance and fader You can be set: • DEMO* - to activate the demonstration display (The demonstration starts about 10 seconds after selecting the item. "ATT" appears in the display. Each time you press (SEL), the item changes as...
... the preset number button simultaneously again. 12 Selecting the desired item Press (SEL) and the desired preset number button simultaneously. (SEL) + (4): DEMO* (SEL) + (6): BEEP * When the unit is turned off . Other Functions Adjusting the balance and fader You can be set: • DEMO* - to activate the demonstration display (The demonstration starts about 10 seconds after selecting the item. "ATT" appears in the display. Each time you press (SEL), the item changes as...

Primary User Manual
Page 13
... desired volume level. Each time you press (EQ3), the item changes. The volume level is set equalizer curve, press (SEL) for each source. Note When EQ3 is adjustable by 1 dB steps from -10 dB to +10 dB. After 3 seconds, the display returns to select a source (Radio or CD). 2 Press (EQ3) repeatedly until the desired equalizer curve. Adjusting the equalizer curve You can store and adjust the equalizer settings for 7 music types (XPLOD...
... desired volume level. Each time you press (EQ3), the item changes. The volume level is set equalizer curve, press (SEL) for each source. Note When EQ3 is adjustable by 1 dB steps from -10 dB to +10 dB. After 3 seconds, the display returns to select a source (Radio or CD). 2 Press (EQ3) repeatedly until the desired equalizer curve. Adjusting the equalizer curve You can store and adjust the equalizer settings for 7 music types (XPLOD...
Primary User Manual
Page 14
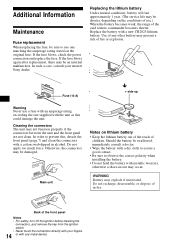
... the original fuse. Main unit Notes on the conditions of use.) When the battery becomes weak, the range of the front panel Notes • For safety, turn off the ignition before cleaning the connectors, and remove the key from the ignition switch. • Never touch the connectors directly with your nearest Sony dealer. Back of the card remote commander becomes shorter. Replace the battery with...
... the original fuse. Main unit Notes on the conditions of use.) When the battery becomes weak, the range of the front panel Notes • For safety, turn off the ignition before cleaning the connectors, and remove the key from the ignition switch. • Never touch the connectors directly with your nearest Sony dealer. Back of the card remote commander becomes shorter. Replace the battery with...

Primary User Manual
Page 15
Face the hook inwards. Orient the release key correctly. 3 Pull out the release keys to remove the protection collar. 2 Pull the release keys to unseat the unit. 3 Slide the unit out of the mounting. 15 Removing the unit 1 Remove the protection collar. 1 Detach the front panel (page 7). 2 Engage the release keys together with the protection collar. 2 Remove the unit. 1 Insert both release keys together until they click.
Face the hook inwards. Orient the release key correctly. 3 Pull out the release keys to remove the protection collar. 2 Pull the release keys to unseat the unit. 3 Slide the unit out of the mounting. 15 Removing the unit 1 Remove the protection collar. 1 Detach the front panel (page 7). 2 Engage the release keys together with the protection collar. 2 Remove the unit. 1 Insert both release keys together until they click.
Primary User Manual
Page 16
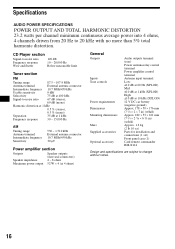
... µV Power amplifier section Outputs Speaker impedance Maximum power output Speaker outputs (sure seal connectors) 4 - 8 ohms 52 W × 4 (at 4 ohms) General Outputs Inputs Tone controls Power requirements Dimensions Mounting dimensions Mass Supplied accessories Optional accessory Audio outputs terminal (rear) Power antenna relay control terminal Power amplifier control terminal Antenna input terminal Low: ±10 dB at 60 Hz (XPLOD) Mid: ±10 dB at 1 kHz (XPLOD) High: ±10 dB at 10 kHz (XPLOD) 12 V DC car battery (negative ground...
... µV Power amplifier section Outputs Speaker impedance Maximum power output Speaker outputs (sure seal connectors) 4 - 8 ohms 52 W × 4 (at 4 ohms) General Outputs Inputs Tone controls Power requirements Dimensions Mounting dimensions Mass Supplied accessories Optional accessory Audio outputs terminal (rear) Power antenna relay control terminal Power amplifier control terminal Antenna input terminal Low: ±10 dB at 60 Hz (XPLOD) Mid: ±10 dB at 1 kHz (XPLOD) High: ±10 dB at 10 kHz (XPLOD) 12 V DC car battery (negative ground...
Primary User Manual
Page 17
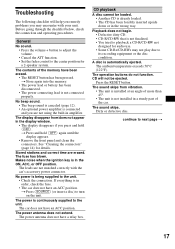
.... CD will help you remedy problems you may not play due to its recording equipment or the disc condition. The sound skips. continue to the unit. • Check the connection. Before going through the checklist below, check the connection and operating procedures. The fuse has blown. t Press (SOURCE) (or insert a disc) to the unit. The power antenna does not extend. The operation buttons do not function. The ambient...
.... CD will help you remedy problems you may not play due to its recording equipment or the disc condition. The sound skips. continue to the unit. • Check the connection. Before going through the checklist below, check the connection and operating procedures. The fuse has blown. t Press (SOURCE) (or insert a disc) to the unit. The power antenna does not extend. The operation buttons do not function. The ambient...
Primary User Manual
Page 18
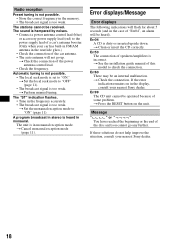
... connection of speakers/amplifiers is too weak. The "ST" indication flashes. • Tune in the frequency accurately. • The broadcast signal is in monaural reception mode. The unit is too weak. If the error indication remains on the unit. Message " " or " " You have reached the beginning or the end of some problem. t Set the monaural reception mode to "ON" (page 11). t Press the RESET button...
... connection of speakers/amplifiers is too weak. The "ST" indication flashes. • Tune in the frequency accurately. • The broadcast signal is in monaural reception mode. The unit is too weak. If the error indication remains on the unit. Message " " or " " You have reached the beginning or the end of some problem. t Set the monaural reception mode to "ON" (page 11). t Press the RESET button...


