
Limited Warranty (U.S. Only)
Page 1
... defects in either its option, (i) repair the product using new or refurbished parts or (ii) replace the product with new or refurbished product, product determined to be defective. For purposes of the product ("Labor Warranty"), Sony will supply new or refurbished replacement parts in Japan any enclosed software Limited Warranty. For specific instructions on your rights and obligations with...
... defects in either its option, (i) repair the product using new or refurbished parts or (ii) replace the product with new or refurbished product, product determined to be defective. For purposes of the product ("Labor Warranty"), Sony will supply new or refurbished replacement parts in Japan any enclosed software Limited Warranty. For specific instructions on your rights and obligations with...
Installation/Connection Instructions
Page 1
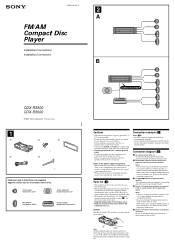
...-11 (1) 2 A FM/AM Compact Disc Player Installation/Connections Installation/Connexions B AUDIO OUT REAR CDX-R3300 CDX-R3000 © 2004 Sony Corporation Printed in Korea 1 1 2 3 × 4 4 5 × 2 Equipment used in illustrations (not supplied) Appareils utilisés dans les illustrations (non fournis) Front speaker Haut-parleur avant Active subwoofer Caisson de graves actif Rear speaker Haut-parleur arrière Power amplifier Amplificateur de puissance Cautions • This unit is only for amplifiers. Connection diagram (3) 1 To a metal...
...-11 (1) 2 A FM/AM Compact Disc Player Installation/Connections Installation/Connexions B AUDIO OUT REAR CDX-R3300 CDX-R3000 © 2004 Sony Corporation Printed in Korea 1 1 2 3 × 4 4 5 × 2 Equipment used in illustrations (not supplied) Appareils utilisés dans les illustrations (non fournis) Front speaker Haut-parleur avant Active subwoofer Caisson de graves actif Rear speaker Haut-parleur arrière Power amplifier Amplificateur de puissance Cautions • This unit is only for amplifiers. Connection diagram (3) 1 To a metal...
Primary User Manual
Page 1
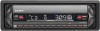
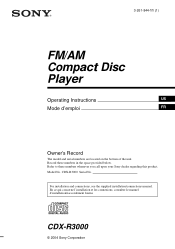
Record these numbers whenever you call upon your Sony dealer regarding this product. Model No. En ce qui concerne l'installation et les connexions, consulter le manuel d'installation/raccordement fourni. CDX-R3000 Serial No. CDX-R3000 © 2004 Sony Corporation Refer to these numbers in the space provided below. For installation and connections, see the supplied installation/connections manual. 3-261-844-11 (1) FM/AM Compact Disc Player Operating Instructions US Mode d'emploi FR Owner's Record The model and serial numbers are located on the bottom of the unit.
Record these numbers whenever you call upon your Sony dealer regarding this product. Model No. En ce qui concerne l'installation et les connexions, consulter le manuel d'installation/raccordement fourni. CDX-R3000 Serial No. CDX-R3000 © 2004 Sony Corporation Refer to these numbers in the space provided below. For installation and connections, see the supplied installation/connections manual. 3-261-844-11 (1) FM/AM Compact Disc Player Operating Instructions US Mode d'emploi FR Owner's Record The model and serial numbers are located on the bottom of the unit.

Primary User Manual
Page 2
... hazard. 2 Increase the separation between the equipment and receiver. - Connect the equipment into an outlet on , the user is connected. - Thank you for help. You are designed to provide reasonable protection against harmful interference in a particular installation. Consult the dealer or an experienced radio/TV technician for purchasing this Sony Compact Disc Player. Warning This equipment has been tested and found to...
... hazard. 2 Increase the separation between the equipment and receiver. - Connect the equipment into an outlet on , the user is connected. - Thank you for help. You are designed to provide reasonable protection against harmful interference in a particular installation. Consult the dealer or an experienced radio/TV technician for purchasing this Sony Compact Disc Player. Warning This equipment has been tested and found to...
Primary User Manual
Page 3
... Radio Storing stations automatically - Best Tuning Memory (BTM 11 Receiving the stored stations 11 Storing only the desired stations 12 Other Functions Adjusting the sound characteristics 12 Quickly attenuating the sound 12 Changing the sound and display settings - Repeat Play 10 Playing tracks in random order - Menu 13 Setting the equalizer (EQ3 14 Additional Information Maintenance 15 Removing the unit 16 Specifications 17 Troubleshooting 18 Error displays/Message 19 3 Table of Contents Location of controls 4 Precautions 5 Notes on discs...
... Radio Storing stations automatically - Best Tuning Memory (BTM 11 Receiving the stored stations 11 Storing only the desired stations 12 Other Functions Adjusting the sound characteristics 12 Quickly attenuating the sound 12 Changing the sound and display settings - Repeat Play 10 Playing tracks in random order - Menu 13 Setting the equalizer (EQ3 14 Additional Information Maintenance 15 Removing the unit 16 Specifications 17 Troubleshooting 18 Error displays/Message 19 3 Table of Contents Location of controls 4 Precautions 5 Notes on discs...
Primary User Manual
Page 4
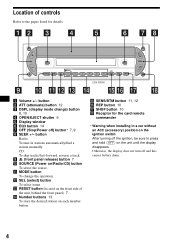
l SEL (select) button To select items. m RESET button (located on the front side of controls Refer to press and hold (OFF) on the unit until the display disappears. button b ATT (attenuate) button 12 c DSPL (display mode change the operation. Otherwise, the display does not turn off ) button* 7, 9 h SEEK +/- Location of the unit, behind the front panel) 7 n Number buttons 13 To store the desired station on /Radio/CD) button To select the source. button Radio: To tune in a car without an ACC (accessory) position on...
l SEL (select) button To select items. m RESET button (located on the front side of controls Refer to press and hold (OFF) on the unit until the display disappears. button b ATT (attenuate) button 12 c DSPL (display mode change the operation. Otherwise, the display does not turn off ) button* 7, 9 h SEEK +/- Location of the unit, behind the front panel) 7 n Number buttons 13 To store the desired station on /Radio/CD) button To select the source. button Radio: To tune in a car without an ACC (accessory) position on...

Primary User Manual
Page 5
... (OFF), it . • Power antenna will not operate properly. In such a case, remove the disc and wait for this unit. SEEK+ ENTER ATT Precautions • If your nearest Sony dealer. Moisture condensation On a rainy day or in direct sunlight, allow the unit to activate the unit first. Card remote commander RM-X114 (optional) DSPL MODE PRESET + MENU DISC + LIST SEEK- The corresponding buttons of the unit. Tip For details...
... (OFF), it . • Power antenna will not operate properly. In such a case, remove the disc and wait for this unit. SEEK+ ENTER ATT Precautions • If your nearest Sony dealer. Moisture condensation On a rainy day or in direct sunlight, allow the unit to activate the unit first. Card remote commander RM-X114 (optional) DSPL MODE PRESET + MENU DISC + LIST SEEK- The corresponding buttons of the unit. Tip For details...

Primary User Manual
Page 6
... on this unit. Notes on a dashboard/rear tray. • Before playing, clean the discs with labels or stickers attached. Avoid leaving them in use any discs with a commercially available cleaning cloth. These marks denote that is not for audio use . Inability to eject a disc (due to warp. • Discs with sticky ink/residue. Such discs may damage the unit. Handle the disc by its...
... on this unit. Notes on a dashboard/rear tray. • Before playing, clean the discs with labels or stickers attached. Avoid leaving them in use any discs with a commercially available cleaning cloth. These marks denote that is not for audio use . Inability to eject a disc (due to warp. • Discs with sticky ink/residue. Such discs may damage the unit. Handle the disc by its...

Primary User Manual
Page 7
... removing the front panel, the caution alarm will erase the clock setting and some stored contents. Remove the front panel and press the RESET button with you must reset the unit. continue to protect the unit from being stolen. If you detach the panel while the unit is still turned on, the power will turn the ignition switch to avoid car battery drain. 2 Press , then pull it in amplifier, the beep sound...
... removing the front panel, the caution alarm will erase the clock setting and some stored contents. Remove the front panel and press the RESET button with you must reset the unit. continue to protect the unit from being stolen. If you detach the panel while the unit is still turned on, the power will turn the ignition switch to avoid car battery drain. 2 Press , then pull it in amplifier, the beep sound...

Primary User Manual
Page 8
... clock setting is completed, the display returns to set the minute. 2 Press (DSPL). button to normal play mode. 8 The hour indication flashes. The minute indication flashes. 3 Press the volume +/- Note Do not put anything on the inner surface of the unit as illustrated and push the left side into position until it clicks. Attaching the front panel Attach part A of the front panel to part...
... clock setting is completed, the display returns to set the minute. 2 Press (DSPL). button to normal play mode. 8 The hour indication flashes. The minute indication flashes. 3 Press the volume +/- Note Do not put anything on the inner surface of the unit as illustrated and push the left side into position until it clicks. Attaching the front panel Attach part A of the front panel to part...

Primary User Manual
Page 9
...disc may be played with the shutter opened or closed. Automatic Music Sensor Fast-forward/ reverse - The disc is already inserted, press (SOURCE) repeatedly until "CD" appears to start playback. Tip A disc can be ejected if you open the shutter forcefully. • While the first/last track on the disc... Skip tracks - Manual Search Press (OFF) (SEEK once for each track] (SEEK) (-/+) (m/M) [hold to the last/first track of the disc. If a disc is ejected. Notes • While ejecting or inserting a disc, do not close the shutter. CD Player Playing a disc 1 Open the ...
...disc may be played with the shutter opened or closed. Automatic Music Sensor Fast-forward/ reverse - The disc is already inserted, press (SOURCE) repeatedly until "CD" appears to start playback. Tip A disc can be ejected if you open the shutter forcefully. • While the first/last track on the disc... Skip tracks - Manual Search Press (OFF) (SEEK once for each track] (SEEK) (-/+) (m/M) [hold to the last/first track of the disc. If a disc is ejected. Notes • While ejecting or inserting a disc, do not close the shutter. CD Player Playing a disc 1 Open the ...

Primary User Manual
Page 11
... stations automatically - If preset tuning does not work - A beep sounds when the setting is received. Receiving the stored stations 1 Press (SOURCE) repeatedly to select the radio. 2 Press (MODE) repeatedly to select the band. 3 Press the number button ((1) to (6)) on the number buttons. Tip If you know the frequency of their frequency. 1 Press (SOURCE) repeatedly to select the radio. 2 Press (MODE) repeatedly to select the band. 3 Press (SENS) (BTM) for the station. continue to prevent accidents. Radio The unit...
... stations automatically - If preset tuning does not work - A beep sounds when the setting is received. Receiving the stored stations 1 Press (SOURCE) repeatedly to select the radio. 2 Press (MODE) repeatedly to select the band. 3 Press the number button ((1) to (6)) on the number buttons. Tip If you know the frequency of their frequency. 1 Press (SOURCE) repeatedly to select the radio. 2 Press (MODE) repeatedly to select the band. 3 Press (SENS) (BTM) for the station. continue to prevent accidents. Radio The unit...
Primary User Manual
Page 12
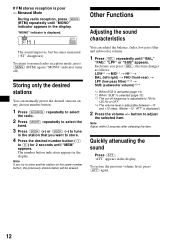
... and subwoofer volume. 1 Press (SEL) repeatedly until "BAL," "FAD," "LPF" or "SUB" appears. Note Adjust within 3 seconds after selecting the item. Note If you try to store another station on any chosen number button. 1 Press (SOURCE) repeatedly to select the radio. 2 Press (MODE) repeatedly to select the band. 3 Press (SEEK) (+) or (SEEK) (-) to tune in the display. Other Functions Adjusting the sound characteristics You can manually preset the desired stations on...
... and subwoofer volume. 1 Press (SEL) repeatedly until "BAL," "FAD," "LPF" or "SUB" appears. Note Adjust within 3 seconds after selecting the item. Note If you try to store another station on any chosen number button. 1 Press (SOURCE) repeatedly to select the radio. 2 Press (MODE) repeatedly to select the band. 3 Press (SEEK) (+) or (SEEK) (-) to tune in the display. Other Functions Adjusting the sound characteristics You can manually preset the desired stations on...

Primary User Manual
Page 13
... a power amplifier. - Switching the REAR/SUB* Press (SEL) and then press the volume + (REAR) or - (SUB) button. Select "REAR" to output to turn the demonstration display on or off . - Select "OFF" to activate the demonstration display (The demonstration starts about 10 seconds after the unit is turned off . 13 Menu The following items can be set: Set up • REAR/SUB* - Select "ON" to deactivate the Dimmer. After 3 seconds, the display returns to switch the audio output REAR or SUB. - to normal play mode. Select...
... a power amplifier. - Switching the REAR/SUB* Press (SEL) and then press the volume + (REAR) or - (SUB) button. Select "REAR" to output to turn the demonstration display on or off . - Select "OFF" to activate the demonstration display (The demonstration starts about 10 seconds after the unit is turned off . 13 Menu The following items can be set: Set up • REAR/SUB* - Select "ON" to deactivate the Dimmer. After 3 seconds, the display returns to switch the audio output REAR or SUB. - to normal play mode. Select...

Primary User Manual
Page 14
... can store and adjust the equalizer settings for each source. The volume level is set equalizer curve, press (SEL) for 7 music types (XPLOD, VOCAL, CLUB, JAZZ, N-AGE, ROCK, CUST and OFF (equalizer OFF)). Setting the equalizer (EQ3) You can select an equalizer curve for 2 seconds. Each time you press (EQ3), the item changes. Selecting the equalizer curve 1 Press (SOURCE) to the desired volume level. LOW t MID t HI (t BAL t FAD t LPF t SUB) 2 Press the...
... can store and adjust the equalizer settings for each source. The volume level is set equalizer curve, press (SEL) for 7 music types (XPLOD, VOCAL, CLUB, JAZZ, N-AGE, ROCK, CUST and OFF (equalizer OFF)). Setting the equalizer (EQ3) You can select an equalizer curve for 2 seconds. Each time you press (EQ3), the item changes. Selecting the equalizer curve 1 Press (SOURCE) to the desired volume level. LOW t MID t HI (t BAL t FAD t LPF t SUB) 2 Press the...

Primary User Manual
Page 15
... Information Maintenance Fuse replacement When replacing the fuse, be shorter, depending on the conditions of use.) When the battery becomes weak, the range of the card remote commander becomes shorter. Cleaning the connectors The unit may explode if mistreated. Back of any metal device. 15 Use of the front panel Notes • For safety, turn off the ignition before cleaning the connectors, and remove the...
... Information Maintenance Fuse replacement When replacing the fuse, be shorter, depending on the conditions of use.) When the battery becomes weak, the range of the card remote commander becomes shorter. Cleaning the connectors The unit may explode if mistreated. Back of any metal device. 15 Use of the front panel Notes • For safety, turn off the ignition before cleaning the connectors, and remove the...

Primary User Manual
Page 16
Orient the release key correctly. 3 Pull out the release keys to remove the protection collar. 2 Pull the release keys to unseat the unit. 3 Slide the unit out of the mounting. 16 Face the hook inwards. Removing the unit 1 Remove the protection collar. 1 Detach the front panel (page 7). 2 Engage the release keys together with the protection collar. 2 Remove the unit. 1 Insert both release keys together until they click.
Orient the release key correctly. 3 Pull out the release keys to remove the protection collar. 2 Pull the release keys to unseat the unit. 3 Slide the unit out of the mounting. 16 Face the hook inwards. Removing the unit 1 Remove the protection collar. 1 Detach the front panel (page 7). 2 Engage the release keys together with the protection collar. 2 Remove the unit. 1 Insert both release keys together until they click.

Primary User Manual
Page 17
... µV Power amplifier section Outputs Speaker impedance Maximum power output Speaker outputs (sure seal connectors) 4 - 8 ohms 52 W × 4 (at 4 ohms) General Outputs Input Tone controls Power requirements Dimensions Mounting dimensions Mass Supplied accessories Optional accessory Audio outputs terminal (rear/sub switchable) Power antenna relay control terminal Power amplifier control terminal Antenna input terminal Low: ±10 dB at 60 Hz (XPLOD) Mid: ±10 dB at 1 kHz (XPLOD) High: ±10 dB at 10 kHz (XPLOD) 12 V DC car battery (negative...
... µV Power amplifier section Outputs Speaker impedance Maximum power output Speaker outputs (sure seal connectors) 4 - 8 ohms 52 W × 4 (at 4 ohms) General Outputs Input Tone controls Power requirements Dimensions Mounting dimensions Mass Supplied accessories Optional accessory Audio outputs terminal (rear/sub switchable) Power antenna relay control terminal Power amplifier control terminal Antenna input terminal Low: ±10 dB at 60 Hz (XPLOD) Mid: ±10 dB at 1 kHz (XPLOD) High: ±10 dB at 10 kHz (XPLOD) 12 V DC car battery (negative...
Primary User Manual
Page 18
... the RESET button. The fuse has blown. t Press (SOURCE) (or insert a disc) to the unit. • Check the connection. The power is in order, check the fuse. • The car does not have been erased. • The RESET button has been pressed. CD will help you remedy problems you may not play back a CD-R/CD-RW not designed for a 2-speaker system. The power antenna does not extend. The operation buttons...
... the RESET button. The fuse has blown. t Press (SOURCE) (or insert a disc) to the unit. • Check the connection. The power is in order, check the fuse. • The car does not have been erased. • The RESET button has been pressed. CD will help you remedy problems you may not play back a CD-R/CD-RW not designed for a 2-speaker system. The power antenna does not extend. The operation buttons...
Primary User Manual
Page 19
... some problem. The stations cannot be an internal malfunction. t Check the connection of speakers/amplifiers is hampered by noises. • Connect a power antenna control lead (blue) or accessory power supply lead (red) to "ON" (page 12). A program broadcast in stereo is too weak. Radio reception Preset tuning is not possible. • Store the correct frequency in the memory. • The broadcast signal is too weak. t Set the local seek mode...
... some problem. The stations cannot be an internal malfunction. t Check the connection of speakers/amplifiers is hampered by noises. • Connect a power antenna control lead (blue) or accessory power supply lead (red) to "ON" (page 12). A program broadcast in stereo is too weak. Radio reception Preset tuning is not possible. • Store the correct frequency in the memory. • The broadcast signal is too weak. t Set the local seek mode...


