

XM Satellite Radio Operating manual
Page 1
... XM. CDX-C8050X CDX-C800REC* CDX-M750 CDX-M650 CDX-M610 CDX-M600 MDX-C8500X XR-M550 * You may use an optional CD or MD changer. • Receive up to choose other . Press the Display (DSPL) button. Each time you to: • Receive XM Satellite Radio programming (with the Sony BUS system. • Connect and use the Disc/Preset...
... XM. CDX-C8050X CDX-C800REC* CDX-M750 CDX-M650 CDX-M610 CDX-M600 MDX-C8500X XR-M550 * You may use an optional CD or MD changer. • Receive up to choose other . Press the Display (DSPL) button. Each time you to: • Receive XM Satellite Radio programming (with the Sony BUS system. • Connect and use the Disc/Preset...
Operating Instructions
Page 3
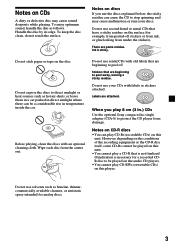
... CDs) on this player. Do not expose the discs to direct sunlight or heat sources such as follows. When you use second-hand or rental CDs that are beginning to stop spinning and may cause sound dropouts while playing. Do not use the discs explained below, the sticky...Do not use solvents such as benzine, thinner, commercially available cleaners, or antistatic spray intended for a recorded CDR disc to be a considerable rise in .) CDs Use the optional Sony compact disc single adapter (CSA-8) to peel off stickers or from ink, or glue leaking from under the stickers). There ...
... CDs) on this player. Do not expose the discs to direct sunlight or heat sources such as follows. When you use second-hand or rental CDs that are beginning to stop spinning and may cause sound dropouts while playing. Do not use the discs explained below, the sticky...Do not use solvents such as benzine, thinner, commercially available cleaners, or antistatic spray intended for a recorded CDR disc to be a considerable rise in .) CDs Use the optional Sony compact disc single adapter (CSA-8) to peel off stickers or from ink, or glue leaking from under the stickers). There ...
Operating Instructions
Page 4
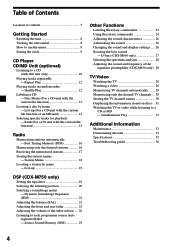
...with the custom file function 13 Locating a disc by name - List-up (For a CD unit with this unit only 10 Playing tracks repeatedly - D-bass (CDX-M600 only 27 Selecting the spectrum analyzer 28 Adjusting the sound and frequency of the equalizer preamplifier (CDX-M650 only) 28 TV/Video Watching the...Setting the clock 9 CD Player CD/MD Unit (optional) Listening to a CD (with the custom file function or an MD unit 14 Selecting specific tracks for playback - Table of Contents Location of controls 5 Getting Started Resetting the unit 8 Turning the unit on discs .. 31 Watching the ...
...with the custom file function 13 Locating a disc by name - List-up (For a CD unit with this unit only 10 Playing tracks repeatedly - D-bass (CDX-M600 only 27 Selecting the spectrum analyzer 28 Adjusting the sound and frequency of the equalizer preamplifier (CDX-M650 only) 28 TV/Video Watching the...Setting the clock 9 CD Player CD/MD Unit (optional) Listening to a CD (with the custom file function or an MD unit 14 Selecting specific tracks for playback - Table of Contents Location of controls 5 Getting Started Resetting the unit 8 Turning the unit on discs .. 31 Watching the ...
Operating Instructions
Page 5
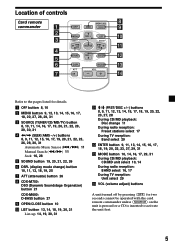
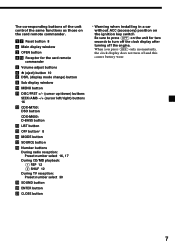
..., 28, 29, 30, 31 4 ) 11 Manual Search (m/M) 11 Seek 16, 28 5 SOUND button 19, 20, 21, 22, 26 6 DSPL (display mode change) button 10, 11, 13, 18, 19, 25 7 ATT (attenuate) button 26 8 CDX-M750: DSO (Dynamic Soundstage Organaizer) button 21 CDX-M600: D-BASS button 27 9 OPEN/CLOSE button 10 0 LIST button 13, 14..., 18, 19, 30, 31 List-up 14, 19, 30, 31 qa M/m (PRST/DISC +/-) buttons 8, 9, 11, 12, 13, 14, 15, 17, 18, 19, 20...
..., 28, 29, 30, 31 4 ) 11 Manual Search (m/M) 11 Seek 16, 28 5 SOUND button 19, 20, 21, 22, 26 6 DSPL (display mode change) button 10, 11, 13, 18, 19, 25 7 ATT (attenuate) button 26 8 CDX-M750: DSO (Dynamic Soundstage Organaizer) button 21 CDX-M600: D-BASS button 27 9 OPEN/CLOSE button 10 0 LIST button 13, 14..., 18, 19, 30, 31 List-up 14, 19, 30, 31 qa M/m (PRST/DISC +/-) buttons 8, 9, 11, 12, 13, 14, 15, 17, 18, 19, 20...
Operating Instructions
Page 6
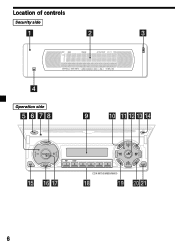
Location of controls Security side Operation side DSPL SOURCE OFF MODE REP SHUF 1 2 3 4 5 6 CDX-M750/M650/M600 MENU LIST SOUND DISC DSO DISC ENTER CLOSE 6
Location of controls Security side Operation side DSPL SOURCE OFF MODE REP SHUF 1 2 3 4 5 6 CDX-M750/M650/M600 MENU LIST SOUND DISC DSO DISC ENTER CLOSE 6
Operating Instructions
Page 7
...6 Z (eject) button 10 8 DSPL (display mode change) button 9 Sub display window 0 MENU button qa DISC/PRST +/- (cursor up/down) buttons SEEK/AMS -/+ (cursor left/right) buttons 16 qs CDX-M750: DSO button CDX-M600: D-BASS button qd LIST button qg OFF button* 8 qh MODE button qj SOURCE button qk Number buttons... During radio reception: Preset number select 16, 17 During CD/MD playback: (1) REP 12 (2) SHUF 12 During TV reception: Preset number select 30 ql SOUND button ...
...6 Z (eject) button 10 8 DSPL (display mode change) button 9 Sub display window 0 MENU button qa DISC/PRST +/- (cursor up/down) buttons SEEK/AMS -/+ (cursor left/right) buttons 16 qs CDX-M750: DSO button CDX-M600: D-BASS button qd LIST button qg OFF button* 8 qh MODE button qj SOURCE button qk Number buttons... During radio reception: Preset number select 16, 17 During CD/MD playback: (1) REP 12 (2) SHUF 12 During TV reception: Preset number select 30 ql SOUND button ...
Operating Instructions
Page 11
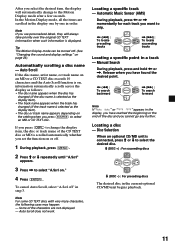
...in the display, you have reached the beginning or the end of the CD TEXT disc or MD is connected, press M or m to select the desired disc. To cancel Auto Scroll, select "A.Scrl off . (See "Changing the sound and display settings" on page 26). Manual Search During playback, press and hold <... or ,. Disc Selection When an optional CD/MD unit is scrolled automatically whether you set...
...in the display, you have reached the beginning or the end of the CD TEXT disc or MD is connected, press M or m to select the desired disc. To cancel Auto Scroll, select "A.Scrl off . (See "Changing the sound and display settings" on page 26). Manual Search During playback, press and hold <... or ,. Disc Selection When an optional CD/MD unit is scrolled automatically whether you set...
Operating Instructions
Page 16
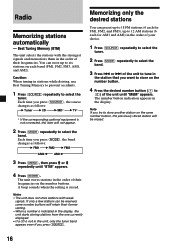
... preset up to (6)) of your choice. 1 Press (SOURCE) repeatedly to select the tuner. 2 Press (MODE) repeatedly to 18 FM stations (6 each for AM1 and AM2) in the station that you press (SOURCE). A beep sounds when the setting is not connected, this item will retain their former setting. • When a number is indicated...
... preset up to (6)) of your choice. 1 Press (SOURCE) repeatedly to select the tuner. 2 Press (MODE) repeatedly to 18 FM stations (6 each for AM1 and AM2) in the station that you press (SOURCE). A beep sounds when the setting is not connected, this item will retain their former setting. • When a number is indicated...
Operating Instructions
Page 17
...on which the desired station is stored. Only the stations with relatively strong signals will automatically avoid noise and narrow the reception frequency. The sound improves, but becomes monaural ("ST" disappears). 3 Press (ENTER). Note When you select the "Local on " appears. Then press , .... Note If the automatic tuning stops too frequently, press (MENU), then press M or m repeatedly until "Wide" appears. 3 Press (ENTER). If FM stereo reception is displayed. To return to the "Wide" setting. 1 During radio reception, press (MENU), then press M or m repeatedly until "IF...
...on which the desired station is stored. Only the stations with relatively strong signals will automatically avoid noise and narrow the reception frequency. The sound improves, but becomes monaural ("ST" disappears). 3 Press (ENTER). Note When you select the "Local on " appears. Then press , .... Note If the automatic tuning stops too frequently, press (MENU), then press M or m repeatedly until "Wide" appears. 3 Press (ENTER). If FM stereo reception is displayed. To return to the "Wide" setting. 1 During radio reception, press (MENU), then press M or m repeatedly until "IF...
Operating Instructions
Page 19
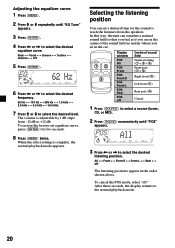
...) to tune in the display. 2 Press M or m repeatedly until "EQ" appears. 3 Press < or , to select a source (tuner, CD, or MD). 2 Press (SOUND) repeatedly until you connect a TV tuner, the list-up 1 Press (LIST) momentarily. Selecting the equalizer curve 1 Press (SOURCE) to select the desired equalizer curve. After...the desired station. List-up indication will not appear in the display of the unit. Note When you find the desired station. DSP (CDX-M750 only) Setting the equalizer You can store and adjust the equalizer settings for five music types (Rock, Vocal, Groove, Techno and Custom...
...) to tune in the display. 2 Press M or m repeatedly until "EQ" appears. 3 Press < or , to select a source (tuner, CD, or MD). 2 Press (SOUND) repeatedly until you connect a TV tuner, the list-up 1 Press (LIST) momentarily. Selecting the equalizer curve 1 Press (SOURCE) to select the desired equalizer curve. After...the desired station. List-up indication will not appear in the display of the unit. Note When you find the desired station. DSP (CDX-M750 only) Setting the equalizer You can store and adjust the equalizer settings for five music types (Rock, Vocal, Groove, Techno and Custom...
Operating Instructions
Page 20
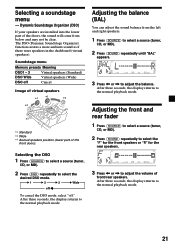
... order shown above. The volume is complete, the normal playback mode appears. In this way, the unit can set equalizer curve, press (ENTER) for the sound to +12 dB. Adjusting the equalizer curve 1 Press (MENU). 2 Press M or m repeatedly until "POS" appears. 3 Press < or , to select the desired level.... from the speakers. After three seconds, the display returns to select the desired equalizer curve. Selecting the listening position You can simulate a natural sound field so that you feel as if you are in the car. 12 3 Display window POS All POS Front POS Front-R POS Front-L ...
... order shown above. The volume is complete, the normal playback mode appears. In this way, the unit can set equalizer curve, press (ENTER) for the sound to +12 dB. Adjusting the equalizer curve 1 Press (MENU). 2 Press M or m repeatedly until "POS" appears. 3 Press < or , to select the desired level.... from the speakers. After three seconds, the display returns to select the desired equalizer curve. Selecting the listening position You can simulate a natural sound field so that you feel as if you are in the car. 12 3 Display window POS All POS Front POS Front-R POS Front-L ...
Operating Instructions
Page 21
...playback mode. After three seconds, the display returns to the normal playback mode. 21 Adjusting the balance (BAL) You can adjust the sound balance from below and may not be clear. After three seconds, the display returns to the normal playback mode. The DSO (Dynamic... Soundstage Organizer) function creates a more ambient sound as if there were speakers in the dashboard (virtual speakers). Selecting a soundstage menu - B 1 B 2 B 3 B Wide off b To cancel the DSO...
...playback mode. After three seconds, the display returns to the normal playback mode. 21 Adjusting the balance (BAL) You can adjust the sound balance from below and may not be clear. After three seconds, the display returns to the normal playback mode. The DSO (Dynamic... Soundstage Organizer) function creates a more ambient sound as if there were speakers in the dashboard (virtual speakers). Selecting a soundstage menu - B 1 B 2 B 3 B Wide off b To cancel the DSO...

Operating Instructions
Page 22
... (Hz) 1 Press (MENU). 2 Press M or m repeatedly to select "Front HPF" or "Rear HPF" 3 Press (ENTER). 4 Press < or , to select a source (tuner, CD, or MD). 2 Press (SOUND) repeatedly until "SUB LPF" appears. 22 After three seconds, the display returns to adjust the volume all the way down , "Sub ATT" appears and the... below), the subwoofer(s) will output only low frequency signals so you press (VOL) repeatedly to the normal playback mode. Tip When you can get a clearer sound image.
... (Hz) 1 Press (MENU). 2 Press M or m repeatedly to select "Front HPF" or "Rear HPF" 3 Press (ENTER). 4 Press < or , to select a source (tuner, CD, or MD). 2 Press (SOUND) repeatedly until "SUB LPF" appears. 22 After three seconds, the display returns to adjust the volume all the way down , "Sub ATT" appears and the... below), the subwoofer(s) will output only low frequency signals so you press (VOL) repeatedly to the normal playback mode. Tip When you can get a clearer sound image.

Operating Instructions
Page 23
... DSPL MODE SOUND 23 off and then on how you mount the rotary commander, attach the appropriate label as shown in the display changes as follows: 62 y 78 y ... the frequency setting is complete, the display returns to adjust the volume. 6 Press (MENU) twice. 3 Press (ENTER). Labeling the rotary commander Depending on again. Source Sound Memory (SSM) Each time you can also control the unit with a rotary commander (optional). Listening to the same source, you return to each programme source...
... DSPL MODE SOUND 23 off and then on how you mount the rotary commander, attach the appropriate label as shown in the display changes as follows: 62 y 78 y ... the frequency setting is complete, the display returns to adjust the volume. 6 Press (MENU) twice. 3 Press (ENTER). Labeling the rotary commander Depending on again. Source Sound Memory (SSM) Each time you can also control the unit with a rotary commander (optional). Listening to the same source, you return to each programme source...
Operating Instructions
Page 25
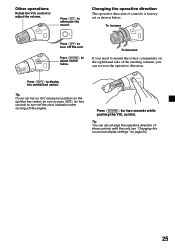
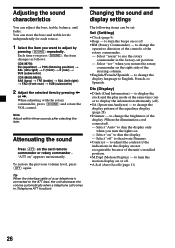
... the right hand side of the steering column, you need to turn off the engine. Tip You can reverse the operative direction. Press (SOUND) to adjust the volume. To decrease If you can also change the operative direction of controls is factoryset as shown below. Tip If your...ACC (accessory) position on page 26). 25 Other operations Rotate the VOL control to adjust sound menu. Changing the operative direction The operative direction of these controls with the unit (see "Changing the sound and display settings" on the ignition key switch, be sure to turn off the clock...
... the right hand side of the steering column, you need to turn off the engine. Tip You can reverse the operative direction. Press (SOUND) to adjust the volume. To decrease If you can also change the operative direction of controls is factoryset as shown below. Tip If your...ACC (accessory) position on page 26). 25 Other operations Rotate the VOL control to adjust sound menu. Changing the operative direction The operative direction of these controls with the unit (see "Changing the sound and display settings" on the ignition key switch, be sure to turn off the clock...
Operating Instructions
Page 26
...: EQ (equalizer) t POS (listening position) t BAL (left-right) t F (front) t R (rear) t SUB (subwoofer) CDX-M650/M600: BAS (bass) t TRE (treble) t BAL (left-right) t FAD (front-rear) t SUB (subwoofer) 2 Adjust the selected item by pressing (SOUND) repeatedly. to change the display pattern of the display (When the illumination cord connected). - Select "on or off ). •...
...: EQ (equalizer) t POS (listening position) t BAL (left-right) t F (front) t R (rear) t SUB (subwoofer) CDX-M650/M600: BAS (bass) t TRE (treble) t BAL (left-right) t FAD (front-rear) t SUB (subwoofer) 2 Adjust the selected item by pressing (SOUND) repeatedly. to change the display pattern of the display (When the illumination cord connected). - Select "on or off ). •...
Operating Instructions
Page 27
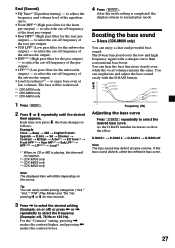
...Equalizer tuning) - to select the cut -off , 78 Hz or 125 Hz). to select the cut -off Note The bass sound may distort at low volumes. D-bass (CDX-M600 only) You can hear the bass line more clearly even while the vocal volume remains the same. Level D-BASS 3 D-BASS ..., this item will not appear. *2 CDX-M750 only *3 CDX-M650 only *4 CDX-M600 only Note The displayed item will be reinforced. *1 CDX-M750 only *2 CDX-M650 only *3 CDX-M600 only 1 Press (MENU). 2 Press M or m repeatedly until the desired item appears. If the bass sound distorts, select less effective bass curve. ...
...Equalizer tuning) - to select the cut -off , 78 Hz or 125 Hz). to select the cut -off Note The bass sound may distort at low volumes. D-bass (CDX-M600 only) You can hear the bass line more clearly even while the vocal volume remains the same. Level D-BASS 3 D-BASS ..., this item will not appear. *2 CDX-M750 only *3 CDX-M650 only *4 CDX-M600 only Note The displayed item will be reinforced. *1 CDX-M750 only *2 CDX-M650 only *3 CDX-M600 only 1 Press (MENU). 2 Press M or m repeatedly until the desired item appears. If the bass sound distorts, select less effective bass curve. ...
Operating Instructions
Page 28
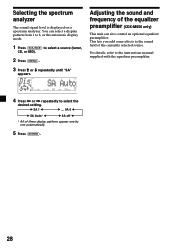
... SA 6 b B SA Auto* b B SA off b * All of the currently selected source. You can also control an optional equalizer preamplifier. B SA 1 b B ... Adjusting the sound and frequency of the equalizer preamplifier (CDX-M650 only) This unit can select a display pattern from 1 to 6, or the automatic display mode. 1 Press (SOURCE) to select a source (tuner, CD...
... SA 6 b B SA Auto* b B SA off b * All of the currently selected source. You can also control an optional equalizer preamplifier. B SA 1 b B ... Adjusting the sound and frequency of the equalizer preamplifier (CDX-M650 only) This unit can select a display pattern from 1 to 6, or the automatic display mode. 1 Press (SOURCE) to select a source (tuner, CD...

Operating Instructions
Page 29
... TV tuner and TV monitor to select the desired TV band. Memorizing TV channels automatically The unit selects the TV channels with weak signals. A beep sounds when the setting is indicated in a station while driving, use Best Tuning Memory to select "AUX." Notes • "AUX 2" appears if the VIDEO 2 terminal of...
... TV tuner and TV monitor to select the desired TV band. Memorizing TV channels automatically The unit selects the TV channels with weak signals. A beep sounds when the setting is indicated in a station while driving, use Best Tuning Memory to select "AUX." Notes • "AUX 2" appears if the VIDEO 2 terminal of...
Operating Instructions
Page 30
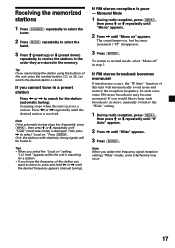
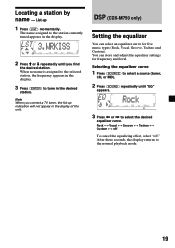
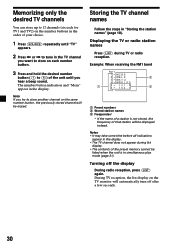
... and hold the desired number button ((1) to (6)) of the unit until you want to tune in the TV channel you hear a beep sound. Example: When receiving the FM1 band FM 1 1 WC B S 2 WB L S 3 WK T U 4 WR K I S S 5 101 .9 6 102 .7 1 Preset numbers 2 Stored station names 3 Frequencies* * If the name of a station is in simultaneous play mode...
... and hold the desired number button ((1) to (6)) of the unit until you want to tune in the TV channel you hear a beep sound. Example: When receiving the FM1 band FM 1 1 WC B S 2 WB L S 3 WK T U 4 WR K I S S 5 101 .9 6 102 .7 1 Preset numbers 2 Stored station names 3 Frequencies* * If the name of a station is in simultaneous play mode...


