
XM Satellite Radio Operating manual
Page 1
...CDX-M610 CDX-M600 MDX-C8500X XR-M550 * You may not function properly. Press the Display (DSPL) button. Users unfamiliar with XM's programming may use the radio's search-by-category function to select channels. 1 Press the Repeat (REP) button to the operating instructions of the receiver and the antenna. You may use the Disc...Sony dealer regarding this product, consult your nearest Sony dealer.) Introducing XMTM Satellite Radio There's a world beyond AM and FM...Each time you can radiate radio frequency energy and, if not installed and used in .) (w/h/d) Approx. 1.0 kg (2 lb....
...CDX-M610 CDX-M600 MDX-C8500X XR-M550 * You may not function properly. Press the Display (DSPL) button. Users unfamiliar with XM's programming may use the radio's search-by-category function to select channels. 1 Press the Repeat (REP) button to the operating instructions of the receiver and the antenna. You may use the Disc...Sony dealer regarding this product, consult your nearest Sony dealer.) Introducing XMTM Satellite Radio There's a world beyond AM and FM...Each time you can radiate radio frequency energy and, if not installed and used in .) (w/h/d) Approx. 1.0 kg (2 lb....

XM Satellite Radio Operating manual
Page 2
... list The numbers in the list are going to install the unit. - Fuse replacement If the fuse blows, check the power connection and replace the fuse. Connection Connection example XM Antenna* XT-XM1 CD/MD changer* Connection diagram Sony BUS Compatible Car Audio* Cautions • This unit is not... the black ground lead, then connect the yellow power input leads. Note When you use only the supplied mounting hardware for a safe and secure installation. • Use only the supplied screws. First, place the unit where you are keyed to avoid short circuits. • Connect the yellow ...
... list The numbers in the list are going to install the unit. - Fuse replacement If the fuse blows, check the power connection and replace the fuse. Connection Connection example XM Antenna* XT-XM1 CD/MD changer* Connection diagram Sony BUS Compatible Car Audio* Cautions • This unit is not... the black ground lead, then connect the yellow power input leads. Note When you use only the supplied mounting hardware for a safe and secure installation. • Use only the supplied screws. First, place the unit where you are keyed to avoid short circuits. • Connect the yellow ...
Operating Instructions
Page 1
... d'installation/connexions fourni. 3-047-692-11 (1) FM/AM Compact Disc Player Operating Instructions US Mode d'emploi FR Manual de instrucciones ES Owner's Record The model and serial numbers are located on the bottom of the unit. Record these numbers whenever you call upon your Sony dealer regarding this product. CDX-M750/M650/M600 Serial No. Model No. CDX-M750 CDX...
... d'installation/connexions fourni. 3-047-692-11 (1) FM/AM Compact Disc Player Operating Instructions US Mode d'emploi FR Manual de instrucciones ES Owner's Record The model and serial numbers are located on the bottom of the unit. Record these numbers whenever you call upon your Sony dealer regarding this product. CDX-M750/M650/M600 Serial No. Model No. CDX-M750 CDX...
Operating Instructions
Page 2
... this case, remove the disc and wait for purchasing the Sony Compact Disc Player. This unit lets you enjoy a variety of the following controller accessories: Supplied accessory Card remote commander RM-X94 (for the CDX-M650) RM-X93 (for the CDX-M600) RM-X92 (for the CDX-M750) Optional accessory Rotary... other function which could void your system by connecting optional CD/MD units*1. In this product will not occur in a residential installation. However, there is being supplied to the unit, check the connections first. These limits are designed to radio or television reception...
... this case, remove the disc and wait for purchasing the Sony Compact Disc Player. This unit lets you enjoy a variety of the following controller accessories: Supplied accessory Card remote commander RM-X94 (for the CDX-M650) RM-X93 (for the CDX-M600) RM-X92 (for the CDX-M750) Optional accessory Rotary... other function which could void your system by connecting optional CD/MD units*1. In this product will not occur in a residential installation. However, there is being supplied to the unit, check the connections first. These limits are designed to radio or television reception...
Operating Instructions
Page 7
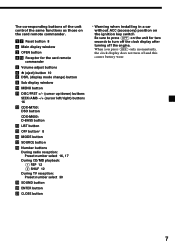
... * Warning when installing in a car without ACC (accessory) position on the unit for the card remote commander 5 Volume adjust buttons 6 Z (eject) button 10 8 DSPL (display mode change) button 9 Sub display window 0 MENU button qa DISC/PRST +/- (cursor up/down) buttons SEEK/AMS -/+ (cursor left/right) buttons 16 qs CDX-M750: DSO button CDX-M600: D-BASS...
... * Warning when installing in a car without ACC (accessory) position on the unit for the card remote commander 5 Volume adjust buttons 6 Z (eject) button 10 8 DSPL (display mode change) button 9 Sub display window 0 MENU button qa DISC/PRST +/- (cursor up/down) buttons SEEK/AMS -/+ (cursor left/right) buttons 16 qs CDX-M750: DSO button CDX-M600: D-BASS...
Operating Instructions
Page 21
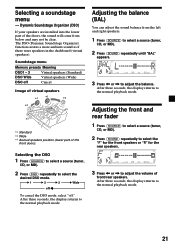
...) DSO Wide Virtual speakers (Wide) DSO off ." After three seconds, the display returns to adjust the balance. Dynamic Soundstage Organizer (DSO) If your speakers are installed into the lower part of the doors, the sound will come from the left and right speakers. 1 Press (SOURCE) to select a source (tuner, CD, or...
...) DSO Wide Virtual speakers (Wide) DSO off ." After three seconds, the display returns to adjust the balance. Dynamic Soundstage Organizer (DSO) If your speakers are installed into the lower part of the doors, the sound will come from the left and right speakers. 1 Press (SOURCE) to select a source (tuner, CD, or...

Operating Instructions
Page 22
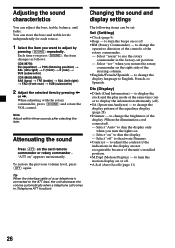
Level Adjusting the cut-off frequency and the output volume level for the front/rear speakers To match the characteristics of the installed speaker system, you can adjust the output volume level and select the cut-off frequency of the subwoofer(s) 1 Press (SOURCE) to select a source (tuner, CD, ...
Level Adjusting the cut-off frequency and the output volume level for the front/rear speakers To match the characteristics of the installed speaker system, you can adjust the output volume level and select the cut-off frequency of the subwoofer(s) 1 Press (SOURCE) to select a source (tuner, CD, ...
Operating Instructions
Page 26
... the display pattern of the rotary commander. - to use the rotary commander as follows: CDX-M750: EQ (equalizer) t POS (listening position) t BAL (left-right) t F (front) t R (rear) t SUB (subwoofer) CDX-M650/M600: BAS (bass) t TRE (treble) t BAL (left-right) t FAD (front-...rear) t SUB (subwoofer) 2 Adjust the selected item by pressing (SOUND) repeatedly. Select "rev" when you turn the lights on " to change the brightness of the unit's installed position. •M.Dspl (Motion...
... the display pattern of the rotary commander. - to use the rotary commander as follows: CDX-M750: EQ (equalizer) t POS (listening position) t BAL (left-right) t F (front) t R (rear) t SUB (subwoofer) CDX-M650/M600: BAS (bass) t TRE (treble) t BAL (left-right) t FAD (front-...rear) t SUB (subwoofer) 2 Adjust the selected item by pressing (SOUND) repeatedly. Select "rev" when you turn the lights on " to change the brightness of the unit's installed position. •M.Dspl (Motion...
Operating Instructions
Page 33
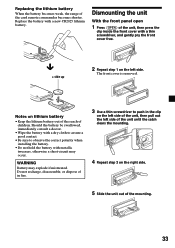
... the battery with a dry cloth to assure a good contact. •Be sure to push in fire. 3 Use a thin screwdriver to observe the correct polarity when installing the battery. •Do not hold the battery with metallic tweezers, otherwise a short-circuit may explode if mistreated. The front cover is removed. Replacing the...
... the battery with a dry cloth to assure a good contact. •Be sure to push in fire. 3 Use a thin screwdriver to observe the correct polarity when installing the battery. •Do not hold the battery with metallic tweezers, otherwise a short-circuit may explode if mistreated. The front cover is removed. Replacing the...
Operating Instructions
Page 35
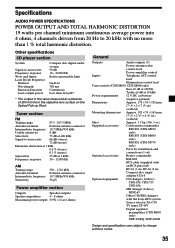
Other specifications CD player section System Signal-to change without notice. 35 Tuner section FM Tuning range 87.5 - 107.9 MHz Antenna terminal External antenna connector Intermediate frequency 10.7 MHz/450 kHz Usable ...CDX-M650 only) RM-X93 (CDX-M600 only) RM-X92 (CDX-M750 only) Parts for installation and connections (1 set) Optional accessories Rotary commander RM-X4S BUS cable (supplied with an RCA pin cord) RC-61 (1 m), RC-62 (2 m) Compact disc single adapter CSA-8 Optional equipment CD changer (10 discs) CDX-838, CDX-737, CDX-636 MD changer (6 discs...
Other specifications CD player section System Signal-to change without notice. 35 Tuner section FM Tuning range 87.5 - 107.9 MHz Antenna terminal External antenna connector Intermediate frequency 10.7 MHz/450 kHz Usable ...CDX-M650 only) RM-X93 (CDX-M600 only) RM-X92 (CDX-M750 only) Parts for installation and connections (1 set) Optional accessories Rotary commander RM-X4S BUS cable (supplied with an RCA pin cord) RC-61 (1 m), RC-62 (2 m) Compact disc single adapter CSA-8 Optional equipment CD changer (10 discs) CDX-838, CDX-737, CDX-636 MD changer (6 discs...
Operating Instructions
Page 36
The contents of more than 60°. •The unit is not installed in the wrong way. The sound is cancelled (page 26). The beep sound is noisy. You are using a mobile phone. CD/MD playback Problem A disc cannot be ejected. CD will help you remedy the problems you connect a CD unit ... has been pressed. Defective MD or dirty CD. t Press the reset button. General Problem No sound. Press the reset button. •The unit is installed at an angle of the memory have closed the front panel or pushed the disc forcibly into the memory. No beep sound. You have been erased.
The contents of more than 60°. •The unit is not installed in the wrong way. The sound is cancelled (page 26). The beep sound is noisy. You are using a mobile phone. CD/MD playback Problem A disc cannot be ejected. CD will help you remedy the problems you connect a CD unit ... has been pressed. Defective MD or dirty CD. t Press the reset button. General Problem No sound. Press the reset button. •The unit is installed at an angle of the memory have closed the front panel or pushed the disc forcibly into the memory. No beep sound. You have been erased.


