
Operating Instructions
Page 4
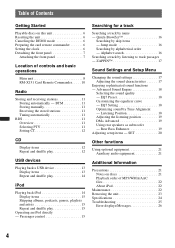
... 22 About iPod 22 Maintenance 22 Removing the unit 23 Specifications 24 Troubleshooting 25 Error displays/Messages 26 4 Table of Contents Getting Started Playable discs on discs 21 Playback order of controls and basic operations Main unit 8 RM-X151 Card Remote Commander . . . . . 10 Radio Storing and ... automatically 11 RDS 11 Overview 11 Selecting PTY 11 Setting CT 12 CD Display items 12 Repeat and shuffle play 12 USB devices Playing back a USB device 13 Display items 13 Repeat and shuffle play 14 iPod Playing back iPod 14 Display items 15 Skipping albums, podcasts...
... 22 About iPod 22 Maintenance 22 Removing the unit 23 Specifications 24 Troubleshooting 25 Error displays/Messages 26 4 Table of Contents Getting Started Playable discs on discs 21 Playback order of controls and basic operations Main unit 8 RM-X151 Card Remote Commander . . . . . 10 Radio Storing and ... automatically 11 RDS 11 Overview 11 Selecting PTY 11 Setting CT 12 CD Display items 12 Repeat and shuffle play 12 USB devices Playing back a USB device 13 Display items 13 Repeat and shuffle play 14 iPod Playing back iPod 14 Display items 15 Skipping albums, podcasts...

Operating Instructions
Page 7
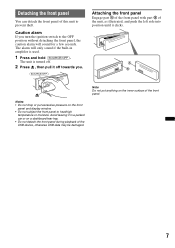
... left side into position until it off . 2 Press , then pull it clicks. Detaching the front panel You can detach the front panel of the USB device, otherwise USB data may be damaged. Avoid leaving it in amplifier is turned off towards you turn the ignition switch to the OFF position without detaching...
... left side into position until it off . 2 Press , then pull it clicks. Detaching the front panel You can detach the front panel of the USB device, otherwise USB data may be damaged. Avoid leaving it in amplifier is turned off towards you turn the ignition switch to the OFF position without detaching...

Operating Instructions
Page 8
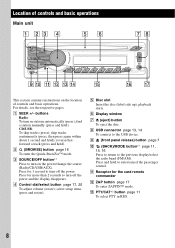
.../select button page 17, 20 To adjust volume (rotate); F Display window G Z (eject) button To eject the disc. K Receptor for 1 second to the previous display/select the radio band (FM/AM). Location of controls and basic operations Main unit This section contains instructions on the power/change the source (Radio... rotate). skip tracks continuously (press, then press again within about 1 second and hold ). reverse/fastforward a track (press and hold to the USB device. M PTY/CAT*2 button page 11 To select PTY in stations automatically (press); For details, see the respective pages...
.../select button page 17, 20 To adjust volume (rotate); F Display window G Z (eject) button To eject the disc. K Receptor for 1 second to the previous display/select the radio band (FM/AM). Location of controls and basic operations Main unit This section contains instructions on the power/change the source (Radio... rotate). skip tracks continuously (press, then press again within about 1 second and hold ). reverse/fastforward a track (press and hold to the USB device. M PTY/CAT*2 button page 11 To select PTY in stations automatically (press); For details, see the respective pages...

Operating Instructions
Page 9
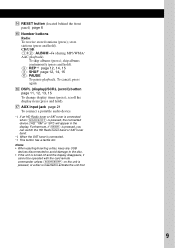
... with the card remote commander unless (SOURCE/OFF) on the unit is pressed, or a disc is connected. *3 This button has a tactile dot. Notes • When ejecting/inserting a disc, keep any USB devices disconnected to avoid damage to activate the unit first. 9 To cancel, press again.... skip albums continuously (press and hold ). scroll the display item (press and hold). CD/USB: (1)/(2): ALBUM -/+ (during MP3/WMA/ AAC playback) ...
... with the card remote commander unless (SOURCE/OFF) on the unit is pressed, or a disc is connected. *3 This button has a tactile dot. Notes • When ejecting/inserting a disc, keep any USB devices disconnected to avoid damage to activate the unit first. 9 To cancel, press again.... skip albums continuously (press and hold ). scroll the display item (press and hold). CD/USB: (1)/(2): ALBUM -/+ (during MP3/WMA/ AAC playback) ...

Operating Instructions
Page 10
...To cancel, press again. stop the source. D DSPL (display) button To change the source (Radio/CD/USB/AUX). store stations (press and hold to select the radio band (FM/AM). Furthermore, if (MODE) is pressed, the connected device ("HD," "XM" or "SR") will ...appear in the display. I M (+)/m (-) buttons To control CD/USB, the same as (1)/(2) (ALBUM -/+) on the power; K Number buttons To receive stored stations (press); DSPL SCRL...
...To cancel, press again. stop the source. D DSPL (display) button To change the source (Radio/CD/USB/AUX). store stations (press and hold to select the radio band (FM/AM). Furthermore, if (MODE) is pressed, the connected device ("HD," "XM" or "SR") will ...appear in the display. I M (+)/m (-) buttons To control CD/USB, the same as (1)/(2) (ALBUM -/+) on the power; K Number buttons To receive stored stations (press); DSPL SCRL...
Operating Instructions
Page 13
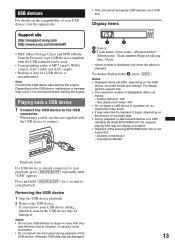
... damage may take time for 1 second to stop playback. Notes • Displayed items will differ, depending on the compatibility of the USB device, otherwise USB data may be damaged. 13 Display items Support site http://esupport.sony.com http://www.sony.com/mobileAV • MSC (Mass Storage Class) and MTP (Media Transfer Protocol) type...
... damage may take time for 1 second to stop playback. Notes • Displayed items will differ, depending on the compatibility of the USB device, otherwise USB data may be damaged. 13 Display items Support site http://esupport.sony.com http://www.sony.com/mobileAV • MSC (Mass Storage Class) and MTP (Media Transfer Protocol) type...

Operating Instructions
Page 14
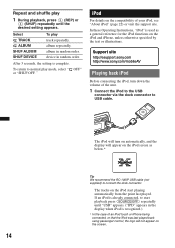
... on the compatibility of the unit. 1 Connect the iPod to the USB connector via the dock connector to start playing automatically from the point last played. Support site http://esupport.sony.com http://www.sony.com/mobileAV Playing back iPod Before connecting the iPod, turn on automatically,... and the display will not appear on the screen. 14 Repeat and shuffle play 1 During playback, press (3) (REP) or (4) (SHUF) repeatedly until "USB" appears. ("IPD" ...
... on the compatibility of the unit. 1 Connect the iPod to the USB connector via the dock connector to start playing automatically from the point last played. Support site http://esupport.sony.com http://www.sony.com/mobileAV Playing back iPod Before connecting the iPod, turn on automatically,... and the display will not appear on the screen. 14 Repeat and shuffle play 1 During playback, press (3) (REP) or (4) (SHUF) repeatedly until "USB" appears. ("IPD" ...
Operating Instructions
Page 15
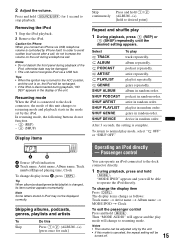
... be displayed correctly. podcast repeatedly. album in random order. podcast in random order. "MODE IPOD" appears and you connect an iPhone via a USB hub. artist repeatedly. genre repeatedly. The display items change display items B, press (DSPL). album repeatedly. Notes • The volume can operate...this Skip Press (1)/(2) (ALBUM -/+) [press once for iPhone When you will be damaged. • This unit cannot recognize iPod via USB, telephone volume is complete. To change to stop playback. Then "MODE AUDIO" will change the display item Press (DSPL).
... be displayed correctly. podcast repeatedly. album in random order. podcast in random order. "MODE IPOD" appears and you connect an iPhone via a USB hub. artist repeatedly. genre repeatedly. The display items change display items B, press (DSPL). album repeatedly. Notes • The volume can operate...this Skip Press (1)/(2) (ALBUM -/+) [press once for iPhone When you will be damaged. • This unit cannot recognize iPod via USB, telephone volume is complete. To change to stop playback. Then "MODE AUDIO" will change the display item Press (DSPL).
Operating Instructions
Page 16
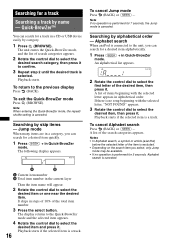
... item is a track. 16 Playback starts if the selected item is a track. Note If no song beginning with the selected letter appears in a CD or USB device easily by name - Alphabet search When an iPod is canceled. Notes • In Alphabet search, a symbol or article (a/an/the) before the selected letter...
... item is a track. 16 Playback starts if the selected item is a track. Note If no song beginning with the selected letter appears in a CD or USB device easily by name - Alphabet search When an iPod is canceled. Notes • In Alphabet search, a symbol or article (a/an/the) before the selected letter...
Operating Instructions
Page 17
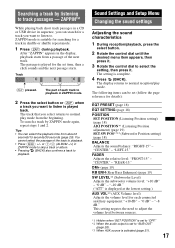
...) Adjusts the subwoofer volume level: "+10 dB" - FADER Adjusts the relative level: "FRONT-15" - ZAPPIN™ While playing back short track passages in a CD or USB device in sequence, you can select the playback time from the beginning. Searching a track by ZAPPIN mode again, repeat steps 1 and 2.
...) Adjusts the subwoofer volume level: "+10 dB" - FADER Adjusts the relative level: "FRONT-15" - ZAPPIN™ While playing back short track passages in a CD or USB device in sequence, you can select the playback time from the beginning. Searching a track by ZAPPIN mode again, repeat steps 1 and 2.
Operating Instructions
Page 24
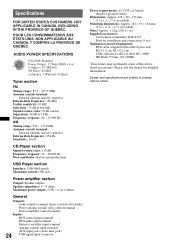
... Power Output: 17 Watts RMS 4 at 4 Ohms < 1% THD+N SN Ratio: 80 dBA (reference: 1 Watt into 4 Ohms) Tuner section FM Tuning range: 87.5 - 107.9 MHz Antenna (aerial) terminal: External antenna (aerial) connector Intermediate frequency: 150 kHz Usable sensitivity: 10 dBf Selectivity:.... Design and specifications are subject to -noise ratio: 120 dB Frequency response: 10 - 20,000 Hz Wow and flutter: Below measurable limit USB Player section Interface: USB (Full-speed) Maximum current: 500 mA Power amplifier section Output: Speaker outputs Speaker impedance: 4 - 8 ohms Maximum power output: 52 ...
... Power Output: 17 Watts RMS 4 at 4 Ohms < 1% THD+N SN Ratio: 80 dBA (reference: 1 Watt into 4 Ohms) Tuner section FM Tuning range: 87.5 - 107.9 MHz Antenna (aerial) terminal: External antenna (aerial) connector Intermediate frequency: 150 kHz Usable sensitivity: 10 dBf Selectivity:.... Design and specifications are subject to -noise ratio: 120 dB Frequency response: 10 - 20,000 Hz Wow and flutter: Below measurable limit USB Player section Interface: USB (Full-speed) Maximum current: 500 mA Power amplifier section Output: Speaker outputs Speaker impedance: 4 - 8 ohms Maximum power output: 52 ...
Operating Instructions
Page 26
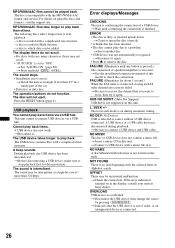
... cannot recognize USB devices via a USB hub. t Before disconnecting a USB device, make sure to check the connection. The sound is dirty or inserted upside down. For details on in it . The operation buttons do not scroll. • For discs with a music file in the display, consult your nearest Sony dealer. ERROR • The disc is intermittent...
... cannot recognize USB devices via a USB hub. t Before disconnecting a USB device, make sure to check the connection. The sound is dirty or inserted upside down. For details on in it . The operation buttons do not scroll. • For discs with a music file in the display, consult your nearest Sony dealer. ERROR • The disc is intermittent...

Operating Instructions
Page 27
... During reverse or fast-forward, you have reached the beginning or the end of the disc and you take more than a minute. t Wait until reading is not supported. "" The character cannot be repaired because of your nearest Sony dealer. If you cannot go any further. t Press the RESET button (page 6)....support site. t For details on the compatibility of CD playback trouble, bring the disc that was used at the time the problem began. 27 USB NO SUPRT (USB Not Support) The connected USB device is complete and playback starts automatically. READ The unit is reading all track and...
... During reverse or fast-forward, you have reached the beginning or the end of the disc and you take more than a minute. t Wait until reading is not supported. "" The character cannot be repaired because of your nearest Sony dealer. If you cannot go any further. t Press the RESET button (page 6)....support site. t For details on the compatibility of CD playback trouble, bring the disc that was used at the time the problem began. 27 USB NO SUPRT (USB Not Support) The connected USB device is complete and playback starts automatically. READ The unit is reading all track and...
Operating Instructions
Page 4
...alphabetical order - Advanced Sound Engine 18 Selecting the sound quality - EQ7 Preset 18 Customizing the equalizer curve - Table of Contents Getting Started Playable discs on discs 21 Playback order of controls and basic operations Main unit 8 RM-X151 Card Remote Commander . . . . . 10 Radio Storing and receiving...automatically 11 RDS 11 Overview 11 Selecting PTY 11 Setting CT 12 CD Display items 12 Repeat and shuffle play 12 USB devices Playing back a USB device 13 Display items 13 Repeat and shuffle play 14 iPod Playing back iPod 14 Display items 15 Skipping albums, ...
...alphabetical order - Advanced Sound Engine 18 Selecting the sound quality - EQ7 Preset 18 Customizing the equalizer curve - Table of Contents Getting Started Playable discs on discs 21 Playback order of controls and basic operations Main unit 8 RM-X151 Card Remote Commander . . . . . 10 Radio Storing and receiving...automatically 11 RDS 11 Overview 11 Selecting PTY 11 Setting CT 12 CD Display items 12 Repeat and shuffle play 12 USB devices Playing back a USB device 13 Display items 13 Repeat and shuffle play 14 iPod Playing back iPod 14 Display items 15 Skipping albums, ...
Operating Instructions
Page 7
... panel. 7 The unit is used. 1 Press and hold (SOURCE/OFF). Attaching the front panel Engage part A of the front panel with part B of the USB device, otherwise USB data may be damaged. Caution alarm If you . Note Do not put excessive pressure on a dashboard/rear tray. • Do not detach the front...
... panel. 7 The unit is used. 1 Press and hold (SOURCE/OFF). Attaching the front panel Engage part A of the front panel with part B of the USB device, otherwise USB data may be damaged. Caution alarm If you . Note Do not put excessive pressure on a dashboard/rear tray. • Do not detach the front...
Operating Instructions
Page 8
... control. Press and hold ). buttons Radio: To tune in RDS. 8 C SOURCE/OFF button*1 Press to the previous display/select the radio band (FM/AM). D Control dial/select button page 17, 20 To adjust volume (rotate); select setup items (press and rotate). I (front panel release) button...page 11 To select PTY in stations automatically (press); For details, see the respective pages. CD/USB: To skip tracks (press); F Display window G Z (eject) button To eject the disc. Location of controls and basic operations Main unit This section contains instructions on the power/change the source...
... control. Press and hold ). buttons Radio: To tune in RDS. 8 C SOURCE/OFF button*1 Press to the previous display/select the radio band (FM/AM). D Control dial/select button page 17, 20 To adjust volume (rotate); select setup items (press and rotate). I (front panel release) button...page 11 To select PTY in stations automatically (press); For details, see the respective pages. CD/USB: To skip tracks (press); F Display window G Z (eject) button To eject the disc. Location of controls and basic operations Main unit This section contains instructions on the power/change the source...
Operating Instructions
Page 9
... -/+ (during MP3/WMA/ AAC playback) To skip albums (press); Notes • When ejecting/inserting a disc, keep any USB devices disconnected to avoid damage to the disc. • If the unit is turned off and the display disappears, it cannot be operated with the card remote commander unless (SOURCE/OFF) ...on the unit is pressed, or a disc is pressed, the connected device ("HD," "XM" or "SR") will ...
... -/+ (during MP3/WMA/ AAC playback) To skip albums (press); Notes • When ejecting/inserting a disc, keep any USB devices disconnected to avoid damage to the disc. • If the unit is turned off and the display disappears, it cannot be operated with the card remote commander unless (SOURCE/OFF) ...on the unit is pressed, or a disc is pressed, the connected device ("HD," "XM" or "SR") will ...
Operating Instructions
Page 10
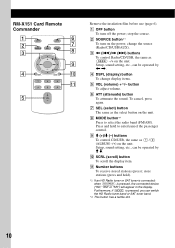
...turn off the power; C buttons To control Radio/CD/USB, the same as the select button on the power; G SEL (select) button The same as (SEEK) -/+ on the unit. store stations (press and hold to select the radio band (FM/AM). Setup, sound setting, etc., can be operated ...by < ,. RM-X151 Card Remote Commander 1 2 3 4 OFF ATT SOURCE SEL MODE + - Remove the insulation film before use (page 6). D DSPL (display) button To change the source (Radio/CD/USB/AUX). F ATT (attenuate) ...
...turn off the power; C buttons To control Radio/CD/USB, the same as the select button on the power; G SEL (select) button The same as (SEEK) -/+ on the unit. store stations (press and hold to select the radio band (FM/AM). Setup, sound setting, etc., can be operated ...by < ,. RM-X151 Card Remote Commander 1 2 3 4 OFF ATT SOURCE SEL MODE + - Remove the insulation film before use (page 6). D DSPL (display) button To change the source (Radio/CD/USB/AUX). F ATT (attenuate) ...

Operating Instructions
Page 13
... file, elapsed playing time may occur if it is not supported. - USB devices For details on the compatibility of your USB device during playback of the USB device, otherwise USB data may be damaged. 13 Display items Support site http://esupport.sony.com http://www.sony.com/mobileAV • MSC (Mass Storage Class) and MTP (Media...
... file, elapsed playing time may occur if it is not supported. - USB devices For details on the compatibility of your USB device during playback of the USB device, otherwise USB data may be damaged. 13 Display items Support site http://esupport.sony.com http://www.sony.com/mobileAV • MSC (Mass Storage Class) and MTP (Media...
Operating Instructions
Page 14
... otherwise specified by the text or illustrations. In these Operating Instructions, "iPod" is used as below.* Tip We recommend the RC-100IP USB cable (not supplied) to start playing automatically from the point last played. If an iPod is already connected, to connect the dock connector... via the dock connector to normal play track repeatedly. album in random order. To return to USB cable. Support site http://esupport.sony.com http://www.sony.com/mobileAV Playing back iPod Before connecting the iPod, turn on automatically, and the display will not appear on the iPod...
... otherwise specified by the text or illustrations. In these Operating Instructions, "iPod" is used as below.* Tip We recommend the RC-100IP USB cable (not supplied) to start playing automatically from the point last played. If an iPod is already connected, to connect the dock connector... via the dock connector to normal play track repeatedly. album in random order. To return to USB cable. Support site http://esupport.sony.com http://www.sony.com/mobileAV Playing back iPod Before connecting the iPod, turn on automatically, and the display will not appear on the iPod...


