Operating Instructions
Page 1
CDX-GT550UI Serial No. To cancel the demonstration (DEMO) display, see page 6. Refer to these numbers whenever you call upon your Sony dealer regarding this product. Pour annuler l'affichage de démonstration (DEMO), reportez-vous à la page 6. CDX-GT550UI ©2010 Sony Corporation Model No. 4-198-109-21(1) FM/AM Compact Disc Player Operating Instructions US Mode d'emploi FR Owner's Record The model and serial numbers are located on the bottom of the unit. Record the serial number in the space provided below.
CDX-GT550UI Serial No. To cancel the demonstration (DEMO) display, see page 6. Refer to these numbers whenever you call upon your Sony dealer regarding this product. Pour annuler l'affichage de démonstration (DEMO), reportez-vous à la page 6. CDX-GT550UI ©2010 Sony Corporation Model No. 4-198-109-21(1) FM/AM Compact Disc Player Operating Instructions US Mode d'emploi FR Owner's Record The model and serial numbers are located on the bottom of the unit. Record the serial number in the space provided below.

Operating Instructions
Page 4
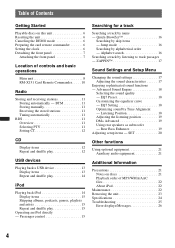
... operations Main unit 8 RM-X151 Card Remote Commander . . . . . 10 Radio Storing and receiving stations 11 Storing automatically - EQ7 Preset 18 Customizing the equalizer curve - BTM 11 Storing manually 11 Receiving the stored stations 11 Tuning automatically 11 RDS 11 Overview 11 Selecting PTY 11 Setting CT 12 CD Display items 12 Repeat and shuffle play 12 USB devices Playing back a USB device 13 Display items 13 Repeat and shuffle play 14 iPod Playing back iPod 14 Display...
... operations Main unit 8 RM-X151 Card Remote Commander . . . . . 10 Radio Storing and receiving stations 11 Storing automatically - EQ7 Preset 18 Customizing the equalizer curve - BTM 11 Storing manually 11 Receiving the stored stations 11 Tuning automatically 11 RDS 11 Overview 11 Selecting PTY 11 Setting CT 12 CD Display items 12 Repeat and shuffle play 12 USB devices Playing back a USB device 13 Display items 13 Repeat and shuffle play 14 iPod Playing back iPod 14 Display...
Operating Instructions
Page 6
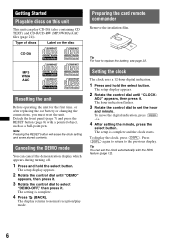
... after replacing the car battery or changing the connections, you must reset the unit. The setup display appears. 2 Rotate the control dial until "DEMO" appears, then press it . To display the clock, press (DSPL). The setup display appears. 2 Rotate the control dial until "CLOCK- The display returns to set the clock automatically with a pointed object, such as a ball-point pen. Setting the clock The clock uses a 12-hour digital indication. 1 Press and hold the select button...
... after replacing the car battery or changing the connections, you must reset the unit. The setup display appears. 2 Rotate the control dial until "DEMO" appears, then press it . To display the clock, press (DSPL). The setup display appears. 2 Rotate the control dial until "CLOCK- The display returns to set the clock automatically with a pointed object, such as a ball-point pen. Setting the clock The clock uses a 12-hour digital indication. 1 Press and hold the select button...

Operating Instructions
Page 8
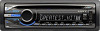
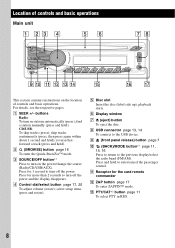
... hold to turn off the power. D Control dial/select button page 17, 20 To adjust volume (rotate); C SOURCE/OFF button*1 Press to turn on the location of controls and basic operations Main unit This section contains instructions on the power/change the source (Radio/CD/USB/AUX). H USB connector page 13, 14 To connect to the previous display/select the radio band (FM/AM). CD/USB: To skip tracks (press); Press for 1 second to turn off the power and the display disappears.
... hold to turn off the power. D Control dial/select button page 17, 20 To adjust volume (rotate); C SOURCE/OFF button*1 Press to turn on the location of controls and basic operations Main unit This section contains instructions on the power/change the source (Radio/CD/USB/AUX). H USB connector page 13, 14 To connect to the previous display/select the radio band (FM/AM). CD/USB: To skip tracks (press); Press for 1 second to turn off the power and the display disappears.
Operating Instructions
Page 10
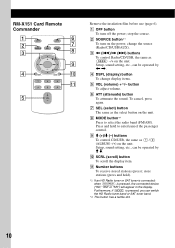
... (MODE) is pressed, the connected device ("HD," "XM" or "SR") will appear in the display. stop the source. C buttons To control Radio/CD/USB, the same as (SEEK) -/+ on the power; Setup, sound setting, etc., can be operated by < ,. Press and hold ). *1 If an HD Radio tuner or SAT tuner is connected: when (SOURCE) is pressed, you can be operated by M m. I M (+)/m (-) buttons To control CD/USB, the same as the select button on the unit. button To adjust volume...
... (MODE) is pressed, the connected device ("HD," "XM" or "SR") will appear in the display. stop the source. C buttons To control Radio/CD/USB, the same as (SEEK) -/+ on the power; Setup, sound setting, etc., can be operated by < ,. Press and hold ). *1 If an HD Radio tuner or SAT tuner is connected: when (SOURCE) is pressed, you can be operated by M m. I M (+)/m (-) buttons To control CD/USB, the same as the select button on the unit. button To adjust volume...

Operating Instructions
Page 15
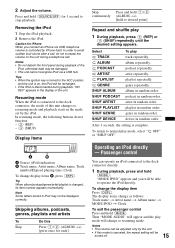
... is canceled, the repeat setting will be turned off. 15 album repeatedly. artist repeatedly. genre repeatedly. artist in the display of the unit. device in random order. Operating an iPod directly - Passenger control You can be damaged. • This unit cannot recognize iPod via USB, telephone volume is disconnected during playback of this unit changes to the dock connector, the mode of the iPod, otherwise data may not...
... is canceled, the repeat setting will be turned off. 15 album repeatedly. artist repeatedly. genre repeatedly. artist in the display of the unit. device in random order. Operating an iPod directly - Passenger control You can be damaged. • This unit cannot recognize iPod via USB, telephone volume is disconnected during playback of this unit changes to the dock connector, the mode of the iPod, otherwise data may not...
Operating Instructions
Page 17
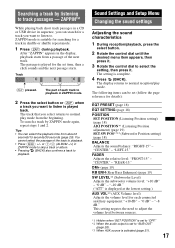
... (Rear Bass Enhancer) (page 19) SW LEVEL*2 (Subwoofer Level) Adjusts the subwoofer volume level: "+10 dB" - "-10 dB." ("ATT" is played back. The setting is played for a track in sequence, you can select the playback time from a passage of the next track. "0 dB" - This setting negates the need to adjust the volume level between sources. *1 Hidden when "SET POSITION" is set to listen is displayed at the lowest setting.) AUX VOL*3 (AUX Volume level) Adjusts the volume level for details): EQ7 PRESET (page...
... (Rear Bass Enhancer) (page 19) SW LEVEL*2 (Subwoofer Level) Adjusts the subwoofer volume level: "+10 dB" - "-10 dB." ("ATT" is played back. The setting is played for a track in sequence, you can select the playback time from a passage of the next track. "0 dB" - This setting negates the need to adjust the volume level between sources. *1 Hidden when "SET POSITION" is set to listen is displayed at the lowest setting.) AUX VOL*3 (AUX Volume level) Adjusts the volume level for details): EQ7 PRESET (page...
Operating Instructions
Page 19
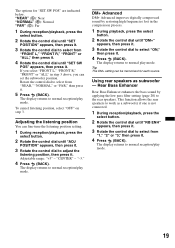
... setting. 1 During reception/playback, press the select button. 2 Rotate the control dial until "SET POSITION" appears, then press it. 3 Rotate the control dial to the rear speakers. The display returns to work as subwoofer - Rear Bass Enhancer Rear Bass Enhancer enhances the bass sound by restoring high frequencies lost in step 3 above, you can be memorized for "SET SW POS" are indicated below. This function allows the rear speakers to normal reception/play mode...
... setting. 1 During reception/playback, press the select button. 2 Rotate the control dial until "SET POSITION" appears, then press it. 3 Rotate the control dial to the rear speakers. The display returns to work as subwoofer - Rear Bass Enhancer Rear Bass Enhancer enhances the bass sound by restoring high frequencies lost in step 3 above, you can be memorized for "SET SW POS" are indicated below. This function allows the rear speakers to normal reception/play mode...

Operating Instructions
Page 20
... (Clock Adjust) (page 6) CT (Clock Time) Activates the CT function: "ON," "OFF" (page 11, 12). BEEP Activates the beep sound: "ON," "OFF." AUTO OFF Shuts off : "NO," "30S (Seconds)," "30M (Minutes)," "60M (Minutes)." Note Displayed items will differ, depending on the source and setting. SW PHASE*4 (Subwoofer Phase) Selects the subwoofer phase: "NORM," "REV." BTM (page 11) *1 When the unit is turned off. *2 When FM is received. *3 When the audio output...
... (Clock Adjust) (page 6) CT (Clock Time) Activates the CT function: "ON," "OFF" (page 11, 12). BEEP Activates the beep sound: "ON," "OFF." AUTO OFF Shuts off : "NO," "30S (Seconds)," "30M (Minutes)," "60M (Minutes)." Note Displayed items will differ, depending on the source and setting. SW PHASE*4 (Subwoofer Phase) Selects the subwoofer phase: "NORM," "REV." BTM (page 11) *1 When the unit is turned off. *2 When FM is received. *3 When the audio output...
Operating Instructions
Page 21
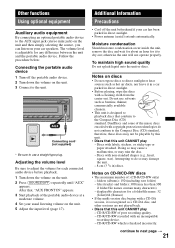
... dry out; displayable characters for each connected audio device before playback. 1 Turn down the volume on discs • Do not expose discs to direct sunlight or heat sources such as hot air ducts, nor leave it in a car parked in direct sunlight. • Before playing, wipe the discs with a CD-DA session, it to do not conform to playback discs that this unit CANNOT play - Connecting cord* (not supplied...
... dry out; displayable characters for each connected audio device before playback. 1 Turn down the volume on discs • Do not expose discs to direct sunlight or heat sources such as hot air ducts, nor leave it in a car parked in direct sunlight. • Before playing, wipe the discs with a CD-DA session, it to do not conform to playback discs that this unit CANNOT play - Connecting cord* (not supplied...

Operating Instructions
Page 25
... problems you press and hold (SOURCE/OFF). t Tuning does not stop at a station: Set "LOCAL-OFF" (page 20). • The broadcast signal is turned on. t Perform manual tuning. During FM reception, the "ST" indication flashes. • Tune in monaural reception mode. CD playback The disc cannot be received. Troubleshooting The following support site. t Turn on the unit until the display appears. • The connectors are not for audio use (page 21). Stored stations...
... problems you press and hold (SOURCE/OFF). t Tuning does not stop at a station: Set "LOCAL-OFF" (page 20). • The broadcast signal is turned on. t Perform manual tuning. During FM reception, the "ST" indication flashes. • Tune in monaural reception mode. CD playback The disc cannot be received. Troubleshooting The following support site. t Turn on the unit until the display appears. • The connectors are not for audio use (page 21). Stored stations...
Operating Instructions
Page 26
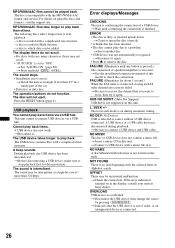
... not function. The operation buttons do not scroll. • For discs with the selected letter in Alphabet search. The USB device contains files with a music file in this unit. t Wait until any button is incorrect. ERROR • The disc is finished. t See the installation/connections manual of the car. • Defective or dirty disc. L. t Insert a music CD in it again. t Connect a USB device with a complicated tree structure. t Disconnect the USB device, then change the source...
... not function. The operation buttons do not scroll. • For discs with the selected letter in Alphabet search. The USB device contains files with a music file in this unit. t Wait until any button is incorrect. ERROR • The disc is finished. t See the installation/connections manual of the car. • Defective or dirty disc. L. t Insert a music CD in it again. t Connect a USB device with a complicated tree structure. t Disconnect the USB device, then change the source...
Operating Instructions
Page 4
... 22 Removing the unit 23 Specifications 24 Troubleshooting 25 Error displays/Messages 26 4 Jump mode 16 Searching by name - Rear Bass Enhancer 19 Adjusting setup items - EQ7 Preset 18 Customizing the equalizer curve - Listening Position 18 Adjusting the listening position 19 DM+ Advanced 19 Using rear speakers as subwoofer - EQ7 Setting 18 Optimizing sound by listening to track passages - Alphabet search 16 Searching a track by Time Alignment - BTM 11 Storing manually 11 Receiving...
... 22 Removing the unit 23 Specifications 24 Troubleshooting 25 Error displays/Messages 26 4 Jump mode 16 Searching by name - Rear Bass Enhancer 19 Adjusting setup items - EQ7 Preset 18 Customizing the equalizer curve - Listening Position 18 Adjusting the listening position 19 DM+ Advanced 19 Using rear speakers as subwoofer - EQ7 Setting 18 Optimizing sound by listening to track passages - Alphabet search 16 Searching a track by Time Alignment - BTM 11 Storing manually 11 Receiving...
Operating Instructions
Page 8
.... buttons Radio: To tune in RDS. 8 D Control dial/select button page 17, 20 To adjust volume (rotate); M PTY/CAT*2 button page 11 To select PTY in stations automatically (press); find a station manually (press and hold ); F Display window G Z (eject) button To eject the disc. reverse/fastforward a track (press and hold to turn on the location of controls and basic operations Main unit This section contains instructions on the power/change the source (Radio/CD/USB/AUX). H USB connector page 13, 14 To connect to...
.... buttons Radio: To tune in RDS. 8 D Control dial/select button page 17, 20 To adjust volume (rotate); M PTY/CAT*2 button page 11 To select PTY in stations automatically (press); find a station manually (press and hold ); F Display window G Z (eject) button To eject the disc. reverse/fastforward a track (press and hold to turn on the location of controls and basic operations Main unit This section contains instructions on the power/change the source (Radio/CD/USB/AUX). H USB connector page 13, 14 To connect to...
Operating Instructions
Page 15
...; This unit cannot recognize iPod via USB, telephone volume is controlled by the unit. • If this mode is turned to normal play 1 During playback, press (3) (REP) or (4) (SHUF) repeatedly until the desired setting appears. In order to operate the iPod directly. Select TRACK ALBUM PODCAST ARTIST PLAYLIST GENRE SHUF ALBUM SHUF PODCAST SHUF ARTIST SHUF PLAYLIST SHUF GENRE SHUF DEVICE To play mode will be displayed correctly...
...; This unit cannot recognize iPod via USB, telephone volume is controlled by the unit. • If this mode is turned to normal play 1 During playback, press (3) (REP) or (4) (SHUF) repeatedly until the desired setting appears. In order to operate the iPod directly. Select TRACK ALBUM PODCAST ARTIST PLAYLIST GENRE SHUF ALBUM SHUF PODCAST SHUF ARTIST SHUF PLAYLIST SHUF GENRE SHUF DEVICE To play mode will be displayed correctly...

Operating Instructions
Page 17
... playback in the display, playback starts from about 6 seconds/15 seconds/30 seconds (page 20). The track that you can select the playback time from a passage of each connected auxiliary equipment: "+18 dB" - This setting negates the need to adjust the volume level between sources. *1 Hidden when "SET POSITION" is set to "OFF." *2 When the audio output is set to "SUB-OUT" (page 20). *3 When AUX source is complete...
... playback in the display, playback starts from about 6 seconds/15 seconds/30 seconds (page 20). The track that you can select the playback time from a passage of each connected auxiliary equipment: "+18 dB" - This setting negates the need to adjust the volume level between sources. *1 Hidden when "SET POSITION" is set to "OFF." *2 When the audio output is set to "SUB-OUT" (page 20). *3 When AUX source is complete...

Operating Instructions
Page 20
... audio output: "SUB-OUT" (subwoofer), "REAR-OUT" (power amplifier). SW PHASE*4 (Subwoofer Phase) Selects the subwoofer phase: "NORM," "REV." SET 1 Press and hold the select button. M.DISPLAY (Motion Display) - "Z.TIME-1 (about 6 seconds)," "Z.TIME-2 (about 15 seconds)," "Z.TIME-3 (about 30 seconds)." The following items can be set to "SUB-OUT." BEEP Activates the beep sound: "ON," "OFF." "OFF": to tune normal reception. 20 MONO*2 (Monaural Mode) Selects monaural reception mode to select the setting, then press it . 3 Rotate the control...
... audio output: "SUB-OUT" (subwoofer), "REAR-OUT" (power amplifier). SW PHASE*4 (Subwoofer Phase) Selects the subwoofer phase: "NORM," "REV." SET 1 Press and hold the select button. M.DISPLAY (Motion Display) - "Z.TIME-1 (about 6 seconds)," "Z.TIME-2 (about 15 seconds)," "Z.TIME-3 (about 30 seconds)." The following items can be set to "SUB-OUT." BEEP Activates the beep sound: "ON," "OFF." "OFF": to tune normal reception. 20 MONO*2 (Monaural Mode) Selects monaural reception mode to select the setting, then press it . 3 Rotate the control...

Operating Instructions
Page 21
... of the music discs encoded with a CD-DA session, it in a car parked in direct sunlight. • Power antenna (aerial) extends automatically. CD-R/CD-RW which is adjustable for each connected audio device before playback. 1 Turn down the volume on the unit. 5 Adjust the input level (page 17). After that this unit. • Discs that conform to the AUX input jack (stereo mini jack) on the unit and then simply selecting the source, you...
... of the music discs encoded with a CD-DA session, it in a car parked in direct sunlight. • Power antenna (aerial) extends automatically. CD-R/CD-RW which is adjustable for each connected audio device before playback. 1 Turn down the volume on the unit. 5 Adjust the input level (page 17). After that this unit. • Discs that conform to the AUX input jack (stereo mini jack) on the unit and then simply selecting the source, you...

Operating Instructions
Page 25
...; An optional power amplifier is not correct. Radio reception The stations cannot be loaded. • Another disc is performed for 5 minutes with the car's accessory power connector. Automatic tuning is not possible. • Setting of a car's antenna (aerial) booster (only when your unit. t Set "MONO-ON" (page 20). RDS PTY displays The current station is not set , demonstration mode starts. Troubleshooting The following support site. No sound. • The ATT function is activated. •...
...; An optional power amplifier is not correct. Radio reception The stations cannot be loaded. • Another disc is performed for 5 minutes with the car's accessory power connector. Automatic tuning is not possible. • Setting of a car's antenna (aerial) booster (only when your unit. t Set "MONO-ON" (page 20). RDS PTY displays The current station is not set , demonstration mode starts. Troubleshooting The following support site. No sound. • The ATT function is activated. •...

Operating Instructions
Page 26
... play back than others. The sound skips. • Installation is confirming the connection of a USB device. t Reconnect it again. t Before disconnecting a USB device, make sure to receive the channel that the USB device is out of speakers/amplifiers is finished. t Insert another disc. • USB device was not automatically recognized. t Connect a USB device with a complicated tree structure. - If the error indication remains on this unit. t Press and hold (DSPL) (SCRL). Press the RESET button (page...
... play back than others. The sound skips. • Installation is confirming the connection of a USB device. t Reconnect it again. t Before disconnecting a USB device, make sure to receive the channel that the USB device is out of speakers/amplifiers is finished. t Insert another disc. • USB device was not automatically recognized. t Connect a USB device with a complicated tree structure. - If the error indication remains on this unit. t Press and hold (DSPL) (SCRL). Press the RESET button (page...


