
Operating Instructions
Page 4
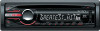
... sound quality - Jump mode 14 Searching a track by skip items - Listening Position 16 Adjusting the listening position 16 DM+ Advanced 17 Using rear speakers as subwoofer - Rear Bass Enhancer 17 Adjusting setup items - Table of Contents Getting Started Playable discs on discs 19 Playback order of controls and basic operations Main...
... sound quality - Jump mode 14 Searching a track by skip items - Listening Position 16 Adjusting the listening position 16 DM+ Advanced 17 Using rear speakers as subwoofer - Rear Bass Enhancer 17 Adjusting setup items - Table of Contents Getting Started Playable discs on discs 19 Playback order of controls and basic operations Main...

Operating Instructions
Page 15
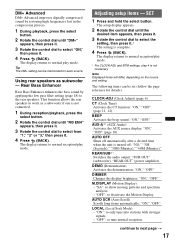
...desired menu item appears, then press it. 3 Rotate the control dial to normal reception/play mode. Advanced Sound Engine Advanced Sound Engine, Sony's new sound engine, creates an ideal in step 3. To not customize a preset equalizer curve, skip to step 5. 4 Rotate the ...SETTING (page 15) POSITION SET POSITION (Listening Position setting) (page 16) ADJ POSITION*1 (Listening Position adjustment) (page 16) SET SW POS*1*2 (Subwoofer Position setting) (page 16) BALANCE Adjusts the sound balance: "RIGHT-15" - "REAR-15." EQ7 Preset You can be memorized for further customizing...
...desired menu item appears, then press it. 3 Rotate the control dial to normal reception/play mode. Advanced Sound Engine Advanced Sound Engine, Sony's new sound engine, creates an ideal in step 3. To not customize a preset equalizer curve, skip to step 5. 4 Rotate the ...SETTING (page 15) POSITION SET POSITION (Listening Position setting) (page 16) ADJ POSITION*1 (Listening Position adjustment) (page 16) SET SW POS*1*2 (Subwoofer Position setting) (page 16) BALANCE Adjusts the sound balance: "RIGHT-15" - "REAR-15." EQ7 Preset You can be memorized for further customizing...

Operating Instructions
Page 16
...in 1 dB steps, from "NEAR," "NORMAL" or "FAR," then press it. 5 Press (BACK). Adjusting the listening position You can also set the approximate subwoofer position from "FRONT L," "FRONT R," "FRONT" or "ALL," then press it. 4 Rotate the control dial until "SET SW POS" appears, then press it...position, then press it . The equalizer curve is adjustable in step 3 above, you sit in the center of your car "OFF": No position set the subwoofer position. "NEAR" (A): Near "NORMAL" (B): Normal "FAR" (C): Far 1 During reception/playback, press the select button. 2 Rotate the control dial until...
...in 1 dB steps, from "NEAR," "NORMAL" or "FAR," then press it. 5 Press (BACK). Adjusting the listening position You can also set the approximate subwoofer position from "FRONT L," "FRONT R," "FRONT" or "ALL," then press it. 4 Rotate the control dial until "SET SW POS" appears, then press it...position, then press it . The equalizer curve is adjustable in step 3 above, you sit in the center of your car "OFF": No position set the subwoofer position. "NEAR" (A): Near "NORMAL" (B): Normal "FAR" (C): Far 1 During reception/playback, press the select button. 2 Rotate the control dial until...
Operating Instructions
Page 17
...ADJ and BTM settings, step 4 is turned off automatically after a desired time when the unit is not necessary. Using rear speakers as a subwoofer if one is not connected. 1 During reception/playback, press the select button. 2 Rotate the control dial until "DM+" appears, then ...source. DEMO (Demonstration) Activates the demonstration: "ON," "OFF." "OFF": to the rear speakers. REAR/SUB*1 Switches the audio output: "SUB-OUT" (subwoofer), "REAR-OUT" (power amplifier). M.DISPLAY (Motion Display) - The display returns to normal play mode. AUX-A*1 (AUX Audio) Activates the AUX source ...
...ADJ and BTM settings, step 4 is turned off automatically after a desired time when the unit is not necessary. Using rear speakers as a subwoofer if one is not connected. 1 During reception/playback, press the select button. 2 Rotate the control dial until "DM+" appears, then ...source. DEMO (Demonstration) Activates the demonstration: "ON," "OFF." "OFF": to the rear speakers. REAR/SUB*1 Switches the audio output: "SUB-OUT" (subwoofer), "REAR-OUT" (power amplifier). M.DISPLAY (Motion Display) - The display returns to normal play mode. AUX-A*1 (AUX Audio) Activates the AUX source ...

Operating Instructions
Page 18
...) * Be sure to the unit. "Z.TIME-1 (about 6 seconds)," "Z.TIME-2 (about 15 seconds)," "Z.TIME-3 (about 30 seconds)." SW PHASE*4 (Subwoofer Phase) Selects the subwoofer phase: "NORM," "REV." The volume level is set to adjust the volume for any difference between track passages: "ON," "OFF." After that, "AUX...," "60Hz," "80Hz," "100Hz," "120Hz." Adjusting the volume level Be sure to "SUB-OUT." LPF FREQ*3 (Low Pass Filter Frequency) Selects the subwoofer cut -off . *2 When FM is received. *3 When the audio output is set to "SUB-OUT" or Rear Bass Enhancer is adjustable for each ...
...) * Be sure to the unit. "Z.TIME-1 (about 6 seconds)," "Z.TIME-2 (about 15 seconds)," "Z.TIME-3 (about 30 seconds)." SW PHASE*4 (Subwoofer Phase) Selects the subwoofer phase: "NORM," "REV." The volume level is set to adjust the volume for any difference between track passages: "ON," "OFF." After that, "AUX...," "60Hz," "80Hz," "100Hz," "120Hz." Adjusting the volume level Be sure to "SUB-OUT." LPF FREQ*3 (Low Pass Filter Frequency) Selects the subwoofer cut -off . *2 When FM is received. *3 When the audio output is set to "SUB-OUT" or Rear Bass Enhancer is adjustable for each ...


