

Limited Warranty (U.S. Only)
Page 1
...; Car Audio LIMITED WARRANTY (U.S. It is provided "AS IS" unless expressly provided for your authorized dealer, call: 1-800-488-SONY (7669) Repair / Replacement Warranty: This Limited Warranty shall apply to commercial use ; A dated purchase receipt is invalid if the factory-applied serial number has been altered or removed from your product, Visit Sony's Web Site: www.sony.com/service Or call the Sony...
...; Car Audio LIMITED WARRANTY (U.S. It is provided "AS IS" unless expressly provided for your authorized dealer, call: 1-800-488-SONY (7669) Repair / Replacement Warranty: This Limited Warranty shall apply to commercial use ; A dated purchase receipt is invalid if the factory-applied serial number has been altered or removed from your product, Visit Sony's Web Site: www.sony.com/service Or call the Sony...

Operating Instructions
Page 1
Refer to these numbers whenever you call upon your Sony dealer regarding this product. To cancel the demonstration (DEMO) display, see page 9. 2-653-154-31 (1) FM/AM Compact Disc Player Operating Instructions US Manual de instrucciones ES Owner's Record The model and serial numbers are located on the bottom of the unit. CDX-GT40W Serial No. Record the serial number in the space provided below. Model No. Para cancelar la pantalla de demostración (DEMO), consulte la página 11. CDX-GT40W © 2005 Sony Corporation
Refer to these numbers whenever you call upon your Sony dealer regarding this product. To cancel the demonstration (DEMO) display, see page 9. 2-653-154-31 (1) FM/AM Compact Disc Player Operating Instructions US Manual de instrucciones ES Owner's Record The model and serial numbers are located on the bottom of the unit. CDX-GT40W Serial No. Record the serial number in the space provided below. Model No. Para cancelar la pantalla de demostración (DEMO), consulte la página 11. CDX-GT40W © 2005 Sony Corporation
Operating Instructions
Page 2
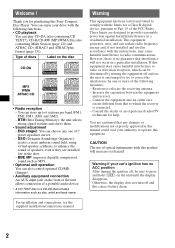
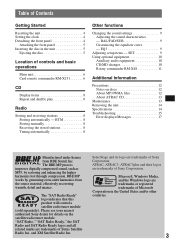
.... - For installation and connections, see the supplied installation/connections manual. 2 BTM (Best Tuning Memory): the unit selects strong signal stations and stores them. • Sound adjustment - Warning if your drive with this causes battery drain. Type of discs Label on the front of the unit allows connection of the FCC Rules. BBE MP: improves digitally compressed sound such as MP3. • Optional unit operation You can enjoy your car's ignition has...
.... - For installation and connections, see the supplied installation/connections manual. 2 BTM (Best Tuning Memory): the unit selects strong signal stations and stores them. • Sound adjustment - Warning if your drive with this causes battery drain. Type of discs Label on the front of the unit allows connection of the FCC Rules. BBE MP: improves digitally compressed sound such as MP3. • Optional unit operation You can enjoy your car's ignition has...
Operating Instructions
Page 3
... 13 Removing the unit 14 Specifications 14 Troubleshooting 15 Error displays/Messages 17 Manufactured under license R from the source material, effectively recovering warmth, detail and nuance. BAL/FAD/SUB 9 Customizing the equalizer curve - BTM 8 Storing manually 8 Receiving the stored stations 8 Tuning automatically 8 Other functions Changing the sound settings 9 Adjusting the sound characteristics - SonicStage and its logo are trademarks or registered trademarks of Sirius Satellite Radio Inc. SET 9 Using optional equipment 10 Auxiliary audio equipment...
... 13 Removing the unit 14 Specifications 14 Troubleshooting 15 Error displays/Messages 17 Manufactured under license R from the source material, effectively recovering warmth, detail and nuance. BAL/FAD/SUB 9 Customizing the equalizer curve - BTM 8 Storing manually 8 Receiving the stored stations 8 Tuning automatically 8 Other functions Changing the sound settings 9 Adjusting the sound characteristics - SonicStage and its logo are trademarks or registered trademarks of Sirius Satellite Radio Inc. SET 9 Using optional equipment 10 Auxiliary audio equipment...
Operating Instructions
Page 4
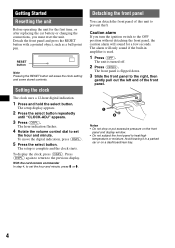
... caution alarm will sound for the first time, or after replacing the car battery or changing the connections, you must reset the unit. To display the clock, press (DSPL). The front panel is complete and the clock starts. Setting the clock The clock uses a 12-hour digital indication. 1 Press and hold the select button. Detaching the front panel You can detach the front panel of the front panel. 1 2 Notes • Do not...
... caution alarm will sound for the first time, or after replacing the car battery or changing the connections, you must reset the unit. To display the clock, press (DSPL). The front panel is complete and the clock starts. Setting the clock The clock uses a 12-hour digital indication. 1 Press and hold the select button. Detaching the front panel You can detach the front panel of the front panel. 1 2 Notes • Do not...

Operating Instructions
Page 5
Inserting the disc in . Note Do not put anything on the unit, then lightly push the left side in the unit 1 Press (OPEN). 2 Insert the disc (label side up). Ejecting the disc 1 Press (OPEN). 2 Press Z. The disc is ejected. 3 Close the front panel. Attaching the front panel Place the hole A of the front panel onto the spindle B on the inner surface of the front panel. 5 Press (SOURCE) on the unit (or insert a disc) to operate the unit. Playback starts automatically. A B x 3 Close the front panel.
Inserting the disc in . Note Do not put anything on the unit, then lightly push the left side in the unit 1 Press (OPEN). 2 Insert the disc (label side up). Ejecting the disc 1 Press (OPEN). 2 Press Z. The disc is ejected. 3 Close the front panel. Attaching the front panel Place the hole A of the front panel onto the spindle B on the inner surface of the front panel. 5 Press (SOURCE) on the unit (or insert a disc) to operate the unit. Playback starts automatically. A B x 3 Close the front panel.
Operating Instructions
Page 6
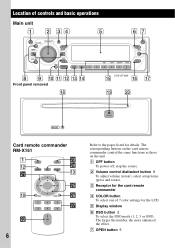
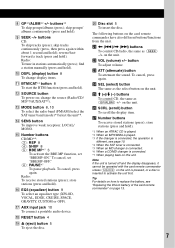
Location of 7 color settings for the LCD. RESET Card remote commander RM-X151 1 qs wa q; The corresponding buttons on the card remote commander control the same functions as those on the unit. B Volume control dial/select button 9 To adjust volume (rotate); E Display window F DSO button 2 To select the DSO mode (1, 2, 3 or OFF). stop the source. The larger the number, the more enhanced the effect. G OPEN button 5 C Receptor for details. select setup items (press and rotate). OFF...
Location of 7 color settings for the LCD. RESET Card remote commander RM-X151 1 qs wa q; The corresponding buttons on the card remote commander control the same functions as those on the unit. B Volume control dial/select button 9 To adjust volume (rotate); E Display window F DSO button 2 To select the DSO mode (1, 2, 3 or OFF). stop the source. The larger the number, the more enhanced the effect. G OPEN button 5 C Receptor for details. select setup items (press and rotate). OFF...
Operating Instructions
Page 7
... (select) button The same as the select button on the unit. wj Number buttons To receive stored stations (press); Note If the unit is turned off and the display disappears, it cannot be operated with the card remote commander unless (SOURCE) on the unit is pressed, or a disc is connected. *7 When playing back on how to activate the unit first. N SENS button To improve weak reception: LOCAL/ MONO. button To adjust volume. Radio: To tune in stations automatically...
... (select) button The same as the select button on the unit. wj Number buttons To receive stored stations (press); Note If the unit is turned off and the display disappears, it cannot be operated with the card remote commander unless (SOURCE) on the unit is pressed, or a disc is connected. *7 When playing back on how to activate the unit first. N SENS button To improve weak reception: LOCAL/ MONO. button To adjust volume. Radio: To tune in stations automatically...
Operating Instructions
Page 8
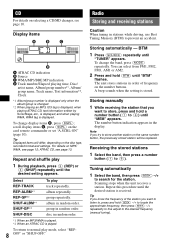
.... Radio Storing and receiving stations Caution When tuning in order of the station you try to normal play mode, select "REP- 8 OFF" or "SHUF-OFF." BTM 1 Press (SOURCE) repeatedly until "MEM" appears. The unit stores stations in stations while driving, use Best Tuning Memory (BTM) to search for the station. Scanning stops when the unit receives a station. You can select from FM1, FM2, FM3, AM1 or AM2. 2 Press and hold a number button ((1) to...
.... Radio Storing and receiving stations Caution When tuning in order of the station you try to normal play mode, select "REP- 8 OFF" or "SHUF-OFF." BTM 1 Press (SOURCE) repeatedly until "MEM" appears. The unit stores stations in stations while driving, use Best Tuning Memory (BTM) to search for the station. Scanning stops when the unit receives a station. You can select from FM1, FM2, FM3, AM1 or AM2. 2 Press and hold a number button ((1) to...
Operating Instructions
Page 9
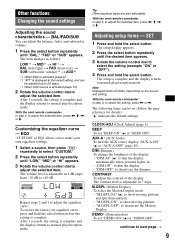
...-rear) t SUB (subwoofer volume)*2 t AUX*3 *1 When EQ3 is activated (page 9). *2 "ATT" is displayed at the lowest setting, and can adjust the balance, fader, and subwoofer volume. 1 Press the select button repeatedly until "BAL," "FAD" or "SUB" appears. BAL/FAD/SUB You can be adjusted up to 20 steps. *3 When AUX source is complete and the display returns to normal play/reception mode. After 3 seconds, the setting is activated (page 10). 2 Rotate the volume control dial to adjust the selected...
...-rear) t SUB (subwoofer volume)*2 t AUX*3 *1 When EQ3 is activated (page 9). *2 "ATT" is displayed at the lowest setting, and can adjust the balance, fader, and subwoofer volume. 1 Press the select button repeatedly until "BAL," "FAD" or "SUB" appears. BAL/FAD/SUB You can be adjusted up to 20 steps. *3 When AUX source is complete and the display returns to normal play/reception mode. After 3 seconds, the setting is activated (page 10). 2 Rotate the volume control dial to adjust the selected...

Operating Instructions
Page 10
... the unit is changed. - CD/MD changer Selecting the changer 1 Press (SOURCE) repeatedly until "CD" or "MD" appears. 2 Press (MODE) repeatedly until "AUX" appears, and rotate the volume control dial to adjust the volume for each connected audio device before playback. 1 Turn down the volume on the unit. 3 Connect to the unit. then, press again within 2 seconds of the portable audio device at a moderate volume. 4 Set your car speakers. To skip album album continuously discs discs continuously Press...
... the unit is changed. - CD/MD changer Selecting the changer 1 Press (SOURCE) repeatedly until "CD" or "MD" appears. 2 Press (MODE) repeatedly until "AUX" appears, and rotate the volume control dial to adjust the volume for each connected audio device before playback. 1 Turn down the volume on the unit. 3 Connect to the unit. then, press again within 2 seconds of the portable audio device at a moderate volume. 4 Set your car speakers. To skip album album continuously discs discs continuously Press...

Operating Instructions
Page 11
... Attaching the label Attach the indication label depending on this unit. ATT SEL PRESET/ DISC MODE SOURCE OFF DSPL VOL SEEK/AMS OFF The following controls on the right hand side of the controls is factoryset as (GP/ALBM) +/- Changing the operative direction The operative direction of the steering column, you need to normal play mode, select "REPOFF" or "SHUF-OFF." To increase To decrease If you...
... Attaching the label Attach the indication label depending on this unit. ATT SEL PRESET/ DISC MODE SOURCE OFF DSPL VOL SEEK/AMS OFF The following controls on the right hand side of the controls is factoryset as (GP/ALBM) +/- Changing the operative direction The operative direction of the steering column, you need to normal play mode, select "REPOFF" or "SHUF-OFF." To increase To decrease If you...
Operating Instructions
Page 12
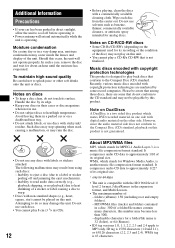
... each disc from using such discs: - displayable characters for Windows Media Audio, is compatible with the ISO 9660 level 1/ level 2 format, Joliet/Romeo in the expansion format, and Multi Session. • The maximum number of a sticker or label causing a disc to approximately 1/10 of the unit. Handle the disc by its surface. WMA, which stands for 64 kbps • The unit is another music...
... each disc from using such discs: - displayable characters for Windows Media Audio, is compatible with the ISO 9660 level 1/ level 2 format, Joliet/Romeo in the expansion format, and Multi Session. • The maximum number of a sticker or label causing a disc to approximately 1/10 of the unit. Handle the disc by its surface. WMA, which stands for 64 kbps • The unit is another music...
Operating Instructions
Page 13
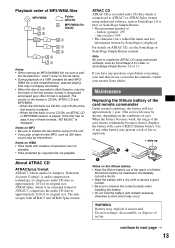
... Adaptive Transform Acoustic Coding3, is audio compression technology. Maintenance Replacing the lithium battery of the card remote commander Under normal conditions, the battery will last approximately 1 year. (The service life may be shorter, depending on WMA • Files made with lossless compression are not playable. • Files protected by SonicStage is displayed. The priority of the format is played. - The unit...
... Adaptive Transform Acoustic Coding3, is audio compression technology. Maintenance Replacing the lithium battery of the card remote commander Under normal conditions, the battery will last approximately 1 year. (The service life may be shorter, depending on WMA • Files made with lossless compression are not playable. • Files protected by SonicStage is displayed. The priority of the format is played. - The unit...

Operating Instructions
Page 14
... fuse blows again after replacement, there may not function properly if the connectors between the unit and the front panel are not clean. Otherwise, the connectors may be an internal malfunction. Orient the release keys as shown. 14 Specifications AUDIO POWER SPECIFICATIONS POWER OUTPUT AND TOTAL HARMONIC DISTORTION 23.2 watts per channel minimum continuous average power into 4 Ohms) CD Player section Signal-to unseat the unit. Removing the unit 1 Remove...
... fuse blows again after replacement, there may not function properly if the connectors between the unit and the front panel are not clean. Otherwise, the connectors may be an internal malfunction. Orient the release keys as shown. 14 Specifications AUDIO POWER SPECIFICATIONS POWER OUTPUT AND TOTAL HARMONIC DISTORTION 23.2 watts per channel minimum continuous average power into 4 Ohms) CD Player section Signal-to unseat the unit. Removing the unit 1 Remove...

Operating Instructions
Page 15
... the fuse. • If the unit is Sony BUS system compatible. The power antenna does not extend. t Play back with the disc format (MP3/WMA/ATRAC CD). US and foreign patents licensed from Fraunhofer IIS and Thomson. Design and specifications are not using the built-in ) (w/h/d) Mass: Approx. 1.2 kg (2 lb 11 oz) Supplied accessories: Card remote commander: RM-X151 Parts for installation and connections (1 set for...
... the fuse. • If the unit is Sony BUS system compatible. The power antenna does not extend. t Play back with the disc format (MP3/WMA/ATRAC CD). US and foreign patents licensed from Fraunhofer IIS and Thomson. Design and specifications are not using the built-in ) (w/h/d) Mass: Approx. 1.2 kg (2 lb 11 oz) Supplied accessories: Card remote commander: RM-X151 Parts for installation and connections (1 set for...
Operating Instructions
Page 16
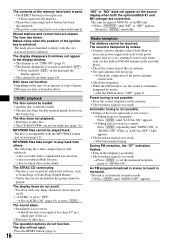
... car antenna. • The auto antenna will not eject. a disc recorded with the car's accessory power connector. a disc recorded in the wrong way. The ATRAC CD cannot play back than 45° in the display window. • The dimmer is not possible. • Store the correct frequency in monaural reception mode. The display items do not function. The sound skips. • Installation is sometimes hampered by noises. • Connect a power antenna control lead (blue...
... car antenna. • The auto antenna will not eject. a disc recorded with the car's accessory power connector. a disc recorded in the wrong way. The ATRAC CD cannot play back than 45° in the display window. • The dimmer is not possible. • Store the correct frequency in monaural reception mode. The display items do not function. The sound skips. • Installation is sometimes hampered by noises. • Connect a power antenna control lead (blue...

Operating Instructions
Page 17
... unit to be operated because of some problem. If the error indication remains on the disc structure, it may be displayed with recorded tracks. t Wait until loading is not written in this model to check the connection. If these solutions do not help improve the situation, consult your nearest Sony dealer. LOAD The changer is connected, storing an XM radio channel into a preset failed. t Insert a music...
... unit to be operated because of some problem. If the error indication remains on the disc structure, it may be displayed with recorded tracks. t Wait until loading is not written in this model to check the connection. If these solutions do not help improve the situation, consult your nearest Sony dealer. LOAD The changer is connected, storing an XM radio channel into a preset failed. t Insert a music...

Operating Instructions
Page 36
only); Call 1-800-222-7669 URL http://www.SONY.com Sony Corporation Printed in these Operating Instructions. 2 Reset the unit. If you have any questions/problems regarding this product, try the following: 1 Read Troubleshooting in Thailand Note: Stored data may be erased. 3 Please contact (U.S.A.
only); Call 1-800-222-7669 URL http://www.SONY.com Sony Corporation Printed in these Operating Instructions. 2 Reset the unit. If you have any questions/problems regarding this product, try the following: 1 Read Troubleshooting in Thailand Note: Stored data may be erased. 3 Please contact (U.S.A.


