Operating Instructions
Page 2
... selects strong signal stations and stores them. • Sound adjustment - For installation and connections, see the supplied installation/connections manual. If this equipment. Connect the equipment into an outlet on the unit until the display disappears. Warning if your car's ignition...These limits are cautioned that any changes or modifications not expressly approved in this Sony Compact Disc Player. However, there is connected. - You can select an equalizer curve for purchasing this manual could void your drive with the instructions, may cause harmful interference to which...
... selects strong signal stations and stores them. • Sound adjustment - For installation and connections, see the supplied installation/connections manual. If this equipment. Connect the equipment into an outlet on the unit until the display disappears. Warning if your car's ignition...These limits are cautioned that any changes or modifications not expressly approved in this Sony Compact Disc Player. However, there is connected. - You can select an equalizer curve for purchasing this manual could void your drive with the instructions, may cause harmful interference to which...
Operating Instructions
Page 3
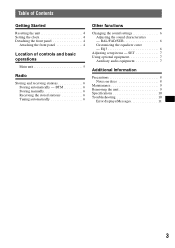
... controls and basic operations Main unit 5 Radio Storing and receiving stations 6 Storing automatically - SET 7 Using optional equipment 7 Auxiliary audio equipment 7 Additional Information Precautions 8 Notes on discs 8 Maintenance 9 Removing the unit 9 Specifications 10 Troubleshooting 10 Error displays/Messages 11 3 EQ3 6 Adjusting setup items - BAL/FAD/SUB 6 Customizing the equalizer curve - BTM 6 Storing...
... controls and basic operations Main unit 5 Radio Storing and receiving stations 6 Storing automatically - SET 7 Using optional equipment 7 Auxiliary audio equipment 7 Additional Information Precautions 8 Notes on discs 8 Maintenance 9 Removing the unit 9 Specifications 10 Troubleshooting 10 Error displays/Messages 11 3 EQ3 6 Adjusting setup items - BAL/FAD/SUB 6 Customizing the equalizer curve - BTM 6 Storing...

Operating Instructions
Page 5
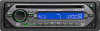
...CD: To skip tracks (press); find a station manually (press and hold ). L MODE button 6 To select the radio band (FM/AM). O SENS button To improve weak reception: LOCAL/ MONO. B Volume control dial/select button 6 To adjust volume (rotate); E Display window F Z (eject) button To eject the disc. P AUX input jack 7 To connect a ...To receive stored stations (press); K BTM button 6 To start the BTM function (press and hold ). Location of controls and basic operations Main unit CDX-GT100 CDX-GT10W Refer to the pages listed for details. A OFF button To power off;
...CD: To skip tracks (press); find a station manually (press and hold ). L MODE button 6 To select the radio band (FM/AM). O SENS button To improve weak reception: LOCAL/ MONO. B Volume control dial/select button 6 To adjust volume (rotate); E Display window F Z (eject) button To eject the disc. P AUX input jack 7 To connect a ...To receive stored stations (press); K BTM button 6 To start the BTM function (press and hold ). Location of controls and basic operations Main unit CDX-GT100 CDX-GT10W Refer to the pages listed for details. A OFF button To power off;
Operating Instructions
Page 6
... station on the number buttons. Repeat steps 2 and 3 to search for the station. To change the band, press (MODE) repeatedly. Storing manually 1 While receiving the station that you want to store, press and hold the select button before the setting is complete and the display returns to...AM1 or AM2. 2 Press and hold (SEEK) -/+ to locate the approximate frequency, then press (SEEK) -/+ repeatedly to fine adjust to the desired frequency (manual tuning). Tip If you know the frequency of the station you want to listen to, press and hold (BTM) until "MEM" appears. "ATT" is displayed...
... station on the number buttons. Repeat steps 2 and 3 to search for the station. To change the band, press (MODE) repeatedly. Storing manually 1 While receiving the station that you want to store, press and hold the select button before the setting is complete and the display returns to...AM1 or AM2. 2 Press and hold (SEEK) -/+ to locate the approximate frequency, then press (SEEK) -/+ repeatedly to fine adjust to the desired frequency (manual tuning). Tip If you know the frequency of the station you want to listen to, press and hold (BTM) until "MEM" appears. "ATT" is displayed...

Operating Instructions
Page 11
...the frequency accurately. • The broadcast signal is too weak. t Tuning stops too frequently: Press (SENS) until "MONO-ON" or "MONO-OFF" (FM), or "LOCAL-OFF" (AM) appears. • The broadcast signal is too weak. FAILURE The speaker/amplifier connection is not correct. t See the ...supplied installation/connections manual to "MONO-ON." " " or " " During reverse or fast-forward, you have reached the beginning or the end of the disc and you take more than 45° in the display, consult your nearest Sony dealer. The sound skips. • Installation is...
...the frequency accurately. • The broadcast signal is too weak. t Tuning stops too frequently: Press (SENS) until "MONO-ON" or "MONO-OFF" (FM), or "LOCAL-OFF" (AM) appears. • The broadcast signal is too weak. FAILURE The speaker/amplifier connection is not correct. t See the ...supplied installation/connections manual to "MONO-ON." " " or " " During reverse or fast-forward, you have reached the beginning or the end of the disc and you take more than 45° in the display, consult your nearest Sony dealer. The sound skips. • Installation is...


