
Limited Warranty (U.S. Only)
Page 1
Pursuant to this Limited Warranty, Sony will, at its original specifications. For purposes of incidental or consequential damages, or allow limitations on your unit. any such damage or loss. Instructions: To obtain warranty service, you must deliver the product, freight prepaid, in either its option, (i) repair the product using new or refurbished parts or (ii) replace the product with respect...
Pursuant to this Limited Warranty, Sony will, at its original specifications. For purposes of incidental or consequential damages, or allow limitations on your unit. any such damage or loss. Instructions: To obtain warranty service, you must deliver the product, freight prepaid, in either its option, (i) repair the product using new or refurbished parts or (ii) replace the product with respect...

XM Satellite Radio Operating manual
Page 1
... operations. Button locations vary with the receiver, an error message will erase the clock setting and some master units, the Disc/Preset button is only equipped on the remote control. 4 Press the Disc/Preset + (Disc +) button for installation and connection (1 set to change without notice. Press the Source button until "XM" is displayed. Pressing and holding the Seek button will not occur in the channel. The category of the master unit for the first time, reset the master unit. The radio...
... operations. Button locations vary with the receiver, an error message will erase the clock setting and some master units, the Disc/Preset button is only equipped on the remote control. 4 Press the Disc/Preset + (Disc +) button for installation and connection (1 set to change without notice. Press the Source button until "XM" is displayed. Pressing and holding the Seek button will not occur in the channel. The category of the master unit for the first time, reset the master unit. The radio...

XM Satellite Radio Operating manual
Page 2
... making connections, turn the car ignition off to avoid short circuits. • Connect the yellow power input cord only after replacement, there may be used because of a higher amperage fuse may cause serious damage. Note When you plan to install it, and mark the positions of the driver and it first. POWER SONY BUS CONTROL OUT IN AUDIO L OUT R L IN R ANTENNA TER SAT 2 Connect as heaters). - Black RCA pin cord (not supplied) BUS cable...
... making connections, turn the car ignition off to avoid short circuits. • Connect the yellow power input cord only after replacement, there may be used because of a higher amperage fuse may cause serious damage. Note When you plan to install it, and mark the positions of the driver and it first. POWER SONY BUS CONTROL OUT IN AUDIO L OUT R L IN R ANTENNA TER SAT 2 Connect as heaters). - Black RCA pin cord (not supplied) BUS cable...

Installation/Connection Instructions
Page 1
... (1) FM/AM Compact Disc Player Installation/Connections Instalación/Conexiones 2 A CDX-FW550 only sólo CDX-FW550 AUDIO OUT FRONT AUDIO OUT REAR B BUS AUDIO IN BUS CONTROL IN CDX-FW550 CDX-FW500 © 2004 Sony Corporation Printed in Korea 1 1 2 3 × 4 4 5 × 2 Equipment used in illustrations (not supplied) Equipo utilizado en las ilustraciones (no suministrado) Front speaker Altavoz frontal Power amplifier Amplificador de potencia Rear speaker Altavoz posterior CD/MD changer Cambiador de CD/MD Active subwoofer Altavoz...
... (1) FM/AM Compact Disc Player Installation/Connections Instalación/Conexiones 2 A CDX-FW550 only sólo CDX-FW550 AUDIO OUT FRONT AUDIO OUT REAR B BUS AUDIO IN BUS CONTROL IN CDX-FW550 CDX-FW500 © 2004 Sony Corporation Printed in Korea 1 1 2 3 × 4 4 5 × 2 Equipment used in illustrations (not supplied) Equipo utilizado en las ilustraciones (no suministrado) Front speaker Altavoz frontal Power amplifier Amplificador de potencia Rear speaker Altavoz posterior CD/MD changer Cambiador de CD/MD Active subwoofer Altavoz...
Operating Instructions (primary manual)
Page 1
... el manual de instalación/conexiones suministrado. For installation and connections, see the supplied installation/connections manual. Record these numbers whenever you call upon your Sony dealer regarding this product. CDX-FW500 Serial No. Refer to these numbers in the space provided below. 3-261-847-21 (1) FM/AM Compact Disc Player Operating Instructions US Manual de instrucciones ES Owner's Record The model and serial numbers are located on the bottom of the unit.
... el manual de instalación/conexiones suministrado. For installation and connections, see the supplied installation/connections manual. Record these numbers whenever you call upon your Sony dealer regarding this product. CDX-FW500 Serial No. Refer to these numbers in the space provided below. 3-261-847-21 (1) FM/AM Compact Disc Player Operating Instructions US Manual de instrucciones ES Owner's Record The model and serial numbers are located on the bottom of the unit.

Operating Instructions (primary manual)
Page 2
... one or more with: • Optional CD/MD units (both changers and players)*1. • CD TEXT information (displayed when a CD TEXT disc*2 is played). • Supplied controller accessory Card remote commander RM-X115 • Optional controller accessory Rotary commander RM-X4S *1 This unit works with the instructions, may cause harmful interference to radio communications. Connect the equipment into an outlet on a circuit different from...
... one or more with: • Optional CD/MD units (both changers and players)*1. • CD TEXT information (displayed when a CD TEXT disc*2 is played). • Supplied controller accessory Card remote commander RM-X115 • Optional controller accessory Rotary commander RM-X4S *1 This unit works with the instructions, may cause harmful interference to radio communications. Connect the equipment into an outlet on a circuit different from...
Operating Instructions (primary manual)
Page 3
...-up 15 Other Functions Using the rotary commander 16 Adjusting the sound characteristics 17 Quickly attenuating the sound 17 Changing the sound and display settings 18 Setting the equalizer (EQ3 19 Setting the Dynamic Soundstage Organizer (DSO 20 Additional Information Maintenance 20 Removing the unit 21 Specifications 22 Troubleshooting 23 Error displays/Messages 24 3 Best Tuning Memory (BTM 14 Receiving the stored stations 14 Storing only the desired stations 15 Tuning in random order...
...-up 15 Other Functions Using the rotary commander 16 Adjusting the sound characteristics 17 Quickly attenuating the sound 17 Changing the sound and display settings 18 Setting the equalizer (EQ3 19 Setting the Dynamic Soundstage Organizer (DSO 20 Additional Information Maintenance 20 Removing the unit 21 Specifications 22 Troubleshooting 23 Error displays/Messages 24 3 Best Tuning Memory (BTM 14 Receiving the stored stations 14 Storing only the desired stations 15 Tuning in random order...
Operating Instructions (primary manual)
Page 4
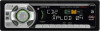
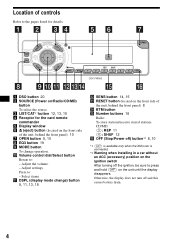
... front panel) 8 n BTM button o Number buttons 18 Radio: To store stations/receive stored stations. c LIST/CAT*1 button 12, 13, 15 d Receptor for details. Adjust the volume. - Select items. k DSPL (display mode change operation. Otherwise, the display does not turn off the ignition, be sure to : - j Volume control dial/Select button Rotate to the pages listed for the card remote commander e Display window f Z (eject) button (located on the ignition switch After turning off and this causes battery drain. 4 Location of controls Refer to : - Adjust settings.
... front panel) 8 n BTM button o Number buttons 18 Radio: To store stations/receive stored stations. c LIST/CAT*1 button 12, 13, 15 d Receptor for details. Adjust the volume. - Select items. k DSPL (display mode change operation. Otherwise, the display does not turn off the ignition, be sure to : - j Volume control dial/Select button Rotate to the pages listed for the card remote commander e Display window f Z (eject) button (located on the ignition switch After turning off and this causes battery drain. 4 Location of controls Refer to : - Adjust settings.

Operating Instructions (primary manual)
Page 5
...find a station manually/select a setting. SOURCE PRE-SET SEEK+ OFF + ATT VOL - a DSPL button b SOURCE button c SEEK (-/+) buttons d OFF button e VOL (+/-) buttons f MODE button g PRESET (DISC/ALBUM) (+/-) buttons h ATT button Note If the display disappears by pressing (OFF), it cannot be operated with the MP3 file control function is connected, and MP3 file is inserted to replace the battery, see "Replacing the lithium battery" on how to activate the unit first. continue to select downwards q DISC (ALBUM)/PRESET buttons (+/-) To receive preset stations/change the disc*1, skip...
...find a station manually/select a setting. SOURCE PRE-SET SEEK+ OFF + ATT VOL - a DSPL button b SOURCE button c SEEK (-/+) buttons d OFF button e VOL (+/-) buttons f MODE button g PRESET (DISC/ALBUM) (+/-) buttons h ATT button Note If the display disappears by pressing (OFF), it cannot be operated with the MP3 file control function is connected, and MP3 file is inserted to replace the battery, see "Replacing the lithium battery" on how to activate the unit first. continue to select downwards q DISC (ALBUM)/PRESET buttons (+/-) To receive preset stations/change the disc*1, skip...

Operating Instructions (primary manual)
Page 6
... card remote commander. (With optional unit) To Press Skip discs - Should this manual, please consult your attention from the road. Album selection and release To continuously skip albums, press (and hold ) either button. Selecting a disc and album with the MP3 file control function is connected, and MP3 file is operating. • While driving, do not use the CUSTOM FILE feature or any questions or problems...
... card remote commander. (With optional unit) To Press Skip discs - Should this manual, please consult your attention from the road. Album selection and release To continuously skip albums, press (and hold ) either button. Selecting a disc and album with the MP3 file control function is connected, and MP3 file is operating. • While driving, do not use the CUSTOM FILE feature or any questions or problems...
Operating Instructions (primary manual)
Page 10
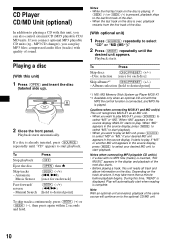
... sound. Note With an optional unit connected, playback of the disc. (With optional unit) 1 Press (SOURCE) repeatedly to the optional CD/MD unit. 10 Playback starts. To Press Skip discs (DISC/PRESET) (+/-) - Notes • While the first/last track on the disc is playing, if (SEEK) (-) or (SEEK) (+) is inserted, "NO MUSIC" appears in the source display, press (MODE) to select your desired MD unit appears in the source display...
... sound. Note With an optional unit connected, playback of the disc. (With optional unit) 1 Press (SOURCE) repeatedly to the optional CD/MD unit. 10 Playback starts. To Press Skip discs (DISC/PRESET) (+/-) - Notes • While the first/last track on the disc is playing, if (SEEK) (-) or (SEEK) (+) is inserted, "NO MUSIC" appears in the source display, press (MODE) to select your desired MD unit appears in the source display...

Operating Instructions (primary manual)
Page 11
... A.SCRL (Auto Scroll) function is set to "OFF" and the disc/album/track is changed, the disc/ album/track name or ID3 tag does not scroll. • When an MP3 file is played and the album is changed, the new album number is set to "ON," names exceeding 8 characters will be scrolled (page 18).) Source Displayable items • Disc number/Track number/Elapsed playing time • Disc name...
... A.SCRL (Auto Scroll) function is set to "OFF" and the disc/album/track is changed, the disc/ album/track name or ID3 tag does not scroll. • When an MP3 file is played and the album is changed, the new album number is set to "ON," names exceeding 8 characters will be scrolled (page 18).) Source Displayable items • Disc number/Track number/Elapsed playing time • Disc name...

Operating Instructions (primary manual)
Page 12
... the select button after locating the desired character. Tips • Simply overwrite or enter " " to play the tracks in the current optional CD (MD) changer in the display. y 0 y 1 y 2 ... * y + y - If you label a CD, you can label each disc with a CD unit that unit is connected along with a custom name (Disc Memo). y ... to label in the memory of the CD unit with the CUSTOM FILE function...
... the select button after locating the desired character. Tips • Simply overwrite or enter " " to play the tracks in the current optional CD (MD) changer in the display. y 0 y 1 y 2 ... * y + y - If you label a CD, you can label each disc with a CD unit that unit is connected along with a custom name (Disc Memo). y ... to label in the memory of the CD unit with the CUSTOM FILE function...

Operating Instructions (primary manual)
Page 14
... in stations while driving, use Best Tuning Memory to prevent accidents. To cancel the local seek mode, press (SENS) twice when receiving FM. Storing stations automatically - If preset tuning does not work - Local Seek Mode: If the automatic tuning stops too frequently, press (SENS) repeatedly until the desired station is indicated in the display, the unit starts storing stations from the one currently displayed. Best Tuning Memory (BTM) The unit selects the stations with...
... in stations while driving, use Best Tuning Memory to prevent accidents. To cancel the local seek mode, press (SENS) twice when receiving FM. Storing stations automatically - If preset tuning does not work - Local Seek Mode: If the automatic tuning stops too frequently, press (SENS) repeatedly until the desired station is indicated in the display, the unit starts storing stations from the one currently displayed. Best Tuning Memory (BTM) The unit selects the stations with...
Operating Instructions (primary manual)
Page 15
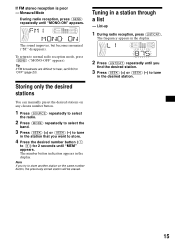
.... List-up 1 During radio reception, press (LIST/CAT). To return to store another station on any chosen number button. 1 Press (SOURCE) repeatedly to select the radio. 2 Press (MODE) repeatedly to select the band. 3 Press (SEEK) (+) or (SEEK) (-) to tune in the desired station. 15 Storing only the desired stations You can manually preset the desired stations on the same number button, the previously stored station will be erased.
.... List-up 1 During radio reception, press (LIST/CAT). To return to store another station on any chosen number button. 1 Press (SOURCE) repeatedly to select the radio. 2 Press (MODE) repeatedly to select the band. 3 Press (SEEK) (+) or (SEEK) (-) to tune in the desired station. 15 Storing only the desired stations You can manually preset the desired stations on the same number button, the previously stored station will be erased.
Operating Instructions (primary manual)
Page 17
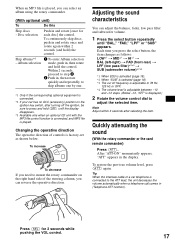
... Hz or OFF. *4 The volume level is adjustable between -10 and +10 steps. (Below -10, "ATT" is displayed.) 2 Rotate the volume control dial to the ATT lead, the unit decreases the volume automatically when a telephone call comes in (Telephone ATT function). Album selection mode, push in and rotate [once for 2 seconds while pushing the VOL control. 17 Changing the operative direction The operative direction of controls is factory-set as follows: LOW*1 t MID...
... Hz or OFF. *4 The volume level is adjustable between -10 and +10 steps. (Below -10, "ATT" is displayed.) 2 Rotate the volume control dial to the ATT lead, the unit decreases the volume automatically when a telephone call comes in (Telephone ATT function). Album selection mode, push in and rotate [once for 2 seconds while pushing the VOL control. 17 Changing the operative direction The operative direction of controls is factory-set as follows: LOW*1 t MID...

Operating Instructions (primary manual)
Page 20
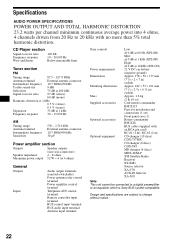
... power connection and replace the fuse. DSO mode and image of virtual speakers *3 *3 *2 *2 *1 *1 *4 *4 Additional Information Maintenance Fuse replacement When replacing the fuse, be clear. Setting the Dynamic Soundstage Organizer (DSO) If your speakers are installed into the lower part of the doors, the sound will come from the ignition switch. 20 • Never touch the connectors directly with your nearest Sony dealer. *1 DSO-1 *2 DSO-2 *3 DSO-3 *4 DSO-OFF 1 Press (SOURCE) to select a source (Radio...
... power connection and replace the fuse. DSO mode and image of virtual speakers *3 *3 *2 *2 *1 *1 *4 *4 Additional Information Maintenance Fuse replacement When replacing the fuse, be clear. Setting the Dynamic Soundstage Organizer (DSO) If your speakers are installed into the lower part of the doors, the sound will come from the ignition switch. 20 • Never touch the connectors directly with your nearest Sony dealer. *1 DSO-1 *2 DSO-2 *3 DSO-3 *4 DSO-OFF 1 Press (SOURCE) to select a source (Radio...
Operating Instructions (primary manual)
Page 22
... remote commander RM-X115 Parts for installation and connections (1 set) Front panel case (1) Rotary commander RM-X4S BUS cable (supplied with no more than 5% total harmonic distortion. Specifications AUDIO POWER SPECIFICATIONS POWER OUTPUT AND TOTAL HARMONIC DISTORTION 23.2 watts per channel minimum continuous average power into 4 ohms, 4 channels driven from 20 Hz to 20 kHz with an RCA pin cord) RC-61 (1 m), RC-62 (2 m) CD changer (10 discs) CDX-757MX CD changer (6 discs) CDX-T69...
... remote commander RM-X115 Parts for installation and connections (1 set) Front panel case (1) Rotary commander RM-X4S BUS cable (supplied with no more than 5% total harmonic distortion. Specifications AUDIO POWER SPECIFICATIONS POWER OUTPUT AND TOTAL HARMONIC DISTORTION 23.2 watts per channel minimum continuous average power into 4 ohms, 4 channels driven from 20 Hz to 20 kHz with an RCA pin cord) RC-61 (1 m), RC-62 (2 m) CD changer (10 discs) CDX-757MX CD changer (6 discs) CDX-T69...

Operating Instructions (primary manual)
Page 23
... adjust the volume. • Cancel the ATT function. • Set the fader control to the center position for a 2-speaker system. • You tried to play due to play back a CD-R/CD-RW not designed for audio use. • Some CD-Rs/CD-RWs may encounter with MP3. t Play back with the car's accessory power connector. Stored stations and correct time are not matched correctly with a Sony MP3 compatible CD unit...
... adjust the volume. • Cancel the ATT function. • Set the fader control to the center position for a 2-speaker system. • You tried to play due to play back a CD-R/CD-RW not designed for audio use. • Some CD-Rs/CD-RWs may encounter with MP3. t Play back with the car's accessory power connector. Stored stations and correct time are not matched correctly with a Sony MP3 compatible CD unit...

Operating Instructions (primary manual)
Page 24
.... The stations cannot be heard. t See the installation guide manual of a car's antenna booster (only when your nearest Sony dealer. t Set the DSO mode to check the connection. t Perform manual tuning. The unit is in the CD unit. t Cancel monaural reception mode (page 15). 24 Error displays/Messages Error displays (For this model to "OFF" (page 20). t Insert a music CD in the memory. • The broadcast signal is too weak. Radio reception Preset tuning is...
.... The stations cannot be heard. t See the installation guide manual of a car's antenna booster (only when your nearest Sony dealer. t Set the DSO mode to check the connection. t Perform manual tuning. The unit is in the CD unit. t Cancel monaural reception mode (page 15). 24 Error displays/Messages Error displays (For this model to "OFF" (page 20). t Insert a music CD in the memory. • The broadcast signal is too weak. Radio reception Preset tuning is...


