Primary User Manual
Page 2
...instructions, may be determined by one or more of the FCC Rules. WARNING To prevent fire or shock hazard, do not expose the unit to Part 15 of the following measures: - This symbol is very easy to come. DISPOSAL OF LITHIUM ION BATTERY. DISPOSE OF PROPERLY. Note: In ...only) For the Sony Factory Service Center nearest you can return your unwanted lithium ion batteries to radio or television reception, which the receiver is intended to alert the user to the presence of uninsulated "dangerous voltage" within the product's enclosure that may be producing home video that to which...
...instructions, may be determined by one or more of the FCC Rules. WARNING To prevent fire or shock hazard, do not expose the unit to Part 15 of the following measures: - This symbol is very easy to come. DISPOSAL OF LITHIUM ION BATTERY. DISPOSE OF PROPERLY. Note: In ...only) For the Sony Factory Service Center nearest you can return your unwanted lithium ion batteries to radio or television reception, which the receiver is intended to alert the user to the presence of uninsulated "dangerous voltage" within the product's enclosure that may be producing home video that to which...
Primary User Manual
Page 3
... camcorder abroad 53 Maintenance information and precautions 54 Specifications 58 Quick Reference Identifying the parts and controls ...... 59 Quick Function Guide 65 Index 66 Advanced Recording Operations Using the wide mode 25 Using the fader function 27 Using special effects ... power supply ..... 8 Installing the battery pack 8 Charging the battery pack 9 Connecting to a wall outlet 13 Step 2 Inserting a cassette 14 Recording - EDITSEARCH / Rec Review ..... 21 Playback - Basics Connections for playback 22 Playing back a tape 23 Editing Dubbing a tape 38 Customizing Your ...
... camcorder abroad 53 Maintenance information and precautions 54 Specifications 58 Quick Reference Identifying the parts and controls ...... 59 Quick Function Guide 65 Index 66 Advanced Recording Operations Using the wide mode 25 Using the fader function 27 Using special effects ... power supply ..... 8 Installing the battery pack 8 Charging the battery pack 9 Connecting to a wall outlet 13 Step 2 Inserting a cassette 14 Recording - EDITSEARCH / Rec Review ..... 21 Playback - Basics Connections for playback 22 Playing back a tape 23 Editing Dubbing a tape 38 Customizing Your ...
Primary User Manual
Page 10
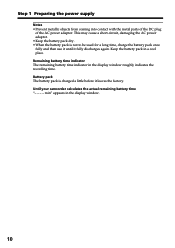
min" appears in the display window roughly indicates the recording time. Battery pack The battery pack is not to be used for a long time, charge the battery pack once fully and then use it until .... 10 Keep the battery pack in a cool place. Step 1 Preparing the power supply Notes •Prevent metallic objects from coming into contact with the metal parts of the DC plug of the AC power adaptor. Until your camcorder calculates the actual remaining battery time "- - - -
min" appears in the display window roughly indicates the recording time. Battery pack The battery pack is not to be used for a long time, charge the battery pack once fully and then use it until .... 10 Keep the battery pack in a cool place. Step 1 Preparing the power supply Notes •Prevent metallic objects from coming into contact with the metal parts of the DC plug of the AC power adaptor. Until your camcorder calculates the actual remaining battery time "- - - -
Primary User Manual
Page 58
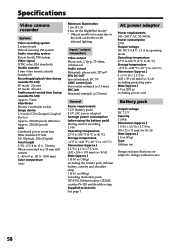
...Video camera recorder System Video recording system 2 rotary heads Helical scanning FM system Audio recording system Rotary heads, FM system Video signal NTSC color, EIA standards Usable cassette 8 mm video format cassette Standard 8 Recording/playback time (using cassette P6-120) SP mode: 2 hours LP mode: 4 hours Fastforward/rewind time (using the battery pack) During camera recording... Image device 1/6 inch CCD (Charged Coupled Device)... 2 1/2 in. (125 × 39 × 62 mm) (w/h/d) excluding projecting parts Mass (approx.) 9.8 oz (280 g) excluding power cord General Power requirements 7.2 V ...
...Video camera recorder System Video recording system 2 rotary heads Helical scanning FM system Audio recording system Rotary heads, FM system Video signal NTSC color, EIA standards Usable cassette 8 mm video format cassette Standard 8 Recording/playback time (using cassette P6-120) SP mode: 2 hours LP mode: 4 hours Fastforward/rewind time (using the battery pack) During camera recording... Image device 1/6 inch CCD (Charged Coupled Device)... 2 1/2 in. (125 × 39 × 62 mm) (w/h/d) excluding projecting parts Mass (approx.) 9.8 oz (280 g) excluding power cord General Power requirements 7.2 V ...

Primary User Manual
Page 59
When purchasing Sony video products, Sony recommends that this "GENUINE VIDEO ACCESSORIES" mark. Identifying the parts and controls Camcorder 1 2 3 1 POWER switch (p. 15) 2 FOCUS switch (p. 33) 3 NEAR/FAR dial (p. 33) 4 Eyecup 5 Viewfinder lens adjustment lever (p. 16) 6 Power zoom lever (p. 17) 4 5 6 7 8 9 q; Quick Reference - ...
When purchasing Sony video products, Sony recommends that this "GENUINE VIDEO ACCESSORIES" mark. Identifying the parts and controls Camcorder 1 2 3 1 POWER switch (p. 15) 2 FOCUS switch (p. 33) 3 NEAR/FAR dial (p. 33) 4 Eyecup 5 Viewfinder lens adjustment lever (p. 16) 6 Power zoom lever (p. 17) 4 5 6 7 8 9 q; Quick Reference - ...
Primary User Manual
Page 60
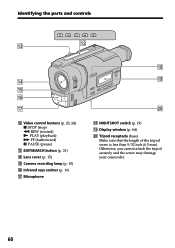
Otherwise, you cannot attach the tripod securely and the screw may damage your camcorder. 60 Tripod receptacle (base) Make sure that the length of the tripod screw is less than 9/32 inch (6.5 mm). Identifying the parts and controls qd qs qf qg qh qj qs Video control buttons (p. 23, 24) x STOP (stop) m REW (rewind) N PLAY (playback) M FF (fastforward) X PAUSE (pause) qd EDITSEARCH button (p. 21) qf Lens cover (p. 15) qg Camera recording lamp (p. 15) qh Infrared rays emitter (p. 19) qj Microphone qk ql w; qk NIGHTSHOT switch (p. 19) ql Display window (p. 64) w;
Otherwise, you cannot attach the tripod securely and the screw may damage your camcorder. 60 Tripod receptacle (base) Make sure that the length of the tripod screw is less than 9/32 inch (6.5 mm). Identifying the parts and controls qd qs qf qg qh qj qs Video control buttons (p. 23, 24) x STOP (stop) m REW (rewind) N PLAY (playback) M FF (fastforward) X PAUSE (pause) qd EDITSEARCH button (p. 21) qf Lens cover (p. 15) qg Camera recording lamp (p. 15) qh Infrared rays emitter (p. 19) qj Microphone qk ql w; qk NIGHTSHOT switch (p. 19) ql Display window (p. 64) w;

Primary User Manual
Page 61
Identifying the parts and controls wa wd ws wf wg wh wa FADER button (p. 28) ws BACK LIGHT button (p. 18) wd EXPOSURE button (p. 32) wf MENU button (p. 26, 39) wg SEL/PUSH EXEC dial (p. 39) wh Lithium battery compartment (p. 47) Attaching the shoulder strap Attach the shoulder strap supplied with your camcorder to the hooks for the shoulder strap. Quick Reference 61
Identifying the parts and controls wa wd ws wf wg wh wa FADER button (p. 28) ws BACK LIGHT button (p. 18) wd EXPOSURE button (p. 32) wf MENU button (p. 26, 39) wg SEL/PUSH EXEC dial (p. 39) wh Lithium battery compartment (p. 47) Attaching the shoulder strap Attach the shoulder strap supplied with your camcorder to the hooks for the shoulder strap. Quick Reference 61

Primary User Manual
Page 62
TIME button (p. 20) ea COUNTER RESET button (p. 15) es PICTURE EFFECT button (p. 29) 62 Identifying the parts and controls wj wk wl wj DATE button (p. 20) wk TITLE button (p. 34) wl PROGRAM AE button (p. 30) e; ea es e;
TIME button (p. 20) ea COUNTER RESET button (p. 15) es PICTURE EFFECT button (p. 29) 62 Identifying the parts and controls wj wk wl wj DATE button (p. 20) wk TITLE button (p. 34) wl PROGRAM AE button (p. 30) e; ea es e;
Primary User Manual
Page 63
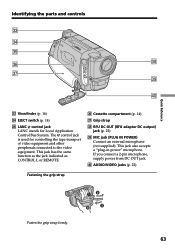
...Control Bus System. This jack also accepts a "plug-in-power" microphone. If you connect a 2-pin microphone, supply power from DC OUT jack. r; Identifying the parts and controls ed ef eg ek eh ej el r; This jack has the same function as the jack indicated as CONTROL L or REMOTE. eh Cassette... strap ek RFU DC OUT (RFU adaptor DC output) jack (p. 22) el MIC jack (PLUG IN POWER) Connect an external microphone (not supplied). AUDIO/VIDEO jacks (p. 22) Fastening the grip strap Quick Reference Fasten the grip strap firmly. 63 ed Viewfinder (p. 16) ef EJECT switch (p. 14) eg LANC control...
...Control Bus System. This jack also accepts a "plug-in-power" microphone. If you connect a 2-pin microphone, supply power from DC OUT jack. r; Identifying the parts and controls ed ef eg ek eh ej el r; This jack has the same function as the jack indicated as CONTROL L or REMOTE. eh Cassette... strap ek RFU DC OUT (RFU adaptor DC output) jack (p. 22) el MIC jack (PLUG IN POWER) Connect an external microphone (not supplied). AUDIO/VIDEO jacks (p. 22) Fastening the grip strap Quick Reference Fasten the grip strap firmly. 63 ed Viewfinder (p. 16) ef EJECT switch (p. 14) eg LANC control...

Primary User Manual
Page 64
... (p. 25) 6Picture effect indicator (p. 29) 7PROGRAM AE indicator (p. 30) 8Backlight indicator (p. 18) 9Manual focusing indicator (p. 33) q;STBY/REC indicator (p. 18)/ Video control mode indicator (p. 24) qaTape counter indicator (p. 18)/Selfdiagnosis display indicator (p. 51) qsRemaining tape indicator (p. 18) qdNIGHTSHOT indicator (p. 19) qfAUTO DATE indicator (p.... indicator (p. 18)/Self-diagnosis display indicator (p. 51)/Remaining battery time indicator (p. 9) qkFULL charge indicator (p. 9) 64 Identifying the parts and controls Operation indicators Viewfinder 1 Display window q;
... (p. 25) 6Picture effect indicator (p. 29) 7PROGRAM AE indicator (p. 30) 8Backlight indicator (p. 18) 9Manual focusing indicator (p. 33) q;STBY/REC indicator (p. 18)/ Video control mode indicator (p. 24) qaTape counter indicator (p. 18)/Selfdiagnosis display indicator (p. 51) qsRemaining tape indicator (p. 18) qdNIGHTSHOT indicator (p. 19) qfAUTO DATE indicator (p.... indicator (p. 18)/Self-diagnosis display indicator (p. 51)/Remaining battery time indicator (p. 9) qkFULL charge indicator (p. 9) 64 Identifying the parts and controls Operation indicators Viewfinder 1 Display window q;


