Operating Instructions
Page 1
Blu-ray Disc™ / DVD Player Operating Instructions 4-410-140-12(1) Getting Started Playback Internet Settings and Adjustments Additional Information BDP-S590/BX59
Blu-ray Disc™ / DVD Player Operating Instructions 4-410-140-12(1) Getting Started Playback Internet Settings and Adjustments Additional Information BDP-S590/BX59
Operating Instructions
Page 2
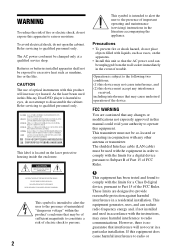
Refer servicing to qualified personnel only. CAUTION The use of optical instruments with the limits for a Class B digital device, pursuant to Part 15 of FCC Rules. Refer servicing to qualified personnel only. The shielded Interface cable (LAN cable) must accept any interference received, including interference that any other antenna or transmitter. b This equipment has been tested and found to comply with liquids, such as sunshine, fire or the like. If this product will not occur in conjunction with the instructions, may be unplugged from the wall socket immediately in ...
Refer servicing to qualified personnel only. CAUTION The use of optical instruments with the limits for a Class B digital device, pursuant to Part 15 of FCC Rules. Refer servicing to qualified personnel only. The shielded Interface cable (LAN cable) must accept any interference received, including interference that any other antenna or transmitter. b This equipment has been tested and found to comply with liquids, such as sunshine, fire or the like. If this product will not occur in conjunction with the instructions, may be unplugged from the wall socket immediately in ...
Operating Instructions
Page 3
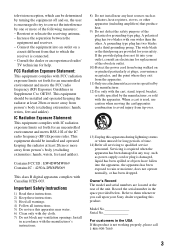
... the equipment and receiver. - A grounding type plug has two blades and a third grounding prong. Owner's Record The model and serial numbers are provided for your Sony dealer regarding this apparatus during lightning storms or when unused for help. Important Safety Instructions 1) Read these instructions. 2) Keep these instructions. 3) Heed all warnings. 4) Follow...
... the equipment and receiver. - A grounding type plug has two blades and a third grounding prong. Owner's Record The model and serial numbers are provided for your Sony dealer regarding this apparatus during lightning storms or when unused for help. Important Safety Instructions 1) Read these instructions. 2) Keep these instructions. 3) Heed all warnings. 4) Follow...
Operating Instructions
Page 4
Should this product is not working properly, please contact our Customer Information Service Center at 1-877-899-7669 or write to us at: Customer Information Service 115 Gordon Baker Road, Toronto, Ontario, M2H 3R6 Precautions This equipment has been tested and found to comply with adequate ventilation to prevent heat build-up the volume while listening to a section with a soft cloth. In this player in a confined space, such as a bookshelf or similar unit. • Do not place the player in a location near heat sources, or in a place subject to direct sunlight, excessive dust, or ...
Should this product is not working properly, please contact our Customer Information Service Center at 1-877-899-7669 or write to us at: Customer Information Service 115 Gordon Baker Road, Toronto, Ontario, M2H 3R6 Precautions This equipment has been tested and found to comply with adequate ventilation to prevent heat build-up the volume while listening to a section with a soft cloth. In this player in a confined space, such as a bookshelf or similar unit. • Do not place the player in a location near heat sources, or in a place subject to direct sunlight, excessive dust, or ...

Operating Instructions
Page 5
... frequency of necessary breaks will be displayed and playback or copying will vary from person to your television screen indefinitely. Consult your nearest Sony dealer. On watching 3D video images Some people may adopt or change its restriction rules after the time of time you should supervise ...televisions are susceptible to ensure they follow the recommendations listed above. The operation of this product and (ii) our website (http:// esupport.sony.com/) for an extended period of purchase. Do not twist or force the HDMI connector into the HDMI OUT jack. If you believe ...
... frequency of necessary breaks will be displayed and playback or copying will vary from person to your television screen indefinitely. Consult your nearest Sony dealer. On watching 3D video images Some people may adopt or change its restriction rules after the time of time you should supervise ...televisions are susceptible to ensure they follow the recommendations listed above. The operation of this product and (ii) our website (http:// esupport.sony.com/) for an extended period of purchase. Do not twist or force the HDMI connector into the HDMI OUT jack. If you believe ...
Operating Instructions
Page 6
...+R," "DVD-R," "DVD VIDEO," and "CD" logos are trademarks. • "x.v.Color" and "x.v.Color" logo are trademarks of Sony Corporation and Sony Computer Entertainment Inc. • This product incorporates High-Definition Multimedia Interface (HDMI®) technology. Revocation should not affect unprotected content ... Verance Corporation. More information about Cinavia by the U.S. To request additional information about Cinavia technology is a trademark of Sony Corporation. • MPEG Layer-3 audio coding technology and patents licensed from Fraunhofer IIS and Thomson. • This ...
...+R," "DVD-R," "DVD VIDEO," and "CD" logos are trademarks. • "x.v.Color" and "x.v.Color" logo are trademarks of Sony Corporation and Sony Computer Entertainment Inc. • This product incorporates High-Definition Multimedia Interface (HDMI®) technology. Revocation should not affect unprotected content ... Verance Corporation. More information about Cinavia by the U.S. To request additional information about Cinavia technology is a trademark of Sony Corporation. • MPEG Layer-3 audio coding technology and patents licensed from Fraunhofer IIS and Thomson. • This ...
Operating Instructions
Page 7
nonexhaustive list of the Digital Living Network Alliance. • Opera® Browser from Opera Software ASA. You agree not to assign, copy, transfer or transmit the Gracenote Software or any Gracenote Data to any and all ownership rights. Gracenote reserves all rights in Gracenote Data, the Gracenote Software, and the Gracenote Servers, including all use Gracenote Data only by Gracenote" logo are either registered trademarks or trademarks of Gracenote in the United States and/or other countries. • Wi-Fi®, Wi-Fi Protected Access® and Wi-Fi Alliance® are ...
nonexhaustive list of the Digital Living Network Alliance. • Opera® Browser from Opera Software ASA. You agree not to assign, copy, transfer or transmit the Gracenote Software or any Gracenote Data to any and all ownership rights. Gracenote reserves all rights in Gracenote Data, the Gracenote Software, and the Gracenote Servers, including all use Gracenote Data only by Gracenote" logo are either registered trademarks or trademarks of Gracenote in the United States and/or other countries. • Wi-Fi®, Wi-Fi Protected Access® and Wi-Fi Alliance® are ...
Operating Instructions
Page 8
GRACENOTE DISCLAIMS ALL WARRANTIES EXPRESS OR IMPLIED, INCLUDING, BUT NOT LIMITED TO, IMPLIED WARRANTIES OF MERCHANTABILITY, FITNESS FOR A PARTICULAR PURPOSE, TITLE, AND NON-INFRINGEMENT. IN NO CASE WILL GRACENOTE BE LIABLE FOR ANY CONSEQUENTIAL OR INCIDENTAL DAMAGES OR FOR ANY LOST PROFITS OR LOST REVENUES. © Gracenote, Inc. 2009 8 No warranty is to allow the Gracenote service to count queries without knowing anything about who you are. The purpose of a randomly assigned numeric identifier is made that the Gracenote Software or Gracenote Servers are licensed to you with new...
GRACENOTE DISCLAIMS ALL WARRANTIES EXPRESS OR IMPLIED, INCLUDING, BUT NOT LIMITED TO, IMPLIED WARRANTIES OF MERCHANTABILITY, FITNESS FOR A PARTICULAR PURPOSE, TITLE, AND NON-INFRINGEMENT. IN NO CASE WILL GRACENOTE BE LIABLE FOR ANY CONSEQUENTIAL OR INCIDENTAL DAMAGES OR FOR ANY LOST PROFITS OR LOST REVENUES. © Gracenote, Inc. 2009 8 No warranty is to allow the Gracenote service to count queries without knowing anything about who you are. The purpose of a randomly assigned numeric identifier is made that the Gracenote Software or Gracenote Servers are licensed to you with new...

Operating Instructions
Page 9
Table of Contents WARNING 2 Precautions 4 Getting Started Guide to Parts and Controls 10 Step 1: Supplied Accessories 14 Step 2: Connecting the Player 15 Step 3: Preparing for Network Connection 18 Step 4: Easy Setup 18 Playback Playing a Disc 20 Playing from a USB Device 21 Playing via a Network 22 Available Options 24 Internet Browsing Websites 26 Settings and Adjustments Using the Settings Displays 28 [Network Update 28 [Screen Settings 28 [Audio Settings 29 [BD/DVD Viewing Settings 30 [Parental Control Settings 31 [Music Settings 31 [System Settings 31 [Network Settings...
Table of Contents WARNING 2 Precautions 4 Getting Started Guide to Parts and Controls 10 Step 1: Supplied Accessories 14 Step 2: Connecting the Player 15 Step 3: Preparing for Network Connection 18 Step 4: Easy Setup 18 Playback Playing a Disc 20 Playing from a USB Device 21 Playing via a Network 22 Available Options 24 Internet Browsing Websites 26 Settings and Adjustments Using the Settings Displays 28 [Network Update 28 [Screen Settings 28 [Audio Settings 29 [BD/DVD Viewing Settings 30 [Parental Control Settings 31 [Music Settings 31 [System Settings 31 [Network Settings...
Operating Instructions
Page 10
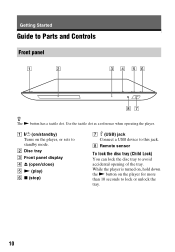
A [/1 (on/standby) Turns on the player for more than 10 seconds to lock or unlock the tray. 10 H Remote sensor To lock the disc tray (Child Lock) You can lock the disc tray to this jack. B Disc tray C Front panel display D Z (open/close) E N (play) F x (stop) G (USB) jack Connect a USB device to avoid accidental opening of the tray. While the player is turned on, hold down the N button on the player, or sets to Parts and Controls Front panel z The N button has a tactile dot. Use the tactile dot as a reference when operating the player. Getting Started Guide to standby mode....
A [/1 (on/standby) Turns on the player for more than 10 seconds to lock or unlock the tray. 10 H Remote sensor To lock the disc tray (Child Lock) You can lock the disc tray to this jack. B Disc tray C Front panel display D Z (open/close) E N (play) F x (stop) G (USB) jack Connect a USB device to avoid accidental opening of the tray. While the player is turned on, hold down the N button on the player, or sets to Parts and Controls Front panel z The N button has a tactile dot. Use the tactile dot as a reference when operating the player. Getting Started Guide to standby mode....

Operating Instructions
Page 12
The player automatically returns to standby mode. B Number buttons (0 - 9) Enters the title/chapter numbers, etc. Selects the sound track on the player or remote is not pressed for interactive functions. C Color buttons (YELLOW/ BLUE/RED/GREEN) Shortcut keys for more than 30 minutes, the player automatically returns to standby mode If any button on CDs. A Z OPEN/CLOSE Opens or closes the disc tray. -TV- DISPLAY (page 21) Displays the playback and web browsing information on the player, or sets to standby mode. [/1 (on/standby) Turns on the screen. Adjusts the TV volume. ...
The player automatically returns to standby mode. B Number buttons (0 - 9) Enters the title/chapter numbers, etc. Selects the sound track on the player or remote is not pressed for interactive functions. C Color buttons (YELLOW/ BLUE/RED/GREEN) Shortcut keys for more than 30 minutes, the player automatically returns to standby mode If any button on CDs. A Z OPEN/CLOSE Opens or closes the disc tray. -TV- DISPLAY (page 21) Displays the playback and web browsing information on the player, or sets to standby mode. [/1 (on/standby) Turns on the screen. Adjusts the TV volume. ...

Operating Instructions
Page 13
...; Fast reverse/fast forward the disc when you press HOME. x STOP Stops playback and remembers the stop point (resume point). SEN (page 22) Accesses the "Sony Entertainment Network™" online service. Displays the wall paper when pressed on the screen. OPTIONS (page 24) Displays the available options on the category icon...
...; Fast reverse/fast forward the disc when you press HOME. x STOP Stops playback and remembers the stop point (resume point). SEN (page 22) Accesses the "Sony Entertainment Network™" online service. Displays the wall paper when pressed on the screen. OPTIONS (page 24) Displays the available options on the category icon...
Operating Instructions
Page 14
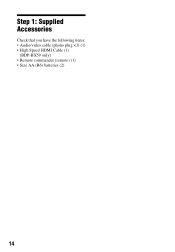
Step 1: Supplied Accessories Check that you have the following items: • Audio/video cable (phono plug ×3) (1) • High Speed HDMI Cable (1) (BDP-BX59 only) • Remote commander (remote) (1) • Size AA (R6) batteries (2) 14
Step 1: Supplied Accessories Check that you have the following items: • Audio/video cable (phono plug ×3) (1) • High Speed HDMI Cable (1) (BDP-BX59 only) • Remote commander (remote) (1) • Size AA (R6) batteries (2) 14
Operating Instructions
Page 15
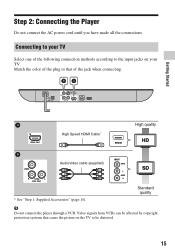
Match the color of the plug to that cause the picture on your TV Select one of the jack when connecting. Standard quality b Do not connect the player through a VCR. Video signals from VCRs can be affected by copyright protection systems that of the following connection methods according to the input jacks on the TV to your TV. Getting Started High Speed HDMI Cable* High quality Audio/video cable (supplied) * See "Step 1: Supplied Accessories" (page 14). Step 2: Connecting the Player Do not connect the AC power cord until you have made all the connections. Connecting ...
Match the color of the plug to that cause the picture on your TV Select one of the jack when connecting. Standard quality b Do not connect the player through a VCR. Video signals from VCRs can be affected by copyright protection systems that of the following connection methods according to the input jacks on the TV to your TV. Getting Started High Speed HDMI Cable* High quality Audio/video cable (supplied) * See "Step 1: Supplied Accessories" (page 14). Step 2: Connecting the Player Do not connect the AC power cord until you have made all the connections. Connecting ...
Operating Instructions
Page 16
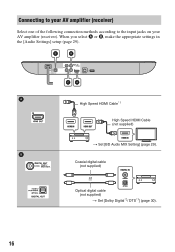
Coaxial digital cable (not supplied) or Optical digital cable (not supplied) t Set [Dolby Digital*2/ DTS*3] (page 30). 16 Connecting to your AV amplifier (receiver) Select one of the following connection methods according to the input jacks on your AV amplifier (receiver). When you select A or B, make the appropriate settings in the [Audio Settings] setup (page 29). High Speed HDMI Cable*1 High Speed HDMI Cable (not supplied) t Set [BD Audio MIX Setting] (page 29).
Coaxial digital cable (not supplied) or Optical digital cable (not supplied) t Set [Dolby Digital*2/ DTS*3] (page 30). 16 Connecting to your AV amplifier (receiver) Select one of the following connection methods according to the input jacks on your AV amplifier (receiver). When you select A or B, make the appropriate settings in the [Audio Settings] setup (page 29). High Speed HDMI Cable*1 High Speed HDMI Cable (not supplied) t Set [BD Audio MIX Setting] (page 29).
Operating Instructions
Page 17
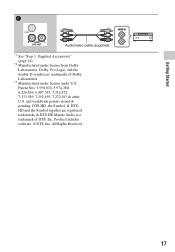
and worldwide patents issued & pending. Product includes software. © DTS, Inc. All Rights Reserved. 17 Dolby, Pro Logic, and the double-D symbol are registered trademarks & DTS-HD Master Audio is a trademark of Dolby Laboratories. *3 Manufactured under license under license from Dolby Laboratories. Patent Nos: 5,956,674; 5,974,380; 6,226,616; 6,487,535; 7,212,872; 7,333,929; 7,392,195; 7,272,567 & other U.S. DTS-HD, the Symbol, & DTSHD and the Symbol together are trademarks of DTS, Inc. Getting Started Audio/video cable (supplied) *1 See "Step 1: Supplied Accessories" (...
and worldwide patents issued & pending. Product includes software. © DTS, Inc. All Rights Reserved. 17 Dolby, Pro Logic, and the double-D symbol are registered trademarks & DTS-HD Master Audio is a trademark of Dolby Laboratories. *3 Manufactured under license under license from Dolby Laboratories. Patent Nos: 5,956,674; 5,974,380; 6,226,616; 6,487,535; 7,212,872; 7,333,929; 7,392,195; 7,272,567 & other U.S. DTS-HD, the Symbol, & DTSHD and the Symbol together are trademarks of DTS, Inc. Getting Started Audio/video cable (supplied) *1 See "Step 1: Supplied Accessories" (...
Operating Instructions
Page 18
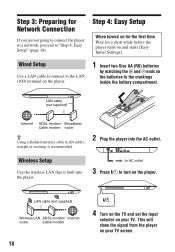
LAN cable (not supplied) Internet ADSL modem/ Broadband Cable modem router z Using a shielded interface cable (LAN cable), straight or crossing, is built into the AC outlet. to AC outlet 3 Press [/1 to "Step 4: Easy Setup" (page 18). Wireless Setup Use the wireless LAN that is recommended. 2 Plug the player into the player. Step 3: Preparing for a short while before the player turns on the batteries to the markings inside the battery compartment. This will show the signal from the player on your TV screen. LAN cable (not supplied) Wireless LAN ADSL modem/ Internet ...
LAN cable (not supplied) Internet ADSL modem/ Broadband Cable modem router z Using a shielded interface cable (LAN cable), straight or crossing, is built into the AC outlet. to AC outlet 3 Press [/1 to "Step 4: Easy Setup" (page 18). Wireless Setup Use the wireless LAN that is recommended. 2 Plug the player into the player. Step 3: Preparing for a short while before the player turns on the batteries to the markings inside the battery compartment. This will show the signal from the player on your TV screen. LAN cable (not supplied) Wireless LAN ADSL modem/ Internet ...
Operating Instructions
Page 19
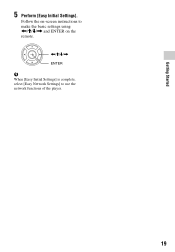
Getting Started 5 Perform [Easy Initial Settings]. Follow the on-screen instructions to make the basic settings using
Getting Started 5 Perform [Easy Initial Settings]. Follow the on-screen instructions to make the basic settings using
Operating Instructions
Page 20
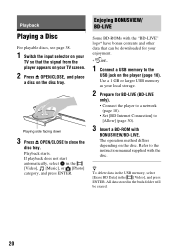
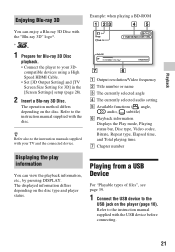
The operation method differs depending on the player (page 10). Use a 1 GB or larger USB memory as your local storage. 2 Prepare for your TV screen. 2 Press Z OPEN/CLOSE, and place a disc on the disc tray. Playback Playing a Disc For playable discs, see page 38. 1 Switch the input selector on your TV so that can be erased. 20 Playback starts. z To delete data in the USB memory, select [Erase BD Data] in the [Video], [Music], or [Photo] category, and press ENTER. Refer to [Allow] (page 30). 3 Insert a BD-ROM with the "BD-LIVE" logo* have bonus contents and other data ...
The operation method differs depending on the player (page 10). Use a 1 GB or larger USB memory as your local storage. 2 Prepare for your TV screen. 2 Press Z OPEN/CLOSE, and place a disc on the disc tray. Playback Playing a Disc For playable discs, see page 38. 1 Switch the input selector on your TV so that can be erased. 20 Playback starts. z To delete data in the USB memory, select [Erase BD Data] in the [Video], [Music], or [Photo] category, and press ENTER. Refer to [Allow] (page 30). 3 Insert a BD-ROM with the "BD-LIVE" logo* have bonus contents and other data ...
Operating Instructions
Page 21
The operation method differs depending on the disc type and player status. compatible devices using a High Speed HDMI Cable. • Set [3D Output Setting] and [TV Screen Size Setting for Blu-ray 3D Disc playback. • Connect the player to the instruction manual supplied with the USB device before connecting. 21 A Output resolution/Video frequency B Title number or name C The currently selected angle D The currently selected audio setting E Available functions ( angle, audio, subtitle) F Playback information Displays the Play mode, Playing status bar, Disc type, Video codec, ...
The operation method differs depending on the disc type and player status. compatible devices using a High Speed HDMI Cable. • Set [3D Output Setting] and [TV Screen Size Setting for Blu-ray 3D Disc playback. • Connect the player to the instruction manual supplied with the USB device before connecting. 21 A Output resolution/Video frequency B Title number or name C The currently selected angle D The currently selected audio setting E Available functions ( angle, audio, subtitle) F Playback information Displays the Play mode, Playing status bar, Disc type, Video codec, ...
